
Creating Out-of-focus Backgrounds using Lightroom
Post-processing hacks #1
By johnhilvert in Articles and Tips on Jun 15, 2016
Don’t you love photos where your subject is so sharp, prominent and standing out from a blurry background?
 This photo of an old Pentax camera forces you to check out its 50mm F1.7 lens while blurring the camera body and beyond.
When light is less than optimal, your camera will expose for the larger apertures and depth of field becomes shallow especially with close-ups. Note how the out-of-focus features seem to exude less saturation also contrasting against the more fleshed-out warmer tones of the book and lens barrel.
Had this been taken with an electronic flash, the chances are everything would be in focus. Yet the overall image may loses its character and depth as the aperture closes to F11 or smaller. It would make a great “record shot”. It may be fine for presenting in a court of a scene of documentary interest to investigators. But its impact would rate a “meh” as it loses its art or feeling of depth and interest.
Yet there are several digital post-processing hacks that can assist.
This guide shows you one way of fudging out of focus backgrounds. It is helpful where your main subject is interesting but competes with a sharp and distracting background that cannot be cropped out.
The first and most effective way is using a layer-style image editing program like Photoshop or GIMP using their versatile Blur tools.
Yet there are even easier hacks available in Adobe Lightroom. These rely on built-in masking tools and the flexible adjustment brush. The downside with this hack: if it's not done in a methodical way, it can look fake. The example I've worked with highlights the technique as much as the result.

Taken with my Panasonic LX-7 with flash. Can we do better?
The first step is work with RAW files to ensure you have flexible light and saturation values at the outset. You may wish to save the original JPG in case you wish to review your processing later. This first photo displays the RAW image cropped tightly. But the background still exudes distracting details as well.
Your first step is to ensure the overall image has been optimised for light values. In this case I reduced highlights while strengthening overall sharpness.
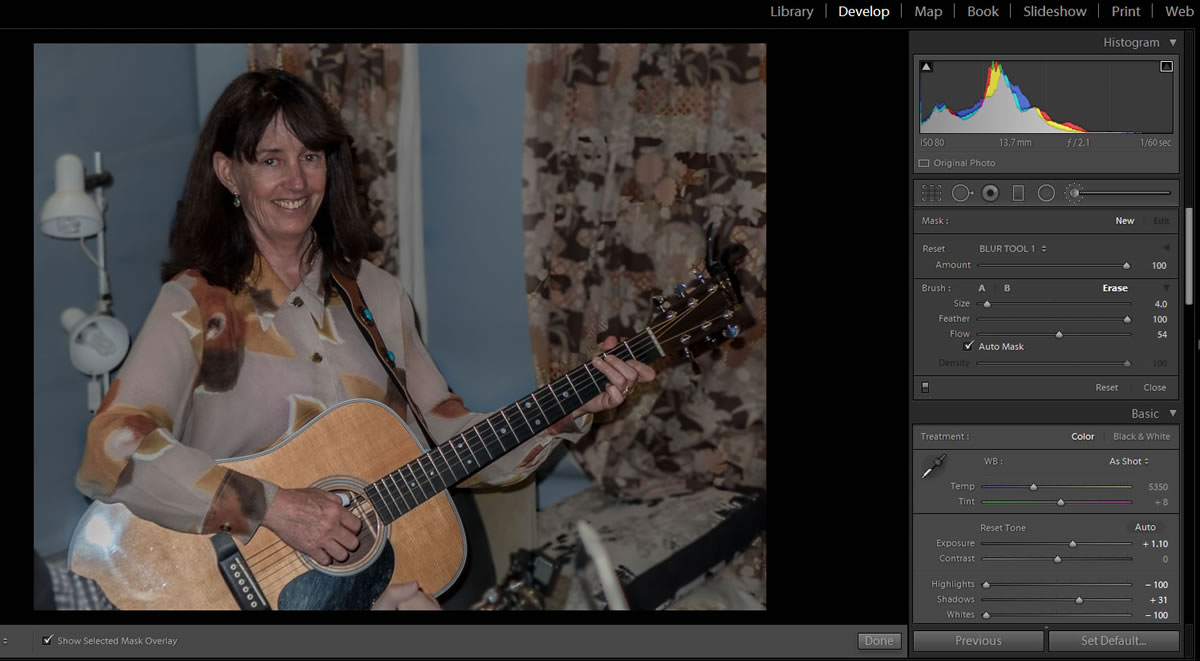
Your next step is to use the adjustment brush, turning on the mask overlay (or press O) and brush out the area that you want to de-emphasise with blurring and de-saturating.

The adjustment brush is your friend
The brush is set to reduce highlights, clarity, and sharpness to the minimum (-100%) and saturation is reduced by about 50%.
As Lightroom does not have a so-called blur tool by default, I’ve also saved the preset as “BLUR TOOL 1” so I can use it again. This results, ensuring that colors are stronger with the main subject but softens the focus and color behind.
 Adjustment brush result. It is also saved as a new preset
As I have saved this adjust brush filter, I can now use it again on top of the existing result. However we need to do it progressively, aiming to make more blurry those parts of the image that are further from the subject as well.
 Duplicating blurry brush over backgrounds further behind subject
In practice, I re-used the brush mainly over the top third of the image behind the subject. Also I varied the saturation back to the default so that we avoid a patchy faded look on progressive use of the preset brush.

This resulted in the final effort, with slight boost to highlights -- for now.

This could do with more touch-ups but offers a glimpse of the merits of this hack
If necessary I could have repeated this again making the background even more blurry and introducing some vignetting to spotlight the subject as well.
Before and After
Seeing the two photos side-by-side allows you to get a better glipse of the improvement:


It’s a useful technique for making less busy and stronger shots that have promise but are marred with irrelevant background details.
While I used Lightroom for this example, any post-processing software with masking capabilities should be able to carry it out a similar technique (with varying levels of difficulty). Dedicated software such as Topaz Lens Effects also offers one-click filters for blur effects, though fine adjustments with masking are often more effective.
Stay tuned for more post-processing hacks in a future part of this series!
More from the Pentax Forums Homepage
- March "Flowers up Close" Contest...
- HD FA 50mm F1.4 vs. SMC 50mm F1.4 Classic Review
- Announcing Our April, 2024 Photo Contest
- Introducing Pentaxify AI by PentaxForums.com
- The Making of "Autumn Draws"
- Ricoh launches the RICOH GR III HDF and RICOH...
- Join Ricoh for the April 6 GR Photo Walk in Las...
- The Making of "Gotcha!"

Tags
blur tools, bokeh, brush, de-focus, depth of field, focus, gimp, lightroom, photoshop
 John Hilvert has been a Pentax user since the early 60s (Asahi Pentax H2). He has processed his own black and white films and printed in his darkroom since he was 16 years old. His first digital...
Comments