
Smooth Trans Focus: The Ultimate Guide
Testing the Sony 135mm STF, and mimicing the effect on film and digital
By K David in Articles and Tips on Apr 14, 2016
You've probably heard the term "Bokeh", but have you ever heard of "Smooth Trans Focus"? Through one of our most comprehensive investigations, we describe what Smooth Trans Focus is, test a lens that delivers this effect, and most interestingly, show how this effect can be simulated without a dedicated lens.

Sony 135mm Smooth Trans Focus Lens
Two SLR lenses engineered specifically to be Smooth Trans Focus (STF) offerings currently exist on the market: the Sony (nee Minolta) 135mm f/2.8 [T/4.5] STF and the Laowa 105mm f/2 [T/3.2] STF. For this article, we tested the Sony lens on film. The Laowa has very recently been launched in the Pentax K-mount for those interested in the STF effect.
This article examines what makes an STF lens special and includes several sample photos and technical examples. We'll also look at how to capture and post-process digital files to simulate an STF lens. The Minolta Maxxum 7 film SLR shows that it's possible to simulate STF lens effects with a non-STF lens on a film frame, though no technical details were provided on how it's done. Through extensive testing, we found an approach that simulates STF images on film and detail how to achieve the result.
What is a Smooth Trans Focus Lens?
Put simply, Smooth Trans Focus (STF) refers to exceptionally pleasing background blur thanks to smoother bokeh than a normal lens would produce.
 K David | Sony 135mm STF, Minolta Alpha 9, Fuji Natura 1600
STF lenses include an apodization element in their optical formulas which creates the STF effect. In technical terms, the apodization element (a gray-tinted, deeply concave element in the Sony lens) acts as a radial gradient filter that introduces perimeter shadowing in the circles of confusion. This causes gradual dimming around the edges of the circles of confusion, and allows the many circles of confusion in out of focus areas to feather together smoothly.
 Sony 135mm f/2.8 [T/4.5] Smooth Trans Focus Lens
What we're really talking about with the STF effect is the bokeh the lens produces. "Bokeh" is a term you've probably heard misused far more than you've heard it used correctly. Bokeh is incorrectly called the out-of-focus area of an image. Correctly, bokeh is the characteristic shape of the circles of confusion within the out-of-focus area. Bokeh arises from mainly from the shape of the aperture, and also from other lens characteristics. Many older lenses tend to have hexagonal or octagonal bokeh, while many newer lenses with rounded aperture blades more closely approximate the same of a circle.
To appreciate why the STF effect is unique among camera lenses, it helps to understand how a conventional camera lens works. Light bounding from a subject travels from the subject through the air and into the lens. Imagine that a subject is comprised of infinitely small mosaic tiles (points). Each mosaic represents a point and light bouncing off of that point from the real-world subject will scatter in a sphere until it reaches an obstruction. Thus, light from each point travels through the entire lens surface and all its optical elements. The (not to scale) animation below demonstrates this process.
 Figure 1: Light Enters a Lens and the Lens' Characteristics Create the Bokeh
A conventional lens focuses those points in circles (because lens glass is round) on the film plane or digital sensor. Figures 1 and Figure 2 (below) demonstrate how traditional and STF lenses, respectively, handle in-focus and out-of-focus light.
Circles of confusion exist because an out of focus area is only seen as such due to the fact that some light is focused on a different plane. That's why focusing a lens works: as you move the lens away from or toward the film plane, you're moving the plane of in-focus points, not the lens's actual focal point (all light passing through a lens is in focus somewhere on some plane parallel to the film or image sensor). Imagine it this way: a single in-focus point travels from the rear lens element to its focal plane as a cone. As you focus the lens you're moving the cone through the sensor until the light in that cone is focused.
Because an out-of-focus area is focused on a different plane, the circular point it will create is a different size on the image plane. The overlapping of countless unfocused points of light creates the appearance of an out-of-focus area. So conventional lenses don't make an area blurry, they make an area's point circles larger so that they overlap, creating an out-of-focus area.
Both types of lenses, conventional and STF, perform in the same manner with an in-focus point: they put it in focus on the image plane. Where an STF lens shines, however, is in the out-of-focus area. Figure 2 demonstrates the difference between out-of-focus points for a conventional and STF lens.
 Figure 2: STF Lenses Feather Out-of-focus Points, Creating a Pleasing Blurry Area
The STF lens causes a gentler overlap between adjacent circles of confusion. This creates a pleasing out-of-focus characteristic while preserving the sharpness of the in-focus area. Let's see what that means in practical application. Here are two samples of the same image, one taken at f/2.8 [T/4.5] and the other at f/6.3 [T/6.7] with the manual iris. The Sony STF's manual iris is perfectly round at both wide open (of course) and f/6.3, which is as far as it stops down (the automatic iris stops down to f/32.)
 f/2.8 [T/4.5]
 f/6.3 [T/6.7]
Note in both images you can see out-of-focus points that are round and feather outward, instead of being perfect circles, ninja-stars, hexagons, or other distinct, hard-lined shapes. In the second sample image, this appears to create a hectic out of focus space, but it actually results from the nature of the background and not the lens. In practical use, the out-of-focus space when using the manual aperture is stunning and smooth.
Focus Sharpness
STF lenses are not soft-focus lenses and the Sony 135mm f/2.8 (T/4.5) STF lens that we tested for this article is nearly or equally as sharp as the Pentax-FA 77mm FA F1.8. The Sony lens also presents an impressive modulation transfer function (MTF) chart, presented as Figure 3.

Figure 3: Sony STF MTF Chart
Figure 4, developed by Pentax Forums, of the Sony 135mm f/2.8 T/4.5 STF lens. This shows how the Sony STF lens was engineered as an STF lens.
 Figure 4: Sony STF Lens Formula
Shaded in gray, the apodizing element has a similar effect to a radial neutral density filter. However, because it's part of the optical formula instead of being a front- or mid-lens-mounted filter, it affects the light pathway differently than a filter would. Having it built into the formula arguably helps with lens performance whereas a filter can impair performance. The apodizing element can influence circle of confusion quality while also helping to focus light, cancel image aberrations, or perform another function of a lens element. This apodizing element causes the out-of-focus dots to feather on their perimeters. This effect, due to the element's concave shape, changes and is diminished as the lens stops down (and thinner areas of the apodizing element are used for image focusing).
Placing this element behind the apertures demonstrates how the apertures and this element work in concert to create the STF effect. The manual aperture, which only stops down to (a circular) f/6.3 [T/6.7], maximizes the STF effect. The automatic aperture stops down well beyond the maximum STF benefit and reaches a minimum opening of f/32 (T/35-ish).
For this article we specifically selected the Sony STF lens to test. The Sony lens was engineered to be an STF lens. Fuji makes an apodizing version of its 56mm f/1.2 lens, but that lens, based on our research, simply incorporates a radial gradient filter inside the lens. Because the Fuji lens was not engineered as an STF lens, and because the image samples available online for the Fuji APD lens do not show significant differences from the standard Fuji 56mm f/1.2, we elected to use the Sony lens.
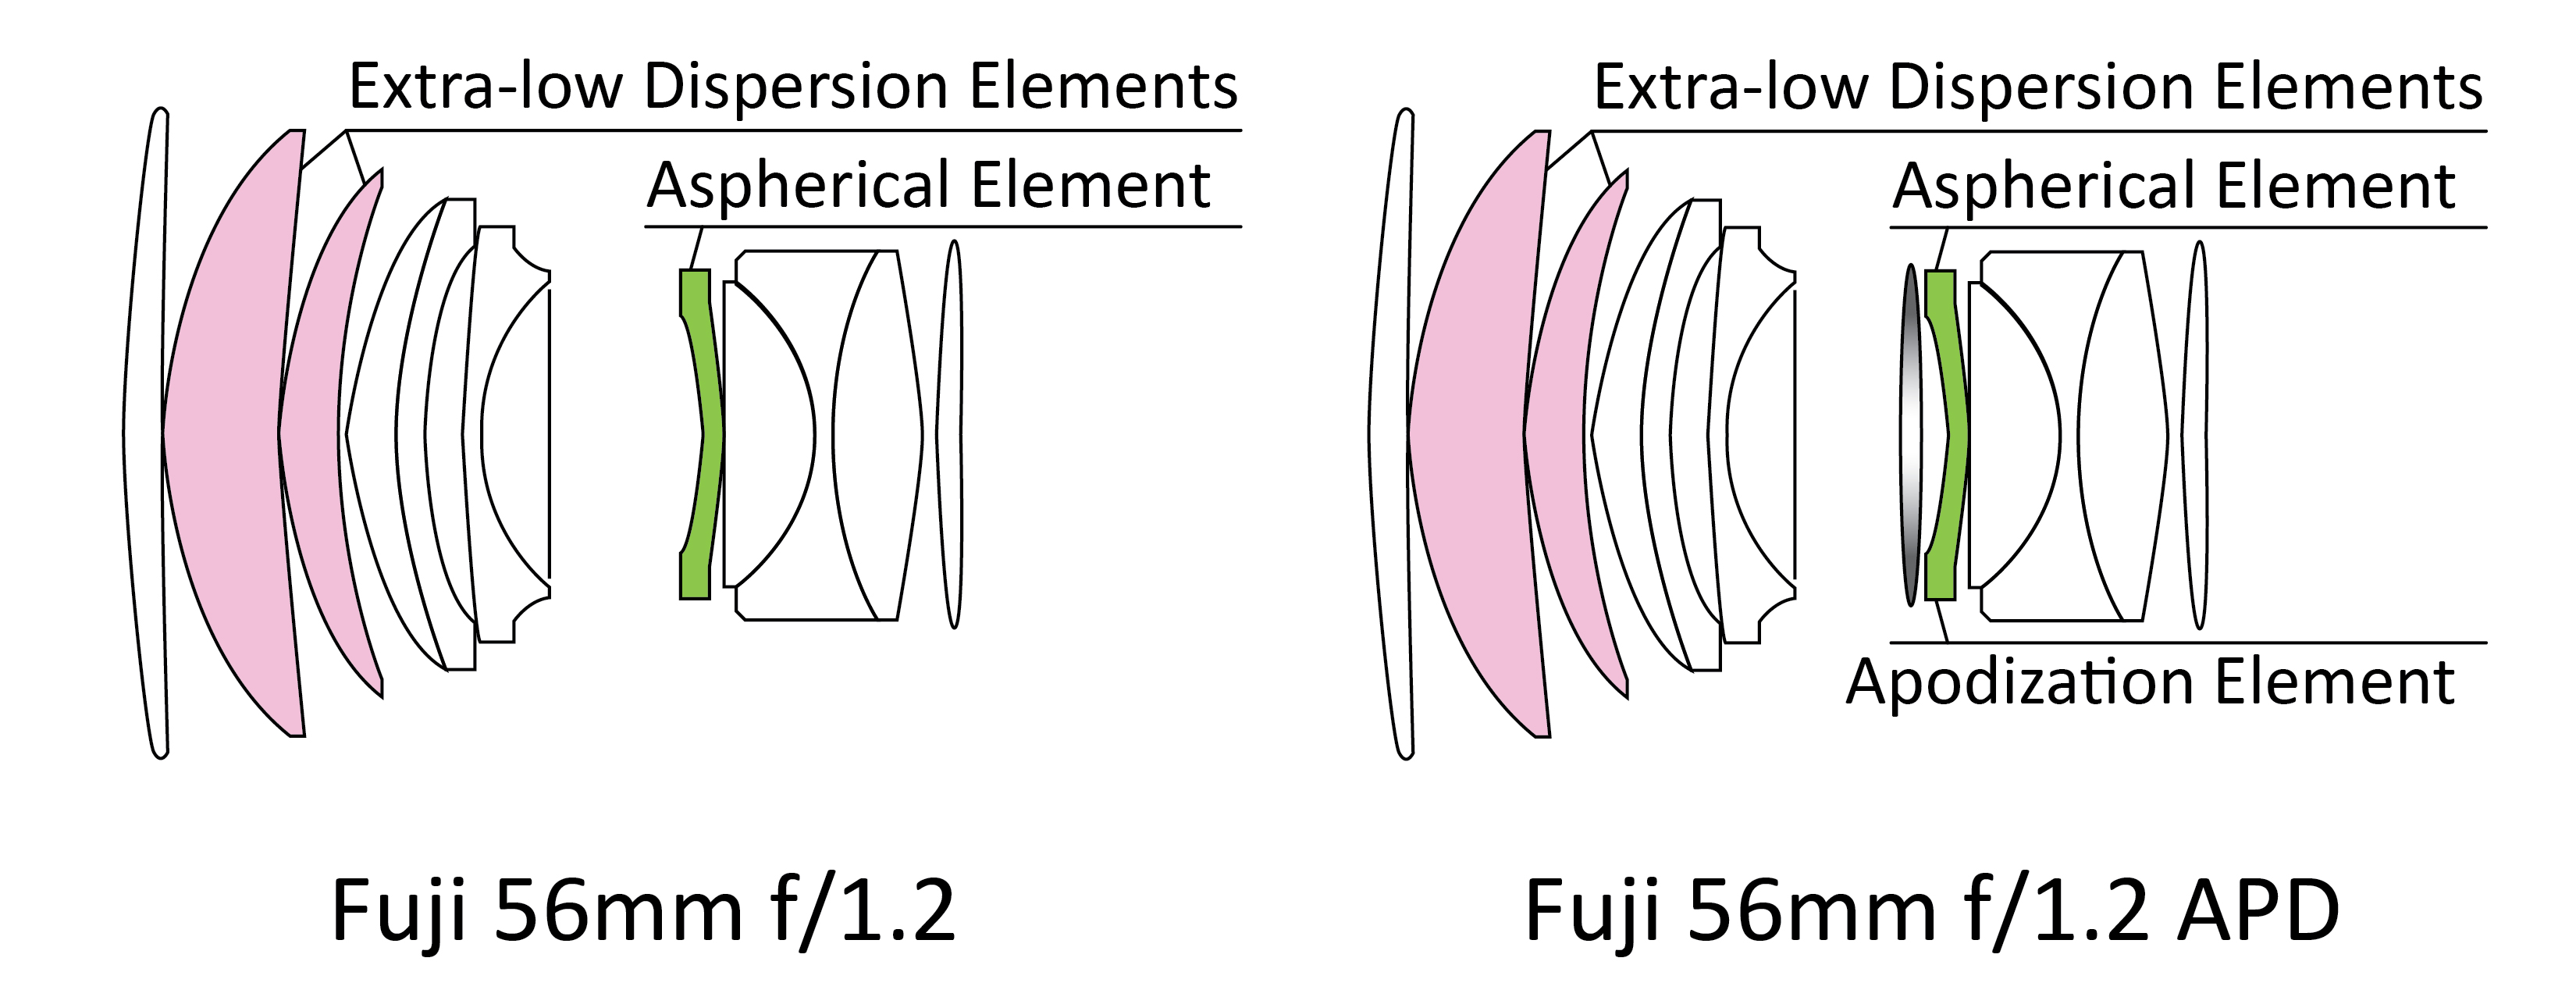 Figure 6: Comparison of the Fuji 56mm f/1.2 and 56mm f/1.2 APD
Laowa announced their STF lens during this article's development. We understand from the Laowa lens diagram that is works akin to the Sony STF in the way the apodization element is used. The Laowa uses a biconcave apodization element instead of a planoconcave apodization element. Also, the Laowa apodization element is thinner at its periphery (as a ratio of core:edge thickness) than the Sony STF. Both of these aspects of the lens indicate that the lens's STF effect may not be as dramatic as that exhibited by the Sony lens.
Another unique aspect to the Sony STF is its double apertures. The lens contains a manually operated aperture that rests in front of a camera-controlled automatic aperture. The manual aperture opens and closes when the manual aperture control ring is turned, even if the camera is in program or aperture-priority mode. The manual setting overrides the automatic aperture. However, if you have a long shutter speed and use the automatic aperture, if you close the manual aperture the automatic aperture will remain closed to the pre-set size. This has little-to-no potential for creative imagery.
 Sony 135mm STF Apertures
What Makes the Sony STF Images Unique?
The details in the previous section describe what makes this lens unique, but in a very sterile manner. What truly makes this lens's images unique is how it renders images. Notice in this image that the in-focus area retains exceptional sharpness and detail and that the transition to out-of-focus areas is smooth. The out-of-focus areas themselves exhibit no odd highlight shapes or distracting qualities.
 Valve Cap Chain | K David | Sony 135mm STF, Minolta Alpha 9, Fuji Natura 1600
What Subjects suit an STF Lens the Best?
The current STF offering falls within the traditional 'portrait' range. This ought to indicate the intended subject for STF lenses: people; specifically portraits. That said, portraits are just one of the uses of an STF lens. Macro imagery is another field that would benefit greatly from STF lens use. Photographers who want to isolate subjects— achieve that "three-dimensional" look— will also find that an STF lens adds a nice quality to those images.
For this article, we were able to obtain portraits and subject-isolation shots. We had no macro tubes or bellows with which to test the STF lens's macro capabilities. We did evaluate some macro samples found on other Internet imaging sites and found the results to be excellent. Because our lens tester does not own a Sony DSLR, all images were taken on a Minolta Alpha 9 with various films. This has the added advantage of showing the entire image circle. None of the images shared in this article are cropped.
 Peter (Portrait) | K David | Sony 135mm STF, Minolta Alpha 9, Fuji Natura 1600
 Exit (Subject Isolation) | K David | Sony 135mm STF, Minolta Alpha 9, Fuji Natura 1600
What Subjects do not Benefit from an STF Lens?
Some subjects do not benefit from an STF lens. Sports photography, where maximum light transmission is needed to allow fast shutter speeds that freeze action, will suffer from the STF lens's light loss (due to the apodization element). To this end, none of our action shots were suitable for sharing.
In addition, anything shot infinity focus with STF lenses will exhibit no benefit. STF lenses provide a pleasing transition between in- and out-of-focus portions of an image. Images which lack this transition, such as a landscape snapshot, show no benefit from the STF characteristic.
 BART (Infinity Focus) | K David | Sony 135mm STF, Minolta Alpha 9, Fuji Natura 1600
Flat-field images where the subject and surroundings are on the same plane also do not benefit from the transition that occurs between in- and out-of-focus areas with an STF lens.
 Watcher (Flat-field Subject) | K David | Sony 135mm STF, Minolta Alpha 9, Fuji Natura 1600
"Crazy bokeh" shots are not achievable with an STF lens. Because the STF lens is engineered to deliver near-perfect out of focus areas, distinctive bokeh that arises from lens coma, distortion, aperture shape, and other lens flaws is not a look that can be achieved with an STF lens.
 Crazy Bokeh Shot | K David | Sony 135mm STF, Minolta Alpha 9, Fuji Natura 1600
Simulating an STF Lens Digitally
The goal with simulating an STF image is to create out of focus circles of confusion that have feathered edges, obviously without using an STF lens. The process is easy but it's easy to make the out of focus area look unnaturally feathered.
Editor's Note: In a perfect world, a camera could perform this task by physically stopping down or opening up the aperture during the exposure. This would feather the out of focus areas to simulate an STF look without requiring multiple exposure. However, no camera (film or digital) offers STF simulation in this manner.
Simulating an STF lens with digital files is a straightforward process. We'll do this in Photoshop and the process takes only a few minutes. For photographers who use software other than Photoshop, this process can be simulated easily in your preferred editor. The first step is to take seven shots of the same subject without changing the focus point or camera alignment. Fewer than five images will not deliver suitably natural-looking blending and we suggest seven as it provides the greatest flexibility to blend layers. Also, seven seems to be a magic STF simulation number originating with the Minolta Alpha 7's STF simulation mode.
 Sample Image, f/5.6 | Pentax K-3 II, 31mm FA Limited | K David
Pre-compose the image, find your focus, and then take your sequence. Each image should be properly exposed. The seven-image series should be shot in third-stop increments from the widest-possible aperture.
After your capture, load the images into Photoshop and stack them using layers with the widest-aperture image on the bottom. The images should be stacked in order of ascending aperture value with the smallest-aperture image on top. Set the transparency on each image except the bottom to 100/X where X is the number of images in the stack. This gives you a starting transparency for the non-background images. For instance, with a seven-image sequence, you'll be changing the transparency on six images: 100/7=14.28%. Set the transparency to 14% on all but the background image and see how it looks. Anywhere from 10% to 18% can work with seven images. One tip with this technique is to keep the blended layers the same transparency. This avoids biasing the blended layers to any one aperture (which would result in jarring bokeh shapes).
For the sample STF image, I took a series from f/1.8 to f/3.5 with the Pentax-FA 31mm F1.8 Limited. Note in the image the different characteristics in the out of focus areas. To switch between the sample shot at f/5.6 and the STF simulation, click on either image and switch between them in the fancybox.
 STF Simulation, f/1.8-3.5 | Pentax K-3 II, 31mm FA Limited | K David
Want to give this a shot on your own? You can download the full-size jpegs (unedited and straight from the camera) via this link: STF Simulation Source Files, .ZIP
Simulating an STF Lens Image with Film
Simulating an STF image on film is a significantly different proposition, as it requires the image be finished with a single negative. In other words, the camera must support multiple exposures. This cannot be done by every camera. For older cameras which lack an aperture-priority setting, the lens needs seven aperture settings with half-stop detentes. We found that on film, half-stop increments work better than third-stop increments. We don't know why.
Film requires that the process be a seven-image process because of the exposure bias built into the compensation process and film reciprocity failure due to significant image underexposure for each shot. We found that out-of-focus shapes that look like onion rings occurred with samples taken at stop increments greater than 1/2 stop.
We also found that seven shots seems to be the magic number of shots in the STF simulation sequence. We used seven as our starting point because the only information we could find about the Minolta Alpha 7's STF simulation mode was that it used a seven-shot sequence.
From that single data point we constructed four shutter speed compensation scenarios and four aperture compensation scenarios, resulting in 16 potential shutter and aperture combinations that could be used to deliver STF simulated images. The one successful combination we discovered is detailed below.
To calculate the STF simulation exposure series, you'll need to determine the proper exposure. A good starting point is with the lens you're using stopped down one full stop. For instance, if you're using one of Pentax's 50mm f/1.4 lenses, take your meter reading from f/2 or f/4 (much slower and the results will have jarring out-of-focus areas, as shown in the sample images below). This will be important because your metered reading needs to be two stops faster than your actual shutter speed during the capture and one stop faster than your initial aperture setting.
For the demonstration, let's assume that your light meter reading is 1/125s at f/2. This determines what your seven-exposure series will be. You'll need to begin by opening up to f/1.4 (an STF simulation should always begin with the lens wide open). Your seven exposures will be shot at f/1.4, 1.7, 2.0, 2.5, 2.8, 3.5. and 4.0. Your exposure begins with a shutter speed two stops slower than required, 1/500th in this scenario. Here's the trick to remember the pattern: Your shutter compensation is two stops slower; your aperture begins two half-stops faster. So:
Shutter compensation: -2 stops (for all seven shots)
Aperture sequence: EV +1 stop, +0.5, EV, -0.5, -1, -1.5, -2
If you kept track of the sequence, you'll notice that this overexposes images by about a half stop. That's an overexposure well within the tolerance of modern films and the overexposure compensates for how much the film is underexposed during the sequence. We found successful STF simulated images to have the same negative density as our control images.
Not all cameras are well suited for this. In fact, most film bodies will struggle to deliver a blur-free STF simulated image. I used a Minolta Alpha 9 for the tests because it allowed me to set the number of exposures for the multiple exposure sequence and manually control the camera's aperture. The Alpha 9, like some of the last-generation of Pentax film bodies (such as the MZ-S or PZ-1) allows multiple exposures without the film moving because the camera disengages the advance motor. Older cameras, such as the K1000, M series, and Spotmatics require that the film advance be activated in order to arm the shutter. In those bodies, a double exposure requires the user to remove slack from the film, take each shot in the multiple exposure, and between frames hold down the film rewind release button and film rewind knob while actuating the film advance lever to re-arm the shutter. This, even on a double exposure, has a high probability of frame shift. On a seven-exposure seires, it is nearly impossible. A notable exception is the Pentax LX, which makes things a little easier thanks to precise frame indication during rewinding.
Even with the Alpha 9, I experienced shake-related blur. However, this was due to the complexity of keeping a camera motionless for seven consecutive shots when the photographer has to adjust settings between each shot. Also, my subjects were affected by wind and changes in lighting that appeared as blurring on the final images.
Also, this technique requires a fast maximum shutter speed. As you can see from the shutter speed compensation, the shutter speed needs to be reduced by two stops. So, if you have an old KX and your meter reading tells you that your f/2 exposure is 1/500th or 1/1,000th, you would be unable to simulate an STF image.
Also, this technique is nearly impossible unless you have stationary subjects. That makes this a studio-oriented technique. We found that attempting STF simulations in the field led to little but frustration.
When to Use STF Simulation
STF simulation is not for all subjects. Like for the recent Pentax K-3 II pixel shift feature, a subject must be motionless for multiple shots. That can pose issues and we found in trying around 50 STF simulations that only a handful resulted in subject and camera not moving at all. One test shot, a simulation using a dripping water spigot, showed spigot and water drop blurring due to the motion in the water spigot caused by drops falling from it. So, STF simulation is best suited for macro, still life, landscape, and architectural work. The good news is that those subjects are suited well to remaining relatively motionless during multiple exposures.
These sample images are digitized with minimal editing. For digitization, I used a Pentax K-3 and a slide copying setup with a Rodagon 85mm enlarging lens. The images are inverted from negative and contrast corrected in post. I did not correct mineral spots nor did I remove the frame edges. Those of you familiar with film digitization will recognize that increased grain, mineral spots on the images, and lower contrast are hallmarks of underdeveloped negatives. The following tables present the results of the two most successful STF simulations, and some failed examples of each. Click on the photos for enlarged views.
 |
 |
 |
 |
|
Table 1: Successful STF Test 1. |
|
To achieve one successful result in the above table required 12 tries. Many of these tries tested various combinations for shutter and aperture settings. The underexposed image shows the results of one such experiment that indicated a set of shutter and aperture speeds which failed to return satisfactory results.
 |
 |
 |
 |
| Table 2: Successful STF Test 2. Clockwise from top left: Control, 1/180th at f/4.0 | Successful STF Test Blurry Result | Underexposed Result |
|
This sample exhibits, perhaps the best of any of our tests, that this process can in fact deliver feathered out of focus areas that replicate an STF lens. The effect is generally pleasing when the results are executed successfully. The samples in the lower row for Table 2 were taken at smaller maximum apertures, resulting the in the final apertures being f/11 and f/16, respectively, for the final shot in the STF simulation sequence. We found that simulating STF images on film when the widest aperture was more than a stop-and-a-half smaller than wide-open returned wildly underexposed images and jarring out-of-focus areas that seemed, simultaneously, to be deep depth-of-field shots but also blurry STF shots.
Post your Smooth Trans Focus Images
Did you know that Pentax Forums has a lens club dedicated to true smooth trans focus lens imagery? Over at the Post your Smooth Trans Focus Lens Images club, users can share images they've taken with these very special lenses. If this article has inspired you to pick up an STF lens, post your shots in the lens club.
A Note to Ricoh
If my next Pentax camera had an STF simulation feature, I'd be thrilled. The best way to implement it would be to have the camera control the aperture during the exposure and stop the aperture down continuously, but at varied speeds, throughout the exposure to feather the out of focus areas. That would eliminate camera shake issues and allow for a sophisticated STF effect with any Pentax digital-era lens.
However, that would require that the image sensor work as a universal sensor and not a rolling sensor, requiring greater processing capacity and limiting this function to slower shutter speeds. That said, if future Pentax bodies need a unique feature akin to the pixel shift (or that could even be combined with pixel shift), an STF simulation that uses a moving aperture during a single exposure would be a great Pentax differentiator.
Conclusion
We hope that this article has taught you something new, and that the STF simulation technique has sparked your interest!
 Sony 135mm f/2.8 [T/4.5] Smooth Trans Focus Lens
While the Sony 135mm STF lens that we tested is not adaptable to Pentax cameras, the Laowa STF 105mm F2 is a viable alternative. It ships worldwide directly from the manufacturer and costs $699 new — considerably less than the Sony.
Additional Sample Images
This last section shares some sample images and notes about them. Each image, or image group, intends to show something about the Sony STF lens (in particular) as well as STF lenses in general (to a lesser extent.)
 |
 |
 |
 |
 |
Marble Cherum | K David Left to Right, Top to Bottom: |
Comparison shots demonstrating the out-of-focus qualities at various major stops. Note the middle row where the same aperture setting is used from different aperture rings. The automatic aperture provides a more traditional and jarring out-of-focus characteristic because the aperture ring is not circular at f/6.3
 Silhouette at Battery Point | K David
This shot demonstrates that the STF provides nice contrast and the capacity for deep depth of field not always seen on a telephoto lens. This shot would have been taken between f/16 and f/32.
 Salt Lake City State Capitol Chandelier | K David
 Salt Lake City Capitol Dome | K David
These companion shots taken inside and outside of the state capitol show the lens' characteristic sharpness.
 Battery Point Overlook | K David
This shot shows the effects of the STF on out-of-focus objects. Note the Golden Gate Bridge and how the blur appears to gently merge with other out of focus areas. Note also how the Golden Gate Bridge and Nick's arm are in sharp definition. This characteristic of an STF lens makes it ideal for portraiture.
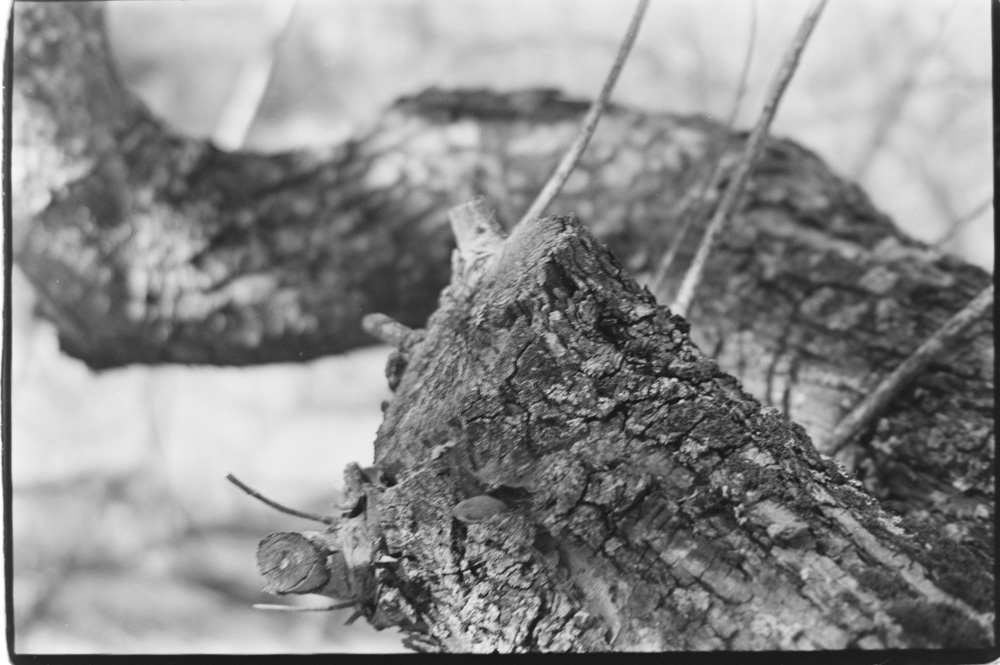
 Close-focus Test | K David
This shot tests the STF's ability to deliver images at its closest focus without the aid of macro attachments. Notice how the transition from in- to out-of-focus remains gentle and that the lens does not reveal latent flaws when pushed to its close-focus point.
 Lake Tahoe Storm Clouds | K David
This shot shows how much range the lens conveys while retaining exceptional contrast. This image fully uses all ten grayscale zones and shows distance and terrain detail behind rain walls.
 Cheever | K David
Few subjects show sharpness better than animal fur. The Sony STF will keep the most "peepiest" of pixel peepers happy.
 Pentax K-3 | K David
This product-type shot shows the lens's sharpness, how the STF out-of-focus effect playis into blurry areas on a real subject, and how well the STF performs for product photography.
 Spaceship Lamppost | K David
This one's just in here because I like it!
More from the Pentax Forums Homepage
- March "Flowers up Close" Contest...
- HD FA 50mm F1.4 vs. SMC 50mm F1.4 Classic Review
- Announcing Our April, 2024 Photo Contest
- Introducing Pentaxify AI by PentaxForums.com
- The Making of "Autumn Draws"
- Ricoh launches the RICOH GR III HDF and RICOH...
- Join Ricoh for the April 6 GR Photo Walk in Las...
- The Making of "Gotcha!"

Tags
135mm, alpha, aperture, background blur, bokeh, focus, smooth, smooth trans focus, sony, sony 135mm, sony 135mm stf, stf, trans

Comments