Forgot Password
Pentax Camera Forums Home
 

Reply
Show Printable Version 1 Like Search this Thread
03-26-2015, 12:51 PM   #1
Forum Member


Join Date: Jan 2015
Posts: 77
How to take product photos like these?

Hello, I'd like to get your opinions specifically about lightings to take product pictures like these ones. What kind of lightings would have been used? I'm familiar with continuous lighting, but these ones look like strobes/flashes might have been used (I might be wrong:-) Can anyone guess the lighting that might have been used? Also, if some less expensive (around $200) but effective equipment recommendation? I would highly appreciate your opinions. Thank you!

Attached Images
     
03-26-2015, 01:02 PM   #2
Veteran Member
AquaDome's Avatar

Join Date: Jan 2014
Location: New Carlisle, IN
Photos: Gallery | Albums
Posts: 1,475
Looks like a light box.
03-26-2015, 01:27 PM   #3
Veteran Member
enoeske's Avatar

Join Date: Jul 2009
Location: Surprise, Az
Photos: Gallery
Posts: 2,136
Light tent with the white background dodged to white.
03-26-2015, 01:31 PM   #4
Veteran Member
EarlVonTapia's Avatar

Join Date: Oct 2012
Location: Vancouver
Photos: Gallery
Posts: 1,207
I've taken similar shots, though not as nice (I use it mainly to take photos for buying and selling online, so I never need to make it super fancy)

Here's my setup.

https://instagram.com/p/i-JU37lX8P/

Here's the result

https://instagram.com/p/i9uDHnlX5U/

$10 of foam core at Walmart

any random manual flash. They can even be triggered via. the onboard flash, so you don't even need to purchase a trigger.

A yongnuo will set you back around $75.

Under $100 and you'll be good to go.

EDIT: I should add, with a little bit of practice, refinement, and post processing, you should be able to get similar results to your example photos.

03-26-2015, 01:39 PM   #5
Veteran Member
Na Horuk's Avatar

Join Date: Feb 2012
Location: Slovenia, probably
Photos: Gallery | Albums
Posts: 11,186
Yeah, these days you can just buy a little tent with lights and all, no need to piece it together yourself.
What you need are soft lights (diffused, reflected). If you use continuous lights, make sure they have a full spectrum (no missing wavelengths) and make sure their flickering will not interfere with the photos.
Or use flashes, umbrellas..
You would also need a background, which has to be a little farther away from the object (so shadows and stuff won't show up). Its a good idea to use the kind of background that seamlessly bends into the bottom base where you rest the product. And usually you want to use a separate light to equally light the background to pure white. Avoid patterns or something with uneven gloss, texture
Good idea to use a macro prime lens, like HD DA 35mm f2.8 macro or DFA 50mm f2.8 macro, but if you want to go cheap you can go with something as old as Pentax M 50mm f1.7 and it will be sharp enough. Macro lenses just give you that clinical, sharp look, and they let you take those closeups of fine detail.
Oh and get a tripod or some sort of base for your camera. Bonus points for remote trigger. Then simply use 2 sec timer, Av mode, ISO 100, f5.6 - f8 (or even bigger f-number for wider DoF. But if you go above f10 or so you will need extra sharpening. DoF should be wide enough to fit the whole object, but not any wider than necessary.)
A lot of these things you can do fairly cheap if you are clever and patient. Of course, if you want things done right, it will cost. This is why product photography is a business. Amazon even has a patent for "white background" product photos.
03-26-2015, 02:00 PM   #6
Veteran Member
CarlJF's Avatar

Join Date: Sep 2014
Location: Quebec City
Posts: 1,185
This really look like it was taken with a macro box, similar to that of ErlVonTapia. You should get a look at this How-To, which has a slightly different design, the flash being outside the box shooting through a diffuser: DIY 10$ Macro Photo Studio.
03-26-2015, 02:27 PM   #7
Pentaxian
normhead's Avatar

Join Date: Jun 2007
Location: Near Algonquin Park
Photos: Gallery | Albums
Posts: 40,451
What we did in school was buy translucent paper and form it into cones with holes cut at appropriate places to the lens to peek through. Set up on a light table and you can achieve completely shadowless product shots..... without highlights... by experimenting with light placement.

03-26-2015, 02:45 PM   #8
Forum Member


Join Date: Jan 2015
Posts: 77
Original Poster
QuoteOriginally posted by EarlVonTapia Quote
I've taken similar shots, though not as nice (I use it mainly to take photos for buying and selling online, so I never need to make it super fancy)

Here's my setup.

https://instagram.com/p/i-JU37lX8P/

Here's the result

https://instagram.com/p/i9uDHnlX5U/

$10 of foam core at Walmart

any random manual flash. They can even be triggered via. the onboard flash, so you don't even need to purchase a trigger.

A yongnuo will set you back around $75.

Under $100 and you'll be good to go.

EDIT: I should add, with a little bit of practice, refinement, and post processing, you should be able to get similar results to your example photos.
That is very impressive setup and shot. Right now, I'm helping a small company to set up the right equipment set, but I'll definitely try it for myself at home. About flashes, I need to buy 2 flashes, right? One attached to shoe mount and another to light the back panel, something like that? I've been using continuous lights only, so please bear with me

---------- Post added 03-26-15 at 02:48 PM ----------
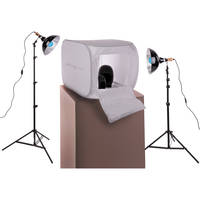
QuoteOriginally posted by Na Horuk Quote
Yeah, these days you can just buy a little tent with lights and all, no need to piece it together yourself.
What you need are soft lights (diffused, reflected). If you use continuous lights, make sure they have a full spectrum (no missing wavelengths) and make sure their flickering will not interfere with the photos.
Or use flashes, umbrellas..
You would also need a background, which has to be a little farther away from the object (so shadows and stuff won't show up). Its a good idea to use the kind of background that seamlessly bends into the bottom base where you rest the product. And usually you want to use a separate light to equally light the background to pure white. Avoid patterns or something with uneven gloss, texture
Good idea to use a macro prime lens, like HD DA 35mm f2.8 macro or DFA 50mm f2.8 macro, but if you want to go cheap you can go with something as old as Pentax M 50mm f1.7 and it will be sharp enough. Macro lenses just give you that clinical, sharp look, and they let you take those closeups of fine detail.
Oh and get a tripod or some sort of base for your camera. Bonus points for remote trigger. Then simply use 2 sec timer, Av mode, ISO 100, f5.6 - f8 (or even bigger f-number for wider DoF. But if you go above f10 or so you will need extra sharpening. DoF should be wide enough to fit the whole object, but not any wider than necessary.)
A lot of these things you can do fairly cheap if you are clever and patient. Of course, if you want things done right, it will cost. This is why product photography is a business. Amazon even has a patent for "white background" product photos.
Thank you so much for your great advice! That is really helpful-Do you think M 50 1.7 would be a better candidate for products shots than DA 50 f1.8? Just wondering because I'm getting both this week:-)

---------- Post added 03-26-15 at 02:49 PM ----------

QuoteOriginally posted by CarlJF Quote
This really look like it was taken with a macro box, similar to that of ErlVonTapia. You should get a look at this How-To, which has a slightly different design, the flash being outside the box shooting through a diffuser: DIY 10$ Macro Photo Studio.
I googled ErlVonTapia but nothing came up. Could you let me know what ErlVonTapia is? --->>> WOoooops. Sorry, ErlVonTapia. I missed your user ID! LOL

Last edited by ychousa; 03-26-2015 at 02:59 PM.
03-26-2015, 02:52 PM   #9
Veteran Member
EarlVonTapia's Avatar

Join Date: Oct 2012
Location: Vancouver
Photos: Gallery
Posts: 1,207
I just use 1 light. In my setup, the light (with a diffuser) bounces around sufficiently in the tent to provide nice, even lighting.

You can use the built-in flash to trigger a manual flash in slave mode. Just be sure to get one of these:

SG-31R IR Panel for Built-In Flash from Nikon

You can get a cheaper version from ebay or amazon.

This prevents the built-in flash from adding light to the picture, while still being able to trigger the off-camera flash.

---------- Post added 03-26-15 at 01:53 PM ----------

QuoteQuote:
I googled ErlVonTapia but nothing came up. Could you let me know what ErlVonTapia is?
Don't google that, you will release the kraken!
03-26-2015, 02:55 PM - 1 Like   #10
Senior Moderator
Loyal Site Supporter
Parallax's Avatar

Join Date: Apr 2008
Location: South Dakota
Photos: Gallery
Posts: 19,333
You can't take photos like that. Amazon has a patent on product photos with no background.
http://www.nydailynews.com/news/national/amazon-patents-technique-seamless-w...icle-1.1808939
03-26-2015, 02:56 PM   #11
Forum Member


Join Date: Jan 2015
Posts: 77
Original Poster
QuoteOriginally posted by normhead Quote
What we did in school was buy translucent paper and form it into cones with holes cut at appropriate places to the lens to peek through. Set up on a light table and you can achieve completely shadowless product shots..... without highlights... by experimenting with light placement.
That sounds very interesting. How did you guys light the item? I'm curious

Thanks for everyone's comments. Because I'm trying to achieve this task rather sooner, can anyone suggest a specific item with around $200 budget? I know that some Chinese lightboxes really suck and are waste of time and money.

---------- Post added 03-26-15 at 03:03 PM ----------

QuoteOriginally posted by EarlVonTapia Quote

Don't google that, you will release the kraken!
LOL Sorry ErlVonTapia! I thought that was a brand name for an expensive lighting equipment! Haha
03-26-2015, 03:05 PM   #12
Administrator
Site Webmaster
Adam's Avatar

Join Date: Sep 2006
Location: Arizona
Photos: Gallery | Albums
Posts: 51,608
My setup is a little more pricey but I tend to prefer floodlights as they give me better control over the lighting without trial-and-error, and they can be moved around to create shadows if/as desired. A third floodlight can be used to fill in the remaining shadows, but I've found that the on-board flash works just as well for that purpose (in slow speed sync mode). These things generate an insane amount of heat and the bulbs burn out quickly (after a few hours of use), so that's another reason in favor of using 2 instead of 3 lights.

Impact Two-Light Digital Light Shed Kit - 24 x 24" DLS-XLK

Here's a sample image, with no PP:

Adam
PentaxForums.com Webmaster (Site Usage Guide | Site Help | My Photography)


PentaxForums.com server and development costs are user-supported. You can help cover these costs by donating or purchasing one of our Pentax eBooks. Or, buy your photo gear from our affiliates, Adorama, B&H Photo, KEH, or Topaz Labs, and get FREE Marketplace access - click here to see how! Trusted Pentax retailers:
03-26-2015, 03:34 PM   #13
Pentaxian
TaoMaas's Avatar

Join Date: May 2007
Location: Oklahoma City
Photos: Gallery | Albums
Posts: 3,574
I agree with those who said it looks like a light tent. Just for future reference...if you look really closely at the highly reflective parts of a product in a photo, you can often see the lighting arrangement of the photographer...or at least get some really good hints as to what was used.

Edited to add: If you want to know what lighting arrangement was used, enlarge the closest corner of the first pic you posted. It looks like it's not a light tent, but a light directly over the lens with reflectors placed on either side and on top of the subject. The black sections that break up the white reflected areas are the studio.

Last edited by TaoMaas; 03-26-2015 at 03:41 PM.
03-26-2015, 03:40 PM   #14
Forum Member


Join Date: Jan 2015
Posts: 77
Original Poster
QuoteOriginally posted by Adam Quote
My setup is a little more pricey but I tend to prefer floodlights as they give me better control over the lighting without trial-and-error, and they can be moved around to create shadows if/as desired. A third floodlight can be used to fill in the remaining shadows, but I've found that the on-board flash works just as well for that purpose (in slow speed sync mode). These things generate an insane amount of heat and the bulbs burn out quickly (after a few hours of use), so that's another reason in favor of using 2 instead of 3 lights.
That's great shot, Adam. But if it emits heat, that would not be suitable in current condition. So, generally using a good softbox/light tent and some enough amount of light (whether continuous or not,) including the one that would light the back shadow are the keys?
03-26-2015, 03:45 PM   #15
Pentaxian
TaoMaas's Avatar

Join Date: May 2007
Location: Oklahoma City
Photos: Gallery | Albums
Posts: 3,574
Here's a close-up. Do you see it? There's some kind of bank light (I would guess an LED arrangement of some sort) directly over the camera and reflectors on the side and over the top.

[IMG][/IMG]
Reply

Bookmarks
  • Submit Thread to Facebook Facebook
  • Submit Thread to Twitter Twitter
  • Submit Thread to Digg Digg
Tags - Make this thread easier to find by adding keywords to it!
background, box, built-in, copy, da, f2.8, flash, flashes, item, jewelry, kit, light, lights, lol, look, macro, opinions, paper, photography, photos, post, product, product photos, setup, story, thanks, time

Similar Threads
Thread Thread Starter Forum Replies Last Post
How can I take product shots like this? hangu Photographic Technique 13 07-21-2016 02:54 AM
Landscape How to take better landscape photos? Newtophotos Photo Critique 8 09-02-2013 08:43 PM
How to take pictures like this? song_hm Photographic Technique 20 07-28-2013 05:05 AM
How do you all take these great photos? Mlcinema Pentax DSLR Discussion 27 01-26-2013 09:38 PM
How Do I Take Photos Like This? Christopher M.W.T Digital Processing, Software, and Printing 10 11-28-2009 05:35 AM


All times are GMT -7. The time now is 05:27 PM. | See also: NikonForums.com, CanonForums.com part of our network of photo forums!
  • Red (Default)
  • Green
  • Gray
  • Dark
  • Dark Yellow
  • Dark Blue
  • Old Red
  • Old Green
  • Old Gray
  • Dial-Up Style
Hello! It's great to see you back on the forum! Have you considered joining the community?
register
Creating a FREE ACCOUNT takes under a minute, removes ads, and lets you post! [Dismiss]
Top