| Pentax/Camera Marketplace |
| Pentax Items for Sale |
| Wanted Pentax Items |
| Pentax Deals |
| Deal Finder & Price Alerts |
| Price Watch Forum |
| My Marketplace Activity |
| List a New Item |
| Get seller access! |
| Pentax Stores |
| Pentax Retailer Map |
| Pentax Photos |
| Sample Photo Search |
| Recent Photo Mosaic |
| Today's Photos |
| Free Photo Storage |
| Member Photo Albums |
| User Photo Gallery |
| Exclusive Gallery |
| Photo Community |
| Photo Sharing Forum |
| Critique Forum |
| Official Photo Contests |
| World Pentax Day Gallery |
| World Pentax Day Photo Map |
| Pentax Resources |
| Articles and Tutorials |
| Member-Submitted Articles |
| Recommended Gear |
| Firmware Update Guide |
| Firmware Updates |
| Pentax News |
| Pentax Lens Databases |
| Pentax Lens Reviews |
| Pentax Lens Search |
| Third-Party Lens Reviews |
| Lens Compatibility |
| Pentax Serial Number Database |
| In-Depth Reviews |
| SLR Lens Forum |
| Sample Photo Archive |
| Forum Discussions |
| New Posts |
| Today's Threads |
| Photo Threads |
| Recent Photo Mosaic |
| Recent Updates |
| Today's Photos |
| Quick Searches |
| Unanswered Threads |
| Recently Liked Posts |
| Forum RSS Feed |
| Go to Page... |
PentaxForums.com → Camera Help Central → Pentax Articles → Photography Articles
→
Stops, Shutter Speed, Aperture, ISO Sensitivity
 |
| 14 Likes | Search this Thread |
| 11 Likes | #1 | ||
| |||
| Views: 19,633 | |||
dosdan | |
 | View full profile |
| Contact via private message | |
| Find other posts by dosdan | |
| Find threads started by dosdan | |
| Find threads in which dosdan has posted | |
| These users Like dosdan's post: |

| 11-02-2011, 04:48 AM | #2 |
|
I've added a small section on ISO sensitivity, exposure & photon/shot noise to the end of the article. Dan Last edited by dosdan; 11-14-2011 at 05:20 PM. | |

| 11-18-2011, 06:36 PM | #3 |
|
Once you understand stops, exposure & LV, you can comprehend the old APEX system (Additive System of Photographic Exposure) from the early 1960s. This was before exposure meters were commonly available. The idea was to estimate the typical scene brightness from a LV chart (see the chart at Tips > Exposure > Light & Exposure Values or Ultimate Exposure Computer), make any adjustment for different film speeds, and you could then set a "LV" dial on the camera which used the right shutter speed and aperture combination for a correct exposure. This is a stops-based numeric system. The value units are Bv (Brightness Value i.e. scene luminance), Sv (Speed Value i.e. film speed - now, in the DSLR era, better thought of as meaning "Sensitivity Value"), Av (Aperture Value), Tv (Time Value i.e. shutter speed) & Ev (Exposure Value). This is where the terms we use for exposure programs came from, but they are used in a different way nowadays. These values are defined with the 0 values being: Sv 0 = ISO3.125 Tv 0 = 1s Av 0 = ƒ/1 Bv 0 = 1 fL (foot-lamberts, or in metric terms 3.4 candelas/m2). This is at a "K" of 11.4 (explained further down). Each change in value by 1 value unit is a 1 stop change. Let's consider an example of f/8, 1/125s, ISO100 ƒ/8 = Av 6 (ƒ/1 -> ƒ/1.4 (1 stop) -> ƒ/2 (2 stops) -> ƒ/2.8 (3 stops) -> ƒ/4 (4 stops) -> ƒ/5.6 (5 stops) -> ƒ/8 (6 stops)) 1/125s = Tv 7 (1s -> 1/2s (stop) -> 1/4s (2 stops) -> 1/8s (3 stops) -> 1/15s (4 stops) -> 1/30s (5 stops) -> 1/60s (6 stops) -> 1/125s (7 stops)) ISO100 = Sv 5 (ISO3.125 -> ISO6.25 (1 stop) -> ISO12.5 (2 stops) -> ISO25 (3 stops) -> ISO50 (4 stops) -> ISO 100 (5 stops)) The two APEX equations are: Bv + Sv = Tv + Av [1] Ev = Tv + Av [2] Eqn. 2 reminds us that exposure in the camera is determined by only shutter speed and aperture. Combining eqns. 1 & 2: Ev = Bv + Sv [3] We see that for the same exposure (Ev) settings in the camera, increasing ISO sensitivity (Sv) is used to compensate for decreasing scene luminance/brightness (Bv). Rearranging eqn. 1 to get Bv by itself: Bv = Tv + Av - Sv [4] Substituting our example values: Bv = Tv 7 + Av 6 - Sv 5 = Bv 8 Bv 8 = 256 foot-lamberts (2^8) or 877 candelas/m2 (metric), at a K of 11.4. "K" is the reflected-light meter calibration constant. Each manufacturer has some latitude in deciding what K value they'll use in setting their metering level for what they consider a correct exposure. K=11.4 was originally used; nowadays K=12.5 (Canon, Nikon, Sekonic) and 14 (Pentax). Higher K numbers mean that exposure levels are slightly greater today, because the brightness is higher. The increase is 0.13 stops ( K=12.5) and 0.3 stops (K=14). Interestingly, Pentax light metering uses a K which is outside the ISO 2720:1974 standard recommended range for K of 10.6-13.4. Using a LV calculator (https://www.pentaxforums.com/forums/miscellaneous-articles/88197-excel-2003-l...alculator.html), for ƒ/8, 1/125s, ISO100, we get LV 13. We could have also get this value by using egn. 2 (Ev = Tv 7 + Av 6) since Ev = LV at ISO100. The difference of 5 value units between Bv 8 & LV 13 is due to Bv coming from a formula which uses a Sv that is referenced to ISO3.125, whereas the formula for LV uses a reference point of ISO100, which is a reference level 5 stops greater. Dan. Last edited by dosdan; 05-10-2016 at 04:57 PM. | |
| 11-22-2011, 02:39 AM - 1 Like | #4 |
|
An interesting thing about APEX is that it has made a small comeback through being included in the Exif 2.2 specification. So you use an Exif Viewer to see this and easily calculate the LV without needing a LV calculator. I'll use the EXIF View add-on for Firefox in this article ( Exif Viewer - a Mozilla Firefox/Thunderbird Extension). As examples, I'll use the first 4 photos in RonHendriks1966 post: https://www.pentaxforums.com/forums/pentax-k-5-forum/115277-k-5-sports-photog...ml#post1719538 Here's part of the Exif data from the first photo, shown in list format: Shot 1: EXIF Sub IFD Exposure Time (1 / Shutter Speed) = 1/1000 second ===> 0.001 second Lens F-Number / F-Stop = 4/1 ===> ƒ/4 Exposure Program = n/a (0) ISO Speed Ratings = 400 EXIF Version = 0230 Original Date/Time = 2011:11:20 14:38:19 Digitization Date/Time = 2011:11:20 14:38:19 Shutter Speed Value (APEX) = 9965784/1000000 Shutter Speed (Exposure Time) = 1/1000 second Aperture Value (APEX) = 4/1 Aperture = ƒ/4 First off, don't be misled by ƒ/4 = Av 4 here. That is a coincidence. Av 4 refers to root-2^4 (f/4), while the next two full Av integers refer to root-2^5 (ƒ/5.6 after step rounding due to 1.4 steps) and root-2^6 (ƒ/8). The ISO is in linear form, but the APEX Sv 0 reference is different from ISO100, the LV ISO reference, which we'll be using. Due to rounding in the standard Tv sequence (e.g. 1/15s -> 1/8s), the actual Tv recorded is a bit messy, but it's easy to see that 9965784/1000000 represents Tv 10. Using the formula: Ev = Tv + Av In this image we get: Ev = Tv 10 + Av 4 = Ev 14 Now this is at ISO100. To get the LV, we need to subtract the stops difference from ISO100 of the actual ISO used. (If ISO100 was used, Ev = LV. If a sensitivity less than ISO100 was used, we need to add the difference e.g. with ISO80 we add 0.3 stops.) The ISO difference here is: 2 stops (ISO100-> ISO200 (1 stop) -> ISO400 (2 stops)) LV = Tv10 + Av 4 - 2 stops = LV 12 Shot 2: ISO Speed Ratings = 1000 Shutter Speed Value (APEX) = 9321928/1000000 Shutter Speed (Exposure Time) = 1/640 second Aperture Value (APEX) = 4970854/1000000 Aperture = ƒ/5.6 The shutter speed shows the choice of 1/3 stop shutter speed increments: Tv 9.3 ƒ/5.6 is Av 5. The ISO difference from ISO100 is: 3.3 stops (ISO100-> ISO200 (1 stop) -> ISO400 (2 stops) -> ISO800 (3 stops) -> ISO1000 (3.3 stops)) LV = Tv + Av - ISOdiff = Tv 9.3 + Av 5 - 3.3 stops = Lv 11 Shot 3: ISO Speed Ratings = 640 Shutter Speed Value (APEX) = 9643856/1000000 Shutter Speed (Exposure Time) = 1/800 second Aperture Value (APEX) = 4/1 Aperture = ƒ/4 The ISO difference from ISO100 is: 2.6 stops (ISO100-> ISO200 (1 stop) -> ISO400 (2 stops) -> ISO500 (2.3 stops) -> ISO640 (2.6 stops)) LV = Tv 9.6 + Av 4 - 2.6 stops (approx) = LV 11 Shot 4: ISO Speed Ratings = 1250 Shutter Speed Value (APEX) = 9643856/1000000 Shutter Speed (Exposure Time) = 1/800 second Aperture Value (APEX) = 4/1 Aperture = ƒ/4 The ISO difference from ISO100 is: 3.6 stops (ISO100-> ISO200 (1 stop) -> ISO400 (2 stops) -> ISO800 (3 stops) -> ISO1000 (3.3 stops) ->ISO1250 (3.6 stops)) LV = Tv 9.6 + Av 4 - 3.6 stops = LV 10 Dan. Last edited by dosdan; 03-11-2013 at 02:29 PM. | |
| These users Like dosdan's post: |
| 03-09-2014, 06:26 PM | #5 |
|
Here's another go at explaining ISO Sensitivity in DSLRs. ISO Sensitivity (henceforth referred to here as just "ISO") is the mapping between an exposure level and the recorded brightness level in the digital image file. While ISO changes are implemented by gain changing, ISO itself is about the exposure-to-brightness-level mapping, not the gain per se. 1. First, the exposure is taken. Exposure is the amount of photons/unit area captured by the sensor and converted into an analogue output signal. Exposure is determined solely by Scene Luminance, Shutter Speed, F-stop. It is measured in lux-seconds, lx.s. Both the scene luminance and f-stop affect the "lux" part of "lux-seconds", while the shutter speed obviously affects the "seconds". Lux is a measure of the density rate of photons/s/cm2. which is analogous to the rate the rain of photons is falling on a certain area. Once you multiply this by the exposure period, you get photons/cm2, which is the density of light captured i.e. how much photonic rain was collected in a certain area. The area of the sensor does not affect the exposure, so, for the same scene luminance, the same f-stop & shutter speed results in the same exposure ,regardless of sensor size. (Technically "t-stop" is the more accurate term to use since a certain amount of light is lost in the transmission through the lens. So a lens set to an f-stop of 2.8 may have an effective t-stop of 3.3.) An FF sensor with these settings and lens will have the same exposure as an APS-C sensor, but due to the 2.3x bigger sensor area of FF, it receives 2.3x more total light for the same exposure, and hence has a potentially 1.2 stops better SNR. 2. Now that the exposure has been captured and converted to an analogue signal, it is amplified to match the ADC input operating window. It is then converted to a Digital Number. The ISO mapping ensures that a certain exposure will result in a certain DN in the digital image file which, when rendered, results a in a certain portrayed relative brightness level. Due to the complexity introduced with matrix exposure metering, where different weightings are given to different light source locations in a scene, there is variation between manufacturers in the exact mapping used. Different cameras have sensor with different quantum efficiencies, metering references & designed-in amounts of clipping headroom, different transmission losses in their Bayer colour filter array filters and different tone response curves. All these affect the ISO mapping used. Another term for the ISO, particularly in a digital camera, is the Exposure Index. EI reminds us that this value, when applied to the exposure, produces a certain result, i.e. a relative brightness level. 3. In most digital cameras, analogue gain has a secondary role, beside mapping an exposure to a certain brightness level. This is to move the the sensor output level range to a more favourable ADC level range as the exposures decreases. This would not be necessary if the ADC DR performance was better or equal to the sensor DR, i.e. a 14-bit sensor DR into a 14-bit ADC DR since, once the initial matching analogue gain was applied, there would be no need to vary it further with weak exposures – bit-shifting of the ADC output (digital gain) would be all that was needed to increase the rendering brightness as the exposure got weaker. Unfortunately, a 14-bit ADC usually does not achieve full 14-bit performance, particularly when dealing with the high-speed, low-cost ADCs used in digital cameras. The term ENOB (Effective Number of Bits) is used to express the effective ADC DR. The ENOB can be surprisingly low. For example, Prof. Bob Newman (bobn2), when discussing ADC ENOB performance, claims that: the 5DIII gives 11 bits maximum though the sensor is giving out 14.5.Therefore, the more the mismatch between the sensor DR and the ADC ENOB, the more the desirability of adjusting the analogue gain applied in the PGA (Programmable Gain Amplifier) between these 2 stages so as to best suit the smaller optimum ADC input range. Conversely, the more closely the ADC ENOB equals or exceeds the sensor DR, the more closely the imaging system exhibits "ISOless" behaviour. Dan. Last edited by dosdan; 12-25-2014 at 07:15 PM. | |
| 12-25-2014, 07:15 PM | #6 |
|
If you look at a camera's DxoMark Dynamic Range graph, but in the Screen tab, you will see that this is a proxy indicator of the ENOB performance of the camera's digital imaging system. So for example, the K-5 tops out at 13.6EV. (This is in the Screen tab. In Print tab it's normalised, based on output filesize, to 14.1EV.) So the ENOB performance is close to 13.6 bits for a 14-bit raw file. Dan. Last edited by dosdan; 12-25-2014 at 07:39 PM. | |
| 04-25-2018, 06:47 AM - 2 Likes | #7 |
| Sensor Sensivity
The sensitivity of an image sensor can be defined in at least two different ways:
Today we have the luxury of Dual CG sensels in many Sony-manufactured sensors. This technology became available to Sony through an IP swap with Micron/Aptina (now ON Semi). See this white paper: http://www.photonstophotos.net/Aptina/DR-Pix_WhitePaper.pdf It's pretty easy to see which sensors are using Dual-CG tech: just look for the discontinuity in the mid-ISO region, in an Input-Referenced RN vs ISO chart (from http://www.photonstophotos.net/Charts/RN_e.htm): 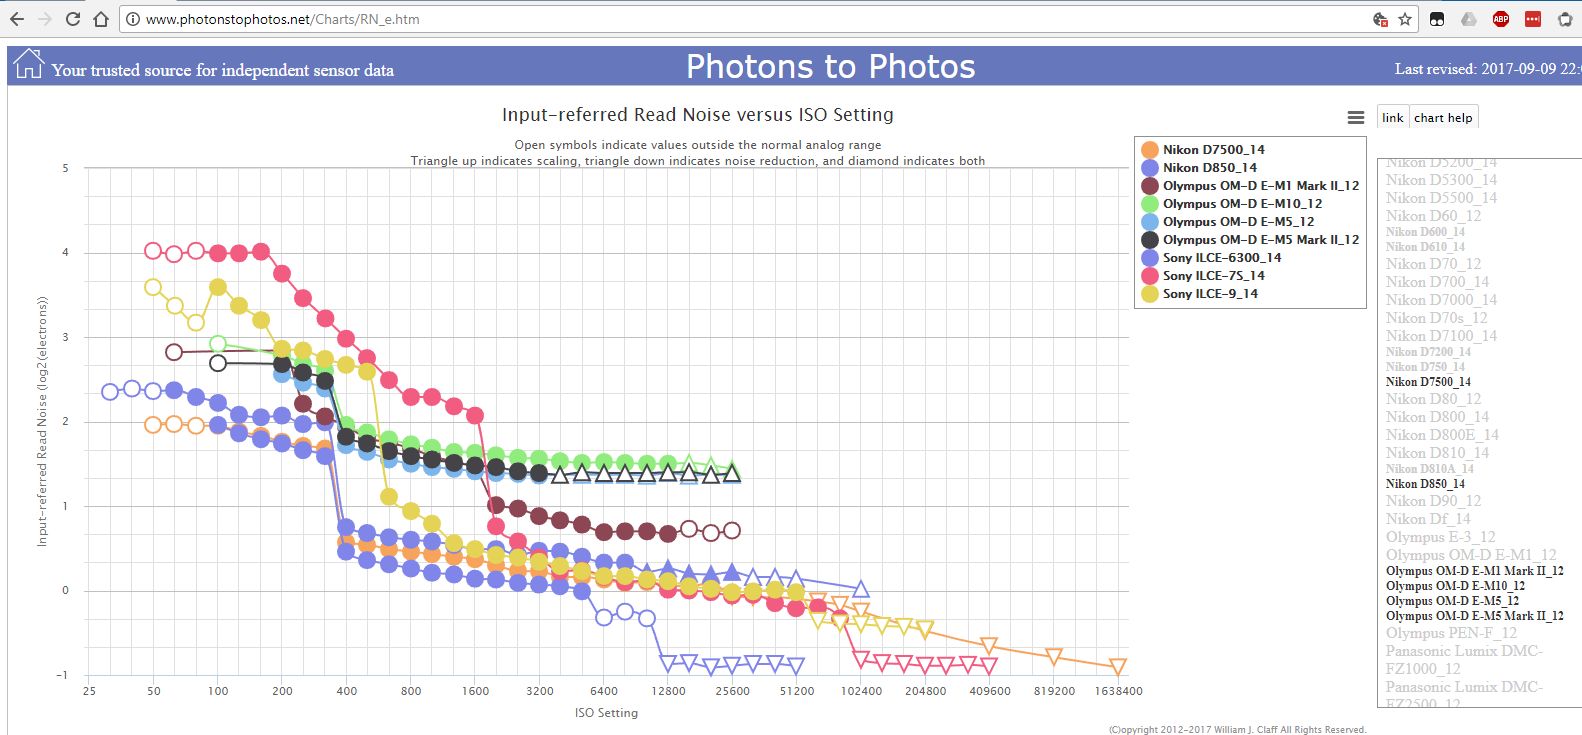 (A discontinuity at High-ISO will be raw-level NR kicking in.) So now we can switch the "sensitivity" between LCG & HCG (Dual CG) when we alter ISO in some cameras. But Dual CG may not be the final improvement in this area. A very interesting paper has appeared at the 2017 IISS Workshop about "An 87dB Single Exposure Dynamic Range CMOS Image Sensor with a 3.0μm Triple Conversion Gain Pixel": http://www.imagesensors.org/Past%20Workshops/2017%20Workshop/2017%20Papers/R29.pdf Fig.5's caption in that paper mentions: In the LPG mode, photodiode saturation occurs before ADC saturation. When the sensel saturates before the ADC, you get a "soft-limiter" knee whereas, if the ADC saturates first, you get a 'hard-limiter" knee. Compare Figs. 1 & 2 here: How to Measure Full Well Capacity (1) « Harvest Imaging Blog The gain is usually set in DSLRs so that the ADC saturates before the sensel. Anyone who has ever done an "Introduction to Semiconductors" has heard of electrons & holes (an atom with a missing electron in the valency band/outer shell, aka a positive ion). See: What is hole? - Definition from WhatIs.com When a photon is converted in a sensor, it liberates a negatively-charged electron (e-) within the pinned photo-diode (PPD), leaving behind a positively-charged hole (h+). The e-, accumulated in the PPD during the duration of the exposure, are then transferred to the floating diffusion (FD). The h+ are not used and are drained away into the substrate. This is because electrons are typically the primary charge carriers in most semiconductor devices. Quoting from Electron hole - Wikipedia In most semiconductors, the effective mass of a hole is much larger than that of an electron. This results in lower mobility for holes under the influence of an electric field and this may slow down the speed of the electronic device made of that semiconductor. This is one major reason for adopting electrons as the primary charge carriers, whenever possible in semiconductor devices, rather than holes. Also, why NMOS logic is faster than PMOS logic.However, in this innovative sensor design, both e- & h+ are collected: Sensors | Free Full-Text | A 750 K Photocharge Linear Full Well in a 3.2 ?m HDR Pixel with Complementary Carrier Collection BTW, Section 1.4. of the article above discusses dual-PD pixels to improve DR. An example of this is the 2006 FujiFilm FinePix S5 Pro (FinePix S5 Pro - Wikipedia) which used a Super CCD SR sensor (Super CCD - Wikipedia). (Note: Some Canon sensors also use dual-PPD pixels, but this is for AF reasons, not for DR improvement.) Compare the DR & SNR 18% of the S5 Pro against the 2005 D200, with its conventional CCD sensor, and with a CMOS sensor of the modern era, the break-through Sony IMX071, as used in the 2010 Pentax K-5: Pentax K-5 vs Fujifilm FinePix S5 Pro vs Nikon D200 The differences in SNR 18% are due to QE, which is affected mainly by fill-factor and CFA filter transmissivity. The article mentions that dual-pixel designs, through a lower fill-factor, lose at least 5% QE compared to a conventional design. The DR of the S5 Pro was exceptional in its day, and still impressive today until you exceed ISO800. Above this ISO, only the output from the larger pixel in the Super CD SR sensor is used, so it has similar performance to a conventional sensor. As I understand it, the reason the small pixel is switched off above ISO800 is because, as ISO increases, you are dealing with smaller and smaller exposures. (The reason for using higher ISOs, in the first place, is to brighten dimmer & dimmer exposures.) But the small pixel is relatively noisy, so continuing to include its RN contribution to the Total RN becomes untenable as the wanted signal level decreases. Dan. Last edited by dosdan; 04-25-2018 at 02:31 PM. | |
| These users Like dosdan's post: |
| 08-25-2018, 11:37 AM | #8 |
|
Maybe will be usefull for someone: How to Evaluate Camera Sensitivity | |

|
« History of Pentax: The Beatles, Tragedy, WW2 (Picture This! Podcast)
|
Excel 2003 LV (Light Value) Calculator »
| Bookmarks |


| Tags - Make this thread easier to find by adding keywords to it! |
| aperture, exposure, iso, iso100, light, noise, sensitivity, sensor, shutter |
| Top Liked Posts |
11  Post #1 by dosdan Post #1 by dosdan |
| 2 Post #7 by dosdan |
| 1 Post #4 by dosdan |
 Similar Threads
 | ||||
| Thread | Thread Starter | Forum | Replies | Last Post |
| Quick Guide to Shutter Speed/Aperture/ISO | Copyright | Troubleshooting and Beginner Help | 3 | 10-24-2010 12:06 PM |
| Shutter Speed and Aperture Comparison | indy | Pentax SLR Lens Discussion | 6 | 05-28-2010 06:25 AM |
| How do you where to start with Aperture and SHutter speed?? | hockmasm | Pentax DSLR Discussion | 22 | 05-04-2010 12:57 PM |
| Exposure: Shutter Speed, Aperture, ISO | ltdstar | Photography Articles | 0 | 06-05-2009 06:27 PM |
| At same aperture/shutter speed, does ISO have impact on IQ? | falconeye | Pentax DSLR Discussion | 24 | 02-17-2008 01:42 PM |


