
Pentax AF360FGZ II Flash
Operation
The operation of the Pentax AF360FGZ II is controlled by the buttons on the back.

Starting to the lower right and working counter clockwise we find:
- On/Off switch. Even when set to On the flash will enter a power saving mode after about 3 minutes if not used. The flash turns back on when the shutter button is half-pressed (if mounted on the camera) or if one of the buttons on the back is operated. In wireless slave mode the flash stays on for about an hour
- Lamp/Fn button:
- Press briefly to turn on the backlight (the backlight also comes on when the shutter button is half-pressed)
- Hold down to enter the custom functions menu and use the SET button and adjustment dial to select the setting and value. Hold the key down again to exit the custom functions menu
- ZOOM button: Cycles through the zoom settings: Auto (the flash head adapts to the focal length of the lens is an autofocus lens is mounted) -> 16 mm -> 19 mm -> 24 mm -> 34 mm -> 48 mm -> 58 mm -> Auto again. If the wide angle panel is deployed the zoom button has no effect. For other formats than APS-C, the appropriate focal lengths are shown (refer the table on the previous page)
- SYNC button: Cycles through the available synchronization modes:
- Leading Curtain (flash fires as soon as the shutter is fully open)
- Trailing Curtain (will freeze a moving subject with the blur trailing the subject)
- Contrast Control (used with two or more flash units with different light intensity so that shadows on the subject can be controlled)
- High-speed (for use with shutter speeds from 1/250 s and faster)
- The sync modes available depends on the flash mode, see below
- MODE button: Cycles through the flash modes:
- P-TTL (Auto). Flash output compensation is possible in this mode (-4 to +2 EV)
- M (Manual). The power settings available are 1/1 (full), 1/2 (half power), 1/4, ..., 1/256
- Multi (Multi flash). Power can be set to 1/1 (full), 1/2 (half power), 1/4, ..., 1/256. The number of flashes to fire can be set from 2 to 100 and the frequency can be set from 1 to 200 Hz (1 to 200 flashes per second)
- Wireless (P-TTL). Flash output compensation is possible in this mode (-4 to +2 EV) and the flash output can be set to 1/1, 2/3, 1/2 and 1/3 of full power
- Wireless (M). Power can be set to 1/1 (full), 1/2 (half power), 1/4, ..., 1/256
- LED button: Turns on the LED lamp that can be used to create a catch light in a model's eyes, or to light up a scene when shooting a movie or taking a still photo. When the LED lamp is lit the output power can be set with the adjustment dial to Auto, 1/1, 1/2, 1/4, 1/8 and 1/16
- Test lamp: Illuminates when the flash is charged. Press to fire a test flash
- SET button and dial: Pres the set button until the value you want to change is blinking, then turn the dial to set the value. Depending on the flash mode the SET button controls one or more of:
- EV compensation
- wireless mode (master, control, slave)
- flash output
- number of flashes
- flash frequency
Contrast Control synchronization requires a wired connection using dedicated, expensive cables and adapters. Add to that the inconvenience of the cabling in itself if you have anything but a small table-top set-up. It would have been better with a wireless option for this mode. Fortunately, the same result (although not automated) can be achieved by two flash units set to Wireless Manual and slave with either the output level or distance to the subject set differently for the two units.
The settings are quite logically arranged and easy to set. However, one easily gets confused when a certain combination of features cannot be set. This table from the operating manual comes in quite handy in such cases (click to enlarge):
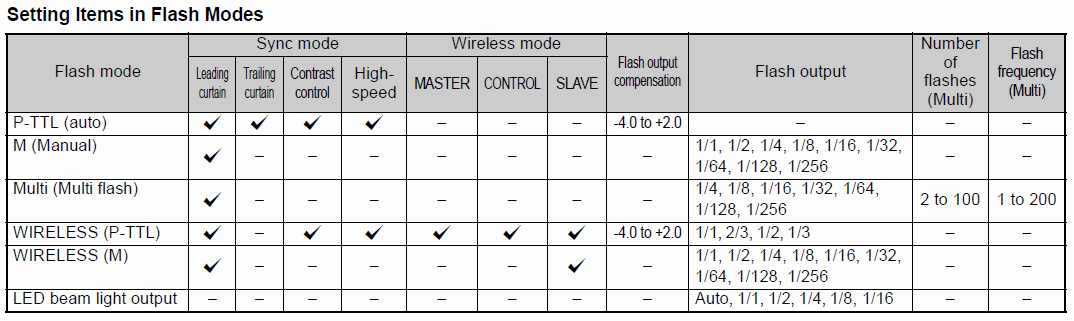
What this table does not show is the dependency on how the camera is set up exposure mode wise.
Flash Modes
The flash modes are:
- P-TTL (auto): The flash must be mounted on the camera or connected with a dedicated wire. The flash fires a pre-flash based on which the camera sets flash output duration so that the image gets exposed properly. Depending on the camera's exposure mode, the shutter speed, aperture and ISO may also be adjusted automatically.
- M (Manual): The user sets the desired output level manually. This mode can only be selected when the camera is in either Manual, Bulb, or X exposure mode.
- Multi (multi flash): The flash will fire multiple times during one exposure. The shutter speed should be set long enough that the shutter stays open during the multiple flash bursts. This mode can be used to freeze several stages of a moving subject. The lower the power output is set the more bursts can be set and obtained
- Wireless (P-TTL): Like P-TTL except that the flash is either used off camera (set to "slave") without any wire, or on camera (set to "master" or "control") in lieu of the built-in flash to control another wireless flash. If set to "control" the flash will not contribute to the exposure of the image but just fire the slave.
- Wireless (M): Like M except that the flash is used wirelessly off camera as a slave.
- LED: The LED light is used to illuminate the scene.
The Wireless Modes
The wireless modes on the Pentax flashes uses the flash light itself to control the function. Usually one would use the camera's built-in flash as the controller, but the AF360FGZ II can also function as a controller when mounted in the hot shoe.
- Master: The flash controls the slave flashes, and also emits a flash during exposure thus contributing to the illumination of the scene.
- Control: The flash controls the slave flashes, but does not emit a flash during exposure. In other words, the flash does not contribute to the illumination of the scene.
- Slave: The flash is off camera and "looks" for a signal from the master that it must fire and for how long.
In Master and Control mode the flash will typically be mounted in the hot shoe, but can also be attached by a dedicated F5P sync cord and the necessary two adapters (hot shoe adapter and off-camera hot shoe adapter).
The Display
The first example is wireless P-TTL mode with the flash used as the master:

| 1. | Flash mode, here P-TTL Wireless |
| 2. | Leading curtain sync |
| 3. | No flash output compensation |
| 4. | Flash range |
| 5. | Flash operates as a wireless master |
| 6. | Zoom head set to 34 mm |
| 7. | Full flash output |
The next example is multi flash mode:

| 1. | Flash mode, here Multi |
| 2. | Leading curtain sync |
| 3. | A flash burst of just 2 |
| 4. | Zoom head set to 34 mm |
| 5. | Flash operates at 1/4th of full output |
| 6. | One flash per second |
 |  |
| Wireless slave in P-TTL mode Zoom flash head set to 16 mm manually Leading curtain sync No EV adjustment, full power | Manual on-camera flash Zoom flash head set to 34 mm automatically Leading curtain sync 1/8th power, flash range 1.3 m |
Custom Functions
There are nine custom functions. They are accessed by pressing and holding the Fn button for a while, then using the SET button and adjustment dial to select a function and adjust it.
Function | Description | Default | |
| Fn1 | Catchlight (LED beam) | Enable catchlight when using the bounce flash | Off |
| Fn2 | AF Spot Beam | Set the autofocus assist light to full power, half power, or off | Full |
| Fn3 | LED Beam Mode | Use the LED beam as an alternative to flash when lit | No |
| Fn4 | Channel | Set the wireless channel for communication with the camera | Ch 1 |
| Fn5 | Slave Mode | Wireless or wired slave mode | Wireless |
| Fn6 | Flash Output comp. | 1/2 or 1/3 steps, or auto (i.e. same as set on camera) | Auto |
| Fn7 | Auto Power Off | Enable or disable | Enabled |
| Fn8 | LCD illumination | High, Low, Off | High |
| Fn9 | Flash Range Display | Meter or Feet | Meter |
Verdict
The AF360FGX II has a good array of settings. The user interface is well laid out so that one doesn't get lost. Some combinations of settings are not possible, and some depends on how the camera is set up which can be a bit baffling at times. It is advisable to consult the tables in the operating manual in order to fully understand how the flash can be set.


