
Ricoh GR vs. Nikon Coolpix A Review
Interface and Performance
On this page we will discuss each camera's user interface, features, and overall performance.
Nikon Coolpix A
The Coolpix A interface will seem very familiar to Nikon DSLR users, as Nikon decided to employ the same menu system in their new premium compact. There are no custom setting banks apart from the two user modes on the mode dial, though.
 |  |
Controls and features:
- Front
- Fn1 Button (customizable)
- Focusing Ring
- IR Port
- AF Assist Light
- Microphone
- Right Side
- HDMI Port
- Left Side
- AF/MF/Macro Switch
- GPS Port
- USB Port
- Top
- Power Switch
- Shutter Release
- Mode Dial
- Control Wheel #1
- Hotshoe
- Flash
- Rear
- Exposure Compensation Button (customizable)
- ISO/Fn2 Button (customizable)
- Zoom Buttons
- Playback Button
- Menu Button
- Control Wheel #2 / Mutli-Directional Pad
- OK Button
- Into Button
- Delete Button
- Flash Release Button
- AF/Flash Indicator
- LCD Screen
- Bottom
- Battery/SD Door
- Tripod Thread
- Speaker
The Nikon's button layout is rather traditional, and it works intuitively. To change the ISO or exposure compensation, one holds down the corresponding button while rotating the control wheel as desired. In manual mode, the top control wheel controls the shutter speed, while the ring around the OK button controls the aperture (this is a very clever design). Another great feature is the ability to zoom in during live view simply by pressing the zoom button. You move around the AF point during live view simply be pressing the multi-directional pad. The OK button re-centers the focus point. On the GR, this zooming is only accessible via a menu option.
Unlike the Ricoh cameras, the Coolpix A has a fully-featured status screen that provides easy access to the camera's key settings. It also has a context-sensitive help system that explains most settings in the menu.

Compared to the Ricoh menu system, however, the Nikon's is much more sparse; it does not allow for nearly as much customization. In addition, there are some annoyances: for example, by default, if one changes the drive mode to self-timer, the camera reverts itself back to single-shot after a photo is taken. Additionally, the settings that are not listed on the status screen, such as live view information display, are generally buried deep within the menu.
One area in which the Nikon is nowhere near as customizable as the Ricoh is its high-ISO noise reduction. While the Nikon only lets you select global adjustments, on the Ricoh you can tell the camera exactly when to apply what degree of noise reduction.
The screenshots below show the complete Coolpix A menu system:
 |  |
 |  |
 |  |
 |  |
 |  |
 |  |
 |  |
 |  |
 |  |
 | |
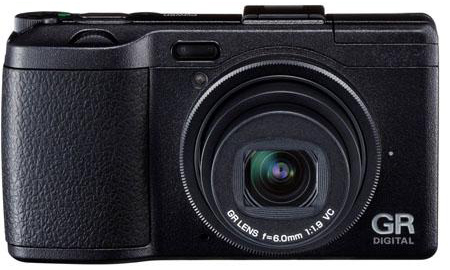
Ricoh GR
The new GR interface is an evolution of the GRD IV's.
 |  |
Controls and features:
- Front
- AF Assist Light
- Microphone
- Right Side
- HDMI Port
- USB Port
- Left Side
- Flash Release Button
- Effects Button (customizable)
- Top
- Power Button
- Shutter Release
- Mode Dial
- Control Wheel #1
- Hotshoe
- Flash
- Rear
- Control Dial #2
- AE-L/AF-C Controls
- Menu/OK Button
- 4-way Pad
- Fn1 Button (customizable)
- Flash Button
- Macro Button
- WB Button
- Playback Button
- Zoom Buttons
- Self-timer/Fn2 button (customizable)
- Display Button
- LCD
- AF Indicator
- Bottom
- Battery/SD Door
- Tripod Thread
- Speaker
The Ricoh GR allows for more customization than in any other camera we have reviewed to date, and the camera sports a number of unique features. For example, the rear control dial (it is not a control wheel, as it only moves in one-stop clicks) can not only be pushed to the left and right, but it can also be pressed down. When you do this, a special quick-access menu containing up to 5 user-defined setting groups (such as image quality and focus mode) is shown. These settings can also be changed via the full menu system.
Below are screenshots of the GR's menu system:
 |  |
| Ricoh GR Quick Access Menu | |
A special menu setting lets you allow the rear control dial to instantly adjust the ISO when pushed to either side. This is but one example of customization options that Ricoh has thought of. In addition to this dial, there are three buttons that can be fully customized to control just about anything (Fn1, Fn2, and the "Effects" button). The buttons can be set to control focus mode, focus assist, file format, 35mm cropping, self-timer, and much more!
While the GR doesn't have full-screen focus peaking, its autofocus sub-menu does let you enable four different types of edge highlighting on a small part of the frame (the size of which is adjustable):
 |  |
| Ricoh GR Focus Assist | |
It is a bit tedious to enable/disable the focus peaking, for one must first select the focus assist setting, then press Fn2, and then go into the second menu option.
An exhaustive listing of all the customization options that the GR offers is outside the scope of our review, but we will say that once you get a hang of the camera, you will be able to set it up to satisfy just about any need. In addition to having 3 "user" modes on the mode dial, the GR also has 6 custom setting banks for easy storage/recall of settings.
Our main complaint about the GR is that the compexity of the menu system can backfire. Various buttons are used differently in different contexts (for instance, the OK button also serves as the menu button), and things can sometimes get confusing, even for a seasoned user. Arguably the most tedious setting to change is the focus. If one wants to focus manually, the MF option must first be selected either via the menu, via a custom-mapped button, or via the quick-access menu. Once the camera is in manual focus mode, the focus setting cannot be controlled directly. First, the up button (labeled macro) on the control pad must be pressed, and then the front control wheel can be used to adjust the focus. After metering or shooting, the camera snaps out of this mode, and the macro button has to be pressed again before you can adjust the focus. As annoying as this may be, the distance scale that is shown in manual focus is nice because it indicates the current hyperfocal distance:
 |  |
| Ricoh GR Hyperfocal Distance Indicator | |
Some things in the GR's menu system are unfortunately not very well thought through. For example, the GR has no combined drive mode menu. Instead, it has one sub-menu that toggles just continuous shooting, and one sub-menu that enables and disables just the self-timer. Therefore, a single button cannot be mapped to control the drive mode.
Another nuisance is the exposure compensation feature. While in live view, the two zoom buttons directly control the exposure compensation. However, the camera stays in the exposure compensation menu (shown below) unless the user specifically presses the OK or cancel buttons. Taking a photo does not snap you out of this menu. This sub-menu is also the only way to view the histogram.
 Ricoh GR Exposure Compensation Menu
Overall, we do prefer the Ricoh's interface and control layout over that of the Nikon, but it was a very close call for us. All in all, though, the Nikon's manual focusing controls, easy zooming, and status screen do not outweigh the tremendous customizability that the Ricoh brings to the table. The Nikon also lacks a number of features that are found in both Ricoh cameras, such as the electronic level. As both cameras are innovative in some areas and quirky in others, ultimately it will be up to you, the photographer, to decide which interface better fits your shooting style.
Note that in green/auto mode, the both the Nikon and the Ricoh menu systems are greatly simplified, though rather than hiding options, the Nikon grays them out, making it more difficult to change and browse through settings.
 |  |
 |  |
 |  |
 |  |
 |  |
 |  |
 |  |
 |  |
 |  |
 |  |
 |  |
 |  |
 |  |
 | |
Ricoh GRD IV
Ricoh's previous-generation interface has the same fundamentals as what's in the new GR. The key difference is that the old menu system has pagination, while the new menu system does not (all of the GR's settings are displayed on a single page and separated by dividers). The fonts and icons on the GR have also gotten a facelift, as is to be expected.
 |  |
Controls and features:
- Front
- AF Assist Light
- AF Sensor
- Microphone
- Right Side
- HDMI Port
- USB Port
- Left Side
- Flash Release Button
- Top
- Power Button
- Shutter Release
- Mode Dial
- Control Wheel #1
- Hotshoe
- Flash
- Rear
- Control Dial #2
- Menu/OK Button
- 4-way Pad
- Fn1 Button (customizable)
- Flash Button
- Macro Button
- Playback Button
- Zoom Buttons
- Self-timer/Fn2 button (customizable)
- Display Button
- LCD
- AF Indicator
- Bottom
- Battery/SD Door
- Tripod Thread
- Speaker
The GRD IV lacks the "effects", AE-L/AF-C, and WB buttons compared to the GR.
Below is the GRD IV's complete menu system:
 |  |
 |  |
 |  |
 |  |
 |  |
 |  |
 |  |
 |  |
 |
Shooting Modes
All three cameras feature the basic shooting modes: full auto, program, aperture priority, shutter speed priority, and manual. On top of these modes, the GR has Pentax's unique "TAv" mode that lets you set the shutter speed and aperture while the camera controls the ISO. The GR's P mode includes Pentax's "hyper program" feature that allows you to step in and manually set the shutter speed or aperture at any time, without changing the mode using the mode dial.
The Coolpix A, being more beginner-friendly, has a host of scene modes, such as "landscape", "portrait", "pets", etc. Even though the GRD IV also has a scene setting on its mode dial, this is a misnomer as the "scene" options shown in the menu include movie, HDR, and perspective-corrective modes.
Performance
Both the Coolpix A and the GR have speedy processors that deliver smooth live view and recording performance in both JPEG and RAW. While the GRD IV often displays a "data being recorded" message when shooting in RAW mode, there are no such messages with the other two cameras. The GRD IV's live view framerate also slows down in low light and at high ISOs.
While file deletion is very quick on both new cameras, the GRD IV generally takes a bit longer.
Battery Life
The large sensors found in the GR and Coolpix A shorten their battery life considerably when compared to the GRD IV. Although the specifications suggest otherwise, we actually found the Nikon to last longer than the GR (its battery has a higher capacity). Regardless, daily recharging is a must with these two cameras.
Flash
Both cameras feature small built-in flashes that do a good job of covering the entire frame despite not being awfully powerful. They can be used in auto, slow-speed sync, red-eye, rear-curtain sync, and manual mode. All shutter speeds up to the maximum speed are suppored by both the GR and the Coolpix A (the GRD IV does not have rear-curtain sync).
The Nikon's flash recycle time is about 2 seconds, while that of the GR is about 4 seconds.
One quirk with the Ricoh GR is that in the continuous drive mode, the flash menu is disabled (as if the flash were stowed). On the Nikon, the flash can still be used, but multiple photos will not be taken.
In addition to the built-in flash, you can also mount an external flash using the dedicated hotshoe. The Coolpix A is compatible with Nikon's full lineup of i-TTL flashes.
Features
The Coolpix A is a bit short on fancy features, for compared to both Ricoh cameras, it lacks not only the electronic level but also a live view histogram. It does not offer as many RAW development options, though it does have some retouch options that the Ricoh cameras lack, such as side-by-side comparisons.
It is also worth noting that both Ricoh cameras include interval shooting and multiple exposure support.

