
Astrophotography Part 2 of 6: Equipment Selection
Choose your grear wisely!
By K David in Articles and Tips on Jun 7, 2015
 Water Wheel and Big Dipper | K David
Astrophotography is one of the newest trends among photographers. High-quality digital cameras with good high-ISO performance combined with fast, high-quality optics from makers like Pentax, Samyang, and Tamron are taking astronomical photography out of the enclaves of astronomers and putting it in the hands of hobbyists, too. This six-part series examines various elements of astrophotography.
This article looks at the equipment you'll want to have for astrophotography. Pentax DSLRs, Pentax film cameras, lenses, astronomical photograph tracking systems, and tripods all help create the image you've already planned. Using the correct tools for the shoot helps improve your ability to obtain an ideal image. Remember: horses for courses. Not all tools are created equal.
Camera Selection
Pentax has many cameras with good high-ISO performance. But even if you have an older model with poorer high-ISO performance, you can mitigate that with a fast lens or an astronomical-stabilization system. An old Takumar or SMC-M 50mm f/1.4, SMC-A 50mm f/2, or brand new FA Limited 31mm f/1.8 (as well as many other options) allow a user with an older body to take stunning astronomical photographs.
Pentax DSLRs

Any market-segment Pentax body can be used successfully for astrophotography. If you have a newer body such as the K-5, high-ISO performance will allow greater lens selection flexibility. Further high-ISO benefits are offered by full-frame cameras and medium format cameras like the 645Z.
If you're shooting with other brands, similar logic applies. Certain bodies such as the Nikon D810A or Canon 60Da are designed specifically for astrophotography if you really want to go all-out, but they aren't cheap.
Since the new Pentax K-3 II has a built-in GPS and astrotracer, it's technically the best Pentax body for the job, but any other recent DSLR will also support this functionality with the external O-GPS1 unit.
Generally speaking, Pentax DSLRs are fantastic for astrophotography because Pentax users have a large selection of fast legacy lenses as well as many brand-new lenses. You can start in astrophotography with a Pentax DSLR for a minimal upfront investment.
Pentax Film Cameras

Many Pentax film cameras will work very well for astronomical photography. However, some work better than others. Bodies with battery-powered shutters, such as the 6X7, would seem ideal but actually are have a weakness. When the battery dies the shutter closes to protect the mechanisms. On my 6X7 body, batteries last between three and eight hours, which may or may not be enough for an image. And there's no way to know how long the battery will last until it dies mid-shot. Ideally, if you have a 6X7 or other battery-powered-shutter body, put brand new batteries in it before each overnight shoot.
Sadly, Pentax never made a large-format camera. But that's okay. We as Pentax users still have some of the best medium-format bodies and lenses ever made. The 6X7 lineage has fast lenses capable of taking great night images. But the medium-format bodies are also heavy and taking an image that tracks stars will require a very beefy tracking unit. Pentax's medium-format bodies are well suited for star trails photography, however.
The best Pentax bodies to use are the all-manual, all mechanical options. The MX, K series, Spotmatics, and older S and H bodies will stay in bulb or time mode for eternity with a locking cable release. If you don't have a cable release, pick up a couple branches of fresh broccoli and use one of the rubber bands that holds them together over the shutter release. The rubber band won't put enough pressure on the shutter to trigger it but will keep the shutter button depressed and shutter curtains open once you press the shutter release. As an added benefit, you can eat the broccoli and your mom or your doctor can get off your back about eating veggies for a day.
ISO Selection
Sensitivity is a double-edged sword. Too slow, good for preventing noise, and your images won't capture enough night details; too fast, good for catching ample detail with short shutter speeds, and your images will have too much noise. Finding a nice balance can be tricky. Personally, I like ISOs between 250 and 800. I've ventured as high as 1,600, but find no benefit there. Typically, with a fast lens, you can keep the ISO at or below 500 and have relatively noise-free images.
Digital
Fortunately for Pentax users, our DSLRs come with digitals sensors that have a 200 ISO native sensitivity. So we gain an extra stop on the high end in terms of noise reduction. All Pentax bodies can handle 400 ISO well. Many can handle 800 ISO. 400 ISO is suitable for many types of astronomical photographs. 800 ISO can capture an incredible level of night sky detail.
As noted above, though, selecting a fast lens will help. If you have a lens with an aperture of f/2 or larger, you can easily take a stop of light away. 250 to 400 ISO at f/2 or f/2.2 is a great combination for many night settings. Experiment with your settings and see what results you like. You key technical image qualities should be:
- Noise level (lower)
- Color (greater saturation)
- Sharpness and detail
Film
If you want to take an image with a tracking unit, you'll want to use a smaller, lighter Pentax body. An M-series body (especially an MX) is an ideal option. The K-series and Spotmatics can actually be too heavy for many inexpensive tracking systems, like the Vixen Polarie. If you are picking up a film body specifically for this and want to use a Pentax, look at the S/H line for very light 35mm bodies with full manual operation and almost no shutter shake. Also, these bodies pre-date light meters, and light meters are useless for astronomical photography. The M42 lenses supporting these bodies have some sharp and fast options as well
Reading a (Film) Reciprocity Failure Chart
 Reciprocity failure is a characteristic only of film photography. This is a sample reciprocity failure chart (Ilford's FP4+). The metered exposure is along the bottom and the compensated exposure on the right. Reciprocity is the principle that says f5.6 at 1/125th of a second is the same amount of light to the film or sensor as f8 at 1/60th or f4 at 1/250th. And that works most of the time. However, for most films, once you exceed one to four seconds, reciprocity failure becomes an issue.
As a note, nitrogen hypersensitization, cold cameras, and vacuum systems for negative flatness and stabilization are outside the scope of this article series. Mostly that's because modern film emulsions are advanced to a point that the highly-advanced techniques required even twenty years ago are no longer mandatory.
Reciprocity failure simply means that not enough electrons contact a silver grain to incite it to react and expose. Film manufacturers provide charts (often, not always) to help photographers calculate long exposures. The longer the exposure, the greater the required compensation.
On the chart above, if your light meter (or digital SLR) tells you (or shows you) that a 25-second exposure is returning a suitable level of detail in your astronomical photograph, then with this film you would need a 120-second exposure or greater.
When you plan your astronomical photograph, you should also be planning which film you will use. Knowing your film allows you to research the reciprocity chart and ascertain your correct exposure ahead of time. Also know how much ambient light you have in the vicinity to avoid base fog due to adjacent (even out-of-frame) light sources.
Lens Selection

This first point should not be controversial. Do not use a zoom lens for astrophotography. Use a prime lens and use the fastest one that you can get (f/1.4, f/1.7, f/1.8, and f/2 lenses provide the most flexibility). A wide aperture allows you to use slightly slower shutter speeds, and the lack of depth of field is irrelevant. Having a lens that's very sharp close to its maximum aperture is ideal.
Because astrophotography is a game of minutes or hours, a fast, manual-focus prime lens is a great option for astrphotography. Many other Pentax prime lenses are great and my five best Pentax prime lenses for star trails as well as astrophotography are listed below.
But first, why shouldn't you use a zoom lens? A zoom lens adds an element of added motion to a camera in that the zoom could creep during the shot. More importantly, though, zoom lenses are often up to three stops slower than primes, meaning you need to set your ISO three stops higher to obtain the same results. That introduces significant noise. Using a zoom lens increases the likelihood of image quality loss at a time when every factor available to gain image quality should be used fully.
Zoom lenses are also longer than prime lenses. This shifts the camera-lens center of gravity away from the central point in the tripod. The further the camera-lens center of gravity is from the tripod's center, the more likely that the combination could introduce camera shake.
Star Trails and Sidereally Tracked Images
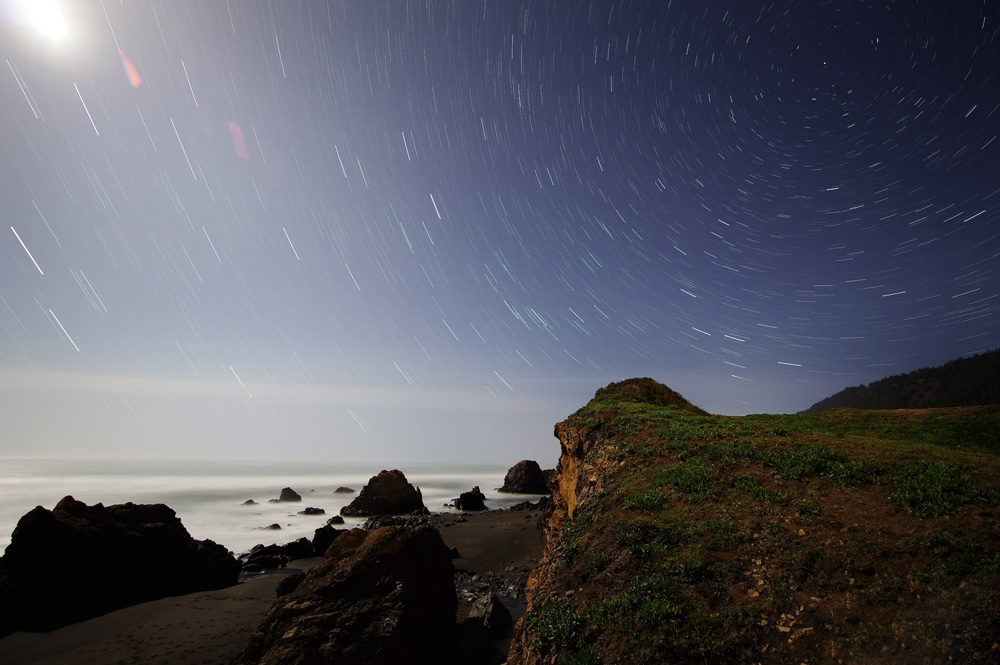 Stars, Beach, and Moon | K David
My favorite lens for star trails is my FA Limited 31mm f/1.8. I've also used my SMC-M 50mm f/1.4 extensively. Recently, I've been using my Samyang 10mm f/2.8. Here are my five best currently available Pentax lenses for astronomical photography and a discussion of each:
- Pentax FA Limited 31mm f/1.8
- Pentax FA Limited 43mm f/1.9
- HD Pentax DA 40mm f/2.8
- SMC Pentax DA 14mm f/2.8
- SMC Pentax DA 50mm f/1.8
Pentax FA Limited 31mm F/1.8
This is my go-to lens for star trails. In digital, this is a simply incredible lens. The 31mm focal length gives a nice angle of view on APS-C and allows for plenty of creative framing options. The lens' legendary sharpness will deliver stunning performance. Combined with a fast maximum aperture, almost no type of astronomical photograph is off-limits with the FA Limited 31mm.
Pentax FA Limited 43mm F1.9

The presence of the other wide FA limited lens shouldn't be a surprise for anyone. This is another great, fast lens with good on-paper credentials for astronomical photography. It's also smaller than the 31mm and easier for packing. It will also place less demand on a sidereal tracking system's motor and keep the camera-lens center of gravity close to the tripod's center. And if you're taking your camera on a multi-day expedition, the 43mm is a great standard lens that can cover most of your photographic needs during the rest of your trip.
HD Pentax DA 40mm F/2.8

One of the slowest lenses on this list, the DA 40mm f/2.8 is also tiny, making it the lightest lens here. For smaller sidereal tracking systems, that weight reduction presents a significant value. Also, if you plan to pack your gear to a remote location, the smaller size and weight are very useful. At 40mm, this is a good focal length for general photography if you plan to do more than astronomical photography on your outing.
SMC Pentax DA 14mm F/2.8

The widest lens on this list, the Pentax DA 14mm is good to get a wide coverage. The previous lenses can lack enough width to capture nice, large swaths of sky and ample star movement. This lens eliminates those concerns. It is a relatively slow lens for astronomical photography and is also the largest lens on this list.
SMC Pentax DA 50mm F/1.8

The longest focal length here, this is a great lens with amazing sharpness that can provide targeted image composition.
Non-Pentax Lenses

A number of good lenses exist that aren't made by Pentax. Chief among them, the Samyang 10mm f/2.8, Samyang 14mm f/2.8, Samyang 24mm f/1.4, Samyang 35mm f/1.4, Sigma 10mm f/2.8, and Sigma 35mm f/1.4 Art are some of the many viable third-party options.
Lunar Imaging
 Moonrise Water Tower | K David
There are two primarily different types of lunar image: a moonscape where the moon is an element in the image's composition and a high-magnification moon shot.
If you plan to take an image where the moon is an element of the composition, any lens can give you great results. If you want to take an image of only the moon and fill as much of the frame as possible with the moon, you'll need a telephoto lens and possibly a teleconverter.
 The Moon | K David
Pentax does not have a large lineup of in-production super telephoto prime lenses. Currently, they only make the HD 560mm DA. However, at that length, the moon is stunningly close. With a 1.4x teleconverter such as the DA AF WR 1.4x, the 560mm lens becomes a 784mm lens, enough to obtain images of the moon that fill almost a quarter of the frame.. You may need a second tripod, however, to prevent camera shake with this setup.
Pentax has myriad legacy lenses available. If you're looking for a less expensive lens to use, check out older lenses no shorter than 400mm. Even a 300mm lens likely won't bring in enough detail in a moon-only shot.
If you want to take a moonscape where the moon is an element in your image, you can plan this out ahead of time (see the first srticle in this series for a link to The Photographers Epehemeris.) As for picking a lens, the wider the lens the smaller the moon will appear in relationship to its surroundings and as a part of the image. Also, as the moon rises above the horizon it will appear to be smaller.
Two primary techniques exist to take a moon shot where the moon appear larger than life. Firstly, place the moon partially behind a horizon item, such as a tree, building, lighthouse, or mountain. Also, use a telephoto lens like a 200mm or 300mm to make the moon appear closer to the subject. These techniques will help make a moon a more prominent element in a moonscape image.
Planetary Imaging
Planetary imaging is a niche type of astronomical photography. The means and methods for it are outside the scope of this article series. If you're interested in this type of work, you'll need a telescope, not a camera lens, and a telescope adapter for your DSLR. You probably also already know how to do this if it interests you.
Solar Imaging
 May 20, 2012, Eclipse in Infrared | K David
Solar imaging is almost as much of a niche as planetary imaging. If this is your goal, in addition to a long lens, you'll need special filters to protect your camera, lens, and eyes.
Tripods
Many tripods exist that will work well for astronomical photography. Likewise, many exist that you should not pick. The more compact, more leg segments, and lighter construction the tripod is, the less likely it will be to provide a suitably stable rest for your camera during a long-duration astronomical photograph.
Key Characteristics

Selecting a good tripod is paramount to a blur-free, shake-free astronomical photograph. A large- or medium-format tripod will, of course, work very well. However, not everyone has upwards of $800 to spend on a tripod. So here are some key characteristics as well as some specific suggestions in the less-than $500 range.
Key Characteristics (in order of importance)
- Suitable weight rating for your gear
- A good tripod head that can tighten and not move under a static load
- Three or fewer extensions
- Sturdy legs without play or give
- Struts connecting the legs to the central column
What constitutes a suitable weight rating? If your DSLR and lens weight, combined, are five pounds (2.25 kilograms), it's a good idea to exceed that by about 100% and buy a tripod rated for 10 pounds (4.5 kilos.) Going higher can afford you insurance if you use a large lens (like the Samyang 10mm f/2.8) that shift the camera's center of weight off the tripod's central column. It's always better to err on the side of caution with tripods for astrophotography.

What constitutes a good tripod head? Two factors in this are key: how tightly you can secure it and how easily you can undo the tightening. Those factors both relate to one factor, the head's construction. A metal head will be easier to set and undo, even after the air hits the dew point or the temperature drops.
I have two tripod heads that I use, often, for astronomical photography. One, a Manfrotto, tightens and locks down well. So does the Vivitar. I also have to use a vice grip on the Vivitar's vertical tilt locking dial to loosen it. The key difference is that the Vivitar, though nothing moves once it's tightened, is plastic. The plastic locks to itself well, especially when the temperature changes. Plastic, being susceptible to temperature-related dimensional shifts, can cause assemblies to contract into each other when the temperature drops overnight, squeezing adjustable components. This, yes, locks the head in place but also makes unlocking it very difficult.
A quick note on ball heads. They are easy to use in the field and easily adjustable when your fingers are cold. However, a beefier ball head is required to provide the same level of support as a three-way head.

Why three or fewer extensions? The tripod above has four extensions. It's a sturdy model, but at each extension union exists an opportunity to tripod shake. Also, more extensions means that the lower leg segments are likely to be thinner and less capable of supporting a camera for an extended duration without flex occurring at some point. The exception to this rule is if you're not going to extend the legs any.

Why Sturdy Legs? The tripod pictured, the Manfrotto 190X, is my go-to tripod for everything. It works very well for astrophotography because the legs are sturdy enough to support the cantilevering extension. Sturdy legs, of course, prevent the tripod from shifting. One difficulty with overnight photography is that, often, the changing air temperatures bring or cause air movement. This manifests as a breeze, often at ground level, that can shake the legs of flimsy tripods.
 Why struts that connect the legs to the central column? Simply for added support. This helps prevent tripod shake and provides for a more stable image.
Recommended Tripods
Here are five tripods that should be good for astrophotography. (The parentheticals indicate the maximum weight rating.)
- Manfrotto MT190XPRO4 with Three-way Head (15 pounds, 6.75 kilos)
- Slik Pro 700DXQ with Three-way Head (19 pounds, 8.6 kilos)
- 3 Legged Thing Evolution 3 Pro Steve (66 pounds, 30 kilos)
- Sachtler FSB 8/2 HDM (22 pounds, 10 kilos)
- Propter People Heavy Duty Tripod (30 pounds, 16.8 kilos)
Sidereal Tracking Systems
For this article I had the opportunity to use three entry-level tracking systems: the Vixen Polarie, iOptron Skytracker, and Pentax O-GPS 1. The Pentax K-3 II was released after this article was authored and I could not test its on-board astronomical photography capabilities.
Interestingly, Ricoh has given a lot of support for astronomical photography. The K-S2 has a video mode designed for astronomical photography (Star Stream.)
Pentax GPS Unit

The O-GPS1 is the least-expensive system available, and it is only available for Pentax cameras. It moves a camera's image sensor in the same path as the stars for up to five minutes. This requires that the camera be in a fixed position and it will blur any foreground objects. Here is a sample of the type of photo that the O-GPS can take.

Big Dipper | K David
This unit is good for taking shots of stars and rendering them in sharp detail. The O-GPS's capabilities have two limiting factors: the quality of the camera's shake reduction system and the quality of the user's calibration. During field tests, the K-3 produced sharp images of stars with exposures up to four minutes. The K-S2 could not produce an image with sharp stars with an exposure duration exceeding 61 seconds. For those tests, I compared both cameras on the same night on the same make of tripod and with the same lenses.
 Sixty-one-second Exposure with the K-S2 | K David
Focal length also plays a factor in the O-GPS unit's ability to track accurately. With the Samyang 10mm f/2.8 and the 31mm FA Limited f/1.8 on the K-3, exposures of 237 seconds and 150 seconds, respectively, returned sharp stars. With a Vivitar 400mm f/6.3 attached, images of no exposure duration could return a sharp image until I mounted the K-3 on my sturdiest tripod and placed the 400mm lens on a concrete wall. That added support allowed for a twenty-second in-focus exposure. This limited compositional choices even more than the limited angle of view of the 400mm lens on a crop-sensor camera.
 Twenty-second Exposure with a 400mm Lens | K David

Stars and Clouds (237-second Exposure) | K David
Vixen Polarie
 Polarie Test Image | K David
Of all the equipment tested thus far, the Vixen Polarie was the biggest disappointment. The Polarie cannot be used out of the box. It requires a ball head (which Vixen sells) and benefits from a polar scope (which Vixen sells.) I put a $12 generic ball head on and that worked well. The lack of a polar scope was a significant issue. Lining up the Polarie with the sighting hole delivered unusable image even with the Samyang 10mm f/2.8.
The above sample photo was a sixty-eight-second exposure, which is good for what the unit can do. The best I achieved was an eighty-second exposure. Typically, I could not maintain an in-focus exposure for longer than thirty seconds.
 Eighty-second Vixen Polarie Exposure | K David
I managed these shots on my third night using the Polarie. What led me to get these was nothing short of disgust with the results obtained by following the manufacturer's use instructions. I obtained the most accurate polar alignment by taking the compass and tripod mount out of the tracker and visually sighting Polaris in the opening where the camera mount would be placed. That was inaccurate but resulted in suitable tracking.
An additional disappointment in the Polarie, which I didn't realize until trying the iOptron, is how poorly it's constructed. The iOptron mounts directly to the tripod's head screw. The Polarie has to mount to a tripod head, meaning that your tripod head has to be strong enough to support the Polarie, the head on the Polarie, your camera, and your lens. This introduces a lot of shake that results from the center of gravity being over the edge of the tripod and not evenly aligned with weight-bearing components (the assembly of tripod head, Polarie, tripod head, camera, and lens has a bit of a winding shape.)
The Polarie is also plastic, whereas the iOptron Skytracker is metal. Yes, the Polarie can move at the same rate as the moon and sun, but those are not hugely beneficial speeds as both objects have enough relative brightness to make a tracking system pointless. I suggest avoiding the Polarie.
iOptron Skytracker
 iOptron Skytracker Fifteen-minute Alignment Test | K David
The iOptron Skytracker, on the other hand, was the best surprise I had of the equipment I tested. In fact, I will be buying one of these for myself this summer. It's a fantastic piece of equipment. I used the same $12 ball head with the iOptron and had stunning results. The above animated gif compiles a series of shots taken over a 15-minute span. Each image was 30 seconds. This unit has the capacity to take long, stop-motion sequences of the stars because it tracks hyper-accurately when aligned correctly.
The iOptron points out the shortcomings of the Polarie. The iOptron Skytracker includes a polar alignment scope. The unit is made of metal. It mounts directly to the tripod base. It uses four AA batteries instead of two, indicating that it has a better (or at least higher-torque) motor. The iOptron also has an adjustable base, operated with a worm screw, that adjusts highly accurately to provide proper alignment based on your latitude. The iOptron was so intuitive that, after I figured it out, it was easier to use than the O-GPS.
But that's the rub. Figuring out how to use it took about an hour and the manual wasn't very helpful. The basic premise is to affix the iOptropn to your tripod, adjust the hatch marks on the base (with the hand-powered worm screw) to your latitude. At your site, point the iOptron toward the north and use the polar scope to site Polaris. The scope has a series of concentric circles that correspond, roughly, with your latitude. Find the one that corresponds with your latitude and place Polaris on it at the point corresponding with the hour hand placement on an analog clock at the time you line up the scope. It sounds tricky, but it's simple in the field so long as you properly pre-focus the polar scope (and then if it doesn't come out of focus in your pocket, like mine did, because it has no focus lock), know your latitude, and know the time.
One nice thing about the iOptron Skytracker's metal construction is that the weight prevents it from being highly susceptible to breezes. It places a LOT of weight in the tripod's center column, evenly spreading it on the legs. This helps plant the feet and keep the tripod motionless.
This second animation tracks the movement of stars for 47 minutes. This animation shows the iOptron's potential for long-duration tracking shots as well as my inability to competently frame a time-lapse with a moving camera.
 First Star Tracking Animation Attempt | K David
Solo Shot
I did not try the Solo Shot for this article. However, it appears to be a viable option for this type of photography. It also has a feature that allows it to track (multiple) people carrying a remote control, giving it flexibility to perform other types of photography.
Home-made Barn Door Trackers

Barn-door trackers come in two general types: single-arm and double-arm. All trackers have a base board which remains stationary and a camera board that moves to keep the camera aligned with stars as they move in our sky. Single-arm trackers are basically two boards and a hinge with a long threaded screw that moves the board with the camera either away from or toward the base other. Double-arm doors have a drive arm that pushed a separate, second arm that has the camera mounted on it.
Single-arm trackers come in two sub-styles, straight-drive and curved drive. Straight-drive trackers use a straight drive road to move the camera arm. Curved drive trackers have a threaded drive rod that's been bent to the same radius as the earth so that the camera moves along the same path as the earth. The latter allows for longer photos with less movement error.
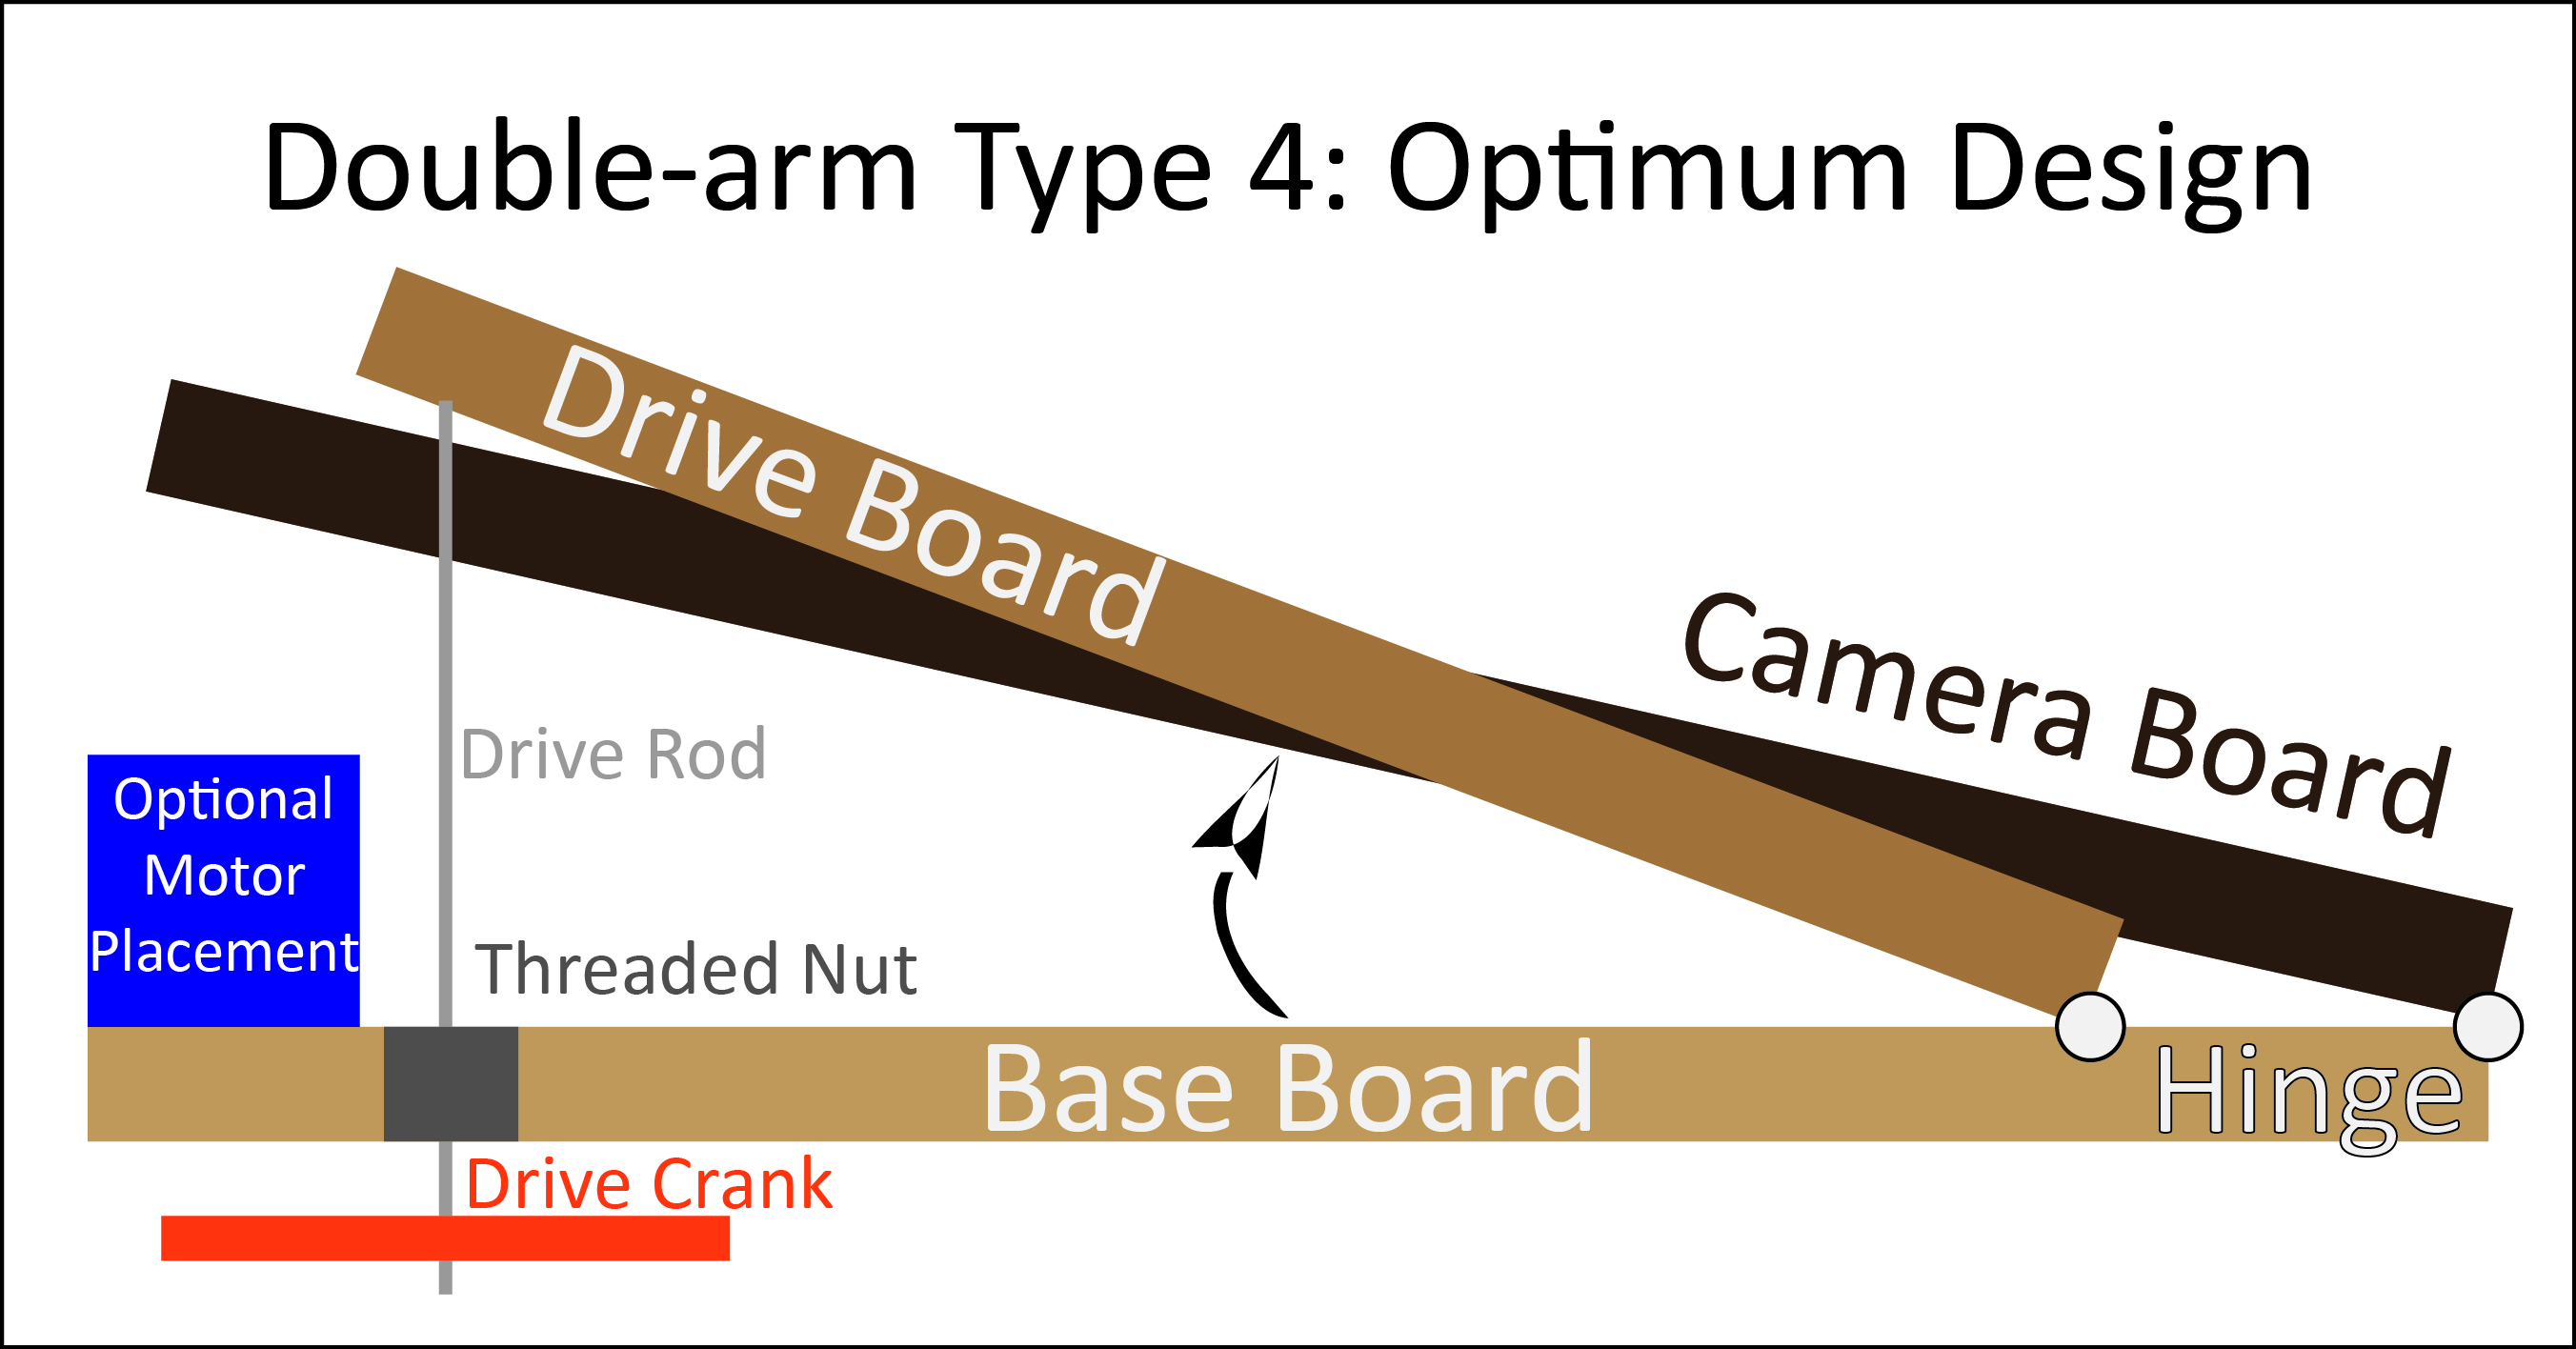
Double-arm trackers come in four sub-styles. Of these, two are known to be good and two faulty. As we move forward with barn-door trackers, I will be using the best double-arm design for the prototype and final construction, the Type 4. The article dedicated to barn-door trackers will detail the one I make, provide the algebra required to scale it up or down, and provide designs and a materials list that will allow you to make your own.
Miscellaneous Equipment
Pentax makes two pieces of equipment that are invaluable in preventing image shake. These remote releases prevent image shake by allowing the photography to begin without the shutter button being pressed.
Pentax Remote Control
Pentax's Remote Control F is a single-button remote control unit that acts as a shutter release. As long as your DSLR can see the infrared beam, you're in good shape. There are also knock-off versions of this available for about 9% of the price, but they last about 9% as long and have about 9% of the reliability.
Cable Release
If you don't want to carry around something that you could easily lose, like a small remote, a cable release is a good option, too. Remotes, however, provide a better certainty of shake-free imagery compared to cable releases. Cable releases leave a cable hanging from the camera that can move if there's a wind. It's a good idea to remove a camera strap before you take a long-duration photo to prevent image shake. So, too, is it a good idea to use a remote control instead of a cable release.
Safety Equipment
Remember to be safe. You'll be walking at night meaning that it's easier to plant your foot in a rabbit hole and twist or break your ankle. Also, at some times in the night in the desert, scorpions may still be out and hard to see. These warnings are not meant to scare you away from night photography, but simply to help alert you to risk mitigation. Here is some basic safety equipment you should absolutely have for a night photo shoot:
- Flashlight
- Cellular phone
- Water and a first aid kit
If you are in a scorpion-rich area, an ultraviolet light can help you spot them as you walk. Also, if you plan to be in an area with bears, wolves, muggers, or other predators, some pepper spray can help protect you. I have never brought pepper spray on a shoot, but were I to go to an area with predators, I would.
More from the Pentax Forums Homepage
- Ricoh updates the K-1, K-1 II, GR III, GR IIIx
- March "Flowers up Close" Contest...
- HD FA 50mm F1.4 vs. SMC 50mm F1.4 Classic Review
- Announcing Our April, 2024 Photo Contest
- Introducing Pentaxify AI by PentaxForums.com
- The Making of "Autumn Draws"
- Ricoh launches the RICOH GR III HDF and RICOH...
- Join Ricoh for the April 6 GR Photo Walk in Las...

Tags
astronomical, astrophotography, astrophotography series, gps, ioptron, manfrotto, o-gps1, photography, polarie, schlater, sidereal, skytracker, star trail, tripod, vixen
Comments