
K-3 III How-to: Smart Function Set-up and Use
How to customize and use the Smart Function
By PF Staff in Articles and Tips on Aug 10, 2021
The Smart Function feature of the K-3 III can seem a bit convoluted at first, in particular since it works quite differently from the older DSLRs, the K-1 series and KP. The bonus, though, is that it is highly customizable and that it, when first set up, can be operated without removing the eye from the viewfinder.

The first thing to do is to decide is which five functions you want assigned to the Smart Function (SFn) button. The options are:
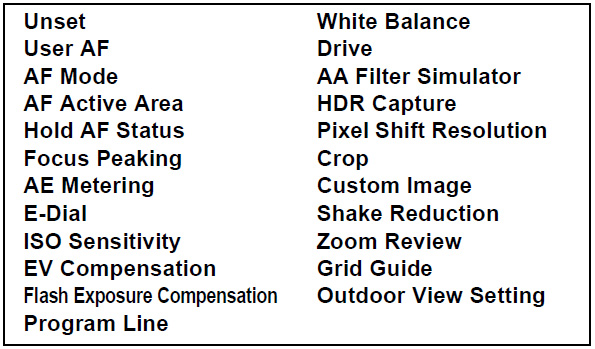
When you have picked your five, proceed to setting up your selection.

Step 1: Setting up your Smart Function Selection
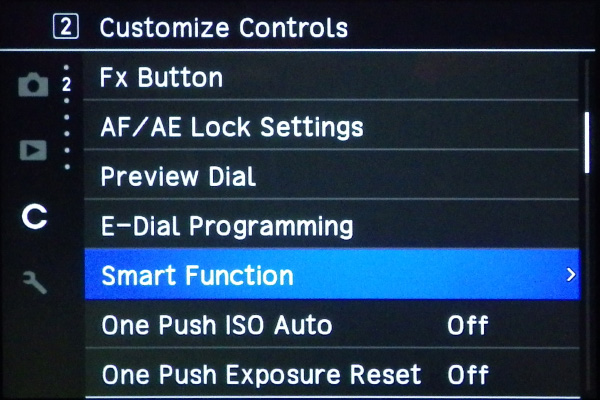
Bring up the customs menu, page 2 and select Smart Function:
Right-clicking brings you to this screen:

Select the one function out of the five you want to change and you can now scroll down to the function which you want to assign to this Smart Function:

We picked User AF. Press the OK button. This brings you back to the prior screen:
Some of the functions have two or more settings. Look for the INFO button hint at the bottom of the screen.
If the INFO button hint is present it means that you can select and set a number of settings for this Smart Function. If the INFO button hint is present, hit the INFO button (otherwise hit the MENU button). In the case of User AF (which we picked to be Smart Function number 1) you can set three settings, each of which defines a combination of AF related features:

Each setting can hold a combination of
- AF mode (Single of Continuous)
- AF active area
- Hold AF status (not available in AF S mode)
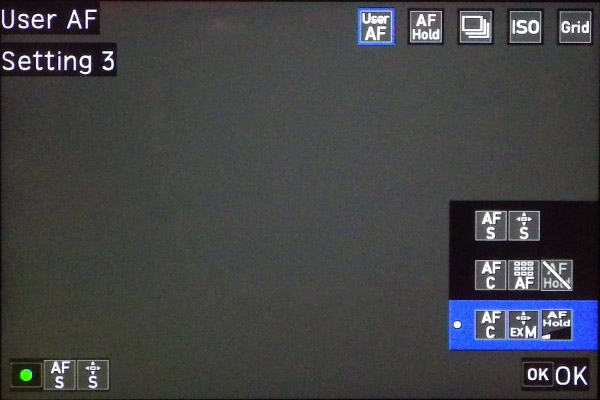
Right-click on the setting you want to change; we picked setting number 3 and right-clicked and got this screen:

We can now set the combination of the three settings available. We picked AF Active Area and right-clicked and got this screen, where we then picked Expanded Area AF:

Click the OK button and then back out of the menu levels by clicking the MENU button.
Note how the information on the grey area at the bottom guides you along.
Note that you can navigate the menus and also hit CANCEL, INFO and OK by touching the screen (unless you have disabled the touch screen, that is).
We have two favorites that we have found particularly convenient to have available a as Smart Functions:
- User AF
- AF Hold (it is quite convenient to be able to change this on the fly without removing the eye from the viewfinder)
Step 2: How to Use Smart Functions when Shooting
While it is a bit of a task to get the Smart Functions feature set up, it is a breeze to use!
- Press SFn
- Select the Smart Function with the rear e-dial
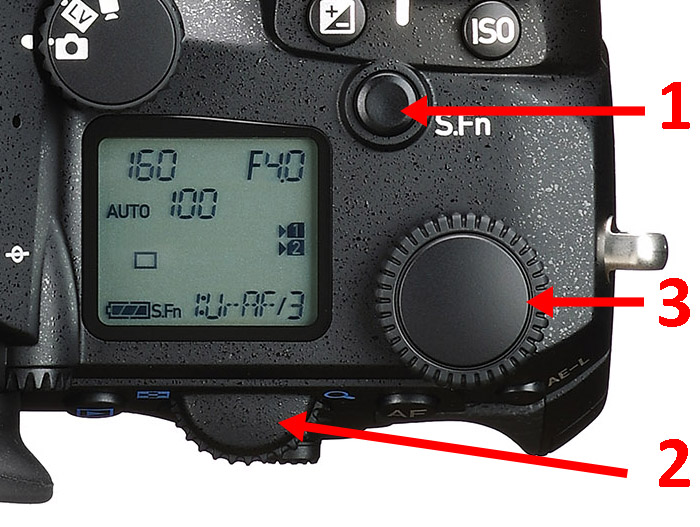
- Select the setting with the knob on the top plate
The rear monitor displays the options with the selected Smart Function in a straightforward way which is easy to understand (AF C, Expanded AF area M, AF hold low):
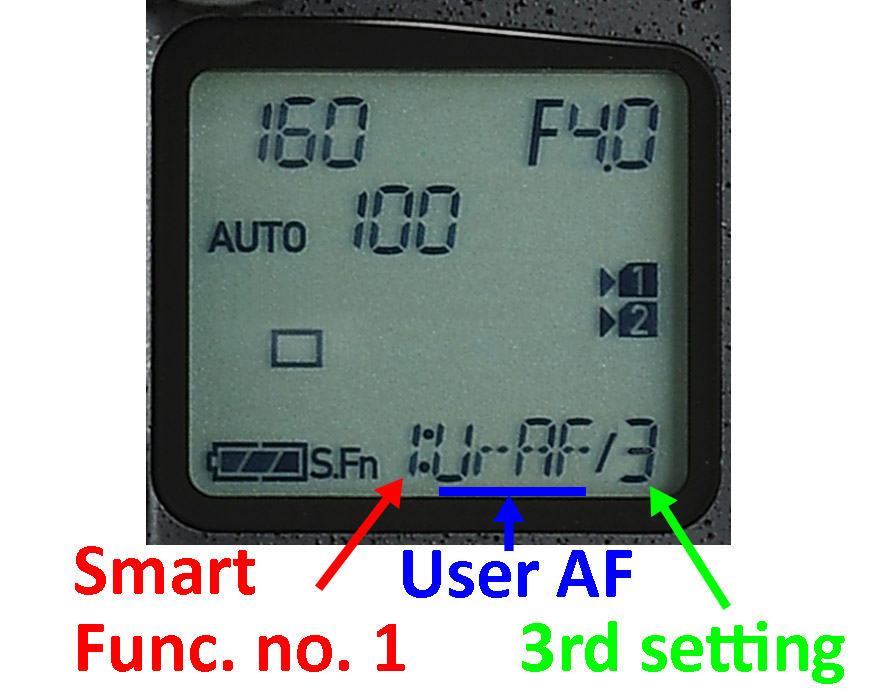
The top LCD is more cryptic in its presentation and in order to understand the display you must recall under with number you stored the setting (3 in this case):
The viewfinder does a better job than the top LCD although some information is omitted in some cases.
More from the Pentax Forums Homepage
- March "Flowers up Close" Contest...
- HD FA 50mm F1.4 vs. SMC 50mm F1.4 Classic Review
- Announcing Our April, 2024 Photo Contest
- Introducing Pentaxify AI by PentaxForums.com
- The Making of "Autumn Draws"
- Ricoh launches the RICOH GR III HDF and RICOH...
- Join Ricoh for the April 6 GR Photo Walk in Las...
- The Making of "Gotcha!"

 Various writers regularly contribute articles to the Pentax Forums homepage blog. More recent articles are published under each author's forum username. We hope you enjoy our guides and news...
Comments