
Weather / Storm Photography Tips and Tricks
By Black Mesa Images in Articles and Tips on Mar 26, 2018

In the Northern Hemisphere, springtime is right around the corner. Here in the High Plains of the United States, that means thunderstorm season. Due to the nature of weather photography, it can be confusing for the beginner. Here are some of the tips and tricks that I have learned over the last several years capturing thunderstorms.
With the advent of the digital age, social media, and reality shows featuring some of the pioneers of storm chasing; the popularity of weather photography has exploded. Companies have sprung out of nowhere that offer storm chase tours. People from other countries come to the US every year during “storm season” just to storm chase. The term "
The purpose of this article is to serve as a primer for those who would like to photograph weather. It will include some of the resources that I use, tips for capturing a fast moving wall cloud or lightning, and a quick rundown of my post-processing technique.
Click any image in this article to enlarge and browse.
Safety
Storm chasing and weather photography can be an inherently dangerous activity. The level of danger will increase depending on your location relative to the storm's core, lightning in the area, the severity of the storm, and the number of people that are on the same road as you.

In the last several years, due to the expansion of social media and “reality” TV shows, storm chasing has become very popular. Weather photography groups seem to be some of the largest groups I have seen on Facebook, and the genre is very popular across the Internet with several photographers becoming almost household names due to their work. Because of this popularity, come springtime and severe weather alerts, the number of storm chasers on the roads grow to a mounting crescendo around the end of May. My solution, avoid the crowds. I am a photographer first and my goal is to capture an image that is unique. I miss the good stuff, but most of the time I am able to attain my goal of a unique image.
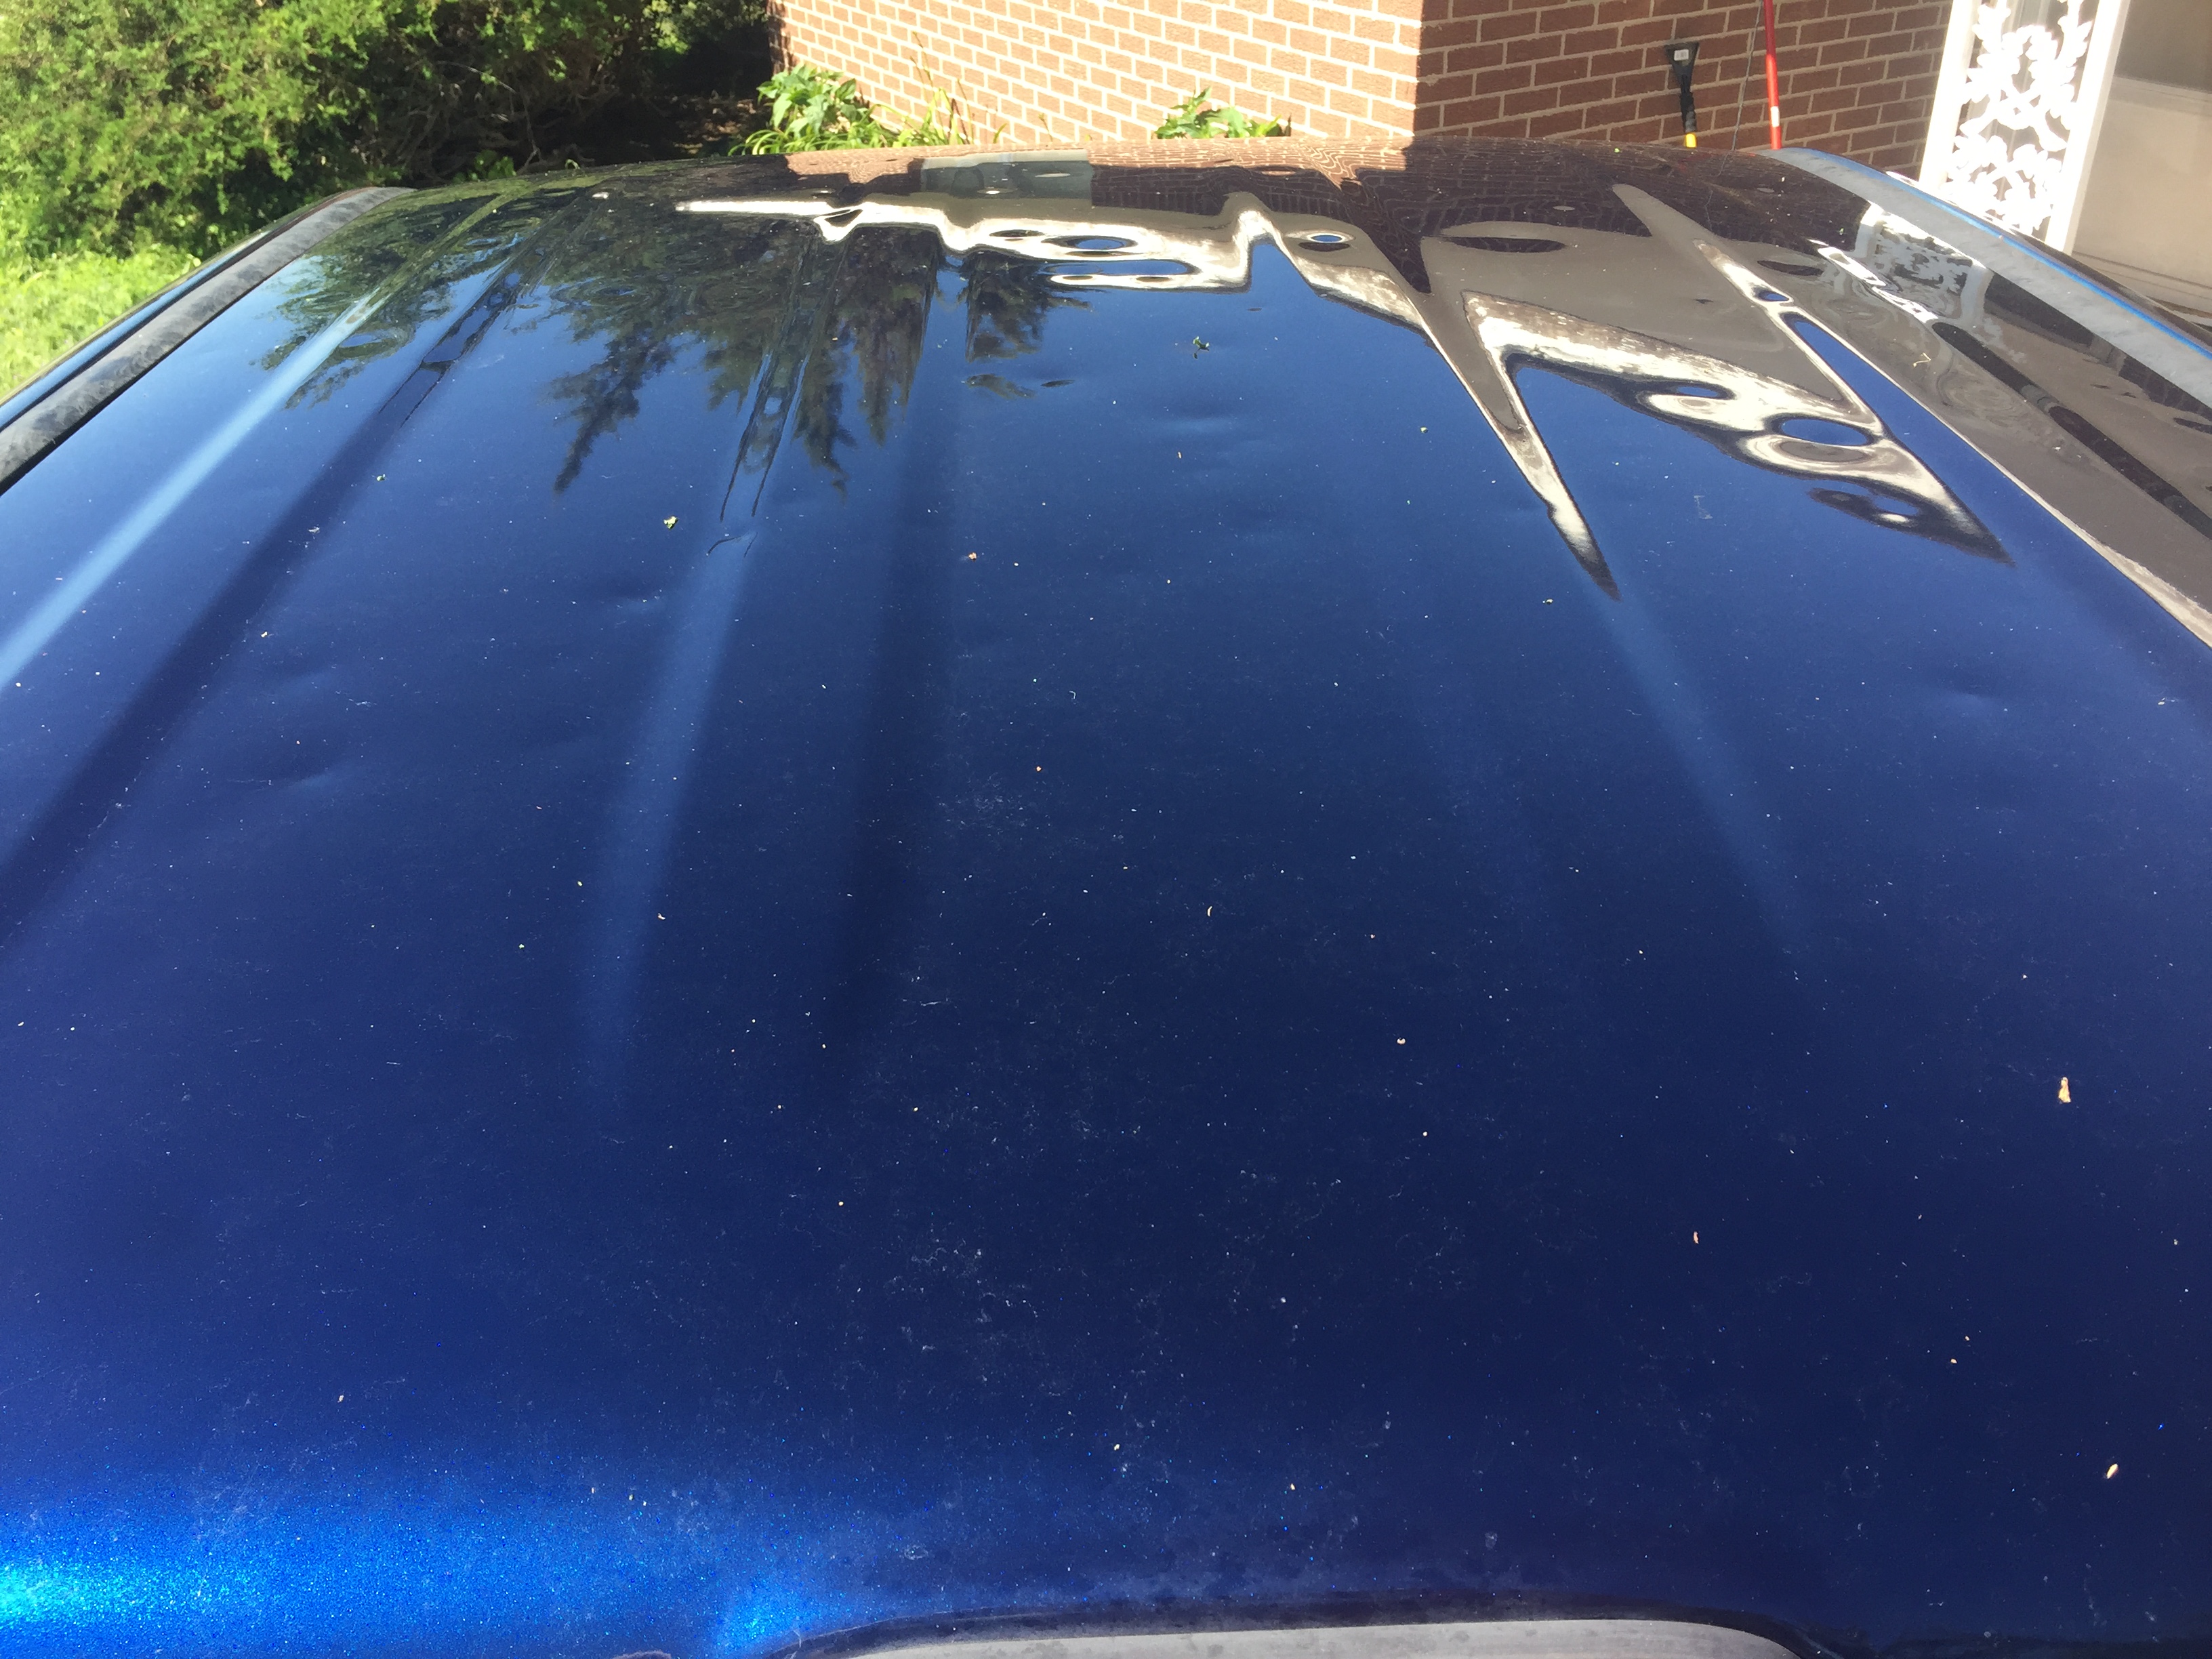 Hail Damage
One thing to keep in mind is the road network where you are. I prefer to stay off of dirt roads if at all possible. If I am in front of a storm, then pulling off onto the dirt for a few minutes is not a bad idea. Many times though, that dirt will be turned to mud quickly, depending on the strength of the downpour. Couple that with a storm that is moving at a pretty good clip, when the leading edge of the rain hits you, and you've thrown everything into your vehicle, a hundred yards down a dirt road can be a show stopper. Even if you are in a 4wd vehicle. If you get stuck, you might have the joy of riding out the storm as a lot of tow services will not respond until after the storm has passed.
I tend to stay local, usually within a hundred miles of my house when I go after a storm. Where I live, I know the road network pretty well, so I usually have no issues. I would suggest that you pick up a good quality road atlas and keep it in your vehicle. This will come in useful if you lose cell phone service.
Last general rule about safety is to remember that storms generally move west to east. Some will move straight east, while others will move northeast from the southwest. That is a general rule though. There will be times that storms will run south or north, but the general west to east direction rule is a good one to go by. Once you see storms on radar and their tracks, you will see this in action.
I will have more safety tips scattered throughout the article.
How to Locate the Storm
The season for thunderstorms tend to start around March and will last through to the end of summer. I mentioned that the last two weeks in May tends to be the most popular time for people to chase storms. In the last several years though, there have been tornadoes in December. I have personally gone after storms in the middle of November, but late spring, early summer is the best time to go.
The last several years have seen tremendous strides made within the weather forecasting community. A lot of the information that the information gathered by the National Weather Service is available to the public.
Two institutions of higher learning, The University of Oklahoma and The College of DuPage are known for their meteorological programs. College of DuPage (COD), on their website, has a whole host of tools that will allow even the armchair weatherperson access to forecast information. They used to offer an IOS app called NexLab, but it appears to have been removed.
The information includes the Global Forecast System (GFS), the North American Mesoscale Forecast System (NAM), and High-Resolution Rapid Refresh (HRRR). The GFS is good for looking long range (384 hours), while the NAM is for 84 hours and the HRRR is for 18 hours. The user can specify the region of the US (the GFS covers the world) they want to look at, and they can also look at various products. One such product is cloud cover and is good for not only weather but for astrophotographers who want to attempt to catch a clear sky for Milky Way season, which is also upon us here in the Northern Hemisphere.
I might check the GFS, but I live for the HRRR and the simulated reflectivity models. The HRRR is updated hourly and it can help a person intercept or anticipate where a storm is going to be. Even though I have the app, I tend to use the COD website on my home desktop.
Another website that is popular is Storm Prediction Center's Convective Outlook page. This page has color-coded areas on a US map where the National Weather Service has forecasted possible storm activity. The colors used are several shades of green, yellow, brown and red; depending on the severity expected. These forecasts are general in nature, so it is prudent to do more in-depth research to decide on a target area.

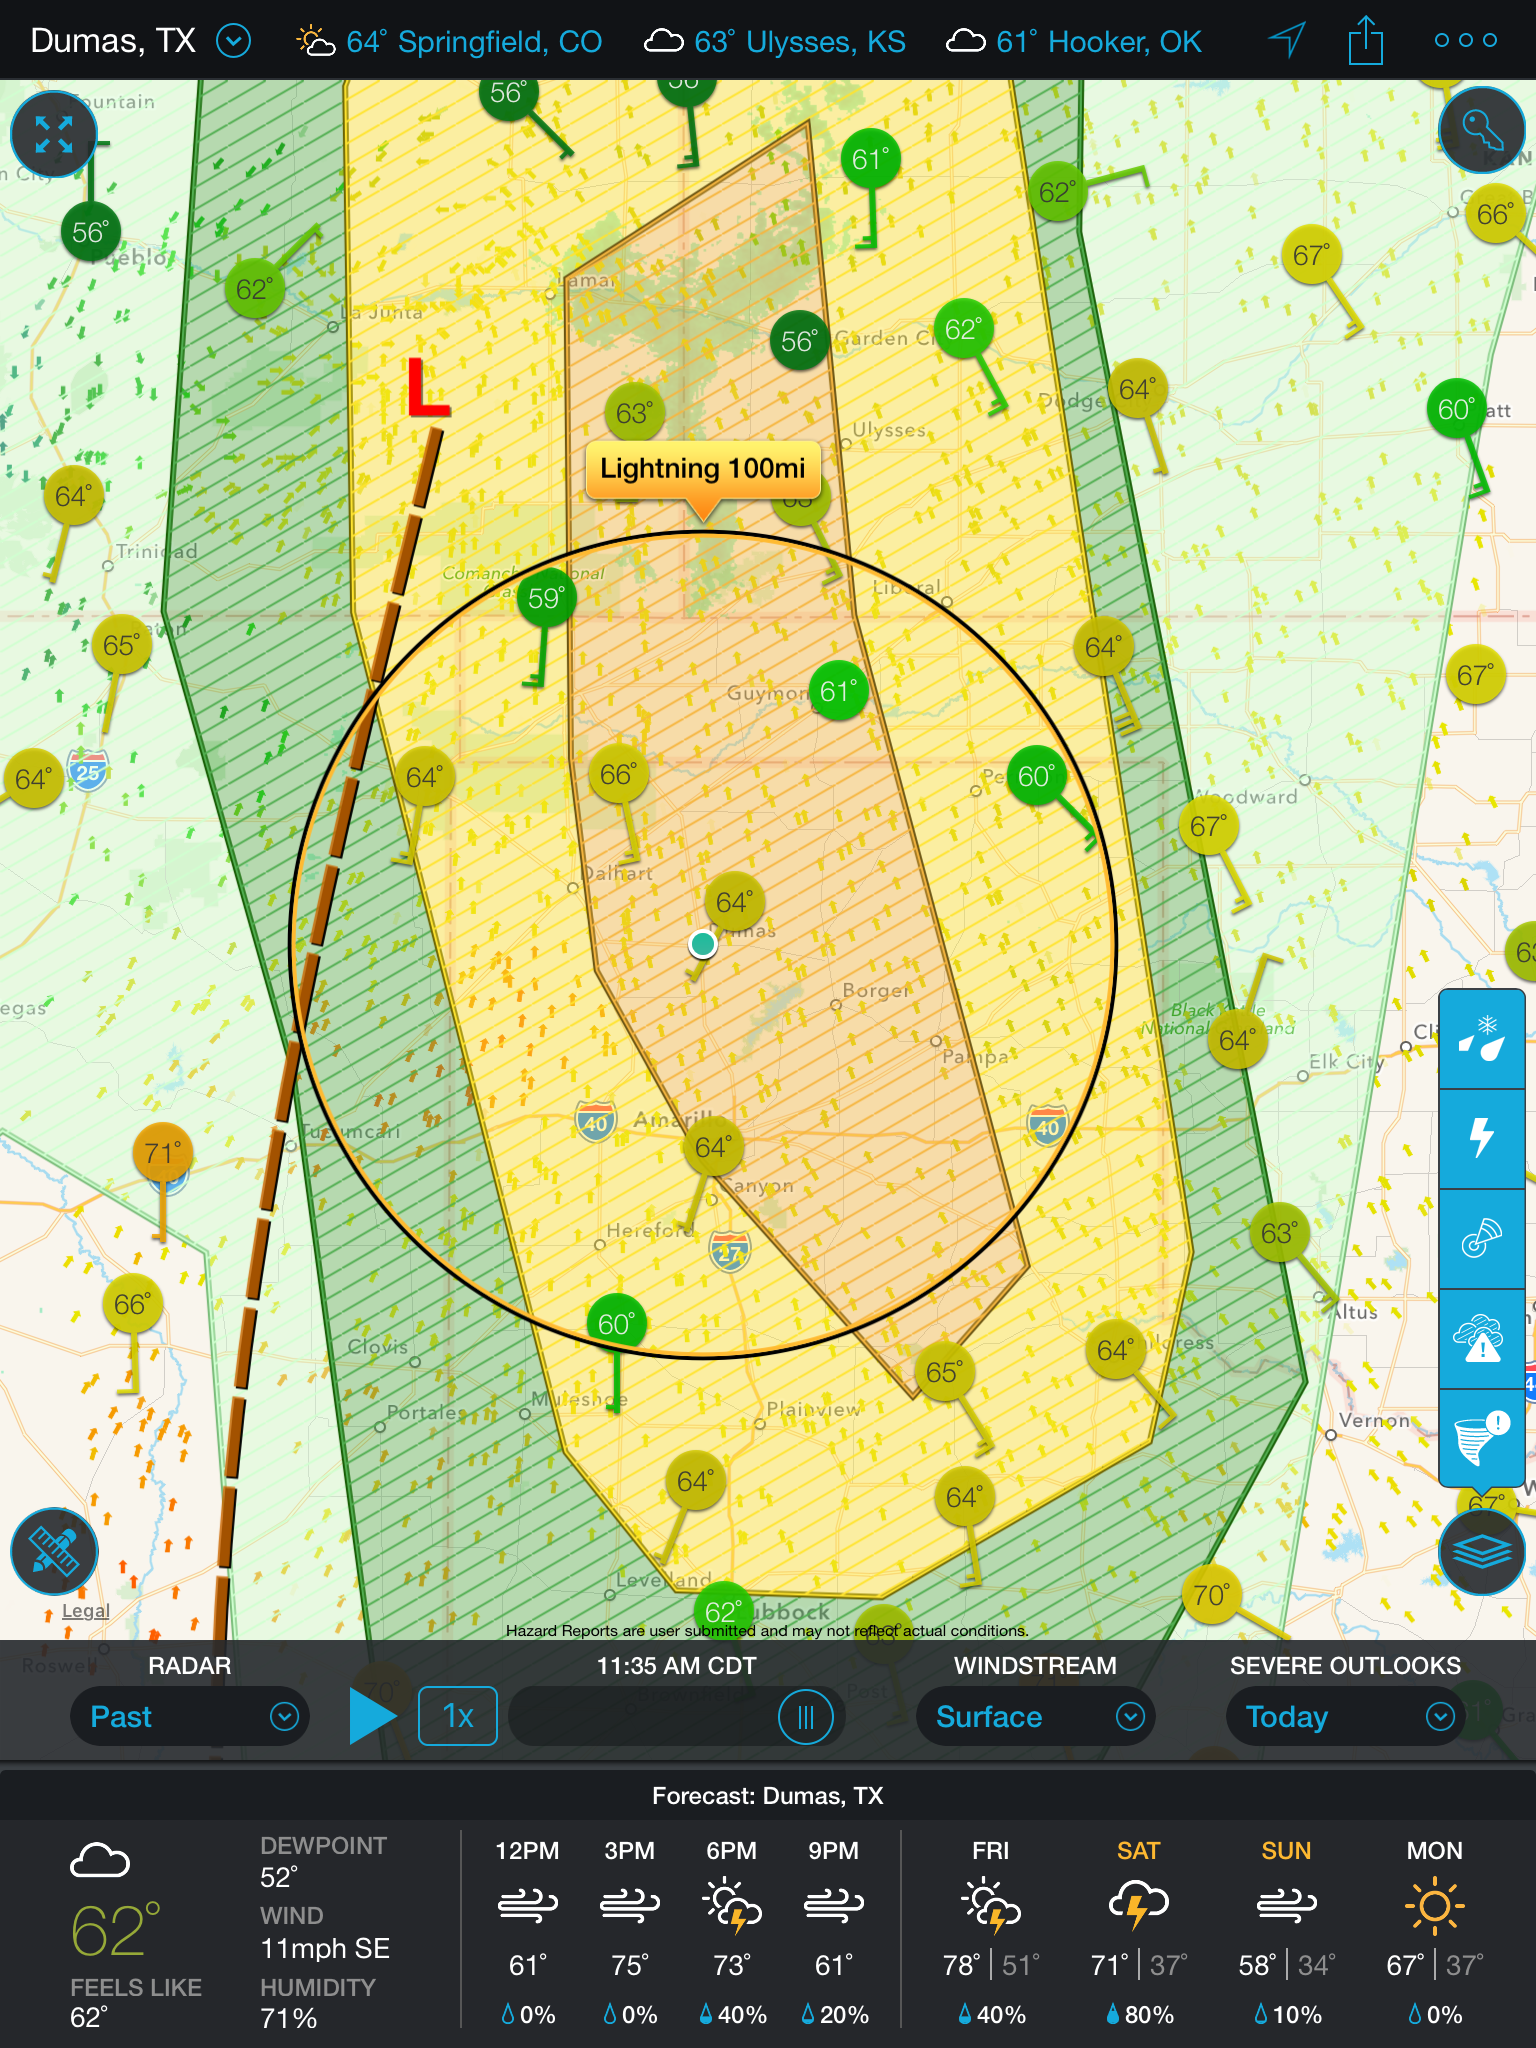
For an almost real-time radar at home, I use the interactive radar Intellicast.com. The radar allows storm track icons to show the direction of the storm. For lightning, I use lightningmaps.org. This is a pretty informative site, but it only shows cloud to ground strikes. That means all the awesome cloud to cloud lightning will not show up, but your weather apps might alert you to it.
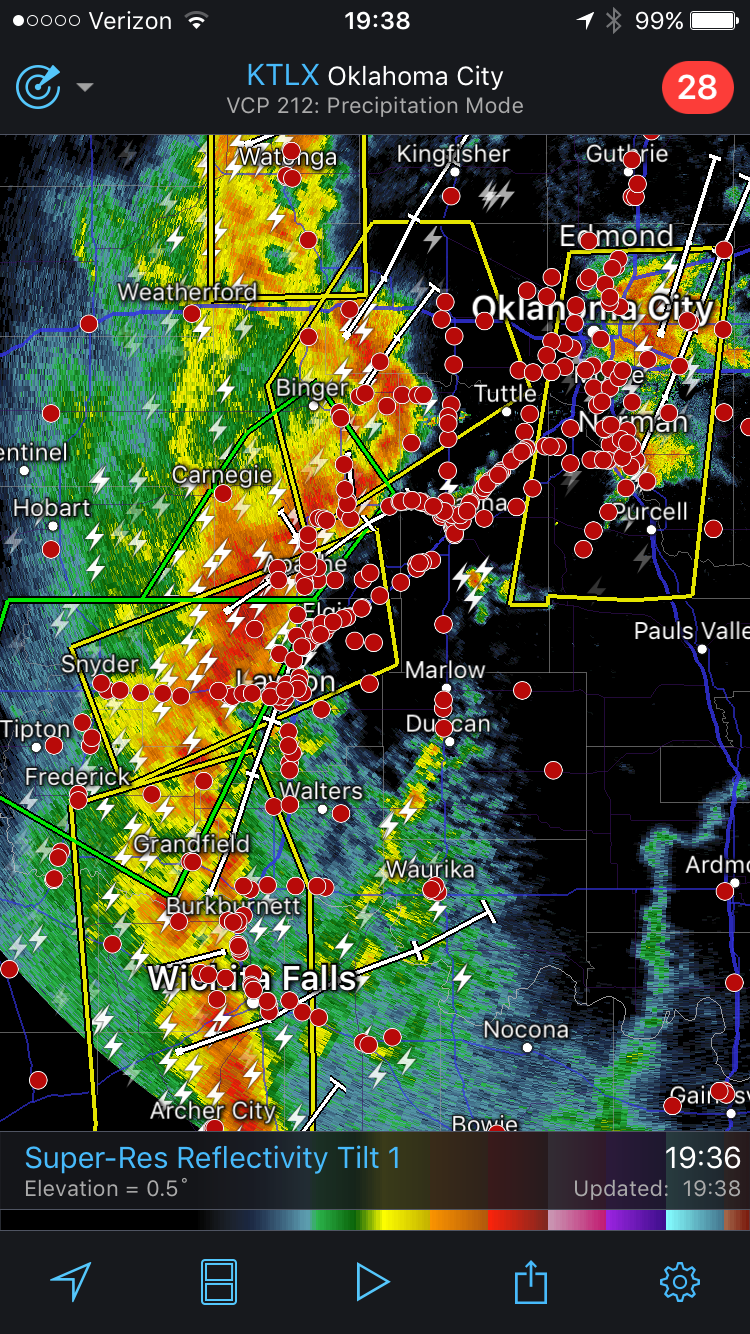
For the nuts and bolts of looking at a storm while mobile, hands down, RadarScope is the best in the business. The app is the most popular in the storm chase community. While a little expensive at $9.99 through the IOS store or Android store, the app is well worth it. There are also several separate subscription levels starting at $9.99 a year that will give the user more tools and information.
The reason behind this is because RadarScope is all on the radar. The user can “look into” a storm and see wind speed, rotation, possible hail size, and storm track. Plus, if you see all the red dots synonymous with storm chasers, then it might tell you how good a storm is. The red dots are locator beacons of storm chasers who are registered with Spotter Network. This means that there will probably be more people chasing the storm that does not show up.
Click to enlarge
The only thing about RadarScope is that the user can only look at one radar at a time. Basically, I can turn on the Amarillo radar, and see what it sees. But because I live
Outside of RadarScope, I like to use the Storm app. Even though it has radar, it is not as detailed as RadarScope. It is all inclusive though, so I do not have to switch between radars. It is good for a wider view, but once I get on a storm, I use RadarScope.
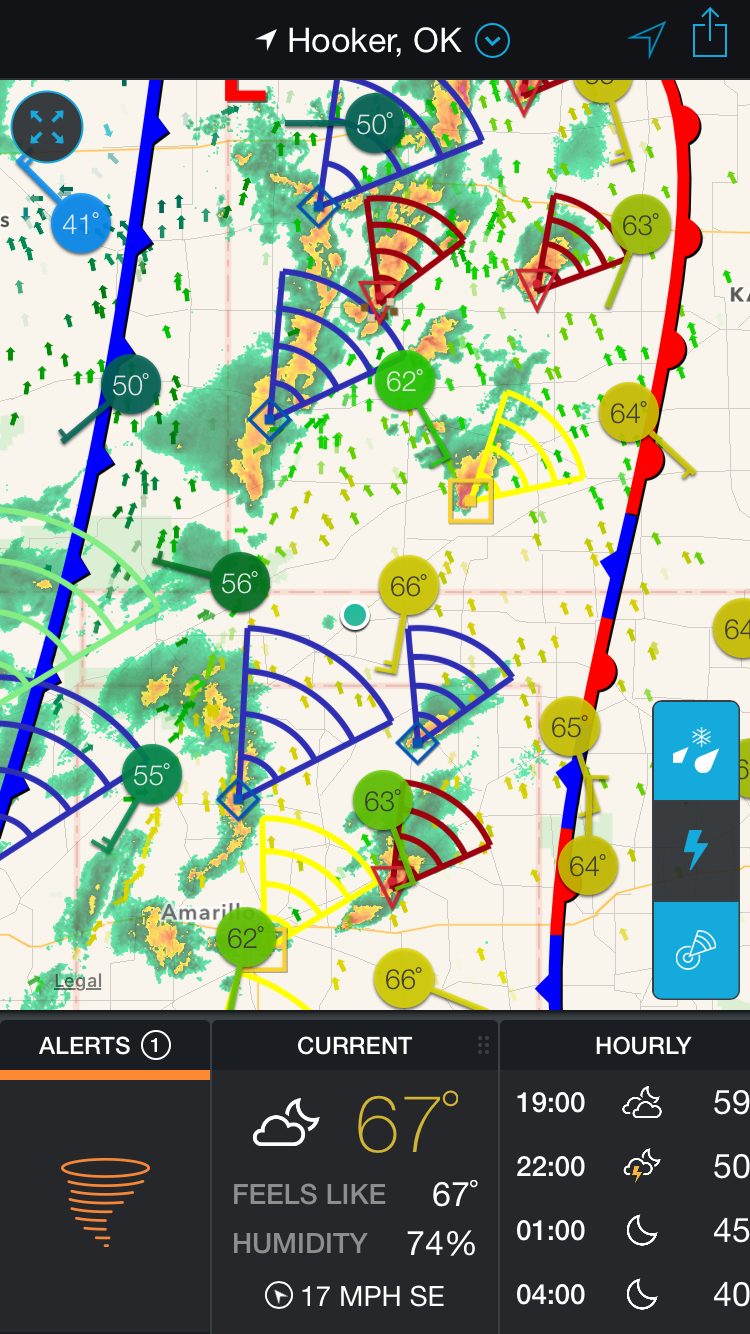
One thing to note about weather radar is the time delay. The image you could be seeing on screen could be several minutes behind real time, so keep that in mind.
Getting into Position
Your location can dictate your positioning. A good rule of thumb for a storm moving northeast is to be southeast of it. My timing is horrible, so it has been a rare occurrence for me to have this happen. If you want to be in front of the storm, you will need to pay attention to the storm track, and the roads you go down. You need to make sure you have an escape path in case the storm decides to change direction.
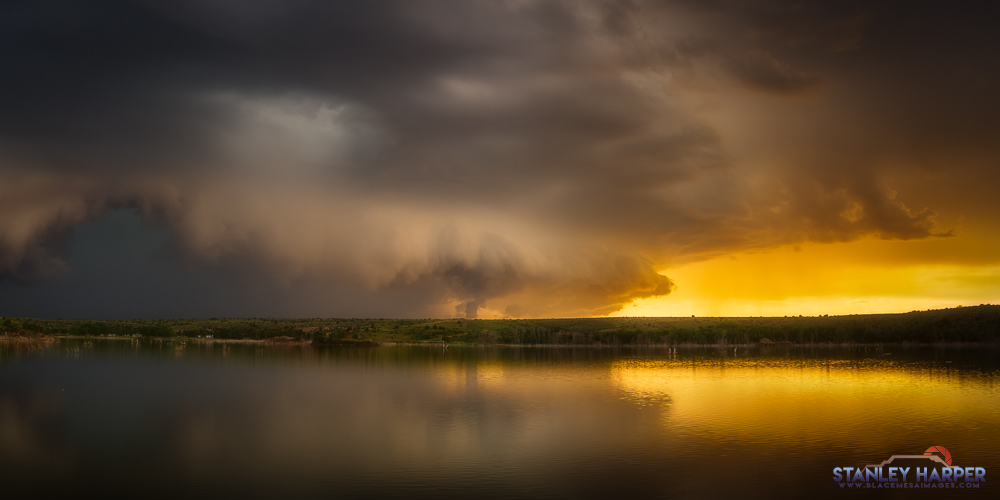
If you cannot get into a position in front of the storm, the backside of a storm can be just as photogenic, especially at sunset and in the dark. At sunset, if the sun has broken through, the sun rays will bounce off the clouds, providing the photographer with a palette of colors. At night, if the storm is producing a lot of lightning, especially cloud to cloud, it will light up the clouds and sky.
The key to positioning though is to have an escape path. Your escape path should take you away from the storm's core.
Camera Gear
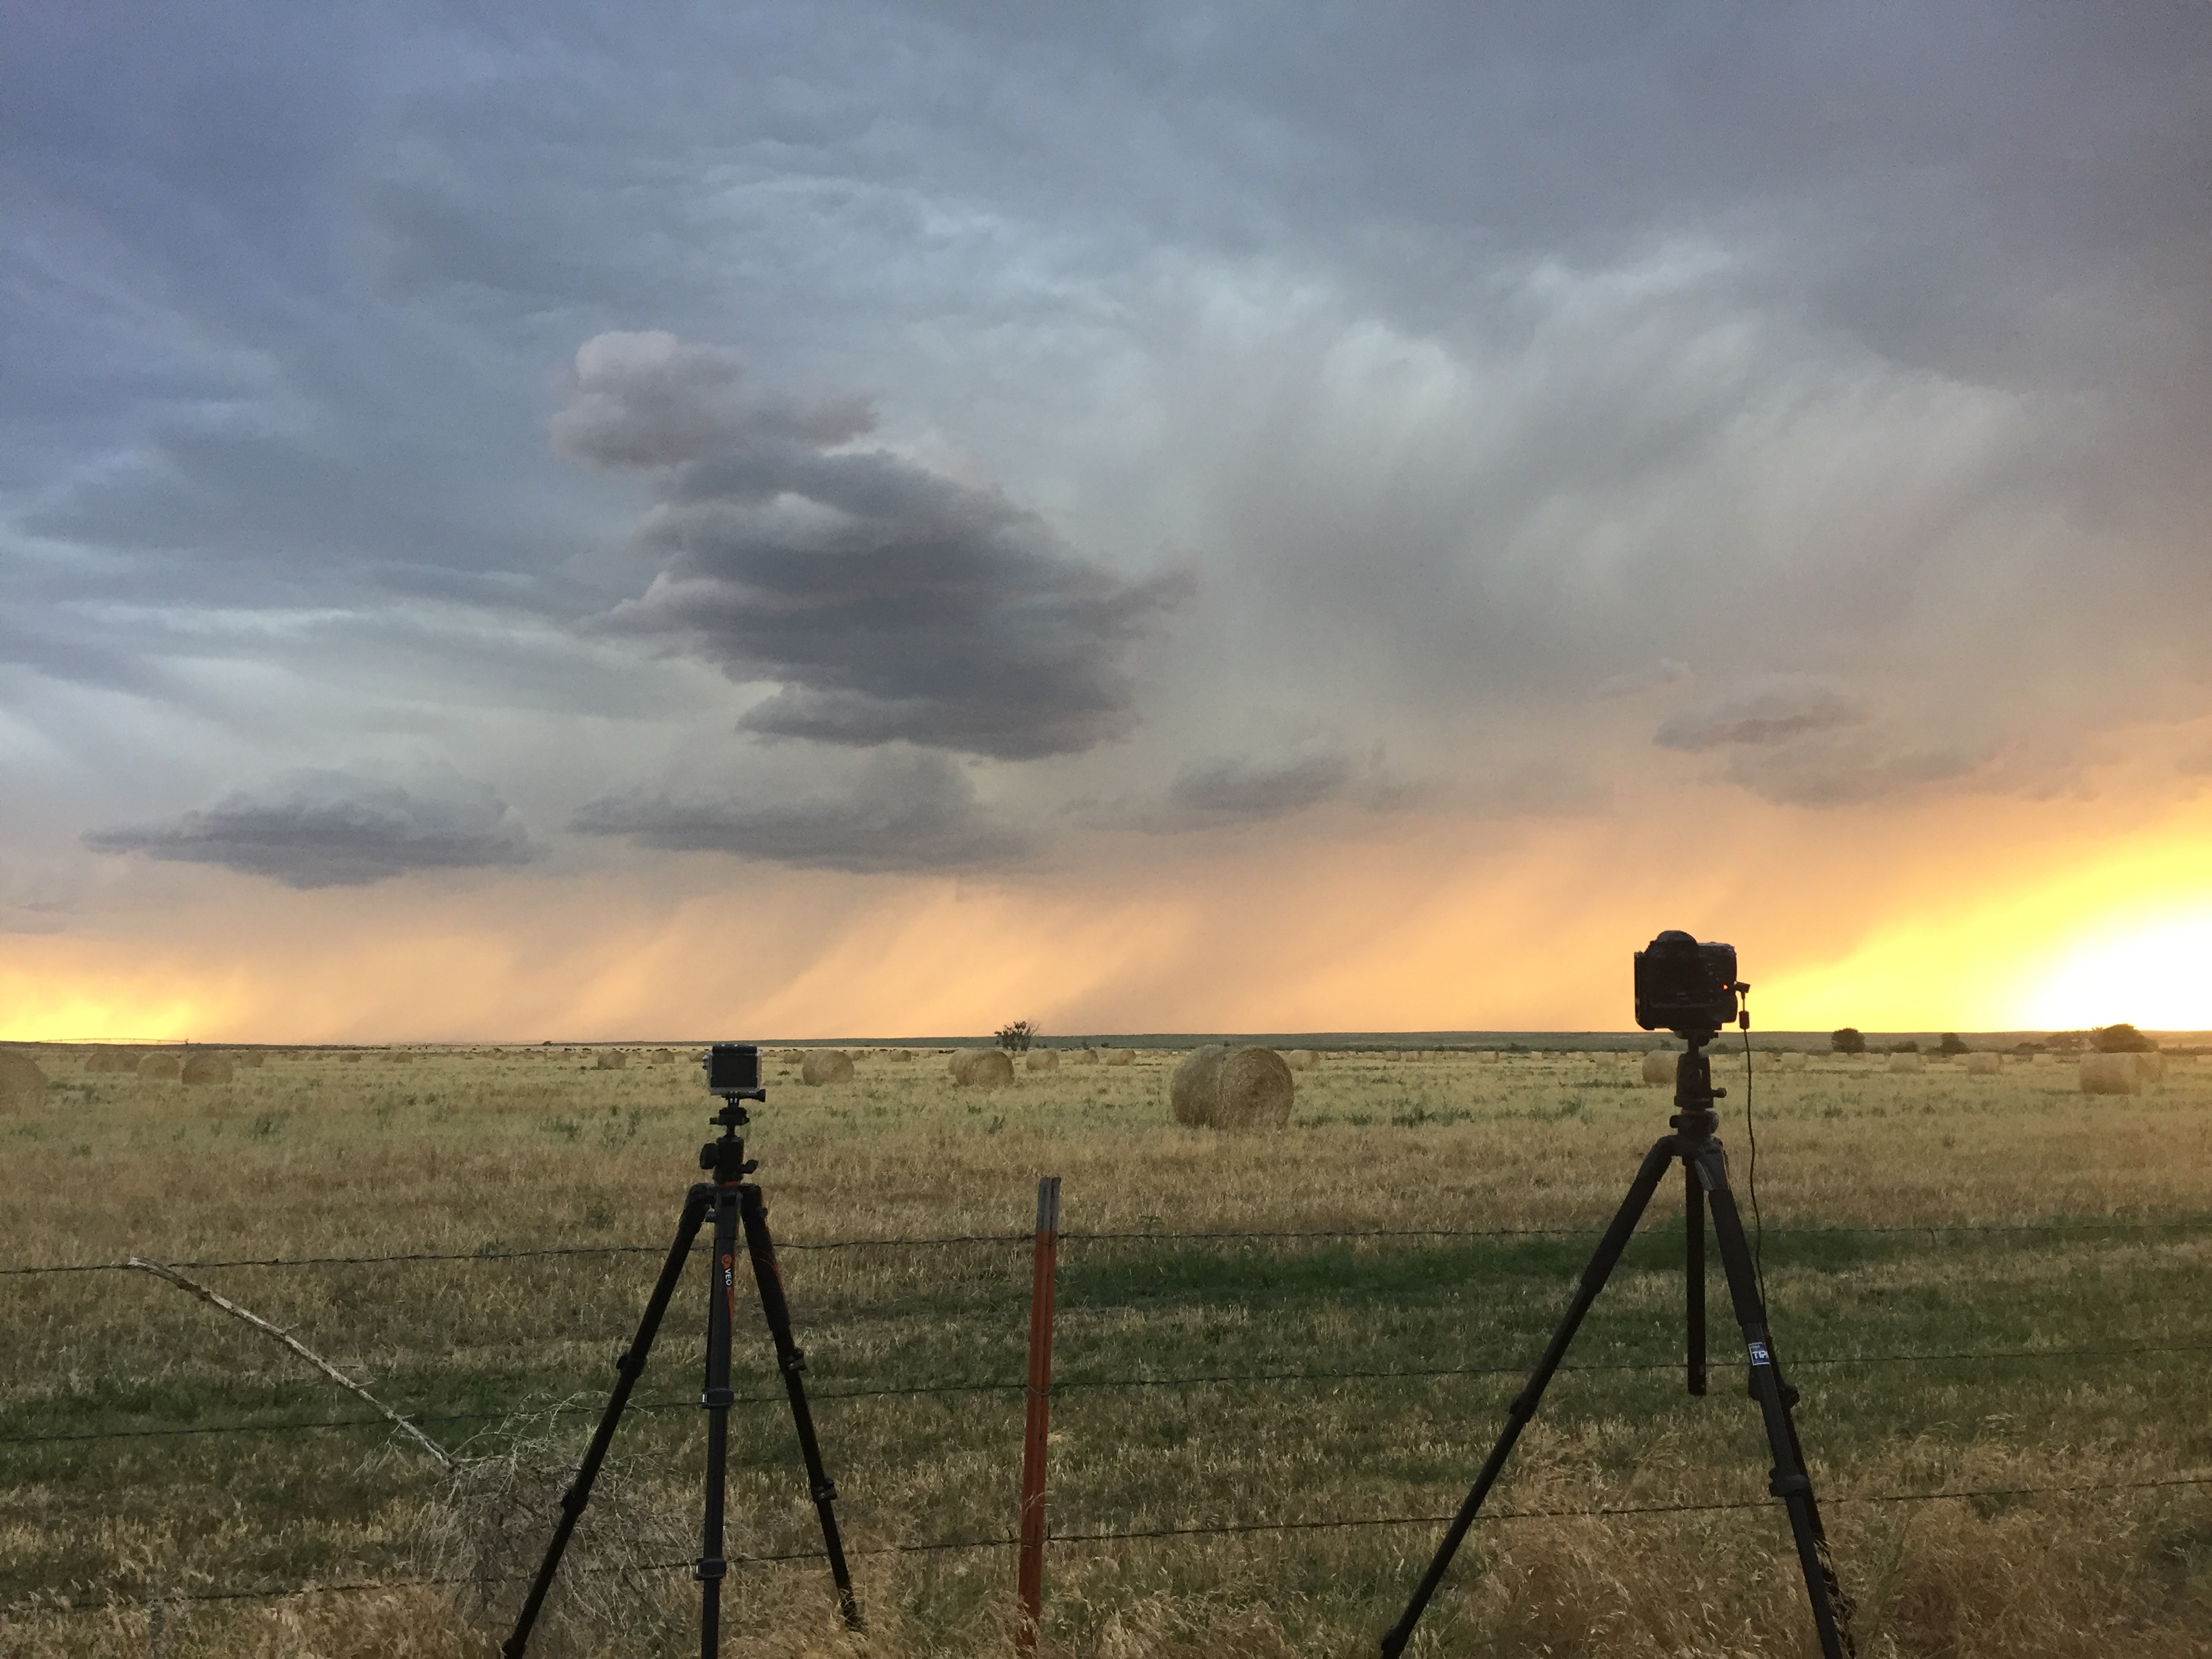
So besides the camera, what else should you have to create weather images. The second most important piece of the puzzle is the tripod. Discussions about tripod quality seem to be a common occurrence within the photography community. Although there are plenty of ways you can save money in photography gear, tripods are not one of those ways. Several years ago, after going through several cheaper tripods, I went with a Vanguard Alta Pro 263AT tripod that has a Vanguard TBH-250 ball head attached. Final cost is just above $200, which I would consider being the minimum amount to spend on a decent tripod.
Glass selection can vary. I have a kit 18-55mm that has seen the most use. I have used my Rokinon 14mm lens a time or two. The dark horses though have been my long glass, the Tamron 70-200 and Sigma 70-300. A lot of times, the wide angle glass will be more than sufficient; but the long glass helps with lightning. The long glass will allow you to be further away and in a safer position.
I would also consider a remote to be a "must have" piece of gear. Wired or wireless is up to the user. I prefer wired just because the wireless remote I had was a pain. Other things you should have in the bag would lens cloths and microfiber towels. I usually carry several of each in my bag.
Camera Settings
Camera settings for weather photography can be somewhat confusing. On one hand, we are doing landscape photography and want low ISO. On the other hand, storms move and some move faster than other storms. In fact, some storms will be moving fast enough that a shutter speed slower than half a second can blur things. Since the storm structure is a key feature of a weather image, we want to showcase it.
If it is daytime, then most times I will use Aperture Priority mode. Most of my work tends to be around f/8 to f/10. Even with ISO set on 100, the camera will give me a shutter speed that works fine. Once I have my settings, I will take a test shot and see if I like it. I shoot in RAW so I have some flexibility. I have also started to shoot for time-lapse, so once I have my settings, I will use the in-camera intervalometer to fire off a couple hundred shots. If the scene presents me with a dynamic range that I cannot capture in one shot, I will also fire off a bracketed series. By doing this, I will be able to create a still image that has all of the dynamic range from the scene.
Weather photography at night can present some more issues. Usually, if I am photographing a storm at night, I am shooting for lightning. I will use a shutter speed of several seconds, anywhere from 2 on up to 30 seconds. Other times, I will use Bulb mode. It all really depends on what I am aiming for at that time. Since the shutter speed will be long, do not expect perfect sharpness to the cloud structure. On the other hand, leaving the shutter open for several seconds will allow you to catch a bolt or two. You can run the risk of blowing the highlights though if the shutter is open too long. If you have a remote, Bulb Mode is a good way to counter this issue.
As for White Balance, I tend to just use Auto White Balance and will change it in post if need be.
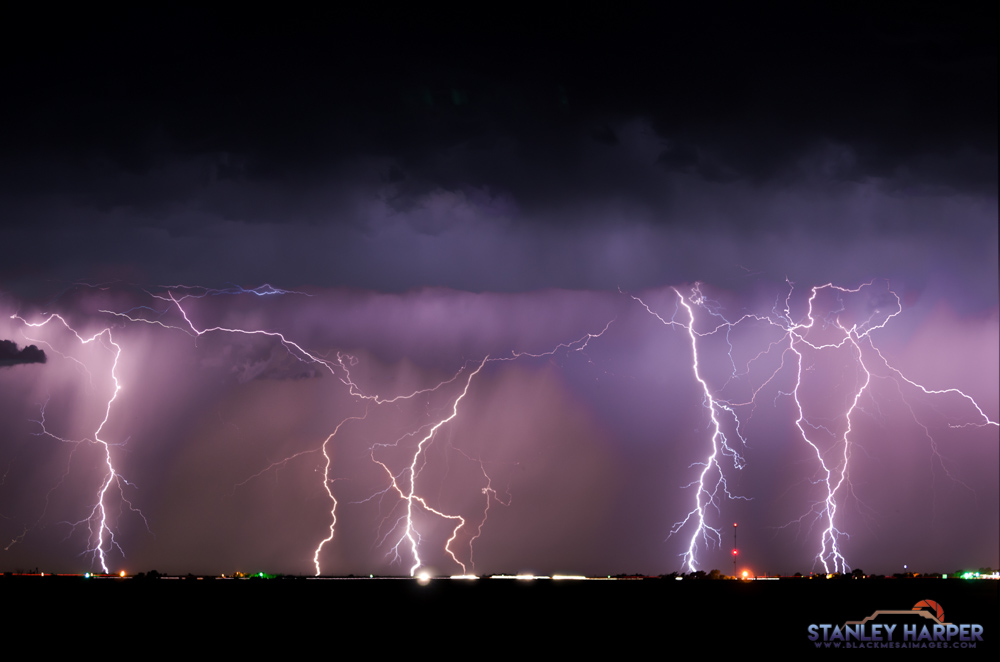
Photographing Lightning
Within the storm, there is hail, high winds, and possibly tornadoes depending on the severity. Lightning might be the one issue that has the most awareness. It has been said the one bolt of lightning can travel up to 20 miles. If you have looked at weather photography for more than a minute, you would agree that a lot of lightning images are probably a lot closer than 20 miles. I have images in my portfolio that captured lightning striking a mere 400 yards from where I was standing.
When it comes to lightning, there are several things I look at. If I can, I will open the
There are also times where the storm will be miles away, which could be a bad thing. This is where having the long glass with you can make the difference. Having a 70-200 2.8 in the bag can add a lot of flexibility to lightning photography. With the tripod collar, I can hook my camera system up to the tripod and shoot away while at a safe distance away.
Another option for shooting lightning is utilizing a lightning trigger. There are several on the market to include the Pluto Trigger,
Post Processing
Post processing is one of those topics that can be controversial. There are those who don't believe in it, there are those that do. Remember, we're talking about a topic that is subjective in nature. You are the artist, it is your vision and the first person you have to impress yourself. If you impress other people, that's a bonus.

I do post process my work and will use all of the tools and knowledge that I have. I want to be able to bring out every bit of potential I can out of one of my images. To do that, my process includes basic adjustments in Lightroom. I will then move into Photoshop and utilize the Lumenzia action panel to make selective adjustments. This could include tweaks to the curves, levels, some dodging, and burning. Each image is different and each process could be different.
One minor issue that weather photography can present is white balance issues. Even using AWB, there might be issues with the image. The sky could be correct, while the grass has a cool, or bluish tint to it. One technique in Photoshop that you can use to fix this is called "painting color." The technique is simple. What you do is create a separate, transparent layer on top of your layers. Change the blend mode to "Soft Light" and choose the Brush tool. Then choose a color, such as a green to change the bluish tint of the grass to a more realistic color as it is supposed to be.

I will usually finish off an image in Photoshop by applying an Orton Effect to bring out a glow in the image.
Again, my way might not be your way and it is not the only way. Utilize what you have to create your vision.
Real World Example
For the purpose of this article, here is an example of a weather photography day on mine. On April 15, 2016, the weather forecasts were calling for severe weather. The area that was being targeted stretched from southeastern Colorado, western Kansas, through the Oklahoma Panhandle and deep into the Texas Panhandle.
My first choice was southeastern Colorado, but by the time I got into a groove, chasers were already reporting possibly tornadoes. I decided that we would head southwest into the Texas Panhandle and see how the day played out.
After the hour-long drive to Stratford, Texas; we pulled off for a bathroom break and check the weather. During the entire drive, we saw several storm chasers heading in the same direction. On RadarScope, I could see the red dots piling up further west. Since I prefer to avoid the crowds in an attempt to create something unique, I changed directions and headed north. We stopped in Boise City, Oklahoma and looked at radar again. By this time, the storms southwest of us in Texas were spinning up. Going off the storm tracks though, any chance of getting out in front of them would not work out. Even though they were tracking northeast, by the time I would intercept them, I might be in a very bad and unsafe position.
Something on radar caught my eye though. Radar was picking up storms firing up over Clayton, New Mexico. Like all of the other storms of the day, they were tracking northeast. This meant that I might have a chance to create some images in the mesa country of the far northwestern Oklahoma Panhandle. The other thing I noticed was that there were very few storm chasers going that way. In fact, the only dots showing up on RadarScope was me, my photography partner in crime, and an Australian couple. That is my kind of storm.
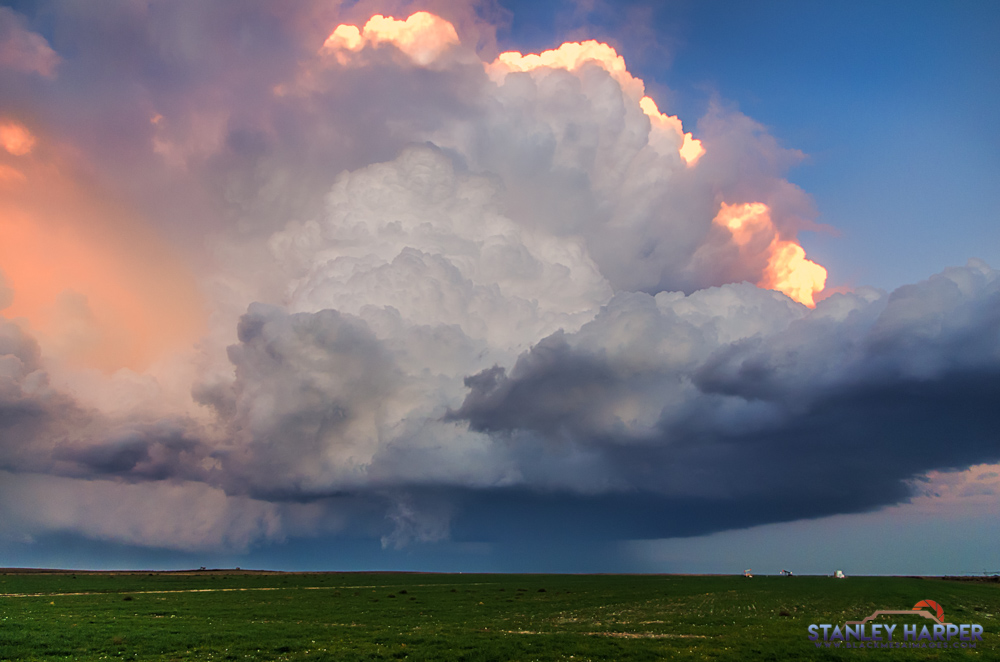
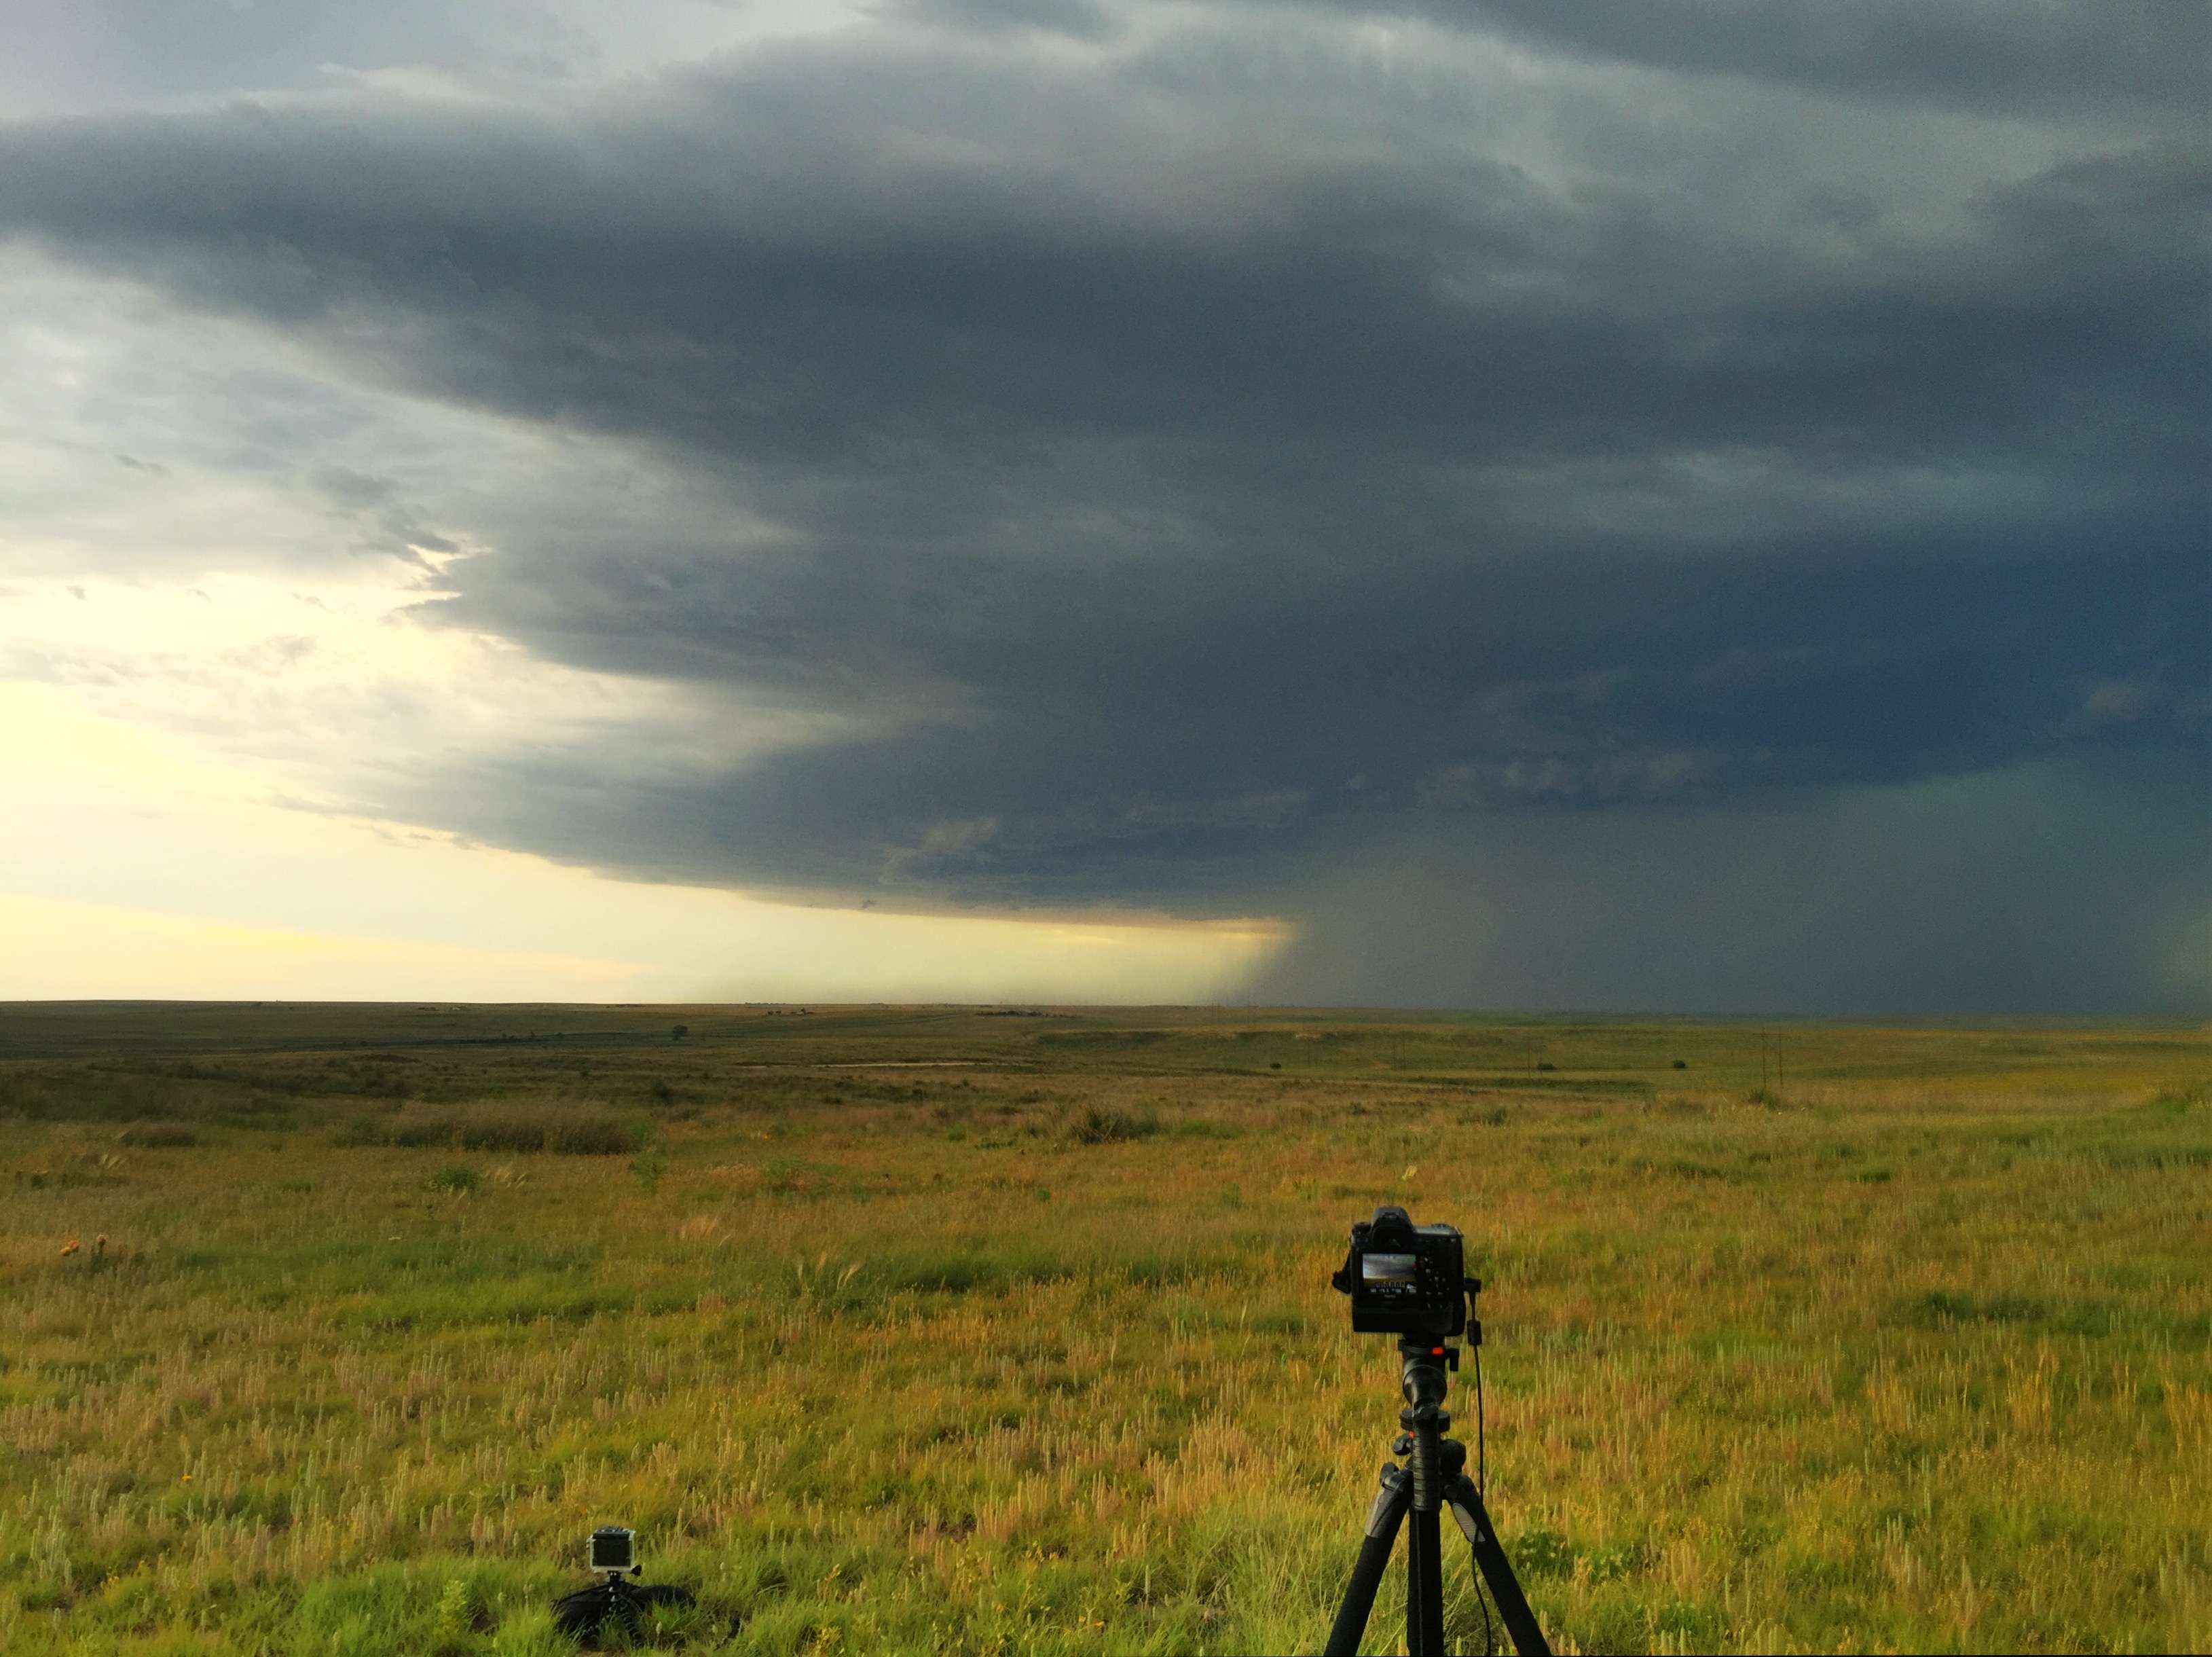
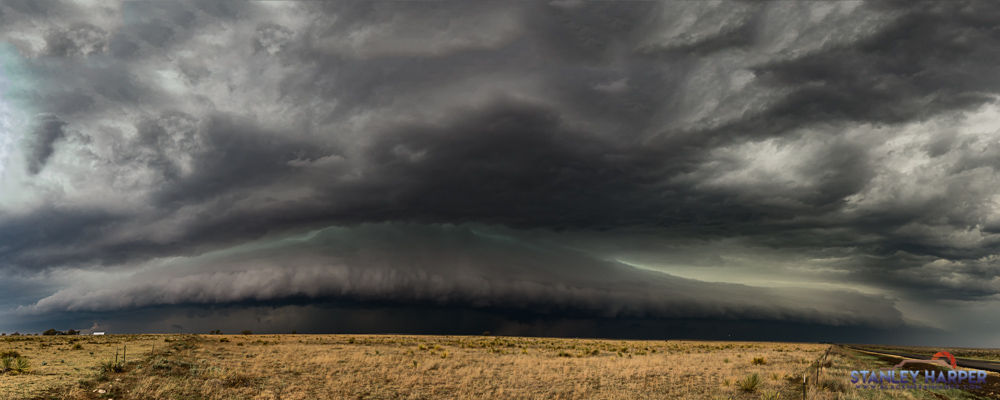
We soon came to the small town of Felt, Oklahoma. We watched the radar and the clouds and within a few minutes, we were heading north towards mesa country. We went a few miles until I found a spot to pull off the road and get set up. I was greeted with one of the more intimidating, yet beautiful cloud structures I have captured to date. Shooting it though was a different story. We were so close that I used my Rokinon 14mm lens and shot a 4-panel panorama to capture the entire cloud. Even though we were that close, there was no lightning and on our side of the storm, no wind.
After spending a few minutes capturing the storm, I glimpsed radar once again to see what I could plain. Unfortunately, I was going to have to take a pass on going into mesa country. The storm had tracked far enough east that we would have had to bust through the core of the storm, which is not what I wanted to do. We ended up calling it a day at this point and went back to Boise City and food.
I ended up missing out on several tornadoes by bypassing the storms in Texas. They had moved northeast and before they got to Kansas, they dropped some tornadoes. I am okay with that due to the number of chasers in the area and knowing the roads like I do, I do not like being in traffic jams.
Conclusion
Seeing images of low precipitation supercells attracted me to weather photography. I knew I had to put weather photography into my bag of tricks. I have been photographing storms now for several years, but have not captured an LP supercell yet. That has not deterred me though. I have had several of my weather images turned into large wall art. I have also had them chosen for publication by national magazines. After pulling off a storm that ended up becoming famous, I decided I needed to learn more about the weather to make myself a better photographer.
Weather photography is gratifying. It allows us to capture unique images and will bring drama to an otherwise boring landscape.
More from the Pentax Forums Homepage
- March "Flowers up Close" Contest...
- HD FA 50mm F1.4 vs. SMC 50mm F1.4 Classic Review
- Announcing Our April, 2024 Photo Contest
- Introducing Pentaxify AI by PentaxForums.com
- The Making of "Autumn Draws"
- Ricoh launches the RICOH GR III HDF and RICOH...
- Join Ricoh for the April 6 GR Photo Walk in Las...
- The Making of "Gotcha!"


Comments