
The Making of "Alone With the Universe"
The winning image in our "Best of 2014" photo contest
By EarlVonTapia in Photo Contests on Mar 14, 2015
Editorial note: forum member EarlVonTapia's impressive starscape finished first in our Best of 2014 photo contest and earned him the Pentax K-50 grand prize. Winning photos like these involve so much more than just being in the right place at the right time; they are the result of a carefully-crafted composition, sound shooting technique, and skillful processing. Without further ado, let us proceed to the photographer's account of how this photo was shot and processed!
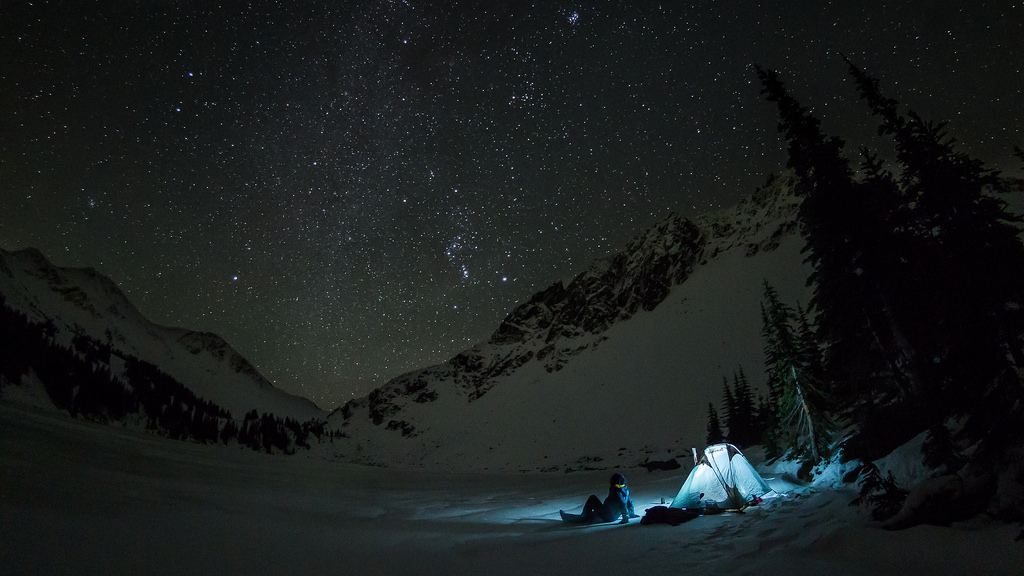 "Alone With the Universe" by EarlVonTapia - Click to Enlarge
Thank you all for voting in the PentaxForums "Best of 2014" contest, and a special thank you to those who voted for me in the finals. There were so many great photo entries, and it was an honor just making it to the final 15.
The contest called for people to submit their best photo of 2014, and for me it was this picture of me camping underneath the stars. I've taken several shots of this nature in the past couple of years, but they've been fairly typical astroscapes. I was thinking of a way to mix it up and decided that a fisheye lens might provide a nice spin from the standard ultra-wide angle view.
My friend and I were heading out on one of our winter excursions in the mountains of BC, Canada. We were trying to find a cabin that someone had said was in the area, but unfortunately we made a wrong turn somewhere and ended up at some random frozen lake. Thankfully the weather was quite clear and calm, and it was getting late, so we decided to just call it a day and set up camp instead of backtracking. My friend opted to camp within the trees, but because the weather was so nice and there was no wind at all I decided to camp out on the frozen lake itself.
The picture itself was not premeditated, other than I knew I wanted to try and take some astroscape shots if the weather was clear. If we had found a cabin, I would not have set up my tent, and if the weather was even slightly bad, I would have set up in the trees. In either of those scenarios the shot as submitted would not exist.
The equipment I used for this shot is as follows:
- Tripod: Slik Sprint Pro II
- Camera: Pentax K-30
- Lens: Pentax DA 10-17mm Fisheye
Taking a long exposure landscape shot is pretty easy, but the introduction of starry skies complicates things a bit.
There are a few key things to getting really nice and crisp stars in your astroscapes:
The rule of 600 - If you divide 600 by your focal length you get the number of seconds you can leave your shutter open without the stars leaving trails (thanks to the Earth's rotation). Of course, this is for full frame cameras. For Pentax crop sensor cameras, you have to first take your focal length and then multiply that by 1.5 to get its full frame equivalent focal length.
I was using the Pentax DA 10-17mm @ 10mm, so the length of time I could keep the shutter open before producing star trails is as follows:
600/(10mm * 1.5 crop factor) = 600/15 = 40 seconds
You don't need to use it all, but it lets you know how long you have before star trails appear.
Infinity Focus - For most lenses the infinity marker on the focus ring does not really equate to actual infinity focus. Finding infinity focus is easy with autofocus or with live view and focus peaking. Neither of these methods works when you are trying to focus on a dark sky. Here's what I did: I just took shot after shot, examining the stars after each shot to see when I eventually got infinity focus correct. It took about three or four tries.
After I found infinity focus for the lens I noted the position of the focus ring. Now I know that when I want infinity focus for that lens I just turn the ring to that spot.
A solid tripod on firm ground - Camera vibrations will ruin your shot. A solid tripod will stop this. If it’s windy, you might want to find a bit of a sheltered spot or use your body to block some of the wind from hitting your camera. Another suggestion to help stabilize your setup even further is to retract a segment or even two segments on your tripod, to make it shorter and more stable. I generally retract one of the segments on my tripod for a shot like this because then the camera is the perfect height for me to look through the viewfinder while sitting on a camp chair, in addition to further stabilizing my setup.
Using the shutter timer (2 seconds or 12 seconds) - The timer will flip the mirror up before opening the shutter, which will eliminate mirror slap vibrations. Using the timer also turns off 'Shake Reduction' automatically, which can actually cause vibrations when the camera is on a tripod.
I set the timer, and before the shutter opened, I would just run and slide into position in the frame.
While I was trying to find infinity focus, I also took the opportunity to refine what position I wanted to be in the frame. You can see some of the out-takes below (click image to enlarge).

The light coming from the tent is just my headlamp pointed up at the ceiling of the tent.
After each shot I would check the LCD until I was satisfied with the exposure and the composition. Below is the RAW shot that I settled on.

The final camera settings for the shot were as follows:
- 20 Seconds
- F3.5
- ISO 3200
I have the "bright/dark area warning" activated on my camera. To me this is more useful than the histogram alone, as not only does it give you a sense of how much of the picture is too dark or too bright, it also shows you the specific areas that are too dark or bright. For example, checking the histogram alone for this shot might lead you to believe that it's horribly underexposed and a ton of data is lost. But when examining the parts that are lost (highlighted in blue below), it's really only the trees on the right and some of the mountains on the left, neither of which were critical to the picture (click image to enlarge).

Post processing was done entirely in Lightroom 5. First I went through the basic sliders. You can see the settings I used below.

Nothing too crazy here. For white balance I pushed it towards the blue side of the spectrum to give it a cooler vibe. After the basic sliders, I only made a few more adjustments.
- Sharpening 55
- Luminance 50
- Defringe 2
- Distortion +100
After dealing with the foreground, I wanted to make the stars "pop" a little more. I used a brush to highlight the sky first.

After I brushed the area I wanted, I used the sliders to help bring out the stars a bit more. The settings I used are below.

Alternatively, there are a bunch of premade Lightroom brushes available for download (search for them using your favorite search engine) that are made for all kinds of situations, including star shots. I've used some in the past, and they were quite good, but I had to reinstall Lightroom last year and I never got around to getting those brushes back again. You can use those brushes to get you "in the ballpark" of where you want, and then refine the picture afterwards to your liking.
Lastly, a crop to 16x9 to emphasize the wide-angle aspect of the picture, and a slight rotate to taste. And that's essentially it. Using these methods, you can take awesome astroscape shots with just about any lens!
Thanks again everyone for voting for me. The contest has inspired me to take better photos this coming year, and I hope all of the excellent submissions will inspire you to take your photography to the next level too.
See you all for next year's contest!
Earl
More from the Pentax Forums Homepage
- Ricoh updates the K-1, K-1 II, GR III, GR IIIx
- March "Flowers up Close" Contest...
- HD FA 50mm F1.4 vs. SMC 50mm F1.4 Classic Review
- Announcing Our April, 2024 Photo Contest
- Introducing Pentaxify AI by PentaxForums.com
- The Making of "Autumn Draws"
- Ricoh launches the RICOH GR III HDF and RICOH...
- Join Ricoh for the April 6 GR Photo Walk in Las...

 Earl Von Tapia started doing photography in October 2012 after he wanted to document his adventures with a good camera. Since then he has been absorbing as much photography knowledge as he can. He...
Comments