
The Making of "Work, work, work"
How the winning photo of the "Movement at Night" contest was made
By pakinjapan in Photo Contests on Oct 7, 2018
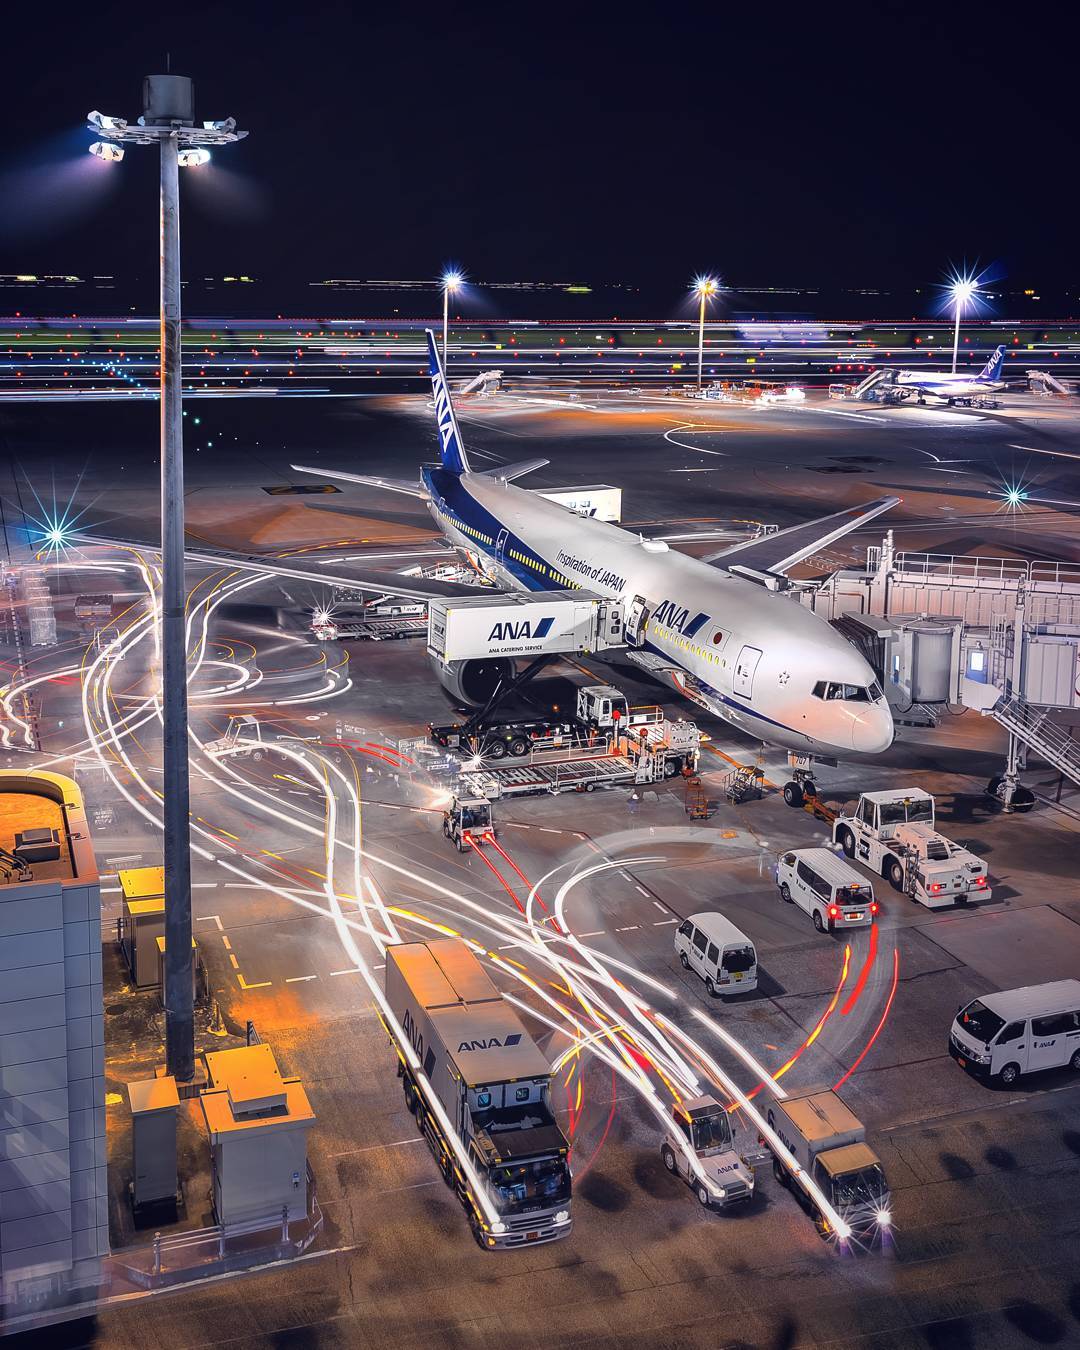 "Work, Work, Work" by pakinjapan
Thank you for voting for my photo in the "Movement at Night" photo contest! Here is how the photo was made:
Tools:
Pentax K-3, smc Pentax-DA 21mm F3.2 Ltd., Tripod, Remote control, Planning, and Patience.
Background Story:
I got the idea from a time-lapse video I did at the same airport. It was interesting to watch the trailer operators drive their machines around in the time-lapse video. You can check it out here. That video is composed of about 1,000 shots. And I wanted to do something like this for my airport light trail photo too (visible cars and their light trials in the same image). To do that, I had to look for locations in front of me where the cars would have to come to a stop. During the capture of the time-lapse I noticed that cars and trailers will have to make a stop at the bottom part of the scene before they exit the area again. As seen from the earlier link, that is just perfect for my light-trails shooting style.
The Challenge:
- The biggest problem is how to capture the cars when they stop as seen in the lower part of the image. There is a large roof over the lower floor that sticks out and blocks part of the road below. It would be ok if I could push my camera out far enough, but there are wires on the upper part of the fence in front of me. To make it worse, most of the lower concrete wall is built in an angle so I cannot securely use a tripod too close to it.
- Next, I have to deal with the high contrast night scene (very large bright spotlights, reflective airplane paint and extremely dark areas in shadow). I want a lot of long, good looking light trails, but I can't use too long a shutter speed here.
- Then the small vibrations of the Airplane when people load/unload its cargo. It's most visible on the wings and trail (imagine when you close a car door, the whole car vibrates a bit).
- I can see activity on both the left and right side of the airplane. My 21 mm lens can't cover everything I want. At least, that was what I wanted before the real shooting. I was greedy!
The planning:
- To fix problem #1 above I scouted the area for a few hours. I found that the left side of the domestic terminal was the only place where I could shoot with a tripod close enough to the fence.
- Do the multi-exposure shooting with a shorter shutter speed so that I don't lose details under strong spotlight areas. This take care of problem #2 above.
- Then select one photo to be used as a "base image". The rest will be used for light trails effect using Photoshop's layer blending. This take care of problem #3 above.
- Shoot portrait orientated and use Pentax composition adjustment to deal with problem #4 above. Shoot one on the left and another one on the right. It was a bad idea: I was trying to do long exposure light trails, and some car would run from the left side to right side. A better idea is to not use composition adjustment at all, or if I want to do it I should do in landscape orientation (one above, one below). Later, I used what I learned here when shooting this photo.
The shooting:
- ISO 100
- F11: I like the starburst effect from the smc version of the DA21 at F11!
- 4 Sec: 4 seconds can't make a long beautiful light trails effect, but I will compensate by using the multi-exposure technique.
- Captured the base images first: If I had to do the soot over again, I would skip this. If you're not sure what I mean about "base image", check out the photo below. I used Pentax's composition adjustment to take one photo on the left side and another one on the right side. Later, I realized that activity on the right hand side is largely blocked by the airplane anyway. Composition adjustment is unnecessary from this shooting angle.
- Capturing light trails; I shot multiple exposures via remote control for about 1 hour. I fired the shutter only when cars came in or drove out of the area. For this step, I left the composition adjustment setting on the left side because most of the activity is there.
The post processing: Also see image below.
- Adjust the images' color/saturation and sharpness in Adobe CameraRaw.
- Select all good images and apply the same CameraRaw setting to them.
- Load the selected images into Photoshop as layers. I ended up with around 40 images / 40 layers.
- Select two photos to use as a base image (one for the left hand side and one for the right hand side and mask out the unnecessary part). Again, this step is unnecessary from the beginning.
- The rest of the (left side) images are for the light trails effect, so I changed every layer's blending modes to "Lighten". (except for the base image; just leave taht as "Normal"). This is the same technique as when doing starlight trails.
- Place all light trails layers in a Photoshop's folder and apply a mask on it so that I can mask out the airplane. If I don't do this, the airplane will be soft because of the small vibration mentioned earlier.
- Crop it to fit the output media. I used a 4:5 ratio image because I usually post my images on my Instagram TokyoScape page initially. I also make minor color and lighting adjustment on a tablet screen using SnapSeed. This is the same process as when you print it out: you want to print out sample images so that you can fine-tune your color and contrast to fit the type of printer and paper used.
 Click image to enlarge
What to improve:
I like the action but I don't like the color. It is too much yellow and I try my best to fix it in the CameraRaw setting. But I still don't like it. If I did it again, I would start shooting from blue hour. And maybe use an ND filter to reduce incoming light so that I can have a longer shutter speed = less work in Photoshop. Any suggestion for color in post process will be very welcome.
Other note:
If you are at Haneda Airport and want to try this: Before you check in, go to the left side of the domestic terminal's top floor. It seems to be the best location to shoot with a tripod and wide-angle lens. They have a free shuttle bus running between the two buildings. I prefer the sunset hour at the international terminal, though.
Thanks so much for voting for my image!
More from the Pentax Forums Homepage
- March "Flowers up Close" Contest...
- HD FA 50mm F1.4 vs. SMC 50mm F1.4 Classic Review
- Announcing Our April, 2024 Photo Contest
- Introducing Pentaxify AI by PentaxForums.com
- The Making of "Autumn Draws"
- Ricoh launches the RICOH GR III HDF and RICOH...
- Join Ricoh for the April 6 GR Photo Walk in Las...
- The Making of "Gotcha!"

Tags
2018, august, available light, contest, movement, night, processing, winner
Comments