Forgot Password
Pentax Camera Forums Home
 

Reply
Show Printable Version Search this Thread
01-29-2008, 12:26 PM   #1
Veteran Member
hinman's Avatar

Join Date: Oct 2006
Location: Fremont, CA
Photos: Albums
Posts: 3,473
Dremel tool set recommended for lens modification

I bought myself a gift over last Christmas with a Dremel tool set with grinding stones and drill bits to make modifications on two lens that don't fit the KAF2 on my K100D. The two lens actually work on K mount as in my Pentax SuperProgram, Pentax p3n and Pentax p5 but two Vivitar lens have a longer flange that can't fit into the K mount in my K100D bodies or Pentax pz-1 that I have.

Here are some pictures after the alternations with removal of base cap and grinding off the large flange with Dremel tool set.


#1 Dremel tool with the grinding head and a small Phillip screw driver


#2 Vivitar 28mm f/2.5 manual in K mount
* modified to work in my K100D using dremel *


#3 Original lens with base cap removed


#4 Vivitar 70-210 f/4.5 manual in K mount


#5 Roughly take out the cap before grinding


#6 Vivitar 70-210 f/4.5 manual in K mount
* modified to work in my K100D with dremel *


Thanks,
Hin


Last edited by hinman; 02-27-2008 at 02:10 PM.
01-29-2008, 12:41 PM   #2
Site Supporter
Site Supporter
Lowell Goudge's Avatar

Join Date: Jan 2007
Location: Toronto
Photos: Gallery | Albums
Posts: 17,892
you need to purchase some flat black paint. That shiny edge will reflect all sorts of things onto the sensor.
01-29-2008, 12:41 PM   #3
Pentaxian
Moderator Emeritus


Join Date: May 2007
Location: Edmonton Alberta, Canada
Photos: Gallery | Albums
Posts: 10,643
Hey Hin, looks like you're becoming "Tim the Toolman"

I have an old 35-105 A SMC f3.5 with a jammed zoom ring. I was wondering if I sent it to you, could you repair the zoom ring and if you could regrind the glass profiles and turn it into a Bigma? If that works I'll get you to turn an old 50mm Tak into an 8 mm fisheye. I could use some new lenses.

Seriously a good tutorial for modifying these lenses to use on the new bodies. I'd suggest you get a little flat black paint to touch up the ground bit and prevent any reflections inside the mirror cage.
01-29-2008, 12:55 PM   #4
Veteran Member
hinman's Avatar

Join Date: Oct 2006
Location: Fremont, CA
Photos: Albums
Posts: 3,473
Original Poster
Yes on the black paint

I just did it over the weekend and I am aware of the need for painting the shinny part of the grind off area. Thanks for the suggestion. I tried some white board black pen but the ink don't seem to stay especially on the grind off area.

I am no handy-man. I am the worst guy in terms of doing handy work. I once burn off a cpu processor in reversing the socket and I only knew about it when I see smoke coming out from my PC. I am resolved to be silly before I grow up, there is a handy man inside everyone of us but I am more like the "Tim the Toolman" who always screw up at the important moment. By the way, that is my favorite TV show.

My next task is to drill off a receiving hole on a M42 lens with a large lens base so that I can mount a 3rd party M42 adapter onto it making it a complete converted K mount. I have this Kalimar on marketplace and I hope no one buys it before I make the modification needed. The vivitar 70-210 f/4.5 is also on marketplace but I may withdraw as I really like that small lens after the lens' modification and it now fit perfectly on my Pentax SuperProgram as well as my K100D body. That Vivitar is very compact and cute, I am yet to test how good it is. If it is as good as it looks, it will be awesome.

It is a beautiful lens and I am about to mess wit it for converting it to a true K mount with a receiving hole so that the K mount pin can secure the converted lens in place


Kalimar 80-200mm f/3.9 in M42


Large lens base, perfect size to drill a receiving hole


large lens base


I will report back on the results. The item is currently in marketplace in this sale thread and if I mess up on the modification, it will have a big discount but I will keep it the same pricing for the potential owner to have it as a true K mount lens with 80-200 at f/3.9.

https://www.pentaxforums.com/forums/photographer-s-marketplace/19308-fs-items-funding-k10d.html


Hin


Last edited by hinman; 01-29-2008 at 09:04 PM.
01-29-2008, 03:21 PM   #5
Inactive Account


Join Date: Jul 2007
Location: Sault Ste Marie, Ont, Canada.
Posts: 563
I was lucky. I bought a really super cheap Vivitar 28-105mm f/3.5-4.5 Macro lens for 5 dollars because of the inside back of the main front element has issues. All I had to do was remove 2 tiny screws, remove that stupid ring you had to grind, and replace the screws so that it holds another ring. No moving parts and no grinding.

I have to wonder why Vivitar decided to make such deep plates. Kind of puzzling.
01-29-2008, 03:52 PM   #6
Veteran Member
hinman's Avatar

Join Date: Oct 2006
Location: Fremont, CA
Photos: Albums
Posts: 3,473
Original Poster
QuoteOriginally posted by Chako Quote
I was lucky. I bought a really super cheap Vivitar 28-105mm f/3.5-4.5 Macro lens for 5 dollars because of the inside back of the main front element has issues. All I had to do was remove 2 tiny screws, remove that stupid ring you had to grind, and replace the screws so that it holds another ring. No moving parts and no grinding.

I have to wonder why Vivitar decided to make such deep plates. Kind of puzzling.
No grinding, you are way better off than me. I believe the deep plates are of the original K mount. As my two Vivitar lens actually work in K1000, pentax p3n, p5 and super program without modification. The lens mount on K100D/10D is perhaps a different K mount as in KAF2 mount (I may be wrong on the exact K mount model name).

How you find another ring, do you replace the ring (or the base mounting plate that I call it) from another lens? The obvious caveat is on the grinding part, but the beauty comes to that I don't need to find another lens that cost another 5 dollars just for the base ring.

The grinding part is not as bad as I have stated. It is actually very fun to do. The only danger that I am aware of is to wear safety gargle (or glass) to avoid flying fragments. I place a piece of moistened of cloth beneath the ring to secure the grinding metallic dust in place and the whole process is quite enjoyable. And I have great satisfaction with the $40 investment on a 7.2 volt rechargeable dremel tool with pretty complete drill bit set in Walmart, and it is going to be long lasting in my household as a useful tool.

Hin
01-29-2008, 07:21 PM   #7
cmv
Senior Member


Join Date: Sep 2006
Location: Chicago, IL, USA
Posts: 147
I brought a less expensive tool but it does not work so well. I am going to buy a Dremel too. I was curious though were you got that screw driver set. It looks like it works well.

01-29-2008, 07:56 PM   #8
Veteran Member
hinman's Avatar

Join Date: Oct 2006
Location: Fremont, CA
Photos: Albums
Posts: 3,473
Original Poster
QuoteOriginally posted by cmv Quote
I brought a less expensive tool but it does not work so well. I am going to buy a Dremel too. I was curious though were you got that screw driver set. It looks like it works well.
The screwdriver is separate from the Dremel that I got from Fry's for about $10, my fault in not mentioning it. I won't recommend that particular screwdriver in my pictures as the bit falls off very easily but it has the Phillip screw bit size that matches the size of the screw that need to be dismounted on most lens.

Thanks,
Hin
01-29-2008, 08:07 PM   #9
Veteran Member
hinman's Avatar

Join Date: Oct 2006
Location: Fremont, CA
Photos: Albums
Posts: 3,473
Original Poster
About the Vivitar 70-210 f/4.5

I have loaded a few test pictures done in cloudy sky on the modified Vivitar that now works with my K100D body and I have it for sale less than what I paid for it. I got lured into thinking that it has macro 1:1.1, I am total newbie to macro ratio, I can't tell. When I am close to the subject at about 2-3 feet, it is close to real size object size. I can' tell, more pictures of the modified lens in this sale thread page 2 for test pictures

QuoteQuote:

Bigger pictures in sale thread:
https://www.pentaxforums.com/forums/photographer-s-marketplace/19308-fs-items...ng-k10d-2.html

we have to careful and not carried away with all Vivitar lens.

There has been numerous reports that some lens from Vivitar with certain mount for Ricoh/Pentax may get stuck as there is an extra pin from some of the Vivitar lens that may can easily get jammed into the AF locking pin. The easy way out of the jammed pin is to switch to AF in MF/AF to push the pin against the lens to yield separation.

The prolonged flange is relatively easier problem as one can grind the prolonged part of the flange down. As for the extra pin, I actually want to find one so that I can document the finding and fixing necessary to do the modification. It should be reasonable to do if the right tool is at hands such as the right size Phillip screw driver. Without the tool of the correct Phillip screw drive to unmount the tiny screws, I don't think I will proceed with the modification as the drilling/grinding will have fine metallic dust likely to harm the inner glass elements if not protected.

Last edited by hinman; 01-29-2008 at 08:54 PM.
01-29-2008, 09:26 PM   #10
Veteran Member


Join Date: Sep 2006
Photos: Gallery
Posts: 5,697
Hin, I have taken that base cap right off, along with the Aperture leaver on several of my lenses in order for it to fit my Sigma.
And I haven't noticed any difference with the picture quality while using it on my Pentax.
I probably would on a full frame camera

If it's a full manual lens removing the Aperture leaver allows you to shoot in AV
01-29-2008, 11:09 PM   #11
Veteran Member
ryan s's Avatar

Join Date: Jan 2008
Location: Madison, WI
Photos: Gallery
Posts: 2,383
A fiberglass cutoff wheel would make your life easier if you do this on a regular basis. Dremel #426

That's just how I'd do it
01-30-2008, 02:27 AM   #12
Veteran Member
hinman's Avatar

Join Date: Oct 2006
Location: Fremont, CA
Photos: Albums
Posts: 3,473
Original Poster
A converted m42-> K mount 1st attempt

Thanks for all the replies. And my first attempt to drill a receiving hole seems to go well tonight. Refinement to be done later on. Some not-so-good pictures to share my 1st attempt without messing up the lens


original Kalimar 80-200 f/3.9 with Bower M42 adapter
currently on sale in marketplace


lens rear end is covered with tape to avoid contact with dust particles


I use crayon pen to color locking pin to locate pin location for drilling


A converted K mount with a not-so-good-looking receiving hole


K mount lock pin that pushes to the receiving hole


I will do refinement and documentation tomorrow and I will definitely try out my Kalimar 80-200 f/3.9 in the newly converted K mount with more test shots. The receiving hole actually works but the mounting and dismounting is not as smooth as a regular K mount and the receiving does secure the pin in place preventing the lens to fall up in abrupt turning. With refinement, it will work great.

Hin

Last edited by hinman; 01-30-2008 at 01:19 PM.
01-30-2008, 07:53 PM   #13
Veteran Member
hinman's Avatar

Join Date: Oct 2006
Location: Fremont, CA
Photos: Albums
Posts: 3,473
Original Poster
How to get the marking for drilling

I forget to mention in detail about how to identify the marking for drilling the receiving hole for locking pin position. Rough steps on what I did last night after getting a clue from my good friend Matthew in photo.net

1. I use a unused camera body, a Pentax P5 that has the locking pin as shown in picture


2. Use crayon, preferably lumbar crayon to color the tip of the locking pin on the K body. Push the pin 'inward' and color to fill in with excess crayon on pin's tip


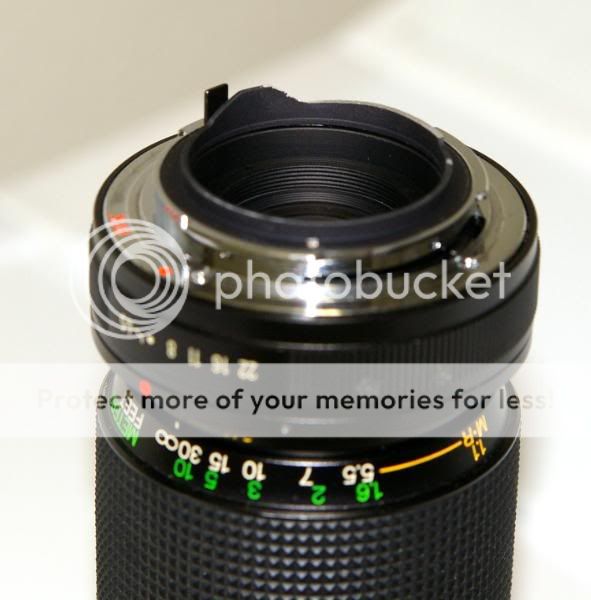
3. Cover the rear end of M42 lens with tape for protection. While the locking pin on camera body is depressed, I mount my un-converted M42 lens that is previously mounted with the M42-> adapter (locking plate on M42 adapter is removed). About a 1/4 turn to stop, release the pin hoping the excess crayon will put a trace on the K body around the K mounting socket

4. Here is the guessing part: unmount in reverse order with pin locking release completely depressed and dismount lens as usual. Inspect the trace of crayon to see where it starts and ends. The drilling pin is about the ending of the trace.

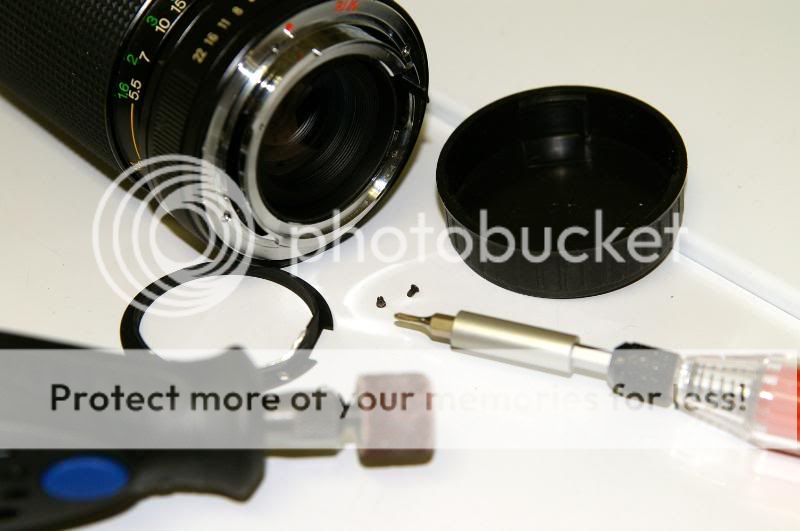
5. Cover the rear end of M42 mount with masking tape to avoid any metallic dust grind off from the lens base. Wear gargle and glass at all time. Prepare a moistened cloth as a base to receive all metallic dust. Remove any equipment before the drilling


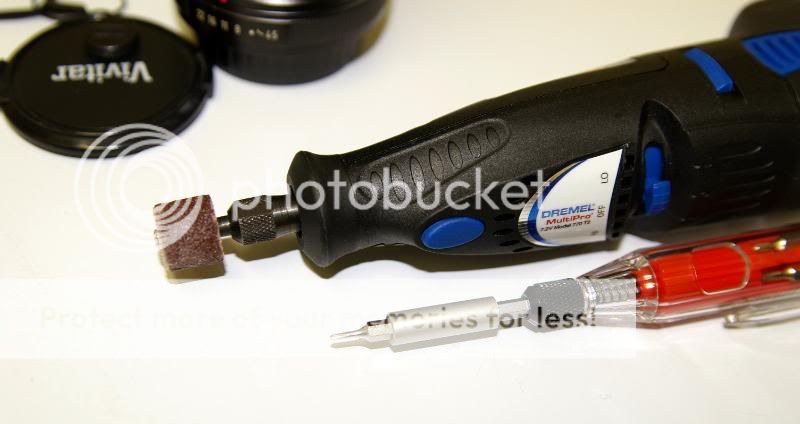
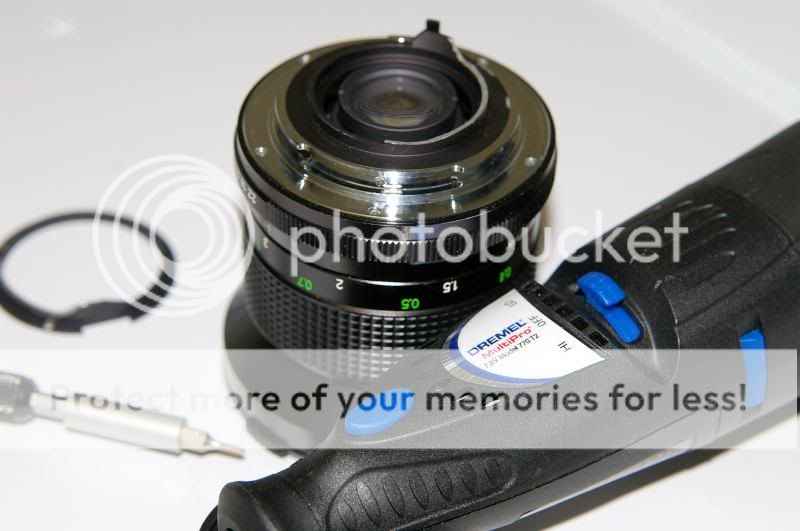
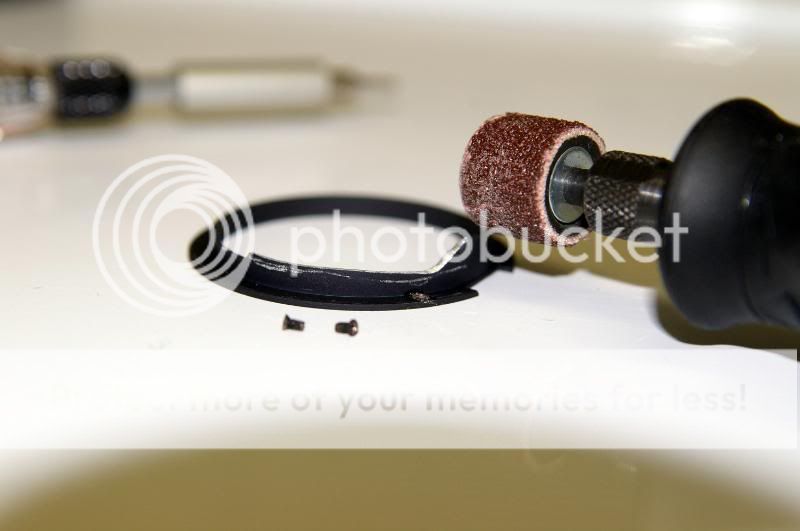
6. Find the best drilling bit for the drilling. I used my Dremel with a sanding stone to drill a small receiving hole simulating the actual K mount receiving hole. I will show the actual K mount later on, but any of your K mount can serve as a good reference.


7. Wipe off any dust, use blower and any logical steps to remove any dirt from lens and the drilling environment.

There may be better methods to identify the drilling location. I use my boys' crayon which does not leave good amount of tracing element and I did not use any masking tape to stick to my M42 lens for easier tracing. All things considered, there are lot of improvements that I can make in my next attempt. If you have done this before, please share and comment.
01-30-2008, 08:32 PM   #14
Inactive Account


Join Date: Jul 2007
Location: Sault Ste Marie, Ont, Canada.
Posts: 563
Hinman, I think it is a design of the particular lens. Once I removed the outer ring with the protrusion, I noted another smaller inner ring holding together the rear objective. The two small screws used to hold the outer ring on, overlap this inner smaller ring, thereby locking it in without the need for that outer ring. Otherwise, I would have had to so surgery using a dremel.
01-30-2008, 10:24 PM   #15
Veteran Member
hinman's Avatar

Join Date: Oct 2006
Location: Fremont, CA
Photos: Albums
Posts: 3,473
Original Poster
QuoteOriginally posted by Chako Quote
Hinman, I think it is a design of the particular lens. Once I removed the outer ring with the protrusion, I noted another smaller inner ring holding together the rear objective. The two small screws used to hold the outer ring on, overlap this inner smaller ring, thereby locking it in without the need for that outer ring. Otherwise, I would have had to so surgery using a dremel.
Chako, are you referring to Vivitar 28mm f/2.5 or Vivitar 70-210 f/4.5. If it is the former, without the outer ring, will the lens internal be exposed easily to reflection. I could have taken the outer ring and forget about the grinding but that leaves the lens rear element more susceptible to flare due to reflections. The Dremel drilling tool cost me $40 and I find it a great gadget that I would buy even without the need for lens alternation. I buy it at impulse around Xmas time in Walmart and the whole set comes with 50 pieces of drilling bits and sand stone and a carrying case, it looks something like this entry in Amazon

Amazon.com: Dremel MultiPro Cordless 7700-02 20,000 RPM Two-Speed 7.2V Rotary Tool System w/50 Accessories: Home Improvement

While one can do it with a regular filer and manual saw, the gadget freak in me opted for the tool as the $40 investment for grinding and M42 to K lens conversion and something that demands a simple drilling and sawing as in do-it-yourself type of job. If you already have regular saw and filer, it can be done similarly.

Thanks,
Hin

Last edited by hinman; 01-30-2008 at 10:44 PM.
Reply

Bookmarks
  • Submit Thread to Facebook Facebook
  • Submit Thread to Twitter Twitter
  • Submit Thread to Digg Digg
Tags - Make this thread easier to find by adding keywords to it!
base, cap, dremel, f/4.5, k-mount, k100d, lens, pentax, pentax lens, slr lens, tool, vivitar

Similar Threads
Thread Thread Starter Forum Replies Last Post
Recommended Lens For Birding & Wildlife? seachunk2 Troubleshooting and Beginner Help 55 07-22-2011 05:35 AM
Linux lens correction tool Mullah Digital Processing, Software, and Printing 4 12-18-2009 04:14 AM
Recommended lens(es) for K20d bessa66 Pentax SLR Lens Discussion 9 06-13-2009 03:32 PM
M42 Auto Only Lens Modification hinman Pentax SLR Lens Discussion 23 03-06-2009 02:07 PM
Lens modification: Panning shots cheat Isaac314 Pentax DSLR Discussion 2 11-14-2008 06:41 PM


All times are GMT -7. The time now is 01:29 PM. | See also: NikonForums.com, CanonForums.com part of our network of photo forums!
  • Red (Default)
  • Green
  • Gray
  • Dark
  • Dark Yellow
  • Dark Blue
  • Old Red
  • Old Green
  • Old Gray
  • Dial-Up Style
Hello! It's great to see you back on the forum! Have you considered joining the community?
register
Creating a FREE ACCOUNT takes under a minute, removes ads, and lets you post! [Dismiss]
Top