Forgot Password
Pentax Camera Forums Home
 

Reply
Show Printable Version Search this Thread
09-17-2008, 03:08 PM   #16
Veteran Member


Join Date: Jan 2008
Location: Ste-Anne des Plaines, Qc., Canada
Posts: 2,013
Nice lesson, Ben Edict, but you forgot a very important part: to re-install the tiny screws, you dip the end of your jewellers screwdrivers in contact cement, so the screws stay on the screwdriver and can be driven in easily.

09-17-2008, 05:26 PM   #17
Inactive Account


Join Date: Dec 2007
Location: Santa Teresa, New Mexico
Photos: Gallery
Posts: 1,130
QuoteOriginally posted by flyer Quote
... you dip the end of your jewellers screwdrivers in contact cement, so the screws stay on the screwdriver and can be driven in easily.
Doesn't work if you can't see the screws. Some of us here are eyesight challenged. So I put the screws I had removed in a very small ziplock bag and sent it to Eric. I have a nice, but yellowed, Super Tak 35/2.0 sitting in the window wrapped in foil.

QuoteOriginally posted by TimB Quote
Taking bets on how many "extra parts" I'll have after this is done
Lets just have an over/under at say 5. I think the mallet would be easier in the long run, but nowhere near as entertaining, if you'll take some pictures for us.
09-17-2008, 05:48 PM   #18
Veteran Member
geauxpez's Avatar

Join Date: Jul 2008
Location: Atlanta
Photos: Gallery
Posts: 1,196
Also a pro-Eric post here. I just got a 28/3.5 back from him Saturday & the blades are as snappy as can be. Before the cleaning, they were jammed wide open & wouldn't budge.

I thought I would do a DIY on an Olympus om 50/1.8 once that had a little algae inside. I didn't get far when I realized that I might be able to get it back together if I went no further. It's a doorstop. But hey, why not. On that one, I could get a replacement far cheaper than a repair, so I went for it.
09-17-2008, 06:51 PM   #19
Senior Member


Join Date: Dec 2007
Location: Berkeley, CA
Posts: 227
Original Poster
QuoteOriginally posted by Ben_Edict Quote
....
- remove name ring, by screwing it out through the filter thread
....
Ben,

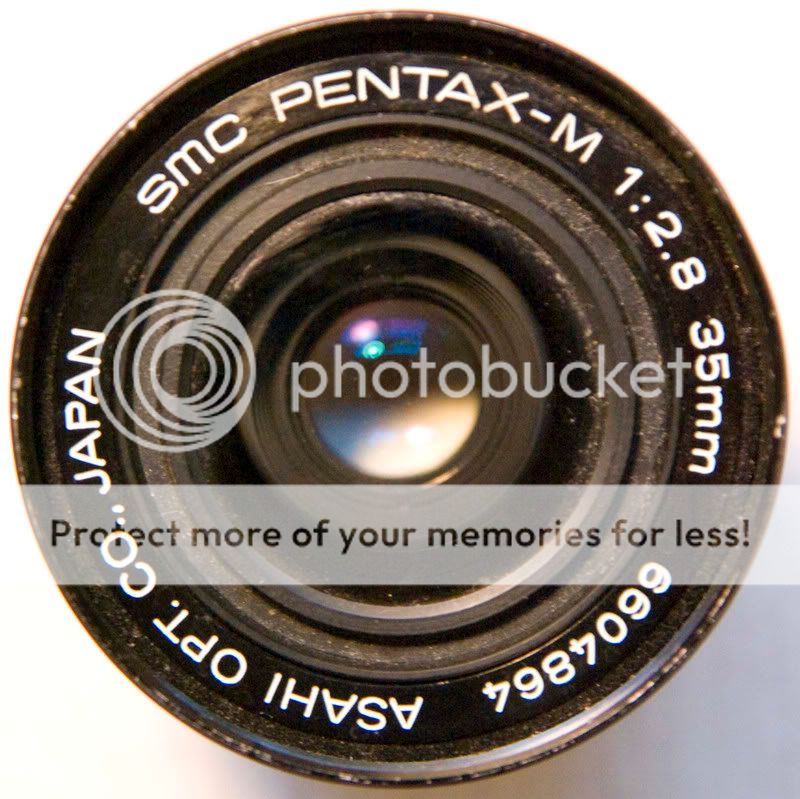
I started by removing the whole optical assembly barrel, and I see what you're saying about unscrewing the name ring, I don's see a way to do it.
Usually there are little notches to grab onto, but this one doesn't have any (see picture).

Any suggestions???


09-18-2008, 04:29 AM   #20
Pentaxian
Arjay Bee's Avatar

Join Date: Sep 2006
Location: Horn Island, Torres Straits, Q
Photos: Gallery
Posts: 4,715
STOP NOW!!!
If you are asking this question you have to do more reading!
Favorite Classics / Camera & Repair Articles
This page gives you stacks more info and this website in general will provide a wealth of info on a great range of lenses.
Microtools website is a good source of camera repair tools lncluding the specialized filter ring name plate removal 'bungs'. A careful tour of the house may turn up a sink plug that will neatly do the job. From the pic above you may have a slight ding at the 2 o'clock position which could make unscrewing of the name plate difficult. Drill two small holes in the plate and use a lense removal tool to allow use of greater force. The whole lens looks a bit seedy to me so this may make a realy good practice lens.

Good luck but remember this is supposed to be fun.

Last edited by Arjay Bee; 09-18-2008 at 04:34 AM. Reason: More info
09-18-2008, 12:17 PM   #21
Senior Member


Join Date: Dec 2007
Location: Berkeley, CA
Posts: 227
Original Poster
QuoteOriginally posted by Arjay Bee Quote
STOP NOW!!!
If you are asking this question you have to do more reading!
Favorite Classics / Camera & Repair Articles
This page gives you stacks more info and this website in general will provide a wealth of info on a great range of lenses.
Microtools website is a good source of camera repair tools lncluding the specialized filter ring name plate removal 'bungs'. A careful tour of the house may turn up a sink plug that will neatly do the job. From the pic above you may have a slight ding at the 2 o'clock position which could make unscrewing of the name plate difficult. Drill two small holes in the plate and use a lense removal tool to allow use of greater force. The whole lens looks a bit seedy to me so this may make a realy good practice lens.

Good luck but remember this is supposed to be fun.
READING?!
Bah, reading is for the weak. I fix with my gut.

Seriously though, thanks for the link. Lots of good info.
And Microtools seems to be located about an hour away from me.

I would like to avoid making holes in the name ring, but I suppose it may be inevitable.

It's been fun so far. We'll see where this goes ....
09-19-2008, 04:03 AM   #22
Pentaxian
Arjay Bee's Avatar

Join Date: Sep 2006
Location: Horn Island, Torres Straits, Q
Photos: Gallery
Posts: 4,715
Glad to help - Making broken photographic stuff work again is one of the really fun aspects I get from this hobby. Particularly when it improves IQ such as wiping oil off internal lens elements and cleaning out mould growths and so on.

Having the right tools prevents making irreversible modifications. Worth the investment. My next challenge is the correction of dented filter rings on a couple of lenses so I can re attach hoods and filters.

Yup - it is fun.

09-19-2008, 04:30 AM   #23
Inactive Account


Join Date: Mar 2007
Photos: Gallery
Posts: 3,675
I bought a (used) Konica Auto S2 on Ebay not long ago. It was advertised, of course, to be in perfect working order. When it arrived I found that the advance lever wouldn't advance and the shutter button wouldn't go down. Basically, the camera was a dud. I didn't pay too much for it so I thought I'd try my hand at camera repair. Following instructions on the net I managed to remove the lens from the camera. It looked fine but for some reason I decided to gently touch the copal shutter blades. They immediately snapped back in place. I reassembled the camera - had no left over parts - and to this day the camera works perfectly.

The moral of the story is: I am available anytime if you want to fly me to California so I can give the Midas touch to your lens. What would be the harm?
09-19-2008, 05:05 AM   #24
Veteran Member
Ben_Edict's Avatar

Join Date: Jul 2007
Location: SouthWest "Regio"
Photos: Albums
Posts: 3,309
QuoteOriginally posted by flyer Quote
Nice lesson, Ben Edict, but you forgot a very important part: to re-install the tiny screws, you dip the end of your jewellers screwdrivers in contact cement, so the screws stay on the screwdriver and can be driven in easily.
Yes, this is a wise thing to do - I do it myself all the time, just forgot to mention. Thanks for the reminder!

Ben
09-19-2008, 05:51 AM   #25
Veteran Member
Ben_Edict's Avatar

Join Date: Jul 2007
Location: SouthWest "Regio"
Photos: Albums
Posts: 3,309
QuoteOriginally posted by TimB Quote
I would like to avoid making holes in the name ring, but I suppose it may be inevitable.

It's been fun so far. We'll see where this goes ....
If the name ring sticks, there is hardly an alternative, but making to small holes. This is not a high value lens, so it might make a good training ground for you. Just protect the lens elements. I have kept some of those thick adhesive foils, which protect LCD screens from scratches, which I place over the lens, when working with any tools on the lens.

Ben
09-19-2008, 02:29 PM   #26
Senior Member


Join Date: Dec 2007
Location: Berkeley, CA
Posts: 227
Original Poster
Thanks for all the help.
Hopefully I'll have some time to put some holes in this baby today and get on with the "fixing".

The number of expected extra parts is growing steadily.
09-19-2008, 02:52 PM   #27
Damn Brit
Guest


QuoteOriginally posted by J.Scott Quote
I bought a (used) Konica Auto S2 on Ebay not long ago. It was advertised, of course, to be in perfect working order. When it arrived I found that the advance lever wouldn't advance and the shutter button wouldn't go down. Basically, the camera was a dud. I didn't pay too much for it so I thought I'd try my hand at camera repair. Following instructions on the net I managed to remove the lens from the camera. It looked fine but for some reason I decided to gently touch the copal shutter blades. They immediately snapped back in place. I reassembled the camera - had no left over parts - and to this day the camera works perfectly.

The moral of the story is: I am available anytime if you want to fly me to California so I can give the Midas touch to your lens. What would be the harm?
You can stay at my place, I can probably find a thing or two needs fixing.
09-19-2008, 02:56 PM   #28
Senior Member
Spex's Avatar

Join Date: Aug 2008
Location: Dubrovnik, Croatia
Posts: 216
Can you see trough the glass any oil or any stains on aperture blades? If not, it could be that aperture ring lubrication is dried out o stuck for some other reason. I opened 3 lenses recently and with one that's really good, I screwed things by cleaning that grease on aperture ring, so it was very hard to rotate it
But then I took some grease from other lenses that are bad...
BTW, does anyone knows what grease could be used as substitute for that? I'm just sure that it has to be high temp resistant, so that it doesn't melt on warm days and slips on the glass or blades...
And about contact cement: what's that?
I'm using magnetized screwdrivers, ie. just rub screwdriver with magnet few times and it's holding screws quite good
09-19-2008, 03:13 PM   #29
Senior Member


Join Date: Dec 2007
Location: Berkeley, CA
Posts: 227
Original Poster
QuoteOriginally posted by Spex Quote
Can you see trough the glass any oil or any stains on aperture blades? If not, it could be that aperture ring lubrication is dried out o stuck for some other reason. I opened 3 lenses recently and with one that's really good, I screwed things by cleaning that grease on aperture ring, so it was very hard to rotate it
But then I took some grease from other lenses that are bad...
BTW, does anyone knows what grease could be used as substitute for that? I'm just sure that it has to be high temp resistant, so that it doesn't melt on warm days and slips on the glass or blades...
And about contact cement: what's that?
I'm using magnetized screwdrivers, ie. just rub screwdriver with magnet few times and it's holding screws quite good
There doesn't seem to be any oil stains on the blades. But I'll have a better idea of what's stuck/dry once I get in there.

I would also like to find out what kind of grease goes into various parts of the lens.
In particular, I'm considering replacing the focus thread grease, as there seems to be a lot of crap in there.
09-20-2008, 10:17 PM   #30
Site Supporter
Site Supporter
Just1MoreDave's Avatar

Join Date: Feb 2007
Location: Aurora, CO
Photos: Gallery | Albums
Posts: 6,340
QuoteOriginally posted by TimB Quote
Ben,

I started by removing the whole optical assembly barrel, and I see what you're saying about unscrewing the name ring, I don's see a way to do it.
Usually there are little notches to grab onto, but this one doesn't have any (see picture).

Any suggestions???
The official tool is a rubber ring that uses friction on just the name ring. MicroTools has it on their site. If you can find something rubber that fits just inside the filter threads and doesn't touch the front element, it will probably work.

Most name rings use the filter threads, so clean these first with a toothbrush if they're dirty. From the photo, this name ring might screw into its own threads. A few times, I have used a few drops of WD40 in the name ring threads to help a stubborn ring turn.

I had a lens like this with similar symptoms and no visible oil. Cleaning the blades had no effect. I thought the mechanism just behind the mount had too much friction. I used a few drops of WD40 there and it fixed the slow aperture. The lens worked for months that way before I was comfortable selling it as a working item.
Reply

Bookmarks
  • Submit Thread to Facebook Facebook
  • Submit Thread to Twitter Twitter
  • Submit Thread to Digg Digg
Tags - Make this thread easier to find by adding keywords to it!
blade, k-mount, pentax lens, slr lens

Similar Threads
Thread Thread Starter Forum Replies Last Post
Slow Aperture blades on my M-28/2.8, how to proceed? fazer Pentax SLR Lens Discussion 4 06-09-2010 04:07 AM
Sticky blades? audiobomber Pentax SLR Lens Discussion 5 11-21-2008 07:42 AM
How to fix oily aperture blades madhurvyas Photographic Technique 5 03-30-2008 02:21 PM
How to fix Oily aperture blades madhurvyas Photographic Technique 0 03-12-2008 01:03 AM
Aperture blades sticky? Toshi Pentax SLR Lens Discussion 7 04-13-2007 12:02 PM


All times are GMT -7. The time now is 10:41 PM. | See also: NikonForums.com, CanonForums.com part of our network of photo forums!
  • Red (Default)
  • Green
  • Gray
  • Dark
  • Dark Yellow
  • Dark Blue
  • Old Red
  • Old Green
  • Old Gray
  • Dial-Up Style
Hello! It's great to see you back on the forum! Have you considered joining the community?
register
Creating a FREE ACCOUNT takes under a minute, removes ads, and lets you post! [Dismiss]
Top