Forgot Password
Pentax Camera Forums Home
 

Reply
Show Printable Version 4 Likes Search this Thread
03-16-2013, 08:52 AM   #16
Veteran Member
Nesster's Avatar

Join Date: Oct 2006
Location: NJ USA
Photos: Gallery
Posts: 13,072
Woo Hooo! That's one of my favorite cameras! Nice results!

03-16-2013, 06:57 PM   #17
Site Supporter
Site Supporter
arnold's Avatar

Join Date: Aug 2012
Location: Queensland
Photos: Gallery | Albums
Posts: 4,294
QuoteOriginally posted by Nesster Quote
Basically, the simple DYI cleaning job consists of removing the front and back lens elements, then dropping a tiny bit of lighter fluid in the various slots leading to the shutter mechanism, and exercising the shutter till it runs. After a day of drying, the lens goes back on, and you set the front element to infinity.
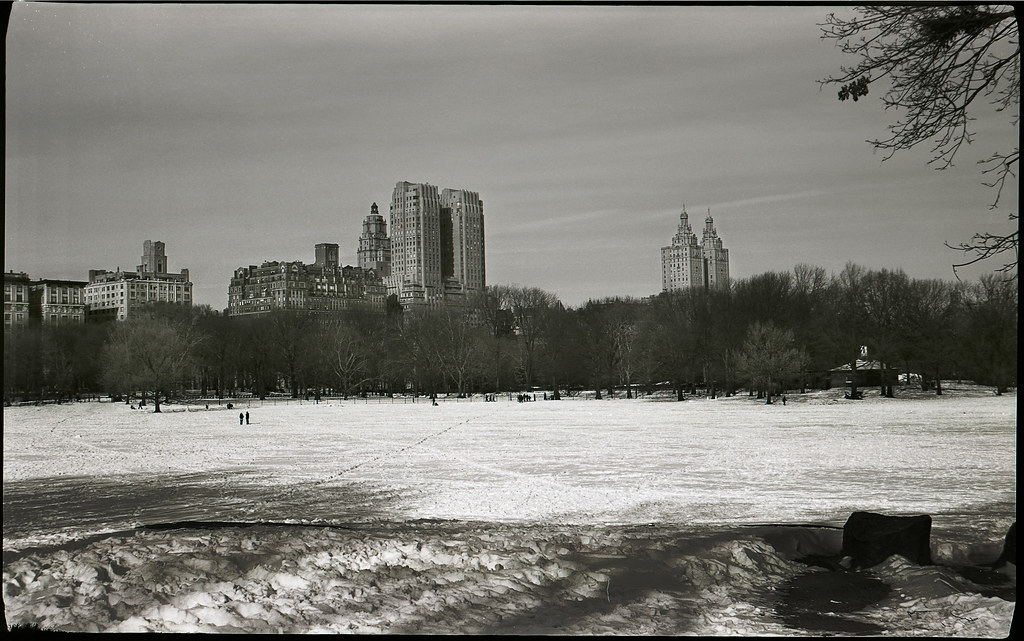
I tried this on the Franka Rolfix, just to clean the haze off the lens. The first rolls I put through before doing this, were sharp. Afterwards, my negatives seem soft at all distances. I tried putting a wax paper screen at the film plane to see if somehow I had mucked up the infinity focus, but just couldn't tell clearly. The colour negtives I received were not flat, and I am wondering if that has confused my flat bed scanner.
Here is a sample for your opinion.
Attached Images
View Picture EXIF
CanoScan 9000F  Photo 
03-16-2013, 07:30 PM   #18
Veteran Member
Nesster's Avatar

Join Date: Oct 2006
Location: NJ USA
Photos: Gallery
Posts: 13,072
You're out of collimation, by the looks of it. The front element need to be set just right for the system to work. Rather than wax paper, try the bringing infinity indoors technique.

http://rick_oleson.tripod.com/index-123.html

I shine the light through the back of the folding camera; I use a bit of film with the frame center, and a X I drew... lately also a clear plastic CD cover cut to the right side with a bit of scotch tape for a ground glass.. I peer through the lens using a SLR with a fast/long lens, say a 90 or 105 or 135. Some use even longer lenses. You look for the target or frame edge, and by moving the folder's front element you get it in focus. Then set whatever needs setting to tighten it, and check once more.

This method is fairly quick and effective. I get better results - to my own eyes - than what I've seen from certo06's work.

Last edited by Nesster; 03-16-2013 at 07:36 PM.
03-16-2013, 09:09 PM - 1 Like   #19
Site Supporter
Site Supporter
arnold's Avatar

Join Date: Aug 2012
Location: Queensland
Photos: Gallery | Albums
Posts: 4,294
QuoteOriginally posted by Nesster Quote
You're out of collimation, by the looks of it. The front element need to be set just right for the system to work. Rather than wax paper, try the bringing infinity indoors technique.

Bringing Infinity Indoors

I shine the light through the back of the folding camera; I use a bit of film with the frame center, and a X I drew... lately also a clear plastic CD cover cut to the right side with a bit of scotch tape for a ground glass.. I peer through the lens using a SLR with a fast/long lens, say a 90 or 105 or 135. Some use even longer lenses. You look for the target or frame edge, and by moving the folder's front element you get it in focus. Then set whatever needs setting to tighten it, and check once more.

This method is fairly quick and effective. I get better results - to my own eyes - than what I've seen from certo06's work.
Thanks for this, I will have to read it a few times to see just what it is I am doing. Plastic with an X against the film rails on the folder. Look through the front of the folder lens with an SLR set to infinity on a long lens. Then the X should be made to come into focus with adjusting the folder front element? Is this correct?

Added later: I put scotch tape across the film window of the folder, with some marks on it. Then with the lens open on Bulb, I looked through the view finder of my SLR 135mm into the front lens of the folder. The SLR was set to infinity. Then rotated the folder lens until the marks were the sharpest. The correcting rotation was about 10 degrees away from infinity (I may have been focused beyond infinity) Then loosened the lens ring and re positioned it at the infinity stop limit. Thanks for the help.


Last edited by arnold; 03-16-2013 at 11:59 PM.
03-17-2013, 12:24 PM   #20
Veteran Member
Nesster's Avatar

Join Date: Oct 2006
Location: NJ USA
Photos: Gallery
Posts: 13,072
Great! you should now be getting sharp results.
03-22-2013, 06:16 AM   #21
Veteran Member
Nesster's Avatar

Join Date: Oct 2006
Location: NJ USA
Photos: Gallery
Posts: 13,072
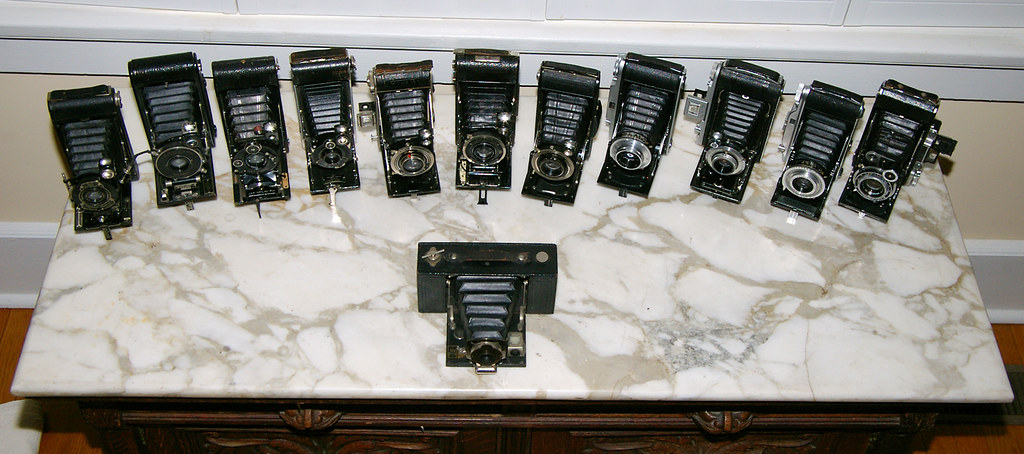
Here's an areal view of the same clutch of folders..


And an example of before/after collimating a lens - Bessa I Vaskar

Hopelessly near focused


After collimation


As you can see, with proper infinity and a 6x9 negative, a triplet like the Vaskar can be very capable - this is a detail from the above photo.

03-22-2013, 02:43 PM   #22
Pentaxian
Jonathan Mac's Avatar

Join Date: Apr 2009
Location: Madrid, Spain
Posts: 10,897
Original Poster
QuoteOriginally posted by Nesster Quote
Here's an areal view of the same clutch of folders..


And an example of before/after collimating a lens - Bessa I Vaskar

Hopelessly near focused


After collimation


As you can see, with proper infinity and a 6x9 negative, a triplet like the Vaskar can be very capable - this is a detail from the above photo.

Excellent detail there.

I've still to try out the 6x6 that arrived a few weeks ago. Maybe this weekend...

03-22-2013, 04:53 PM   #23
Site Supporter
Site Supporter
arnold's Avatar

Join Date: Aug 2012
Location: Queensland
Photos: Gallery | Albums
Posts: 4,294
QuoteOriginally posted by Nesster Quote
As you can see, with proper infinity and a 6x9 negative, a triplet like the Vaskar can be very capable - this is a detail from the above photo.
Yes, very clear. Before I cleaned the lens, the Franka was pretty good as well, as seen below. I have not tried the lens since using your procedure since it is such a pain and expensive to get film processed. $22 just to develop eight pictures!!!
Attached Images
 
03-23-2013, 04:21 AM - 1 Like   #24
Site Supporter
Site Supporter
germar's Avatar

Join Date: Apr 2007
Location: North Palm Beach, Florida
Photos: Gallery
Posts: 728
Collimation Illustrated

Here are a few images showing how I set up to perform this collimation process. I opted on the scotch tape stretched across the film plane with an "X" on it.

As explained earlier in this thread, the idea is to use the film SLR as a tool to properly calibrate the folder's lens to infinity.
The SLR has a longer lens, in this case a 135mm lens. It is set wide open and on infinity.
The folder is set to bulb and shutter held open with a cable release. It too is set wide open and on "infinity" according to the distance ring attached. The back is opened and a piece of scotch "magic tape" (that's important since you do not want the tape to leave residue on the film guide) is taped across the film guides and a focusing mark made on the tape. A light sources is placed behind the folder so light enters from behind.
I am NOT aware of a proper distance between SLR and folder lenses. This looks to be about two inches... I believe the idea is that the two optics are "close."
Looking through the SLR, I turned the focus ring of the folder until the image of the tape came into sharp focus. The magic tape itself has got fine "grains" that you can also use to check focus.
Once this new infinity point is set, simply loosen the set screws on the focus ring and rotate (the RING not the lens itself) until you now have the distance indicator set to infinity. Re-tighten your set screws.

I will be running some film through this pre-war bessa today and see if I got focus nailed. If I missed a step or have something wrong, please let me know.

Germar
Attached Images
View Picture EXIF
SAMSUNG-SGH-I747  Photo 
View Picture EXIF
SAMSUNG-SGH-I747  Photo 
View Picture EXIF
SAMSUNG-SGH-I747  Photo 
View Picture EXIF
SAMSUNG-SGH-I747  Photo 

Last edited by germar; 03-23-2013 at 06:38 AM. Reason: Further clarification
03-23-2013, 05:09 AM   #25
Veteran Member


Join Date: Jan 2010
Location: Michigan
Photos: Gallery
Posts: 2,207
Hi Germar,
Maybe you could edit your post with a reference to the procedure?
03-23-2013, 05:39 AM   #26
Veteran Member


Join Date: Jan 2010
Location: Michigan
Photos: Gallery
Posts: 2,207
The Nettar is back from shutter cla that took 9 months including a return to fix the focus. Infinity focus looks good now on gg.
I will try a roll of C41 according to Nesster's advice, but I have to accumulate a few rolls over next few weeks/months before getting another C41 kit.
It is dull and gloomy morning in Michigan, this shot was at 1.5 second with a bit of light painting using a led flashlight ( I mean an ordinary hand flashlight not a camera flash)
Attached Images
View Picture EXIF
PENTAX *ist DS  Photo 
03-23-2013, 06:41 AM   #27
Site Supporter
Site Supporter
germar's Avatar

Join Date: Apr 2007
Location: North Palm Beach, Florida
Photos: Gallery
Posts: 728
QuoteOriginally posted by wombat2go Quote
Hi Germar,
Maybe you could edit your post with a reference to the procedure?
Done. I posted these quite late and didn't have it in me to write additional instructions!

If anyone more familiar with the process sees an error in my description, please let me know.
03-23-2013, 11:48 AM   #28
Otis Memorial Pentaxian
stevebrot's Avatar

Join Date: Mar 2007
Location: Vancouver (USA)
Photos: Gallery | Albums
Posts: 42,007
QuoteOriginally posted by germar Quote
Done. I posted these quite late and didn't have it in me to write additional instructions!

If anyone more familiar with the process sees an error in my description, please let me know.
Thanks for doing this. It makes me wonder if it would work for my rangefinder lenses as well?


Steve
03-23-2013, 08:33 PM   #29
Site Supporter
Site Supporter
arnold's Avatar

Join Date: Aug 2012
Location: Queensland
Photos: Gallery | Albums
Posts: 4,294
QuoteOriginally posted by stevebrot Quote
Thanks for doing this. It makes me wonder if it would work for my rangefinder lenses as well?
Can't see why not. I tried it on anAgfa Silette range-finder 1953, but the two front elements are well and truly seized as one so I can't adjust the front element for focus. The camera is otherwise in nice shape, but not usable until I can find another donor lens.
03-24-2013, 06:49 AM   #30
Veteran Member


Join Date: Jan 2010
Location: Michigan
Photos: Gallery
Posts: 2,207
Thanks Nesster, Arnold and Germar,
I tried it with 100 mm macro on K-01 with peaking on.
It is a great way to set infinity stops on the Graflex.
I wonder if the LF-ers know of this method ? I never saw it mentioned over there
Reply

Bookmarks
  • Submit Thread to Facebook Facebook
  • Submit Thread to Twitter Twitter
  • Submit Thread to Digg Digg
Tags - Make this thread easier to find by adding keywords to it!
advice, cameras, film, format, medium, photography

Similar Threads
Thread Thread Starter Forum Replies Last Post
Samsung Digital Medium Format Philippos Canon, Nikon, Sony, and Other Camera Brands 7 08-25-2011 10:54 AM
35mm vs Medium Format maverickh Film SLRs and Compact Film Cameras 16 03-21-2011 03:43 PM
Advice on getting started in medium format ADHWJC Pentax Medium Format 34 09-21-2010 03:38 PM
Medium Format Advice mk07138 Pentax Medium Format 8 03-08-2009 09:26 AM


All times are GMT -7. The time now is 06:46 PM. | See also: NikonForums.com, CanonForums.com part of our network of photo forums!
  • Red (Default)
  • Green
  • Gray
  • Dark
  • Dark Yellow
  • Dark Blue
  • Old Red
  • Old Green
  • Old Gray
  • Dial-Up Style
Hello! It's great to see you back on the forum! Have you considered joining the community?
register
Creating a FREE ACCOUNT takes under a minute, removes ads, and lets you post! [Dismiss]
Top