Forgot Password
Pentax Camera Forums Home
 

Reply
Show Printable Version 3 Likes Search this Thread
03-27-2013, 06:26 AM   #1
New Member


Join Date: Mar 2013
Posts: 3
Slide copying adaptor vs scanning??

Hi all,

I have been developing B&W for just about half a year. So far so good at chemicals. But about digitizing the films, I wonder if there is a method that is, hmmm, approved by anyone more experienced than me.

I have a low-end 135-format film scanner. It gives 3696 x 2464 compressed JPG files (and unable to setting for BMP). Color films suffer from bad color corrections. B&W is okay in terms of tone. But the problem is, the scanned files are kind of blur and generally lack of contrast. And for certain it can't accept 120-format films.

So I look for document scanners. Some say they can go to 9600 x 9600 for films, but their price is kind of "not utilized" since I don't have documents to scan.

I have also found some equipments called "Slide copying adapter", a film-era copying equipment for, I believe, copying a color slide into a negative for photo printing. I wonder, if I put a DSLR into this "slide copying adapter" and take photos (in RAW??), how will the quality be compared to high-res scanners??

Thank you very much!!

03-27-2013, 06:37 AM - 1 Like   #2
Ole
Administrator
Ole's Avatar

Join Date: Sep 2006
Location: Copenhagen, Denmark
Photos: Gallery | Albums
Posts: 4,409
If you use the slide adapter on a macro lens and a good, uniform light source, you can get fine results with the slide copier. The resolution of course will be that of your camera. Note that the slide adapters were designed for 1:1 copying onto 35mm film. With an APS-C camera you must ensure that you can focus at 1:2 only (0.5x), since the APS-C sensor is half the size of the slide. Some slide adapters do not allow for that.

Some options can be found here.
03-29-2013, 04:01 PM - 1 Like   #3
Veteran Member


Join Date: Sep 2008
Location: Portland, OR, USA
Photos: Gallery | Albums
Posts: 430
You actually want a magnification equal to the crop factor, or 1.5 for our APS-C cameras.

I'm still learning how to do this without a scanner, but...

Slide copiers that have adjustable magnification (to get to 1.5) and that can hold your negatives (most of them are designed for mounted slides) would be the quickest way to get the job done. Downside: you're limited to your camera resolution because you can't take a "panorama" at a higher magnification and then stitch those images together.

Current scanners, by most reports, produce very workable images, very quickly. You can get models that scan multiple images at the same time, and focus isn't a problem. Downside: it may be an expensive, single purpose piece of hardware that takes up a bit of room. It, too, cannot be oversampled. Most importantly, though, with color negatives, you will have far less data in the blue channel due to the orange mask.

I use a tripod mounted over a light table to take pictures of my negatives. This allows me to get as high a resolution "scan" as I have the patience for, and also allows me to use filters (a stacked 020 and 021 seem to do the trick) to compensate optically for the orange mask. This also uses the least amount of specialized equipment: tripod, filters, macro lens...these are all things you can use in the field, too. Downside: this takes a lot of time and patience to get right.

I'm still finding ways to speed things up. I use multiple levels to ensure everything is parallel: this is much sturdier than creating a tower of lens hoods for a 100mm macro. My latest innovation is buying a negative holder for an obsolete scanner: the holder was cheap because nobody uses that scanner, but it holds negatives just as well as it ever did. The filters I started using to maximize image quality now get me close enough that I can use the eyedropper in Lightroom then customize to taste.

I'm also aiming to enhance this model by using my laptop as a backlight, and loading up a customized mask for the negative I'm taking to maximize contrast data in the digital realm. Haven't quite started that project yet, though.
03-29-2013, 07:01 PM   #4
New Member


Join Date: Mar 2013
Posts: 3
Original Poster
QuoteOriginally posted by Ole Quote
If you use the slide adapter on a macro lens and a good, uniform light source, you can get fine results with the slide copier. The resolution of course will be that of your camera. Note that the slide adapters were designed for 1:1 copying onto 35mm film. With an APS-C camera you must ensure that you can focus at 1:2 only (0.5x), since the APS-C sensor is half the size of the slide. Some slide adapters do not allow for that.

Some options can be found here.
Thanks for the info!! I have never thought of so many copiers and bellows!!!


QuoteOriginally posted by JonPB Quote
I'm still finding ways to speed things up.
Yes, same problem here... a light table / pad with a tripod is slow. And there are several other problems. The major one is that the camera can never be dead-center and horizontally parallel; it is like shooting tilt / shift that I have to go to Photoshop or something else to correct the "perspective". Second problem is that the film is usually curled. I put a piece of glass to press down the film, but I always capture my own reflection....

So I think extension tubes plus lens hoods will do best to keep the planes and axies correct, and I can do panorama stitch; but I need a macro lens which I don't have. Slide copiers may be shaky (and not panorama stitch-able??), but the magnification is adjustable and it has a film holder. Kind of a dilemma....

03-30-2013, 09:34 AM - 1 Like   #5
Veteran Member


Join Date: Sep 2008
Location: Portland, OR, USA
Photos: Gallery | Albums
Posts: 430
To me, it is becoming an issue of end result. Taking careful pictures of every exposure on a roll doesn't make sense when I might only want to print one or two of them. I'm thinking that a loupe would be a good investment to help me decide which exposures I want to invest more time in.

If you're seeing a reflection in the flattening glass, then you have too much extraneous light, which will reduce the contrast of the image. I not only mask out the light source below the negative, but I also do this in a near-dark room (aka on my bathroom floor). Removing most of the unnecessary light has proven to be the single biggest improvement I've yet found.

Also note that negative film is inherently low contrast...which is the flip side of having wide latitude. (Slide film has high contrast and low latitude.) You will normally need to clip the whites and blacks somewhere, or use creative tone curves, to get a desirable level of contrast in the final image.

Personally, I like using my digital camera to capture the negative because it allows me to choose which densities of the negative I want to work with in the digital realm. My view is that as much as possible should be done optically to make the digital bits as meaningful as possible. For example, when I took two pictures of the same negative, one with automatic exposure and one that clipped the highlights of the sprocket holes (exposing to the right), the noise level noticeably favored the latter image.
04-07-2013, 02:48 PM   #6
Site Supporter
Site Supporter
Clarkey's Avatar

Join Date: Jan 2008
Location: Brampton, ON, Canada
Photos: Gallery
Posts: 2,456
Good comments re: the orange mask and the clipping points.
One other thing with slide copying is that you will really need to clean your negs prior to copying them, or be prepared to put a lot of clean up time into them.

Last edited by Clarkey; 04-12-2013 at 03:33 PM. Reason: replace scanning with copying
04-19-2013, 08:32 AM   #7
Site Supporter
Site Supporter
smigol's Avatar

Join Date: Sep 2008
Location: Menlo Park, CA
Photos: Albums
Posts: 422
QuoteOriginally posted by JonPB Quote
... This allows me to get as high a resolution "scan" as I have the patience for, and also allows me to use filters (a stacked 020 and 021 seem to do the trick) to compensate optically for the orange mask. ...
Quick question regarding these filters.

A google search on 020 and 021 filters returns two different variations. The 020 shows as a blue Wratten 80A filter and the 021 as a blue Wratten 80B OR a B+W light yellow filter, depending on the maker.
Are you using B+W, Cokin, TIffen, Hoya brands -- I want to understand how you're accomplishing this as getting a few filters is a lot cheaper than buying a scanner. I'm already taking pictures of my black and white and slides and have been avoiding color negatives because of the annoying orange mask.

04-19-2013, 09:47 AM   #8
Veteran Member


Join Date: Sep 2008
Location: Portland, OR, USA
Photos: Gallery | Albums
Posts: 430
Smigol,

I'm using Cokin filters because they are large and don't have any metal rings that might cause scratches... and also because I was able to buy a bunch of them for fairly cheap. :-) I don't have much experience with filters and assumed that they used numbers in a somewhat consistent way. Oops!

What you're looking for is a way to increase the color temperature of the captured image, so a blue or cooling filter is what you want. I haven't made any attempt to be precise in my filter usage; rather, I just try to get into the ballpark where the Lightroom white balance sliders are sufficient to correct the image. A strong blue filter--022 or 80C?--might be enough on its own to do that, but stacking the weaker 020 and 021 combined works for the Ektar I've shot.

Let me know what you try and how it works!

Cheers,
Jon
04-19-2013, 10:42 AM   #9
Site Supporter
Site Supporter
pixelsaurus's Avatar

Join Date: Jul 2007
Location: Te Kuiti, NZ
Photos: Gallery | Albums
Posts: 986
QuoteOriginally posted by smigol Quote
I'm already taking pictures of my black and white and slides and have been avoiding color negatives because of the annoying orange mask.
Will this help?
Orange mask removal, Burton's technique: Nikon Coolpix Talk Forum: Digital Photography Review
or
http://old.macedition.com/feat/film/feat_film_20030626.php
04-19-2013, 02:14 PM   #10
Site Supporter
Site Supporter
smigol's Avatar

Join Date: Sep 2008
Location: Menlo Park, CA
Photos: Albums
Posts: 422
I did more reading and rummaged in my box of aging gear to find a Cokin 020 or Blue 80A filter. I tried it on an old film shot with a custom white balance set on the film leader. Just a quick invert and it was looking pretty good!

I have a bunch of gels for my flash that I can put in front of the light source of my flat surface to further correct the color if needed.

I'm going to see what I can do with my experience with stacking astronomy pictures to get better noise reduction, too. I can use the above mentioned gels to do an RGB combine on very special shots that are worth the effort.

Looks like I can stop worrying and start shooting my medium format reversal film.

I also found a good resource on this page:
http://dpbestflow.org/camera/camera-scanning

Advantage is that it included videos for LR3 (which is what I use).

Last edited by smigol; 04-19-2013 at 02:25 PM.
04-19-2013, 03:09 PM   #11
Site Supporter
Site Supporter
pixelsaurus's Avatar

Join Date: Jul 2007
Location: Te Kuiti, NZ
Photos: Gallery | Albums
Posts: 986
You can also enhance very thin b/w negatives by photographing them against a black background and placing 2 lights, one on each side of the neg at 45 degrees and out of view, on the camera side of the arrangement. This will render the neg as a positive due to forward scattering by the small silver particles in the film. I'm not at all sure if this would work on colour film though as the image is formed by colour dyes and not silver.
04-22-2013, 02:58 PM   #12
Site Supporter
Site Supporter
smigol's Avatar

Join Date: Sep 2008
Location: Menlo Park, CA
Photos: Albums
Posts: 422
QuoteOriginally posted by pixelsaurus Quote
You can also enhance very thin b/w negatives by photographing them against a black background and placing 2 lights, one on each side of the neg at 45 degrees and out of view, on the camera side of the arrangement. This will render the neg as a positive due to forward scattering by the small silver particles in the film. I'm not at all sure if this would work on colour film though as the image is formed by colour dyes and not silver.
That's an interesting trick. I have a collection of old negatives that date back to the 40s and earlier that would probably work with this kind of technique.
04-29-2013, 02:43 PM   #13
Site Supporter
Site Supporter
smigol's Avatar

Join Date: Sep 2008
Location: Menlo Park, CA
Photos: Albums
Posts: 422
Follow up question on this topic:

What's a good rule of thumb for exposure settings? I've considered running 1/3 to 2/3 stop over exposed in the hopes of helping to get good dark regions. I'm not entirely pleased with how the final images look as they seem spotty and under-resolved.
04-29-2013, 05:18 PM   #14
Veteran Member
BirdDude007's Avatar

Join Date: Jun 2009
Location: Las Vegas NV
Photos: Albums
Posts: 784
I dont know if this would help, but about five years back I came across what looks to be a slide/negative holder/light source/adapter for some sort of HP scanner. I found it in a box of odds and ends electronics that was being thrown out, I saw the part on it that looked like you could clip either a monted slide or an unmounted slide/negative 35mm film. So the pack rat in me said to just grab it and put it away for a later time when I can disect it and figure out just what it is and how I could make a useful tool out of it.
about a year later I had a little time on my hands and sat down and took it apart, turns out it IS an adapter for a scanner, it has one of those miniature cathode tube lights (I think that is what they are called) that take a 12 Volt DC source that provides the light for exposures. I have gobs of 12 volt transformers and am guessing at the amperage of what this light needs, right now it is using an 800 miliamp transformer but it still heats up the coil in the circuit, I am going to bump it down to a 500 miliamp transformer and see if that will help.
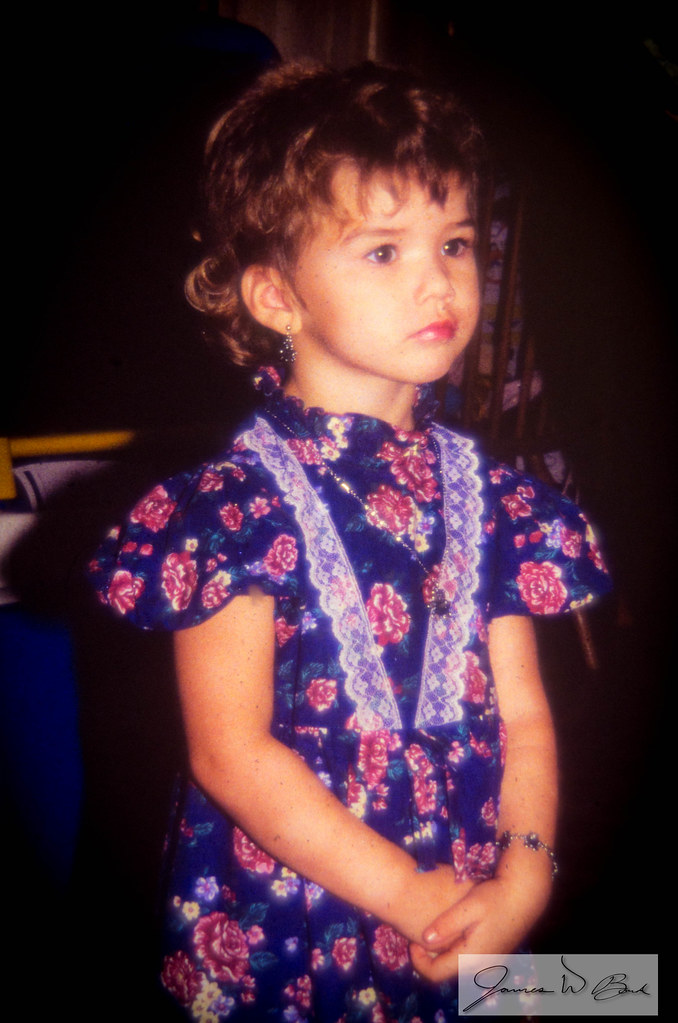
Anyhow back to the story- the light source is mounted just behind a really nice chunk of ground glass that is 35mm size, on the outside of this gadget is a metal door with a 35mm hole in it, it is held shut magnetically, all you gotta do is hinge it open and just place your film in it, it even has indexing tabs for the sprocket holes on the film. I rigged it to a switch and have been taking practice shots, but I dont have any type of macro lens set up, so I gave up for a while until I took an old vivitar teleconverter I never use anymore and pulled out the lenses that were in it and it actually makes the perfect macro tube at around 21mm, I tried my old vivitar35mm lens and Whala! I am in business! I havent had much time lately to take a bunch of pics of my old film negatives and slides but I managed to take one shot of my daughter when she was little(see below) I also tried my coveted Pentax 50mm f1:1.4 M lens that i have had for three forever's, but it wont get close enough to the film to fill the whole sensor on the camera, and compared to the vivitar shot there really is no difference in IQ, so it is looking like the vivitar will be used for all my scans.
This goes to show that no matter what you come across in life, if it looks like something you can use in the future, then just grab it and check it out later, I did and I will most likely use the heck out of it. I am a do it yourselfer big time, so far I have made a wired remote for my K-5 out of an aluminum flashlight, and extension tube out of an old telaconverter, and now a film scanner from an old discarded scanner part. I will post pics of the set up soon.
this pic was done really quick in order to see if it can be done feasibly, but it actually came out pretty good compared to my earlier attempts at film scanning, this shot is only tweeked a little in LR along with some vignetting, once I learn more on PP then I am sure I can really make something more of my scans-
04-29-2013, 09:33 PM   #15
Site Supporter
Site Supporter
smigol's Avatar

Join Date: Sep 2008
Location: Menlo Park, CA
Photos: Albums
Posts: 422
Sounds a lot like a device I picked up years ago from Photosolve - their "Xtend a Slide" system. I'd used it a few times back in the day and was stopped by the orange mask pushing the blues into the low exposure ranges. Recently I've been playing with a flat panel that I use for my telescope. It works very well for the black and white and slide film along with a short macro (specifically the 35mm limited). I have noticed that I get glare off the film surface so I made a metal tube that acts as a barrier for extraneous light. It works very well for the medium format film. For 135 film it gets in the way, so I may make another that is shorter.

My system is fully open to the air so dust is an ongoing challenge.

Recently, I started using that 80A filter to help remove the orange mask and it makes a bit difference. However, I've seen that the orange is stronger on some films than others and I'm stacking up gels to get the right color. As I get closer, I see that the noise is becoming less of a problem and the tones are not as patchy.

I also have been using the multi-exposure function of the K10D and at a 9x exposure, the tone is very smooth!
Reply

Bookmarks
  • Submit Thread to Facebook Facebook
  • Submit Thread to Twitter Twitter
  • Submit Thread to Digg Digg
Tags - Make this thread easier to find by adding keywords to it!
color, files, film, films, photography, slide, wonder

Similar Threads
Thread Thread Starter Forum Replies Last Post
Scanning 120 slide film - slide or negative? adelorenzo Film Processing, Scanning, and Darkroom 16 01-19-2012 09:04 AM
Lens for Slide Copying ?????? hillerby Photographic Technique 7 05-20-2011 01:57 PM
Home Slide Scanning vs Lab Digitizing Question Biff Digital Processing, Software, and Printing 7 01-29-2011 10:28 AM
Slide copying... off screens Rick Digital Processing, Software, and Printing 2 08-28-2009 04:08 PM
Slide Copying To Digital Mike Bokeh Pentax SLR Lens Discussion 19 02-29-2008 02:02 PM


All times are GMT -7. The time now is 10:37 PM. | See also: NikonForums.com, CanonForums.com part of our network of photo forums!
  • Red (Default)
  • Green
  • Gray
  • Dark
  • Dark Yellow
  • Dark Blue
  • Old Red
  • Old Green
  • Old Gray
  • Dial-Up Style
Hello! It's great to see you back on the forum! Have you considered joining the community?
register
Creating a FREE ACCOUNT takes under a minute, removes ads, and lets you post! [Dismiss]
Top