Forgot Password
Pentax Camera Forums Home
 

Reply
Show Printable Version 6 Likes Search this Thread
04-25-2014, 12:30 AM - 3 Likes   #1
Veteran Member


Join Date: Jun 2013
Location: Nevada, USA
Photos: Albums
Posts: 3,348
Some thoughts on DSLR scanning of negatives, processing, and film (with pix!)

I spent nearly all day today DSLR scanning some negatives and I wanted to share my experience here.

Let me begin with the bottom line : it works but it takes work.

So how does it work? It takes some serious Google searching across many forum sites to see how people configured their cameras. Nearly everyone uses 35mm or 50mm lens with an extension behind it to connect to the camera body and spacers in the front that connect to a slide/film duplicator. I used my A series 50mm f/1.4 lens with ~30mm of extension behind it. My tubes are just cheap knock-offs from China purchased off of eBay for ~$10. They are sectioned so I can add or remove sections within the assembly to make the system longer or shorter. The fit and finish is rough and my lens ends up mounting almost upside down. That's not a big deal as long as everything is functional. I have a series of step up/down rings and spacers after my lens which connect to an Accura slide/film duplicator. This duplicator seemed like a nice kit because it is expandable and collapsable. I thought I could use this feature to set a rough focus and fine tune the focus with the lens' focus ring. The problem with this feature on the Accura is that the sliding film holder may or may not end up sitting parallel to the image sensor way in the back inside the camera. I decided to collapse the holder and make up for it by adding another ring before it as a spacer. Doing this seemed to make the image more parallel. My Accura kit came complete with instructions and a couple of rings. These kit rings are important because the threads on the Accura are not the standard 49mm, 52mm, 55mm, etc filter threads we are used to today. They are part of a system called Series which has its roots in the early days of photography.

Here is a picture I took of my setup when I was at work earlier last week.


There is a large silver spacer that wombat2go made for me. It's basically a M42 gender-bender. I was going to use my M42 bellows here but it turned out that it could not collapse enough to achieve focus. That's OK because now I feel future-proofed if Pentax ever releases a FF. Then I'll use my bellows.

Here's a link to one of the best examples and explanations of a DSLR scanning configuration.

The Boy With Illuminated Measles: Digitising old negatives - Part 1 - kit

An Accura duplicator was used in that example.

Illuminating the negative was easy. Most people use a flash to illuminate the negatives but I used daylight. I mounted the camera on a tripod and pointed the camera out the window on a bright day. Some people say gray cloudy days work better than clear bright sunny days. The weather was partly cloudy today and I had bouts of both kinds of illumination. It didn't seem to make much of a difference in my case.

Focusing is very easy through both the OVF and LCD. Set your lens aperture wide open and your DoF is very, very thin. You will see when the negative comes into focus.

I set my ISO to 100 and tried sampling the negative at f/5.6, f/8, f/11, f/16, and f/22. Through this trial and error I found that f/16 delivered the sharpest images. Now I know that diffraction begins to set in but I'm not sure if the same rules and guidelines from non-extension use apply here. It seems that extensions stress the optical performance of a lens. Maybe the aberrations and defects which were too small to notice before are stretched and expanded like a marshmallow in a microwave. Does stopping down the aperture to f/16 help the lens bend and refract the light back down to something we would call sharp?

I also found the 2-second timer and the Composition Adjustment function in my K-30 very handy. Although camera shake shouldn't be an issue here, using the 2-second timer allowed me to let go of the camera so there was no chance I could bump it or do something strange to knock the negative out. I used the Composition Adjustment to rotate the sensor and align it with the negative.

I didn't worry about setting the white balance because I was shooting in RAW which allows me to change it willy-nilly. All of my RAW images are process in Apple Aperture. In another thread I posted a link to a tutorial on how to process negatives using Aperture. Here is the link again:

my infinite wisdom: Inverting DSLR-Scanned Negatives in Aperture

I followed this process with two exceptions. First, rather than manually set my white and black points in the "Curves 3" section I use the Auto feature. Second, I also do a lot of tweaking to the colors using the Curves vs. the Levels that this guy uses. I think Curves and Levels operate on the same parameters but Curves offers more flexibility in adjustment. Use what feels comfortable. I ended up using both.

I started off DSLR scanning a negative from a 1994 mountain biking trip I took with my father to Colorado. He took a picture of me riding well ahead of him on fire trail. I don't know how well this will show on everyone's monitors but ...


IMGP2756 DSLR Colorado
by Never Off, on Flickr

Obviously, you can click on the image to see the full size file. The film was Kodak Gold 200 and I think he had a P&S of some sort. There are some issues with this image such as soft corners and strong contrast. The soft corners are on the source material and the contrast is a natural consequence of scanning film. This negative was made to be printed and photo paper has low contrast. To make up for it the film will have high contrast. So, shadows are black and highlights are blown out. I think this could be an example of film having a higher dynamic range than a digital image sensor. The image sensor could not accommodate the wide range of illuminations. If you zoom in you can see some film grain. Some of the finer details are washed out but I don't know if my K-30 could have done much better if it had traveled back in time to 1994 and taken this same photo. I was pleased and impressed with the quality of the image so I decided to move on to some recently developed Kodak Ektar 100.

This is where the fun begins! Ektar is a modern film that claims to have some of the finest grain on the market. I would be hard pressed to disagree. Here's an example.


IMGP2779 DSLR Reading
by Never Off, on Flickr

At worst it looks like high ISO noise but otherwise you can say that it adds a soft and romantic texture to what could have been a dull and sterile shot. Ektar is advertised to have extremely high contrast and that's another point I agree on. I had to tone down the intensity a lot in that shot. Here is a shot at full throttle.


IMGP2775
by Never Off, on Flickr

The colors scream here! They are almost electric! I think this would be the same as a "Vivid" setting in a camera's JPG engine. If that wasn't enough to blind you then here's a floodlight of color.


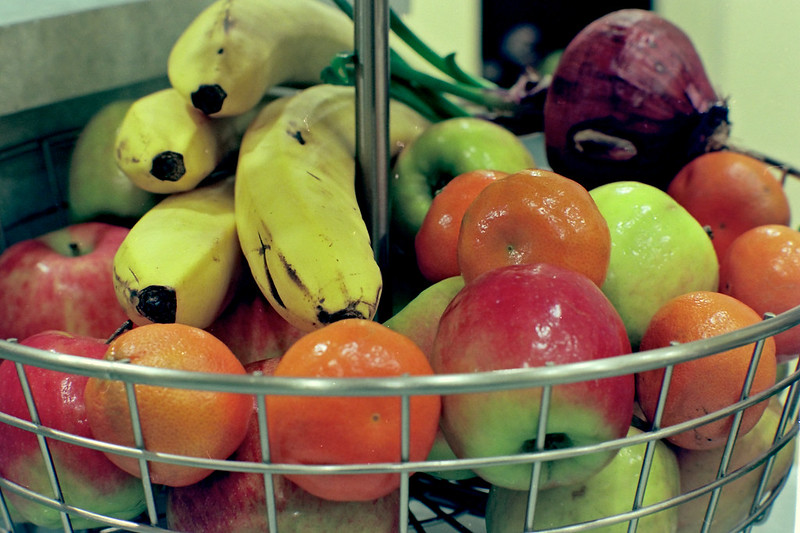
IMGP2790 DSLR Fruit Bowl
by Never Off, on Flickr

For as garish as it looks, I have to confess that the fruit bowl really does look like that when I think about the lighting and the color scheme of my kitchen.


I have been showing the pretty side of DSLR scanning but now I want to show you the ugly side of it : expired film, runny emulsions, dust, and grain! Let's start with an example.


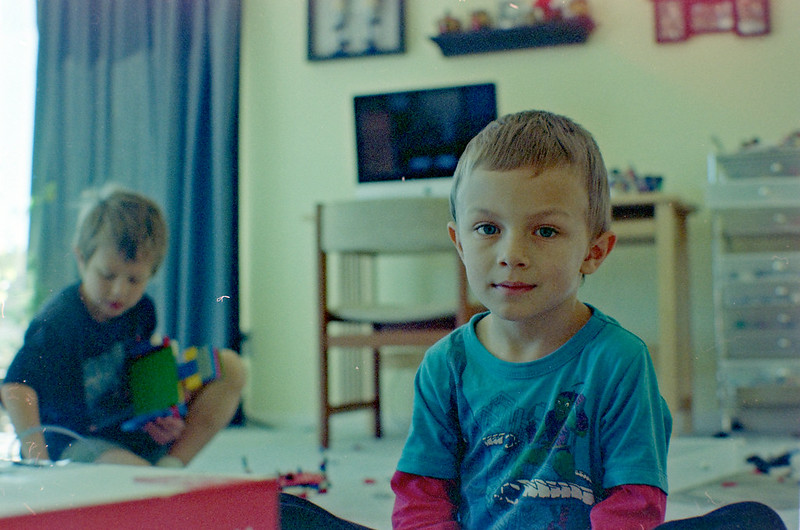
IMGP2801 DSLR Tad
by Never Off, on Flickr

This is Kodak Gold 200 film that was in a SF1n camera package I bought off of eBay. I have no idea how old the film is nor how the camera was stored. My guess is that the film is 10+ years old and there was no temperature controls. It got hot in the summer and cold in the winter. You can see my two kids making a mess on the floor with their Legos. You can also see muted colors throughout, blotchy grain everywhere, and color shifts in the upper right hand corner (the picture frame should be black - it's red). I'm sure there's a lot of digital tools out there that are beyond my skill and wallet which could clean up this image but it's not worth it. I'll go with the whole lomography movement and say that it looks "grungy" and "hip". It's still a romantic shot and I think there is an aspect of lomography I can appreciate but I would have been very disappointed if this would be the best DSLR scanning could ever be - lomography or not.

Here's another example with an emphasis on dust.


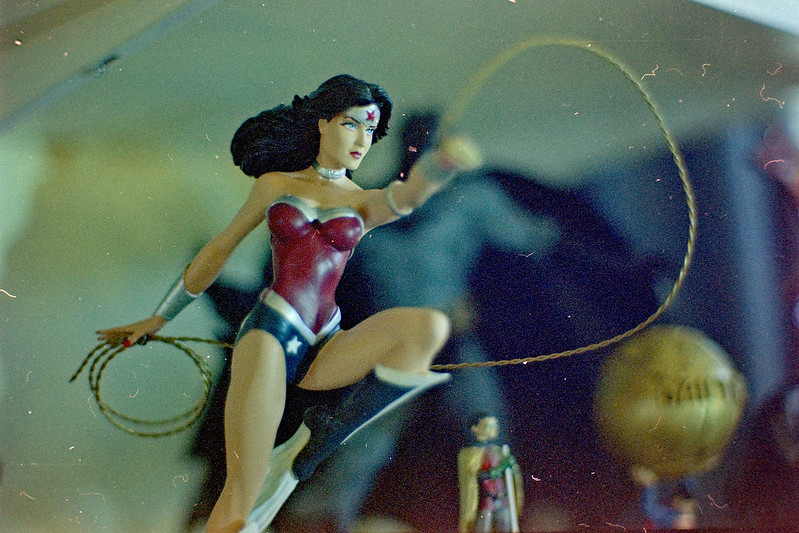
IMGP2794 DSLR Wonder Woman
by Never Off, on Flickr

From what I understand, stopping down a lens helps make the light more coherent so it strikes the image sensor in focus. This is a result of the increased DoF. Increasing the DoF is a three dimensional operation. It sharpens the image from left to right and front to back. The DoF was so deep that it brought all the dust inside the lens into focus on the image sensor! There was also some dust on the film too because it fell on my carpeted floor. No matter how many times I goosed it with my Giottio Rocket Blaster and dusted it my LensPen I simply could not get all the dust off. Now I have to confess that I cheated a bit in my previous images where I could. I used the touch-up feature in Aperture to get rid of most of the dust but it also wasn't nearly this bad. No way. This is very, very dusty!


And now I come to the end of my story telling. If you stayed with me through all of this then you deserve a gold star!

I spent a lot of time thinking about the best to go with digitizing my negatives and it seemed like there isn't a good low cost film scanner for 35mm film. Claimed resolutions fell short by as much as 50% and there are noise issues, focusing issues, etc. Using my K-30 gives me a bit over 5200 DPI resolution for the sensor which is almost overkill here, eliminates focusing issues (although it introduces dust issues), and gives me access to a sensor with low noise and a relatively wide dynamic range (but not wide enough for all of film's dynamic range). Plus there's the hassle of spending $200 on a scanner and finding a place for it. Not including the camera and lens, the DSLR scanning hardware cost me $50 tops and I probably could have done better than that. This solution may not be perfect but I think the compromises are worth the result considering the low cost. It's this low cost that makes the recently announce Pentax bellows seem overpriced to me. I spent $50 to get the IQ shown here. What would another $1150 get me? Would it be worth it? I'm not a professional or archivist. Would I spend a bit extra to get something a bit more elegant and have the ability to DSLR scan 120 film and have a Ricoh/Pentax name on it? Sure - just not $1150 more!!

I hope this (long) post and tutorial will help others looking into DSLR scanning.

Questions? Comments? Rumors? Fantasies?


Last edited by 6BQ5; 04-26-2014 at 06:23 PM.
04-25-2014, 02:26 AM   #2
Senior Member


Join Date: Jul 2013
Posts: 106
Couple of questions having spent three months of my life scanning 4,500 slides a couple of years back with a Plustek scanner. How long did each slide take? This is a major consideration if you need to scan loads of slides. You could die of brain damage! Also, I could never find a really good method of cleaning slides. Also, on a number of slides (which had been boxed, and generally well cared for) on the scans I could detect what were obviously the trails of minute bugs. Basically like snail trails but micro small. Could not get rid of these except in PS of course. 90% of these slides were for the family record and were not really excellent photos but some deserve some special care and attention which I'm willing to devote time to. I can use the Plustek at max resolution and use all sorts of noise reduction and general enhancement features (it has this facility to work out what is dirt etc). But that's a good tem minutes per slide. So, I'm wondering whether, for those 'special' slides a set up like you used is preferable to my Plusteck (it cost about £280 UK pounds).


Richard
04-25-2014, 04:54 AM   #3
Pentaxian


Join Date: May 2011
Location: Santa Cruz, CA
Photos: Albums
Posts: 3,235
QuoteOriginally posted by 6BQ5 Quote
Using my K-30 gives me a bit over 5200 DPI resolution for the sensor which is almost overkill here, eliminates focusing issues (although it introduces dust issues), and gives me access to a sensor with low noise and a relatively wide dynamic range (but not wide enough for all of film's dynamic range).
A Coolscan 4000dpi provides about 5600 X 3600 while the K30 only provides 4928 x 3264 pixels. How did you get 5300dpi?

BTW, nice writeup. Since you are comparing it with other alternative scanning methods, maybe you can provide results from the others for comparison.
04-25-2014, 06:11 AM   #4
Site Supporter
Site Supporter
TER-OR's Avatar

Join Date: Apr 2009
Location: Dundee, IL
Photos: Gallery | Albums
Posts: 6,699
Thanks for this. I have loads of old negative strips I eventually want to scan. I was thinking of setting up a tabletop arrangement, and still might - but this seems pretty straightforward too.

04-25-2014, 06:55 AM   #5
Pentaxian


Join Date: Jul 2009
Location: Pugetopolis
Posts: 11,032
QuoteOriginally posted by 6BQ5 Quote
I'm sure there's a lot of digital tools out there that are beyond my skill and wallet which could clean up this image but it's not worth it....
A can of air and the content aware healing tool in Photoshop, for example, does wonders.
04-25-2014, 10:13 AM   #6
Veteran Member


Join Date: Jun 2013
Location: Nevada, USA
Photos: Albums
Posts: 3,348
Original Poster
Thanks for all the positive replies and questions! Let me answer what I can.

@Richard Briggs : In terms of time, this process can be relatively quick but it can also be time consuming. Photographing the slides goes very, very quickly as you can imagine. Once your camera is set up with the tripod, lens bits, focused, etc it's just a matter of cycling the shutter. I use an EyeFi card so my images are transferred to my Mac as I work. Processing the RAW images is what takes the time. Following the tutorial from the blog post I referenced can be confusing at first but once I got comfortable with it I created a preset that I can apply to all photos with one click. This gets me to 80% of the final image. Even if the preset stamped images are not 100% it let's me see if the image is worth my time. Maybe something was blurred. Maybe the compensation was bad. I then fine tune and tweak the first image to compensate for the film profile, etc and save that as as a second preset. Then, I stamp that second preset onto a down-selected set of images. Now I'm at 90% to 95% of the final image. That second preset is flawed though. In addition to settings that make up for the film profile I also have settings to make that specific image look good. Those mixed-together settings may not apply to the other images so I need to tweak the last 5% to get the results I am looking for. The fine tuning and tweaking is what takes time. Sometimes its's 5 minutes on an image sometimes it's 15 minutes. Notice too that while I may be photographing almost every negative I am not processing every image. On a roll of 36 exposure I may have DSLR scanned 20 and processed 10 because those are the images I really, really wanted. The other images are at least archived and if I want to process them later for some reason then I can. Rainy day activity maybe? It's an approach.

As far as noise reduction goes, I find that Apple Aperture is not very well suited to that. It's an image post processor vs. a photo manipulator. There are lots of plug-ins available but they are not free. For my images I find that I can bumble around with the limited noise reduction and touch-up tools. I'm sure something like Photoshop can run circles around Aperture for that sort of thing.

@LesDMess : The K-30's sensor is 4928 pixels across 23.7mm, or 0.933 inches. That translates to a resolution density of 5281 DPI. Now on second thought I imagine I may be losing some resolution since my lens, for as good as it is, is not perfect. So maybe I end up ... oh, 4000 DPI. Still that's way ahead of pretty much every consumer grade scanner. The Scandig website has some good write ups and reviews on scanners. None of the scanners actually achieve their claimed DPI resolution. For example, a V600 has a claimed resolution of 6400 DPI but only achieves 1560 DPI. Here is their website :

http://filmscanner.info/en/FilmscannerTestberichte.html

I do not have a scanner so I cannot do the comparison myself. Petapixel did a comparison between an Epson V700, a professional grade drum scanner, and a Canon 5D Mark II. I would assume the V700 in this test was tweaked and tuned to create the best image possible.

http://petapixel.com/2012/12/23/why-you-should-digitize-your-film-using-a-ca...-of-a-scanner/
04-25-2014, 05:09 PM   #7
Pentaxian


Join Date: May 2011
Location: Santa Cruz, CA
Photos: Albums
Posts: 3,235
QuoteOriginally posted by 6BQ5 Quote
@LesDMess : The K-30's sensor is 4928 pixels across 23.7mm, or 0.933 inches. That translates to a resolution density of 5281 DPI. Now on second thought I imagine I may be losing some resolution since my lens, for as good as it is, is not perfect. So maybe I end up ... oh, 4000 DPI. Still that's way ahead of pretty much every consumer grade scanner. The Scandig website has some good write ups and reviews on scanners. None of the scanners actually achieve their claimed DPI resolution. For example, a V600 has a claimed resolution of 6400 DPI but only achieves 1560 DPI. Here is their website :

I do not have a scanner so I cannot do the comparison myself. Petapixel did a comparison between an Epson V700, a professional grade drum scanner, and a Canon 5D Mark II. I would assume the V700 in this test was tweaked and tuned to create the best image possible.
You are correct regarding he K30's sensor density. However, you are scanning a frame of 35mm film which measures 36mm X 24mm or 1.417in X 0.945in. Therefore you are distributing 4928pixels across 1.417 inches. So as it applies to scanning 35mm film the K30 is ideally a 3478 dpi scanner. What you are actually achieving will depend on a variety of factors such as the lens, focusing, alignment, film flatness, aperture/diffraction and of course the sensor's bayer filter.

Regardless it sounds like you are getting results you can work with and that's the important thing.

04-26-2014, 08:17 AM   #8
Veteran Member


Join Date: Jun 2013
Location: Nevada, USA
Photos: Albums
Posts: 3,348
Original Poster
Interesting perspective! You took the K-30's sensor and expanded its resolution to cover the film frame. I took the film frame and compressed it down through "de-magnification" to fit in the camera's sensor. The result is probably the same when it comes down to making a print since that is where the rubber meets the road.
04-26-2014, 09:22 AM   #9
Pentaxian


Join Date: May 2011
Location: Santa Cruz, CA
Photos: Albums
Posts: 3,235
If the film image you are scanning with your K30 is the same size as the K30's sensor then that is ideally a 5281 dpi scanner as it is a 1:1 ratio since you are evenly distributing the pixels to the area. However, since you are compressing a larger area to a smaller area - or you are spreading the same pixel over a larger area, either way the ratio is no longer one to one which decreases the effective DPI.
Intuitively, it is easy to see this when you consider different film formats - simplified by not considering aspect ratios.
If you were to scan an even larger film format like medium format 6X7 film (2.722in X 2.185in) the K30 scan would go down to 1800dpi.
If scanning a smaller film format like 110 film (0.654in X 0.501in) the K30 scan would go up to 7535dpi.
04-26-2014, 02:00 PM   #10
Pentaxian


Join Date: Jul 2009
Location: Pugetopolis
Posts: 11,032
Resolution is not the only thing to consider. How much density are you capturing with your DSLR vs a scanner with a good D-Max range. I don't know the answer to that or if it matters. I've scanned some really old family positives with my Coolscan 9000ED and with my D800. I think the Coolscan ones have an edge. But it is hard to tell on these old slides because most of them the focus is poor and the lens on that old camera was not that great.
04-26-2014, 03:18 PM   #11
Veteran Member


Join Date: Jun 2013
Location: Nevada, USA
Photos: Albums
Posts: 3,348
Original Poster
@LesDMess : I continue to keep thinking about DPI, resolution, and image size. One other factor which you imply is field of view. It makes me wonder when I compare a zoomed-out image to a zoomed-in image. When I'm zoomed out looking at landscape with trees there is no way I can resolve the leaves that are far, far way. When I zoom in I have a better chance of doing this. That makes me wonder what is the field of view for every pixel. Maybe that is my true resolution. Maybe instead of wondering about the number of pixels or dots specifically I should be wondering what each pixel sees based on my optical configuration and then count up the pixels.

@tuco : My K-30 had difficulties capturing the dynamic range of the film. With the histogram in the middle my shadows were too dark and my highlights were blown out. In other words, the instant review/playback showed lots of blinking areas. I can adjust the exposure manually to reduce the blown out highlights at the expense of more shadows or reduce the amount of shadow by blowing out highlights. I just let meter pick it's own shutter speed which seemed like a good compromise. Just for grins I compared the dynamic range score of my K-30 to the Sony A7R on DxOMark. I know these scores are controversial due to the test methodology but I think it may be a good starting point. The K-30 is rated at 13 EV and the Sony A7R is rated at 14 EV. Would one extra EV give me a significant boost in my DSLR scanning?

Without diving too deep into all the math I am still very happy with my DSLR scans.
04-26-2014, 06:28 PM   #12
Pentaxian


Join Date: Jul 2009
Location: Pugetopolis
Posts: 11,032
QuoteOriginally posted by 6BQ5 Quote
The K-30 is rated at 13 EV and the Sony A7R is rated at 14 EV. Would one extra EV give me a significant boost in my DSLR scanning?
Remember that is Engineering DR (SNR 1:1) not photographer's DR where the bottom 2 or 3 stops of the Engineering DR is really not that useful for photography (noisy and color shifts). With side film there should be plenty of DR in a DSLR but modern color negative film and BW it could be more of a challenge but I can't say for certain.
04-27-2014, 07:39 AM   #13
Pentaxian


Join Date: May 2011
Location: Santa Cruz, CA
Photos: Albums
Posts: 3,235
For high contrast scenes, maybe you can HDR it? For instance, the Kodak Ektar 100 shot below is very high contrast under normal scanning even on my Coolscan so I scanned the single frame three times at under, normal and overexposure and used Photomatix to obtain what I consider a very reasonable exposure.


Of course if you are achieving a good range in your "scan" then perhaps it's only a matter of using Shadows/Highlights tool in post to bring out the details in either since film - like the Kodak Portra 400 shot below, has captured it.

Full res -> http://www.fototime.com/DCE615918D77901/orig.jpg
04-27-2014, 08:16 AM   #14
Veteran Member


Join Date: Jun 2013
Location: Nevada, USA
Photos: Albums
Posts: 3,348
Original Poster
@LesDMess : HDR! Of course! I completely forgot about that feature! And, I even have a custom user setting on my K-30 for this. Next time I will have to remember to try this.

I am not too worried about the dark shadows. Some of the shadows are clipped but would make no visual difference if they weren't. They're so close to non-clipped black. I just boosted some of the shadows and manipulated the black point on the curves to bring out the mid-darks (if that makes sense) and lower some of the upper-highlights into range. The blown highlights were usually bright reflections of sunlight on hair and faces. Those can be toned down in post processing.

@tuco : I hear you! The sensor has a noise floor based on how much brownian noise it produces. It ought to be low at ISO 100 but it's still there. The darkest black colors have to compete with that but like I said above to @LesDMess those darks are so dark that there's really nothing to see there. It's just mathematically detected by Aperture as being clipped. There's a probably a range just above the lower EVs that starts to contain some discernible image and we hope our sensors can detect it as our eye sees it. If the sensor has a different transfer function than our eyes that's when I think the captured images seem to have contrast stacking. Just my guess here...
05-05-2014, 09:48 AM - 1 Like   #15
gma
Junior Member


Join Date: Jan 2014
Posts: 35
I've started doing this myself recently. I used the approach in this article...

How to scan films using a digital camera | | Addicted2light Addicted2light

...and have found it to be very successful. Once you get going picking the camera up, moving it to the next frame, putting it down, checking focus with live view and shooting a shot with the self timer takes around 15s per shot.

I spent around £80 on a light table (I wanted an A4 one so I could lay out a lot of negatives at once) and £70 on a 50mm f4 Takumar macro lens. On a M43 body (crop factor of 2:1) a 35mm negative fills the frame perfectly when the lens is just shy of its closest focus. For the lens hood, I worked out how far the lens needed to be from the table, bought as long a metal hood as I could find (that would encompass a 35mm slide holder), and filled the remaining gap with 4 step up rings.

I'm loving it, and the light table is actually really handy for looking at negatives and slides anyway.
Reply

Bookmarks
  • Submit Thread to Facebook Facebook
  • Submit Thread to Twitter Twitter
  • Submit Thread to Digg Digg
Tags - Make this thread easier to find by adding keywords to it!
35mm, auto, body, camera, curve, dslr, dust, film, flickr, focus, function, image, lens, mp, negatives, photography, range, sensor

Similar Threads
Thread Thread Starter Forum Replies Last Post
Request for some insight on a pair of negatives Gareth.Ig Film SLRs and Compact Film Cameras 15 04-23-2014 10:42 AM
scanning negatives and slides condor27596 Film Processing, Scanning, and Darkroom 2 08-13-2013 08:51 AM
MF Film and scanning of art work Jacquot Film Processing, Scanning, and Darkroom 4 02-03-2013 11:34 PM
"Scanning" film with DSLR and macro lens zoltan1983snapper Pentax DSLR Discussion 5 07-10-2011 11:04 AM
After Playing With Some DSLR's Yesterday, Some Thoughts. Christopher M.W.T Canon, Nikon, Sony, and Other Camera Brands 15 07-01-2010 01:53 PM


All times are GMT -7. The time now is 05:05 PM. | See also: NikonForums.com, CanonForums.com part of our network of photo forums!
  • Red (Default)
  • Green
  • Gray
  • Dark
  • Dark Yellow
  • Dark Blue
  • Old Red
  • Old Green
  • Old Gray
  • Dial-Up Style
Hello! It's great to see you back on the forum! Have you considered joining the community?
register
Creating a FREE ACCOUNT takes under a minute, removes ads, and lets you post! [Dismiss]
Top