Forgot Password
Pentax Camera Forums Home
 

Reply
Show Printable Version Search this Thread
11-27-2021, 09:59 AM - 1 Like   #31
Site Supporter
Site Supporter
bobbotron's Avatar

Join Date: Jan 2015
Location: Ottawa, ON
Photos: Gallery
Posts: 3,349
Awesome, looks like some good results! Development really is a skill that benefits from practice, keep shooting!

11-27-2021, 11:40 AM - 1 Like   #32
Site Supporter
Site Supporter


Join Date: Jan 2010
Location: Netherlands
Photos: Gallery
Posts: 438
Very nice pictures.

I have developed and printed a lot of 35mm film in the past.
For drying the film I used smal children toy clothespins.

At that time I made an easy transformation method to make a darkroom of our bathroom.
Works much better than with a plastic bag.

It is even rather simple.
I painted the window frame and door frame black. Took a window size piece of 8 mm thick plywood, panted it also black and placed self adhesive 5 mm thick rubber band at the edges of the plywood so that it would make contact with the window frame. And also placed the same rubber band at the door frame.
I only had to place the piece of plywood over the window frame, close the door, place a thick towel against the doorstep and I had a perfect darkroom including warm and cold running water.

Last edited by Sakura; 11-27-2021 at 01:00 PM.
11-27-2021, 05:39 PM   #33
Loyal Site Supporter


Join Date: Feb 2018
Posts: 1,903
Nice work man - and dust free to boot! Congrats - people don't know how hard it is till they try it themselves.
11-27-2021, 10:51 PM   #34
Digitiser of Film
Loyal Site Supporter
BigMackCam's Avatar

Join Date: Mar 2010
Location: North East of England
Posts: 20,660
Original Poster
Thanks, all I'm looking forward to the next roll... Not sure whether I should stick with 120 format Fomapan 200 and start to build my experience with one emulsion, or try out some of the 35mm Fomapan 400 I recently bought. Decisions, decisions

11-27-2021, 11:25 PM - 1 Like   #35
Site Supporter
Site Supporter


Join Date: Sep 2020
Location: Seattle
Photos: Albums
Posts: 1,755
QuoteOriginally posted by BigMackCam Quote
Thanks, all I'm looking forward to the next roll... Not sure whether I should stick with 120 format Fomapan 200 and start to build my experience with one emulsion, or try out some of the 35mm Fomapan 400 I recently bought. Decisions, decisions
Foma 400 is pretty cheap, try some out and see how different the two emulsions are. It's less nuanced than the 200, and it'll seem extra grainy after developing 120, but it's a look, a cool look!
11-28-2021, 12:16 AM - 1 Like   #36
Pentaxian


Join Date: Mar 2014
Location: Sydney
Photos: Gallery
Posts: 912
QuoteOriginally posted by BigMackCam Quote
Not sure whether I should stick with 120 format Fomapan 200 and start to build my experience with one emulsion, or try out some of the 35mm Fomapan 400 I recently bought.
I think mixing it up means you have to think carefully about each step. This is as important to practice as getting used to one type of film. BTW the first time I developed 120 I used 35mm chemical amounts in the tank. The negatives came out with a high water tide mark. Now I double check each step in the sequence. So my advice comes from experience.
11-28-2021, 08:54 AM   #37
Site Supporter
Site Supporter
ChrisPlatt's Avatar

Join Date: Nov 2007
Location: Rockaway Beach NYC
Posts: 7,692
QuoteOriginally posted by officiousbystander Quote
Just try loading film during a humid Sydney summer. The developing bag becomes a sauna. You have about five minutes before everything sticks to everything else.

Humidity is a scourge to be avoided at all costs. A larger changing bag buys you extra time.
Avoid sweaty palms; an adult beverage before starting might help if it calms your nerves.
Again reels, tank, hands and inside of changing bag should first receive the hair dryer treatment.

Chris

11-28-2021, 10:04 AM   #38
Pentaxian


Join Date: Jan 2013
Location: Near Vienna, Austria
Photos: Gallery
Posts: 2,057
QuoteOriginally posted by BigMackCam Quote
After unrolling the film from the backing and separating the two, I needed to cut off the adhesive strip left on the film, and found it tricky to keep the bag out of the way of the scissor blades.
Just a quick comment: I just tear the adhesive tape off at the end of the film. The residue doesn’t do any harm and is better cut off when the film is dry.

PS: the photos look absolutely flawless!

Last edited by wkraus; 11-28-2021 at 11:08 AM.
11-28-2021, 10:07 AM   #39
Digitiser of Film
Loyal Site Supporter
BigMackCam's Avatar

Join Date: Mar 2010
Location: North East of England
Posts: 20,660
Original Poster
QuoteOriginally posted by wkraus Quote
Just a quick comment: I just tear the adhesive tape off at the end of the film. The residue doesn’t to any harm and is better cut off when the film is dry.
Ah, OK - that's interesting... How about the grooves in the reels? They don't get gummed up from the adhesive residue?
11-28-2021, 11:05 AM - 1 Like   #40
Pentaxian


Join Date: Jan 2013
Location: Near Vienna, Austria
Photos: Gallery
Posts: 2,057
QuoteOriginally posted by BigMackCam Quote
Ah, OK - that's interesting... How about the grooves in the reels? They don't get gummed up from the adhesive residue?
I never had any issues and usually the tape does not touch the grooves.
11-28-2021, 01:00 PM   #41
Site Supporter
Site Supporter
ChrisPlatt's Avatar

Join Date: Nov 2007
Location: Rockaway Beach NYC
Posts: 7,692
QuoteOriginally posted by wkraus Quote
I never had any issues and usually the tape does not touch the grooves.

My somewhat related bulk loading tip:

When bulk loading 35mm film I recommend using high quality PVC electrical tape to secure the film end to the spool.
I use 3M Scotch Super 33+ tape. It is strong enough to never come loose yet peels off cleanly leaving no residue.

Some other types of tape I tried failed, particularly when using motorized advance.
When this occurs in the field the camera body becomes useless until the back can be opened in a changing bag, film loaded onto a reel and placed safely in a daylight tank.
That can really spoil a day out taking photos...

Chris
11-29-2021, 02:15 AM - 1 Like   #42
Site Supporter
Site Supporter
Digitalis's Avatar

Join Date: Mar 2009
Location: Melbourne, Victoria
Photos: Gallery
Posts: 11,694
Excellent results!


QuoteOriginally posted by BigMackCam Quote
oading the 120 film onto a reel was a little challenging, despite several practice runs in advance (with different film stock - relevant, perhaps?)
Film base thickness was and by all accounts still is a mixed bag. I recall Kodak tech pan in 120 format had the THICKEST film base I have ever worked with in 120 format, and was a breeze to load. If you are still having difficulty: I'd suggest practicing with a waste roll in the changing bag after the de-humidification treatment. Plastic spirals are fine for a beginner but stainless steel spirals are really something to work with and they last a lifetime! - if you ever have to upgrade your film development gear metal spirals should be right at the top of your list. Mine have a built in clip at the core so no tape required to get the film loading started. Also gloves are your friend, (I use nitrile gloves as even dilute pyrochatechol film developers are the last thing you want on your skin, pyro is a severe irritant) they prevent moisture or particulate matter on your hands affecting any step of the film loading process.


QuoteOriginally posted by BigMackCam Quote
5. Label all jugs of solution
I use laboratory grade stoppered Erlenmeyer flasks that have a patch on them for note writing on the glass with a sharpie - saves me a lot of time. I also measure out my chemistry and arrange it in order in which it has to be used from left to right. There is a huge benefit to working in a logical, ordered fashion.

QuoteOriginally posted by BigMackCam Quote
I discarded the fixer solution rather than pouring it into an awaiting storage bottle (to my horror, as I'm an evironmentally-aware chap). Wasted fixer, and a bit of silver in the drainage system
Silver compounds are pretty inert, unless you're a gram negative bacteria you'd have to be exposed to a blazing lot of it for it to do any lasting harm.

Last edited by Digitalis; 11-29-2021 at 03:35 AM.
11-29-2021, 06:05 AM - 3 Likes   #43
Site Supporter
Site Supporter
ChrisPlatt's Avatar

Join Date: Nov 2007
Location: Rockaway Beach NYC
Posts: 7,692
Suggested future upgrade

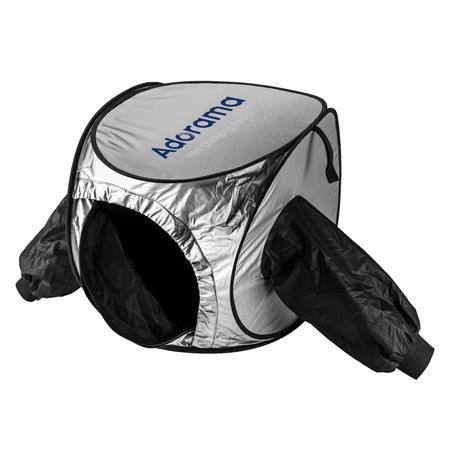
Before you upgrade to a larger changing bag you might want to consider a miniature film changing tent.
I bought a used one on eBay. They cost a bit more than a changing bag but are far superior in use.
When opened it is semi-rigid and has much more room inside for tank reels etc. yet folded it stores quite compactly between uses.

Here's one sold by Adorama, similar to one made by Photoflex:


Chris

Last edited by ChrisPlatt; 11-29-2021 at 06:10 AM.
11-29-2021, 09:56 AM   #44
Digitiser of Film
Loyal Site Supporter
BigMackCam's Avatar

Join Date: Mar 2010
Location: North East of England
Posts: 20,660
Original Poster
QuoteOriginally posted by Digitalis Quote
Excellent results!
Thank you!

QuoteOriginally posted by Digitalis Quote
Film base thickness was and by all accounts still is a mixed bag.
I actually had trouble getting one of the strips through my EFH film holder, due to the springy film. The EFH has a thin 0.5mm gap through which to feed the film, and I just couldn't get it into the slot (difficult to describe - you'd really need to be familiar with the holder to know what I mean). Having spoken with the designer of the EFH, he said that Fomapan 200 is notoriously thin and springy... which also confirms why it was a bit of a bear to load onto the reel, at least until I'd bent it back on itself a few times to flatten it...

QuoteOriginally posted by Digitalis Quote
I recall Kodak tech pan in 120 format had the THICKEST film base I have ever worked with in 120 format, and was a breeze to load. If you are still having difficulty: I'd suggest practicing with a waste roll in the changing bag after the de-humidification treatment. Plastic spirals are fine for a beginner but stainless steel spirals are really something to work with and they last a lifetime! - if you ever have to upgrade your film development gear metal spirals should be right at the top of your list. Mine have a built in clip at the core so no tape required to get the film loading started. Also gloves are your friend, (I use nitrile gloves as even dilute pyrochatechol film developers are the last thing you want on your skin, pyro is a severe irritant) they prevent moisture or particulate matter on your hands affecting any step of the film loading process.
Thanks for the nod re steel spirals. I've actually watched a couple of YouTube videos to see how they're loaded... I'll stick with what I have for now, but will keep the steel ones in mind for future.

I actually bought a box of suitable talc-free gloves a couple of days ago from a local DIY shop, and will be using those in future - though I'll need a couple of practice runs first whilst wearing them, as despite being very thin, they completely change the feel of everything

Last edited by BigMackCam; 11-29-2021 at 11:13 AM.
11-29-2021, 10:02 AM   #45
Digitiser of Film
Loyal Site Supporter
BigMackCam's Avatar

Join Date: Mar 2010
Location: North East of England
Posts: 20,660
Original Poster
QuoteOriginally posted by ChrisPlatt Quote
Before you upgrade to a larger changing bag you might want to consider a miniature film changing tent.
I bought a used one on eBay. They cost a bit more than a changing bag but are far superior in use.
When opened it is semi-rigid and has much more room inside for tank reels etc. yet folded it stores quite compactly between uses.

Here's one sold by Adorama, similar to one made by Photoflex:
Thanks, Chris I did a quick search online and found one by Calumet (a well-respected retailer here in the UK) for GBP £49.99, which isn't a bad price - and the product looks identical to the Adorama one you linked to. I've spent more than enough on this so far, though, and feel I should work with the gear I have for the time being. The items I bought are decent quality and well-regarded, and I think it's just a case of getting used to them. Once I've got through developing a dozen rolls or so, I'll take stock and decide if there are any upgrades (like this changing tent) that I think will make a significant difference. Until then, I'll put my money into film stock and processing chemistry, as I think gaining experience is the most important thing at this stage...
Reply

Bookmarks
  • Submit Thread to Facebook Facebook
  • Submit Thread to Twitter Twitter
  • Submit Thread to Digg Digg
Tags - Make this thread easier to find by adding keywords to it!
bag, bit, cut, film, fixer, photography, roll, solution, strip, water
Thread Tools Search this Thread
Search this Thread:

Advanced Search


Similar Threads
Thread Thread Starter Forum Replies Last Post
Focus screen replacement and lessons learned jcdoss Pentax K-1 & K-1 II 13 09-23-2020 07:13 PM
Film woes (mistakes and lessons learned) Femto1969 Film Processing, Scanning, and Darkroom 19 07-21-2017 11:47 AM
Initial impressions / lessons learned from first solo show frogoutofwater General Photography 3 06-22-2016 07:51 AM
Telephoto Lens, Tripod and Lessons Learned - the hard way interested_observer Photographic Technique 10 01-27-2013 10:00 PM
Got my first roll developed, and many of my shots came back noisy. Is this due to... Codazzle Film SLRs and Compact Film Cameras 10 11-19-2012 01:59 AM


All times are GMT -7. The time now is 01:37 AM. | See also: NikonForums.com, CanonForums.com part of our network of photo forums!
  • Red (Default)
  • Green
  • Gray
  • Dark
  • Dark Yellow
  • Dark Blue
  • Old Red
  • Old Green
  • Old Gray
  • Dial-Up Style
Hello! It's great to see you back on the forum! Have you considered joining the community?
register
Creating a FREE ACCOUNT takes under a minute, removes ads, and lets you post! [Dismiss]
Top