Forgot Password
Pentax Camera Forums Home
 

Reply
Show Printable Version 4 Likes Search this Thread
4 Likes  
Takumar 55mm disassembly guide for regreasing
Posted By: vladimiroltean, 03-01-2013, 04:40 PM

Staff note: This post may contain affiliate links, which means Pentax Forums may earn a small commission if a visitor clicks through and makes a purchase. If you would like to support the forum directly, you may also make a donation here.


Hi, this is going to be my first useful post on the forums, I hope it will also be helpful to someone out there.
After accumulating a number of Takumar lenses in the last 2 years, lack of funds for maintenance and repair made me pick it up myself, and slowly get better at it. In my experience, the Takumar myth of greatest, smoothest focusing rings hasn't quite stood up. Yes, they are miles ahead of Soviet lenses, but lubrication does dry out after some 40 years. Of course, sample variation plays a huge role here, and I do realize that I have always bought the cheapest ones I could find, but nevertheless, even some of my minty ones had old age issues. I am sure that my lenses are not the only ones that had problems with stiff focusing rings and aperture blades, fungus and falling distance scales. In fact, even ugly ducks can provide surprises sometimes (hey, check out Susan Boyle!).
Enough with me rambling on and let's get to today's lens. I have selected the 55mm f/1.8 to exemplify some general concepts in Takumar disassembly. It didn't really need to be dismantled, but the focusing ring was just a little stiff for my liking, and I wanted to document a disassembly since I had received my flash back (my natural light is horrible).
I will guide you through some important aspects that are generally avoided in online tutorials, such as how to properly assemble the focusing helicoid from scratch. My guide will be based on this one, which is a fantastic guide in itself, and even I learned a lot from it, but nevertheless it has some important shortcomings, one of which is the not-so-reader-friendly language (mine isn't great either, but at least I'm trying!).


The lens parts are stacked together, so in order to gain access to the mount, you have to disassemble it all the way from the front. Later K-mount lenses introduced a second access from the back.

So here is the lens. I pay great attention to detail, so I do care where the writing on the name ring will end up. I like "Super-Multi-Coated Takumar 55mm" to be at the top, because I find it more important when I look at it, rather than the serial number, or Asahi Opt Co. So I note with a marker where the top should go, and only then I proceed to unscrew the name ring. Under it lie 3 screws, and thus the ring can fit in 3 circular permutations. When reassembling, I take care that the part which should be at top really is there.


The images are pretty self-explanatory, so I won't describe the steps in too great detail.

0. Take notice of the distance pictured here. I will call it "focusing ring offset", and I will explain later why this is important.


1. Unscrew the name ring using a friction tool. DO NOT drill holes in it, better sell it to someone with more patience than you. Even if the filter ring is bent, it can be bent back into shape.


2. Remove the 3 flat screws, I have already exhausted the subject above. Although this is a S-M-C lens, it appears that they didn't use JIS until the rubber focusing ring SMC. Other lenses already used the JIS cross-type screw by this time.


3. With the lens focused at infinity, remove the focusing ring.


4. Now focus the lens all the way past infinity, and take notice of the distances marked in the picture. You will have to redo infinity focus, and the 3 holes in the brass piece have to be at a distance from the other 3 from the ears, otherwise you won't be able to tighten the screws if they are right under the ears!


5. Remove the distance scale ring. I use for this operation the thinnest blade knife I have. The ring is held by 3 very small set screws. Do not remove the screws completely, just loosen them!


This is how your lens should look at this point.


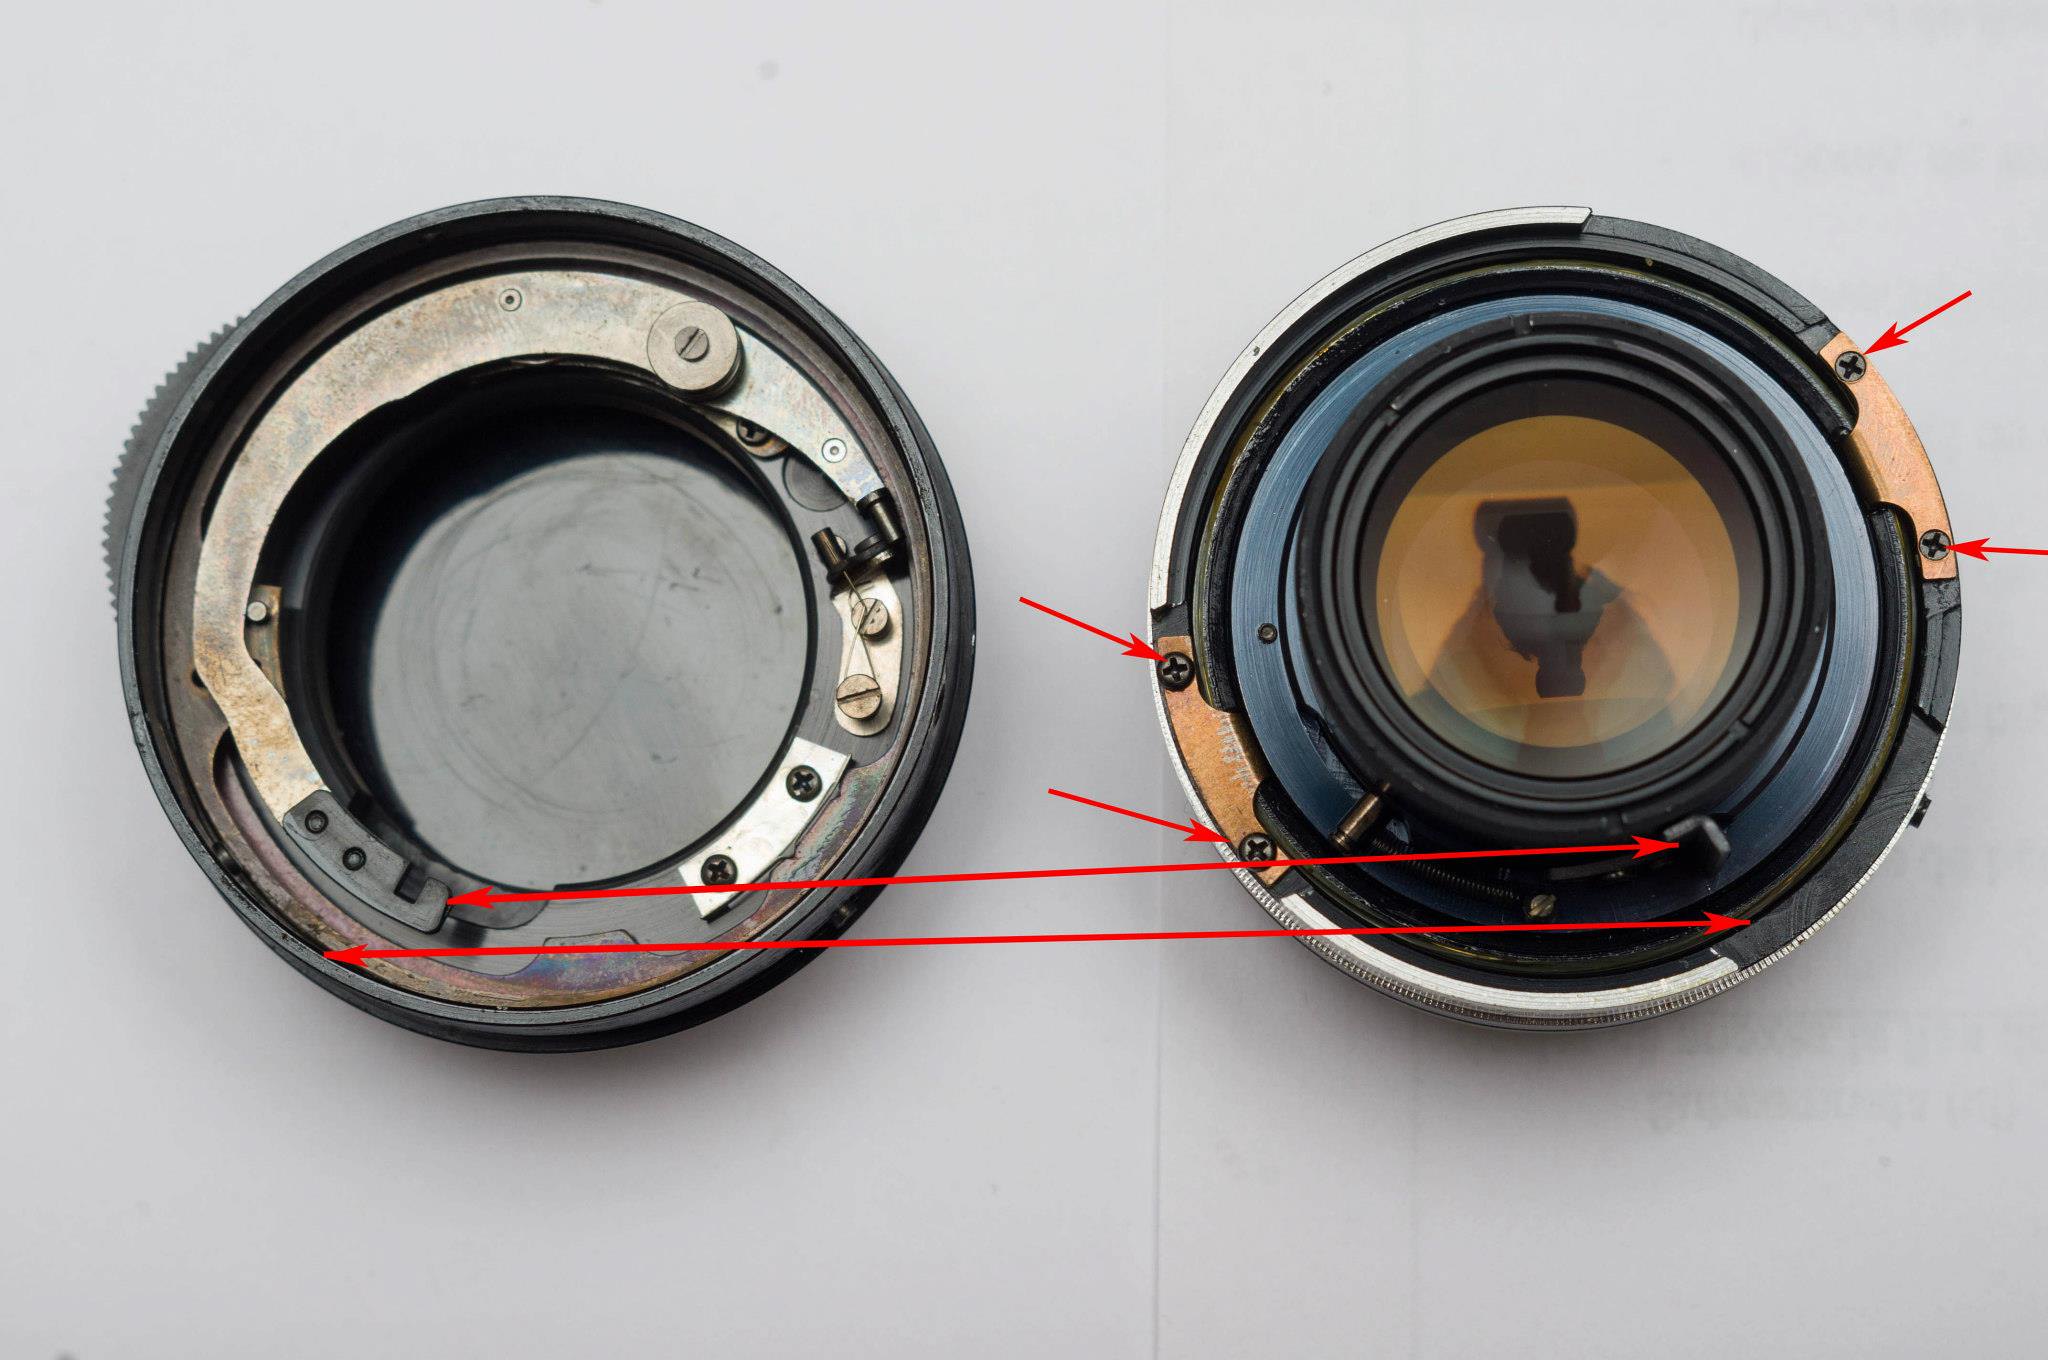
6. Remove the aperture ring. Be careful about the ball bearing. I also remove that so I don't lose it.


7. Remove the 3 screws that are holding the helicoid block and the mount piece together. Strangely, these are JIS type, at least in my copy, so you will need special screwdrivers for them, sorry.


8. When taking the two pieces apart, take notice how they should fit together. There are just 2 contact points, figured in the picture: the F-shaped aperture lever with the corresponding lever on the optical block, and a groove near those. The groove is absent on some lenses, like the 50/1.4. Generally speaking, the groove should be on the same side as the aperture lever. You will need this information when reassembling.
My copy was very weird in some aspects: it must be a very early S-M-C example, because it has no open-aperture contacts. The spring-loaded aperture lever was also the first I saw in a Takumar, and the L-shaped pieces normally mount differently too. But all principles remain the same.


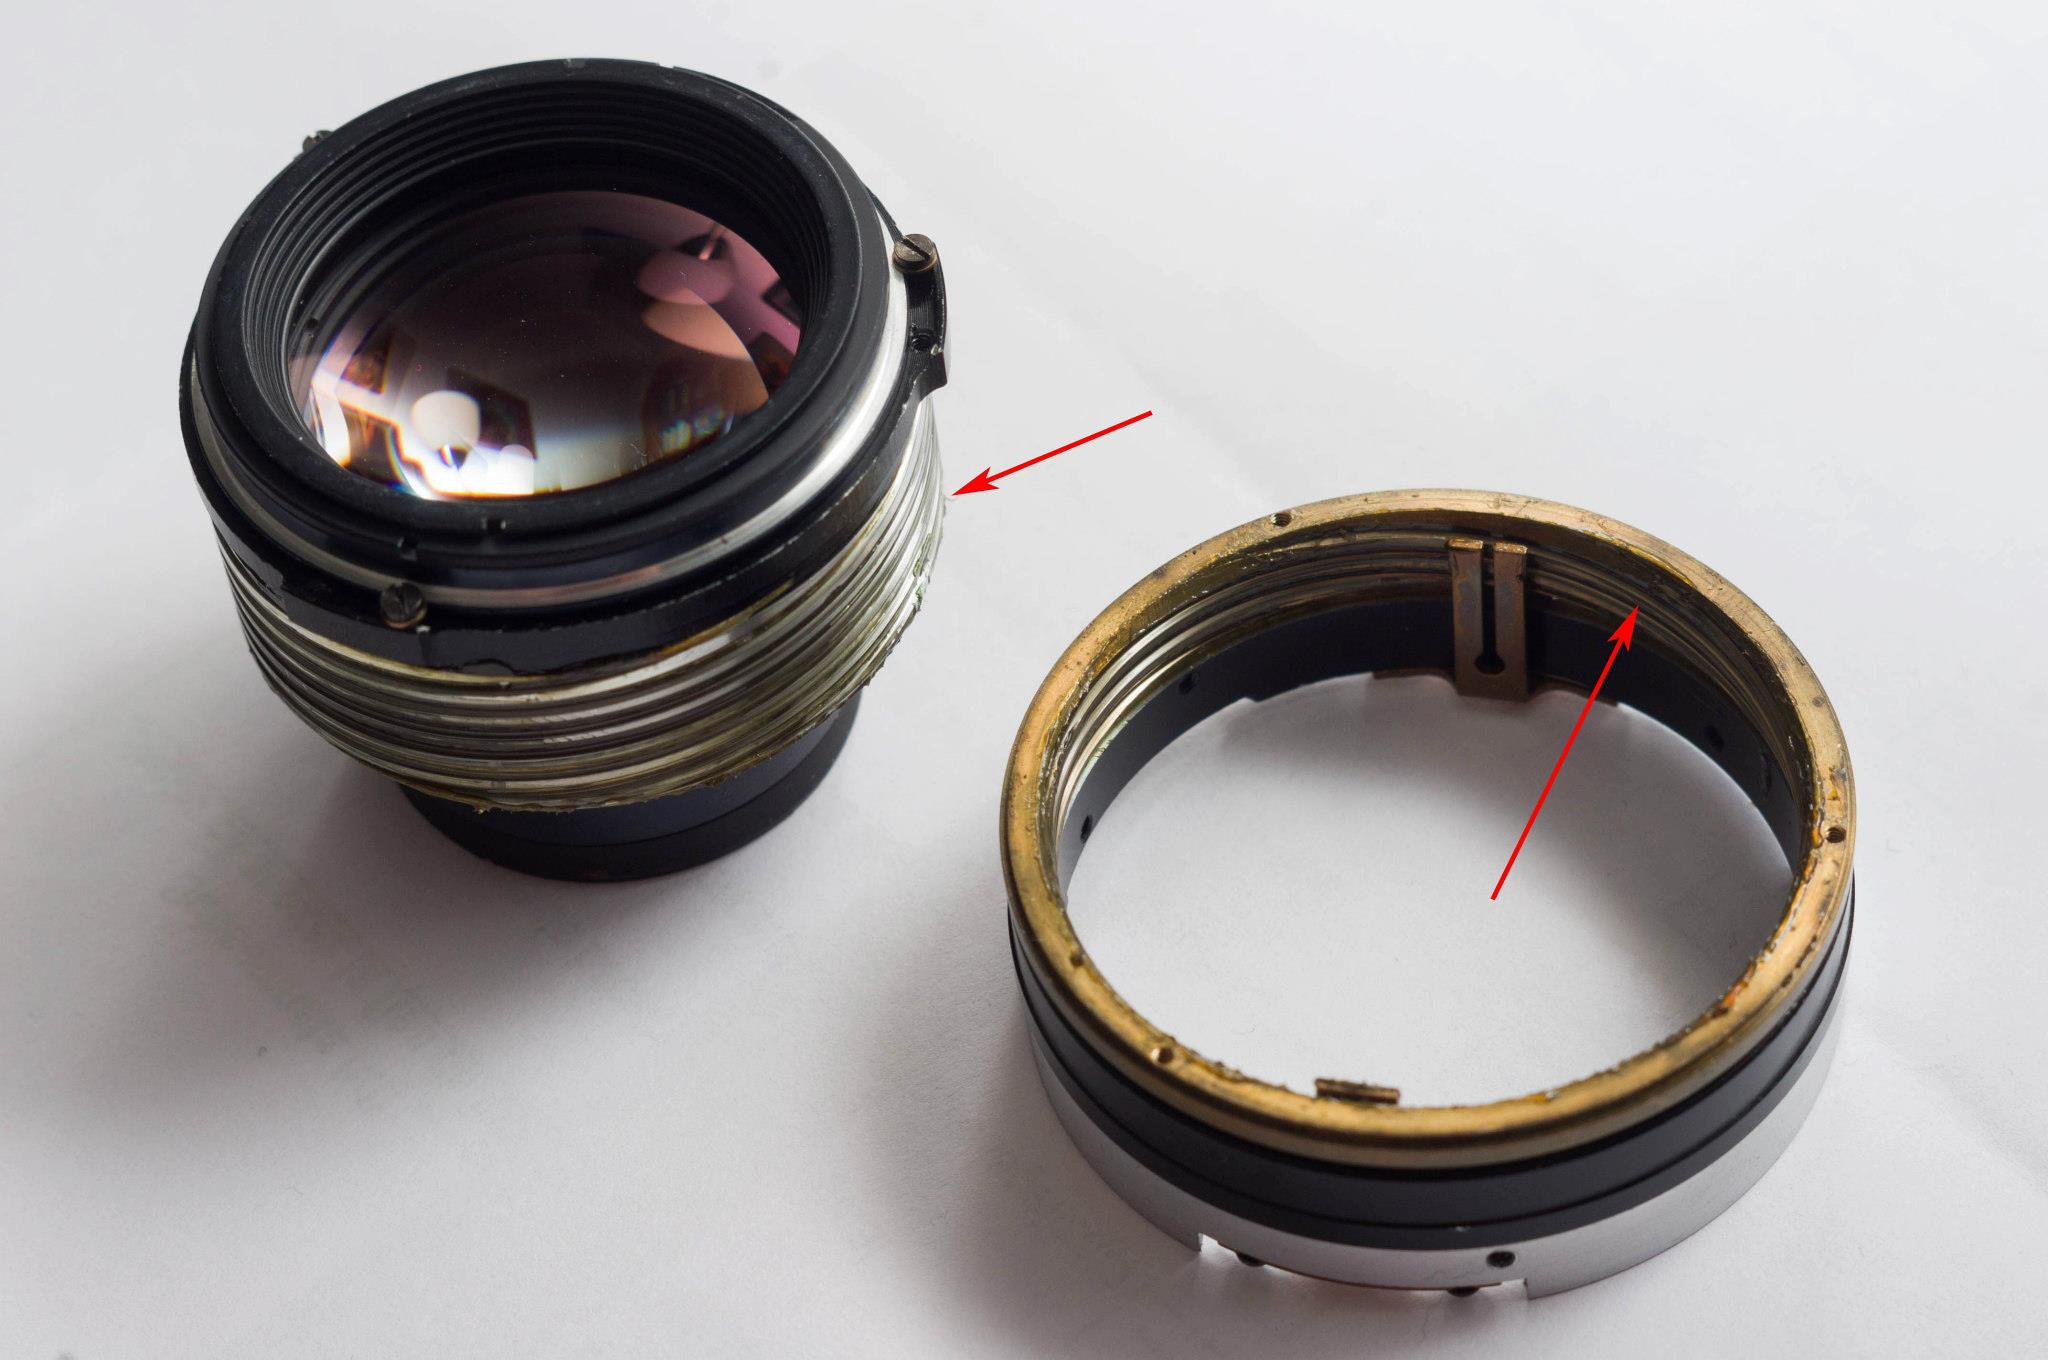
9. Our purpose is to dismantle the focusing helicoids completely, for cleaning reasons. On the 55/1.8, you can achieve this in two ways: either focus it all the way towards minimum focus distance, and the helicoid will be ejected, or unscrew the L pieces. I will explain the role of those in a moment.
The helicoid is comprised of 3 moving parts: one belongs to the optical block (1), one is the brass piece (2) and one is the black aluminium piece (3). The black and the brass piece are threaded together opposite to normal direction. The L pieces reduce the number of moving parts from 3 to 1, by connecting (1) with (3), so that only (2) is able to move. When (2) screws into (1), it also unscrews from (3), and vice versa, because they are threaded differently.
Now you have a basic principle in your mind of how the focusing mechanism works. Disassemble everything you see and clean with isopropyl alcohol/naphta/Zippo lighter fluid/whatever floats your boat. That stuff is old and gummed up by now.


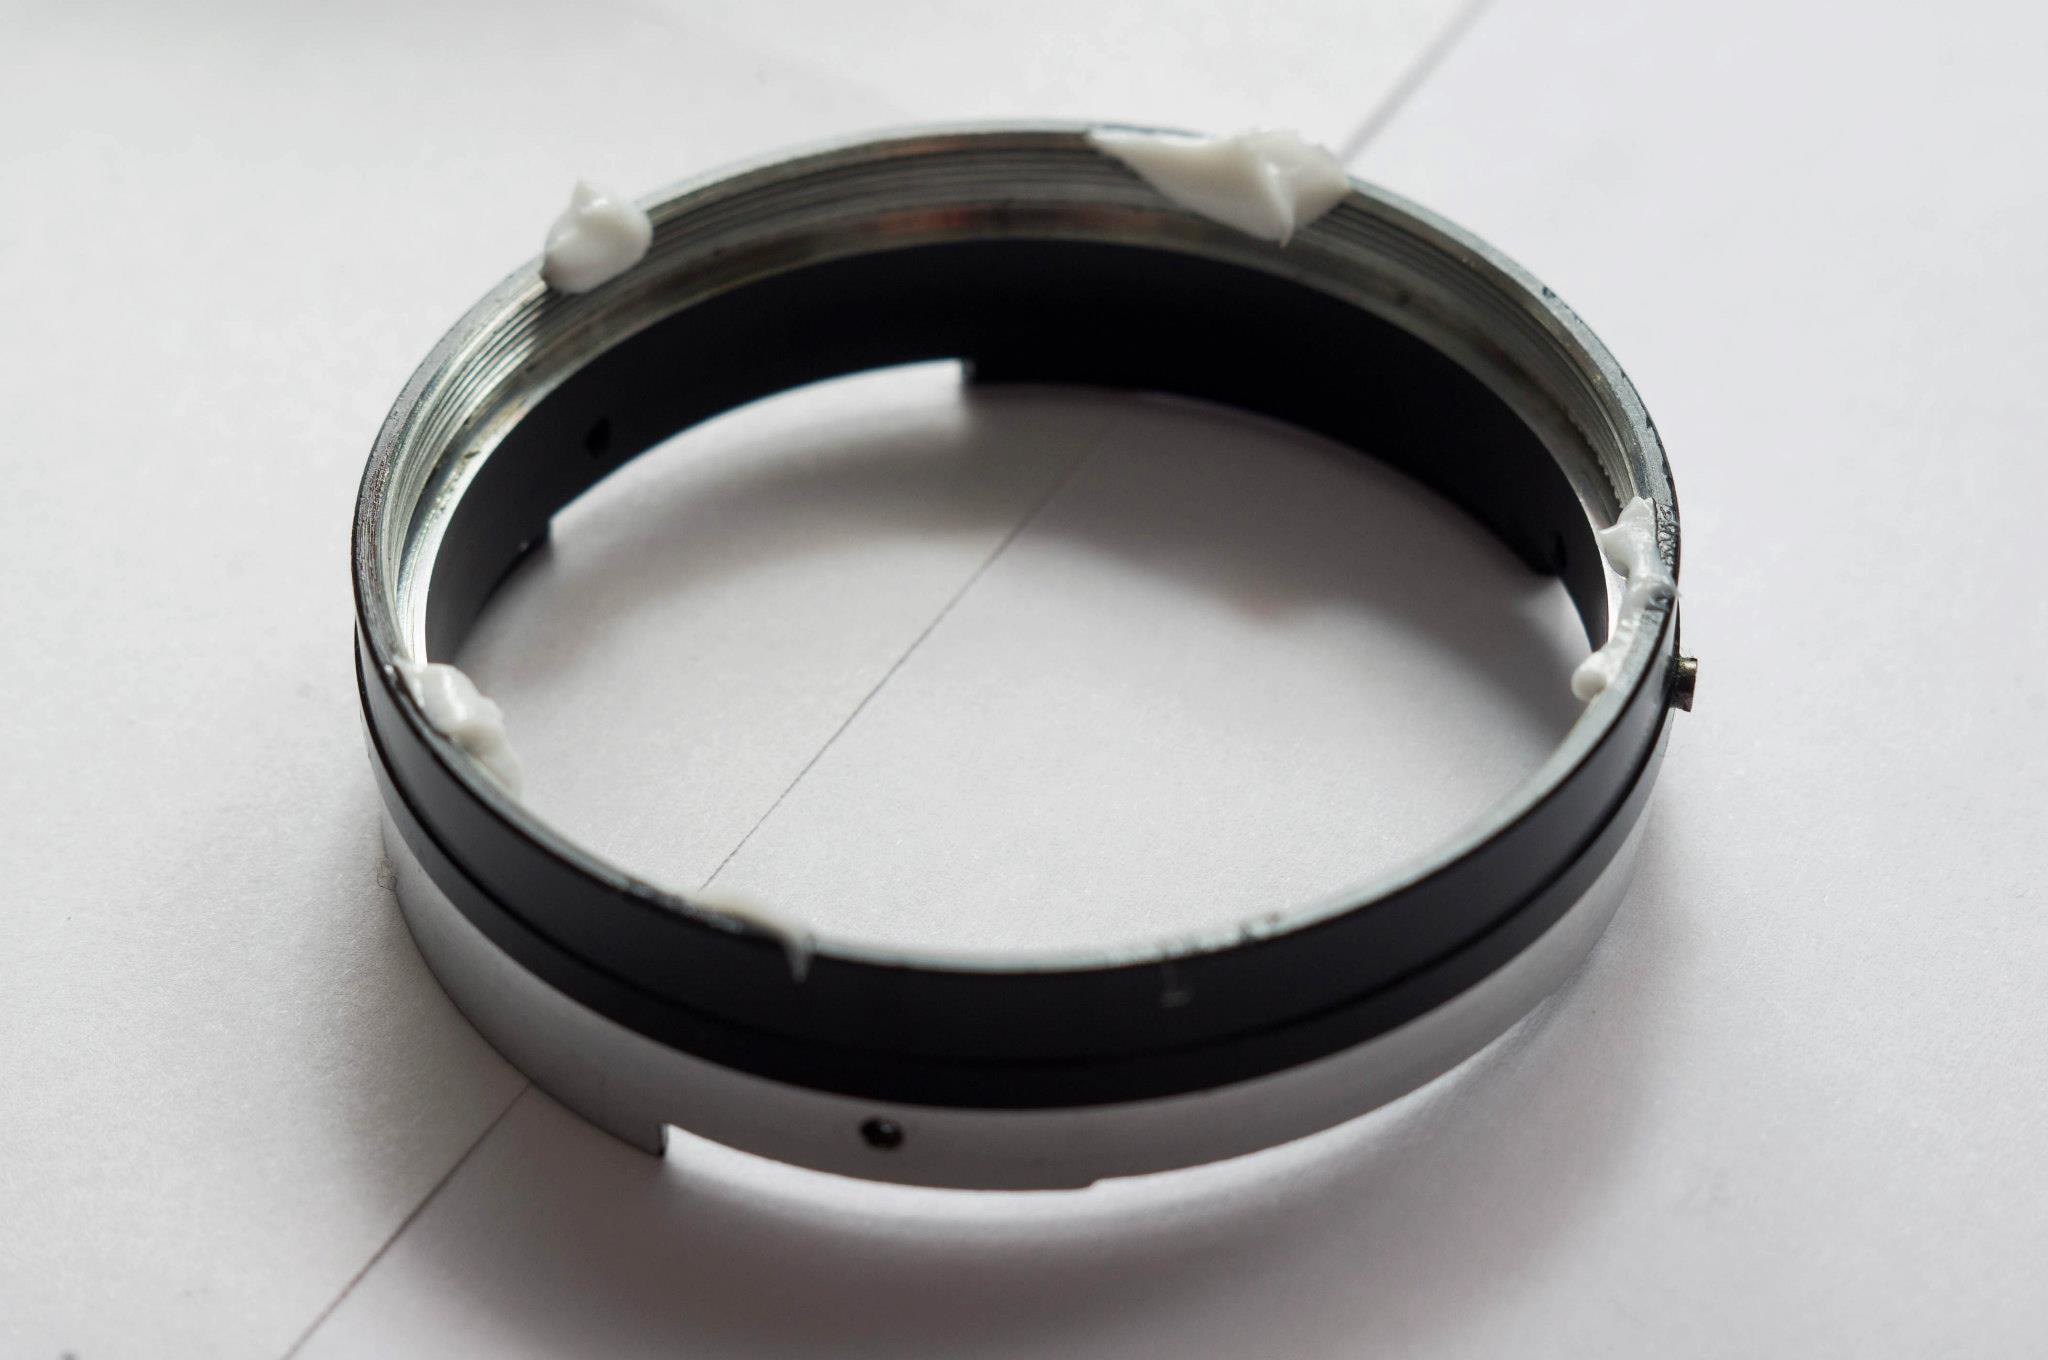
10. Not only cleaning (1) and the interior of (2) is important, but also the exterior of (2) and (3). In fact, this is the critical part for smooth focus. I use a different, lighter grease for this, because I want it to be really smooth. In fact, I combine my usual grease with a PTFE-based lubricant spray to make it lighter. Worked great so far, but that's my dirty little secret.


11. Now it's time for reassembly. It is just the reverse process of disassembly.
Kidding! I just hate it when I hear that. Mainly because it totally isn't. You have to rethink the lens from its core to reassemble it. So here's how to do it.
The brass piece, (2), has multiple entrances on the inside threads (which go into (1)). I haven't counted them, but it is a finite number smaller than 5. If you approach the problem systematically, it won't be a problem. So pick one randomly, and thread (2) and (3) into (1) completely. Then unscrew (3) from (2) just enough so that the L pieces are in the right place. You will understand when you have the lens in front of you. Generally, if (3) needs more than an 180 degree rotation from fully screwed to its correct position, then you should pick a different entrance.
Basically it doesn't matter which entrance you hit, but here's why it actually does:
Remember what I told you about step 0 and 4? Read them again. Some of the entrances will result in holes right under those 3 ears, which is not what you want. Also, the entrance you pick will also give different focusing ring offsets, because of different degrees of rotation necessary for the (3) ring (discussed above). Too small an offset, and it will jam your focusing ring. Too large, and it will just look wrong.
So basically this is the step where I can't give you the fish, however I can teach you how to fish. I wish you best of luck and a lot of patience.

12. Once you have done the above for one possible entrance, mount the L pieces again, (IMPORTANT!) focus it towards minimum focus distance, and place the whole assembly into the mount piece, with the rules described at step 8. Tighten the 3 JIS screws. Go to a window, mount the lens on a camera (with live view or any focusing aid would be preferred) and focus on the farthest object you can see. The moon makes a good candidate for this.
Take notice where the 3 holes in the brass piece will end up. If they are under the ears, you're in the wrong entrance. If not, move on.
Mount the ball bearing, aperture ring, distance scale (without tightening the screws!) and the focusing ring. Tighten the screws holding it. If it gets jammed, then the offset is too small, and you're in the wrong entrance again. You have to disassemble everything again. If it is alright, then your lens is almost done. You just have to mount back the filter ring.

If you're anything like me, you won't believe me that these things really matter, and you could have reasons to do so. So I will show your some lower quality pictures taken of my 35/3.5 and 50/1.4, illustrating different entrances. In the second picture, the holes are under the ears, and you can't see them, let alone tighten them. Actually, you will notice that the 50/1.4 has 4 holes. One was drilled by a repairman that got fed up with the original 3 holes always ending up under the ears. He simply didn't have enough patience to find the right entrance, it was a pain for me too actually.


I really hope this is of use, because it took me a lot of time to write it, and I'm really sleepy now. I will correct it if there is anything I have missed.

Last edited by vladimiroltean; 04-11-2021 at 06:13 PM.
Views: 30,616
06-19-2013, 07:48 PM   #16
Moderator
Not a Number's Avatar

Join Date: Mar 2012
Location: Venice, CA
Posts: 10,526
Some people use a soldering iron applied to the screw head to soften the glue/thread lock. Others use acetone. Use caution either way.

Be sure to use JIS drivers as Philips drivers are designed to cam out if the screw doesn't turn. This is what strips the head. JIS drivers are compatible with Philips head screws.

06-19-2013, 07:53 PM   #17
New Member


Join Date: Jun 2013
Posts: 18
I just put grease on a 55/1.8, and spent a lot of time trying to reassemble the hellicoid. It was a very difficult thing... I needed a lot of hours before discovering the trick. The whole process is not easy at all... The hardest thing is reassembly!
06-19-2013, 08:10 PM   #18
Veteran Member


Join Date: Nov 2012
Location: Saint Paul
Posts: 304
QuoteOriginally posted by Steve.T Quote
same problem here, mine is the S-M-C Takumar 24mm f3.5.

I successfully unscrewed the name ring using double side glue. it was the hardest part I was thinking. but then I found there are some transparent glue around the three cross-screws which are mounted to the filter ring. That makes me very hard to unscrew them. should I need to use chemical such as ethanol or alcohol to dissolve the glue, or just need a stronger screw driver to work out?
To fix the loose DOF ring, you may not have to dis-assemble the lens, I guess. You might be able to adjust that by loosen the screws shown in step#5 (image#8) and re-tightening at the correct position.

I have recently acquired a Super Multi Coated Takumar 50/1.4, which has a tiny bit of dust in the focus ring lubricant (slight grinding noise) and now I am preparing myself to fix that! That lens is in better than excellent condition cosmetically and optically. Not sure if I can get it cleaned and re-lubricated if I send it to Eric.

The one which I worked on was not in the good shape but now it is!!

Last edited by TropicalMonkey; 06-19-2013 at 08:18 PM.
06-19-2013, 08:28 PM   #19
Veteran Member


Join Date: Nov 2012
Location: Saint Paul
Posts: 304
QuoteOriginally posted by ambrosius Quote
I just put grease on a 55/1.8, and spent a lot of time trying to reassemble the hellicoid. It was a very difficult thing... I needed a lot of hours before discovering the trick. The whole process is not easy at all... The hardest thing is reassembly!
I had the same issue. I spent two evenings trying to figure out how to put that thing back into the grove! But once I learned how to take those L brackets out as described in this thread, now it is really easy. Another place I got stuck was the screws holding the focus ring, at a first glance I could not figure out how those screws can hold anything in place!

06-19-2013, 08:51 PM   #20
Veteran Member


Join Date: Nov 2012
Location: Saint Paul
Posts: 304
QuoteOriginally posted by kcobain1992 Quote
I have a set of Moody JIS drivers, can't find the exact link now, but you can find them on ebay. You will need #000 and #00 for this purpose. As for the screws, I have no idea, try micro-tools.com.
I just ordered some Moody drivers from ebay (both slotted as well as JIS) to prepare for my main project with Super Multi Coated Takumar 50/1.4.

What kind of Grease and Lubricant do you use or recommend? In my initial trial I did not remove the grease, instead I just thinned it by adding a few drops of Hoppe's Gun Oil.
06-20-2013, 12:27 AM   #21
Moderator
Not a Number's Avatar

Join Date: Mar 2012
Location: Venice, CA
Posts: 10,526
I use this stuff. Very high quality.

Helimax XP Camera Telescope Optical Instrument Focusing Helicoid Grease w PTFE | eBay

Hoppe's Gun Oil may not be a good choice because of the additives to dissolve powder residue and is somewhat volatile (out-gassing).
06-20-2013, 05:10 AM   #22
Veteran Member


Join Date: Nov 2012
Location: Saint Paul
Posts: 304
QuoteOriginally posted by Not a Number Quote
I use this stuff. Very high quality.

Helimax XP Camera Telescope Optical Instrument Focusing Helicoid Grease w PTFE | eBay

Hoppe's Gun Oil may not be a good choice because of the additives to dissolve powder residue and is somewhat volatile (out-gassing).
Thanks for the link. Ordered one. Should I also use the spray lubricant at all?

06-20-2013, 09:29 AM   #23
Moderator
Not a Number's Avatar

Join Date: Mar 2012
Location: Venice, CA
Posts: 10,526
QuoteOriginally posted by TropicalMonkey Quote
Thanks for the link. Ordered one. Should I also use the spray lubricant at all?
It's pretty much a matter of personal preferences on how "stiff" the movement feels to you. If you like the movement to be fairly "soft" then by all means thin the grease with the spray.

I re-lubed my Minolta Rokkor-PF 58mm f/1.4 lens and my Celestron C-90 with this grease. The Minolta is just as I like it. The Celestron seems a little stiff to me but then there is a large surface area for the helicoid (90mm barrel). I can live with it. At least it doesn't have the play like it did before cleaning and relubricating.
06-20-2013, 09:51 AM   #24
Veteran Member


Join Date: Nov 2012
Location: Saint Paul
Posts: 304
QuoteOriginally posted by Not a Number Quote
It's pretty much a matter of personal preferences on how "stiff" the movement feels to you. If you like the movement to be fairly "soft" then by all means thin the grease with the spray.

I re-lubed my Minolta Rokkor-PF 58mm f/1.4 lens and my Celestron C-90 with this grease. The Minolta is just as I like it. The Celestron seems a little stiff to me but then there is a large surface area for the helicoid (90mm barrel). I can live with it. At least it doesn't have the play like it did before cleaning and relubricating.
What would be a good spray lubricant for this purpose? I could not find the one from the picture!
06-20-2013, 01:44 PM   #25
Veteran Member
vladimiroltean's Avatar

Join Date: Dec 2010
Location: Bucharest, Romania
Photos: Gallery
Posts: 1,465
Original Poster
To be honest, I have no idea where I bought it from. It is the one in this link, however I simply chose it because I found it locally - as long as it's PTFE-based and it's not WD40, it should be good to go.

But I should also warn you by now: in my Takumar copies, the scratching sound was because of the scale on the focusing ring coming loose, and coming in contact with the DOF ring.
06-20-2013, 02:21 PM   #26
Veteran Member


Join Date: Nov 2012
Location: Saint Paul
Posts: 304
QuoteOriginally posted by kcobain1992 Quote
in my Takumar copies, the scratching sound was because of the scale on the focusing ring coming loose, and coming in contact with the DOF ring.
That's very much possible. It could also be that the focus ring was not perfectly centered. I will check that tonight. If I remember correctly, I noticed that faint scratching sound even with the focus ring removed. I have one more nice Takumar (non SMC) for reference
06-20-2013, 07:11 PM   #27
Moderator
Not a Number's Avatar

Join Date: Mar 2012
Location: Venice, CA
Posts: 10,526
There is Tri-Flow in the US. I don't know how suitable it is for using with optics. The oil has a distinct sweet odor. Odors are usually a sign of volatility.
06-20-2013, 11:21 PM   #28
New Member


Join Date: Jun 2013
Posts: 18
I bought this, works superb. I think it's the same as microtools. S30 is really perfect for the 55.

http://www.amazon.co.jp/gp/aw/d/B001500ZCC/ref=mp_s_a_1_2?qid=1371790432&sr=8-2&pi=SL75
06-22-2013, 10:23 AM   #29
Otis Memorial Pentaxian
stevebrot's Avatar

Join Date: Mar 2007
Location: Vancouver (USA)
Photos: Gallery | Albums
Posts: 42,007
QuoteOriginally posted by Not a Number Quote
There is Tri-Flow in the US. I don't know how suitable it is for using with optics. The oil has a distinct sweet odor. Odors are usually a sign of volatility.
Tri-Flow does out-gas. That is one of its characteristics. It is my understanding that it was originally designed for applications where the intent is to deliver the PTFE component in a volatile light oil base leaving the teflon as a non-dirt-attracting primary lubricant. I have used it for years to lube my bicycle chains after cleaning. It does an excellent job for that application and does not gum up or attract dirt.

I don't know that I would use it in a lens except perhaps (judiciously) in the aperture mechanism, though I can definitely see its use with small gear trains and such in the camera body.


Steve
08-21-2016, 04:33 PM   #30
Veteran Member
Helios 1984's Avatar

Join Date: Oct 2013
Location: Saint-Constant, Québec
Posts: 747
Concerning the Infinity focus adjustment, I suggest to use a vintage camera with a Split Screen or Microprism Screen (I used my Praktica L2), it make things way more easier than a digital live view.
Reply

Bookmarks
  • Submit Thread to Facebook Facebook
  • Submit Thread to Twitter Twitter
  • Submit Thread to Digg Digg
Tags - Make this thread easier to find by adding keywords to it!
aperture, distance, entrance, focus, holes, lens, mount, piece, screws, takumar

Similar Threads
Thread Thread Starter Forum Replies Last Post
A* 300mm disassembly/cleaning guide RXrenesis8 Pentax Lens Articles 14 03-25-2023 08:57 PM
Suggestion description change for takumar 55mm in the review section. glasbak Site Suggestions and Help 4 07-09-2012 09:27 PM
Hood for Takumar 6x7 3.5 55mm ChrisFe Pentax Medium Format 3 06-11-2012 10:50 AM
Takumar lens price guide Scott_the_Artist Troubleshooting and Beginner Help 9 08-11-2009 01:07 PM
Takumar A 70-200 F4 zoom disassembly Stratman Pentax SLR Lens Discussion 3 07-10-2008 07:51 AM


All times are GMT -7. The time now is 04:10 PM. | See also: NikonForums.com, CanonForums.com part of our network of photo forums!
  • Red (Default)
  • Green
  • Gray
  • Dark
  • Dark Yellow
  • Dark Blue
  • Old Red
  • Old Green
  • Old Gray
  • Dial-Up Style
Hello! It's great to see you back on the forum! Have you considered joining the community?
register
Creating a FREE ACCOUNT takes under a minute, removes ads, and lets you post! [Dismiss]
Top