Forgot Password
Pentax Camera Forums Home
 

Reply
Show Printable Version 61 Likes Search this Thread
45 Likes  #1
Pentax-A 50mm f1.7 Aperture ring repair
Posted By: Just1MoreDave, 01-24-2010, 07:52 PM

The Pentax-A 50mm f1.7 is a very good lens except for one problem. A tiny part can break and jam the aperture ring at some place other than the A position. It often won't return to the A position, making the lens far less useful and valuable. The fix is not that hard and doesn't require special tools. It is probably better to read through this once before starting, then follow the instructions.

A clean workspace with good light is helpful. You may want a clear plastic bag to control a spring-loaded bearing. More on that later. A good quality Phillips #0 or #00 screwdriver is required to take off the mount. Tweezers, a small dab of lithium grease and a small flat-bladed screwdriver are optional.

I have heard that the mount screws have slots for a slightly different screwdriver head, but Phillips will work OK with proper technique - make sure you have good contact with the slot and apply even pressure. With the lens face-down on the work surface, remove all five screws. Grab onto the bayonet lugs and lift off the mount. You'll see this:


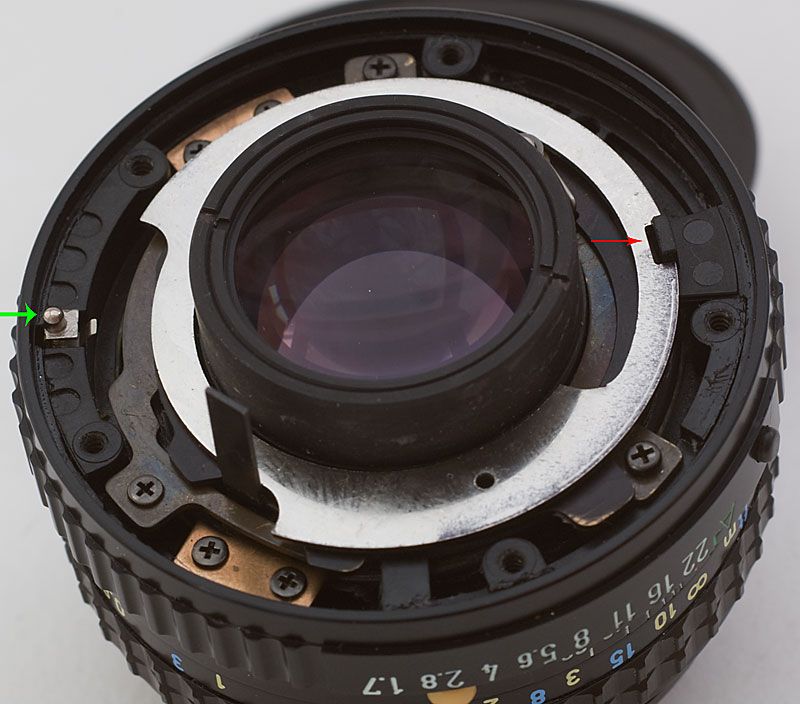
At this point, a lot of things are loose - the mount was holding everything together. The first thing you can do is lift off the stamped steel ring around the rear element. It links the aperture to the aperture ring. This photo will help you put it back in the right place.

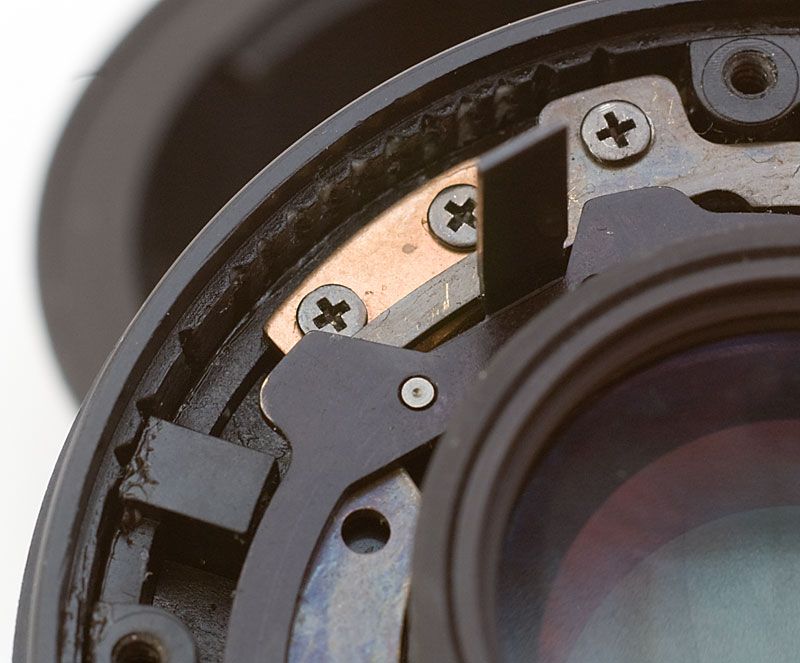
Next, there's a thing on the left side of the photo marked with a green arrow. Pentax calls it the "A-M Selecting Plate", part number 38305.X50801. It has two more associated parts, a tiny spring and a metal plate. This part is critical in telling your camera you've mounted a KA lens. You can slide it out now with the tweezers, or leave it for later. The main thing is, these three parts are important for maintaining the A position functions. A closer photo:


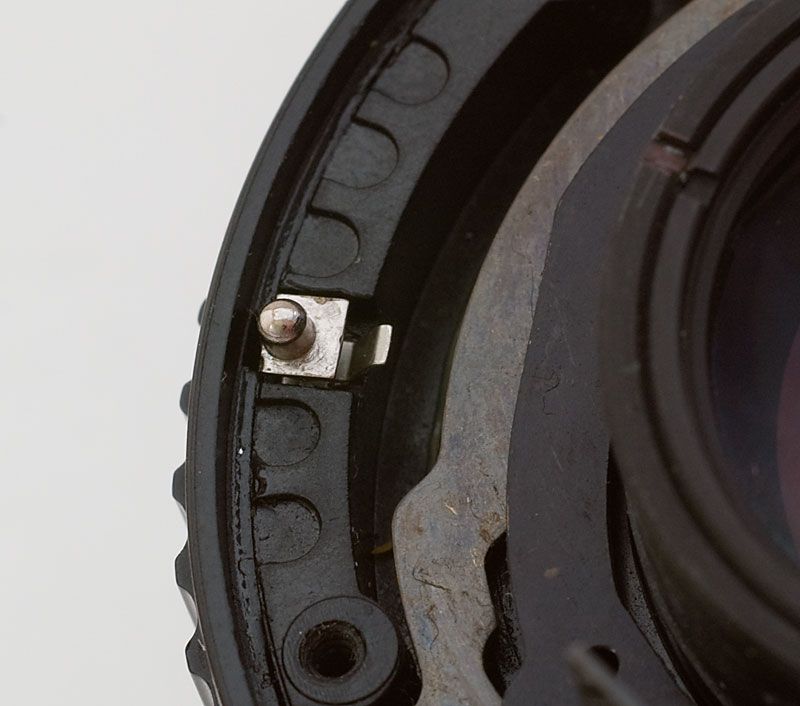
I think it's easiest to take all these off and reinstall them in the final stages, instead of worrying about them staying in place. Here is the part, its spring and contact:


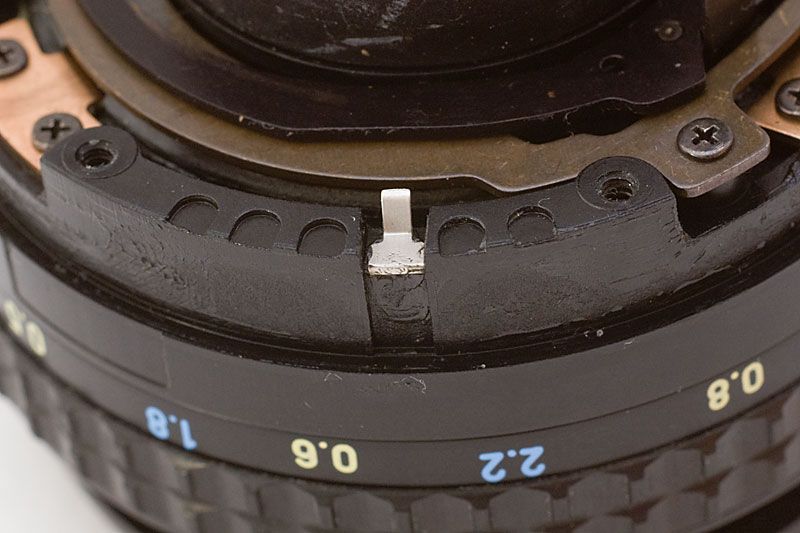
OK, now we'll talk about the second part that you don't want to lose. There's a 1.5mm ball bearing that makes the clicks between aperture settings. A spring is pushing it outward against the aperture ring, so when you remove the aperture ring, this bearing will launch into space. The bearing is just to the right of the off-white bump. In this photo, it is perched on its little spring:


If you have the lens in a plastic bag, when you slide the aperture ring off, the bearing will end up in the bag. I can usually just orient the lens so the bump is in my left palm, slide the ring off with my right, and the bearing is in my hand. This probably only works because I have spare bearings, so losing one is no big deal for me. The spring can also get lost when you're not looking at it, but it usually stays hidden in its hole. The aperture ring has the small black button in it too; keep track of that.

With the aperture ring off, you now have access to the problem. You probably see something like this:


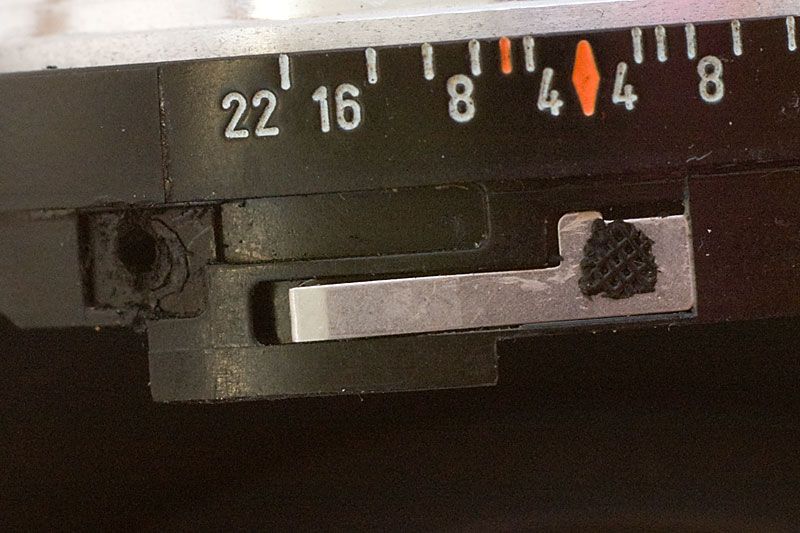
And you have another tiny part falling out, one of those flat steel springs. Pentax put these springs on with a plastic weld, which doesn't last forever. (In their defense, they may not have expected people to be using these lenses 25 years later.) You can fix the spring in several ways. Epoxy glue is one solution. Pentax uses screws on almost all other lenses, if you have some very small screws. Screw heads or epoxy should not stick out at all, because the aperture ring has to slide by them. Here is a successful screw repair:


It's a good time to clean the aperture ring of any dirt, and remove other grit or dirt you see. One more photo to show you the little v-grooves that mark each click-stop for the aperture:


Now all you have to do is reassembly. This can be challenging because of all the tiny unsecured parts moving around. I use a small amount of lithium grease to relube the aperture ring. I also use a bit to stick the A button in place, and stick the ball bearing to its spring on the lens. I hold the lens sideways and orient the ball bearing so it's at the top and not falling off. I hold the aperture ring so the numbers are going the right way and the v-grooves are lined up with the ball bearing.

Then I slide the opposite side of the aperture ring onto the lens first. I keep sliding it on until it runs into the first (lower) flat spring, then use a small flat-blade screwdriver to tuck that flat spring under the ring. Then I slide the ring on a bit more until it's up against the bearing. I use the flat-blade screwdriver to shove the bearing down and slide the ring over it. Then the upper flat spring gets tucked under the ring and the hard part is done. You should be able to move the aperture ring and feel click-stops, and the button to select the A position should work correctly. Set the ring to the A position for the next step.

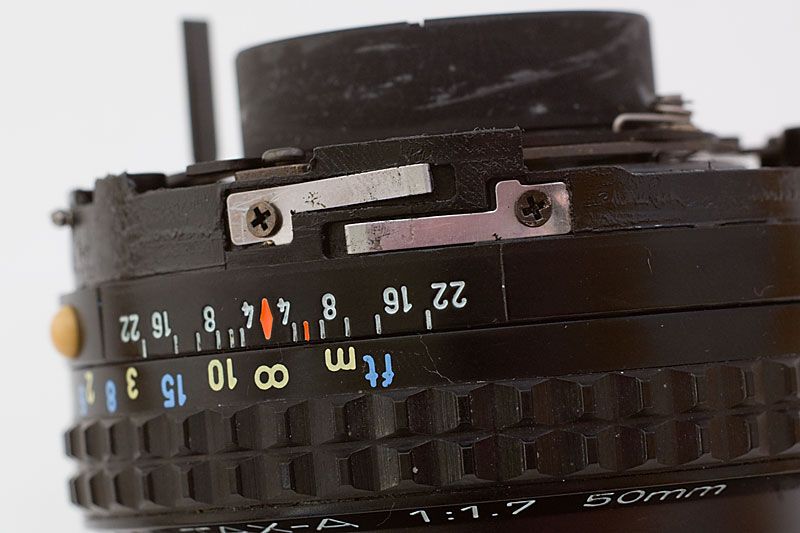
Next, reinstall the parts for the A contact. The contact plate goes in first. It has a hook that goes over the outer rim. I use a bit of grease to stick this in place too. It should be in this position, except of course your aperture ring is installed now:


Then just slide the "A-M Selecting Plate" into its slot. The stamped steel plate goes on next, flat side up. Use the first photo to install it; the tab in the aperture ring fits into the slot (red arrow). Line the mount up so the aperture lever will fit through its slot and the A contact will fit into its hole, then put that into place. Reinstall the five screws.

Check your work by mounting the lens on your DSLR. Set the aperture ring to A and see if the camera will recognize the aperture setting. Use the DOF preview to see if the lens stops down to the selected aperture, then change the aperture with the wheel and stop down again. (Exact controls to do this will vary with different camera models.) Then go use your repaired lens.
Views: 73,358
01-25-2010, 03:42 PM - 1 Like   #2
Veteran Member


Join Date: Jun 2009
Location: on the wall
Photos: Gallery
Posts: 715
I was going to rate this thread five stars, but that option isn't available. Great tutorial.
01-27-2010, 10:59 PM   #3
Forum Member


Join Date: Nov 2008
Photos: Gallery
Posts: 99
Thanks for this helpful info. Pictures are great.
02-27-2010, 03:44 AM   #4
New Member


Join Date: Feb 2010
Posts: 4
This is really helpful article!
But do you know where I can get spare parts for such repair? My lens lacks A-M Selecting Plate, auto-exposure button on aperture ring and both flat springs.
Thank you!

02-27-2010, 09:41 AM   #5
Veteran Member


Join Date: Jun 2009
Location: on the wall
Photos: Gallery
Posts: 715
QuoteOriginally posted by 8bit_soul Quote
This is really helpful article!
But do you know where I can get spare parts for such repair? My lens lacks A-M Selecting Plate, auto-exposure button on aperture ring and both flat springs.
Thank you!
Buy another lens?
02-27-2010, 11:15 AM   #6
Veteran Member


Join Date: Nov 2006
Location: md-usa
Photos: Gallery | Albums
Posts: 2,580
Great post Dave!
If I may add, working on a couple paper towels helps keep anything that falls from rolling away. That little ball really is TINY too, I love the plastic bag trick.
02-27-2010, 08:07 PM   #7
New Member


Join Date: Feb 2010
Posts: 4
@dragonfly
Noo, it won't work out.. I've bought this one for $30 hoping to fix it
I believe springs and button can be hand made (if only I had more detailed pictures of them). I totally don't know what to do with A-M Selecting Plate (but to use lens in M mode, of course!)

08-01-2010, 01:59 PM   #8
PEG Moderator
Loyal Site Supporter
Kerrowdown's Avatar

Join Date: Aug 2008
Location: Highlands of Scotland... "Hold Infinity in the palm of your hand" - William Blake
Photos: Gallery
Posts: 57,860
Now I know why I would leave this to others if I had a problem lens.

Great post deserves a reputation point I think, so I did.
09-06-2010, 12:40 PM   #9
New Member


Join Date: Sep 2010
Posts: 1
[langtitle=de]Ersatzt-Feder Pentax-A 50mm f1.7[/langtitle]

Hallo zusammen, ich habe "fast" erfolgreich das Objektiv repariert, doch kurz vor Vollendung meines Werkes ist mir die Feder ins All geflogen (AM-Auswahltaste)

Wo bekomme ich schnellstmöglich eine Ersatzfeder her.

Gruß
Jürgen
09-06-2010, 09:29 PM   #10
Site Supporter
Site Supporter
GregK8's Avatar

Join Date: May 2008
Location: Western New York
Photos: Gallery | Albums
Posts: 614
I almost had disaster myself. I had to go one step further because the little contact plate for the A contact fell into the lens and got stuck there in some of the grease that was lubricating the focusing ring, so I had to take the aperture control cam and lever off too so I could retrieve it. After removing two of the three screws holding the cam in place, the lens slipped and caused the first two to go flying. After I had been so careful with the stupid little ball bearing and spring, I lose a screw that should not have been necessary to remove

After about fifteen minutes of carefully looking around, I found one underneath my laptop and the other in the rug under my chair, phew!

So I finally get it all together and it works beautifully now. All that just to get it to the A position, and now it will stay there forever.

The hardest part for me was getting the little A contact back together. The contact with the little spring inside fits into its little bracket in a very specific way. There is a little groove in the contact and it slips into the bracket, but if the spring is already inserted, it is nearly impossible to get the bracket into the slot on the contact. I eventually got it, but it took about 25 minutes of patiently working with it to find success.

I used JB Weld to make the repair instead of drilling and screwing. I didn't have a small enough bit to create a pilot hole and I also didn't have any screw to put into it. The JB Weld seems to have worked very well. It takes so long to cure it flattened itself down below the edge so the aperture ring turns very smoothly. I also reinforced the "good" spring by letting a little of the compound to flow down around the original plastic weld.

Anyway, job is done. I couldn't have completed it without Just1MoreDave's post, so thank you for taking the time to document this.
09-06-2010, 09:30 PM   #11
Site Supporter
Site Supporter
GregK8's Avatar

Join Date: May 2008
Location: Western New York
Photos: Gallery | Albums
Posts: 614
QuoteOriginally posted by JohnDaly75 Quote
Hallo zusammen, ich habe "fast" erfolgreich das Objektiv repariert, doch kurz vor Vollendung meines Werkes ist mir die Feder ins All geflogen (AM-Auswahltaste)

Wo bekomme ich schnellstmöglich eine Ersatzfeder her.

Gruß
Jürgen
Good luck finding the spring (or replacement) Jürgen. Maybe a watchmaker would have something that small?
02-12-2011, 03:59 PM   #12
New Member


Join Date: Apr 2008
Location: Earth Base One
Photos: Gallery
Posts: 8
Springs can be hand made if you can find the right type of wire and wind it around a needle. The wire used for braiding shielded cables is the correct thickness/diameter but the wire is of the wrong type. Have no idea where you can get spring steel in such thin diameters, let alone what that diameter is. My measuring tools don't go that small.

Tried several camera repair shops, including those recommended by Pentax with no luck any of these parts.
02-16-2011, 12:02 AM   #13
Inactive Account


Join Date: Dec 2010
Location: bellingham,wa
Posts: 5
excellent tutorial
10-24-2011, 05:08 PM   #14
Veteran Member
Nick Siebers's Avatar

Join Date: Jun 2008
Location: Madison, WI
Photos: Gallery | Albums
Posts: 2,165
Are those metal springs important? Can you just leave the broken one out?

Ok, some reflections on this:
1) I have repaired a number of M lenses but this was WAY trickier
2) Has anyone seen that little ball bearing? I used the bag for taking the aperture ring off, but getting it back on again - sproing!
3) Eat me, A-M Selecting plate. You want to hide down in the bowels of the lens, stuck for a third time? I am THIS CLOSE to leaving you there!

In conclusion, I have a lens that has no stops and will switch out of (but not into) A without pressing the button; and I will never work on an A lens again. It does work on A, though! Thanks, Just 1 More Dave.

Last edited by Nick Siebers; 10-24-2011 at 07:55 PM.
11-18-2011, 03:42 AM   #15
Forum Member


Join Date: Feb 2010
Location: Vancouver
Photos: Albums
Posts: 62
Fantastic writeup—thanks!!!

I just managed to execute this repair (with epoxy, rather than a screw) on my SMC-A 50mm without a snag. Sticking a ziplock over the lens while pulling the aperture ring off is a very good idea, as otherwise the tiny bearing would have undoubtedly been airborne. A good quality set of fine tweezers is a must-have here (at least with my sausage fingers) for reassembly.

In answer to the previous comment, yes—it seems that the springs, in addition to keeping the aperture ring in tension, the springs also act as the detents that stop the ring from moving in and out of the 'A' position without pressing the lock button.
Reply

Bookmarks
  • Submit Thread to Facebook Facebook
  • Submit Thread to Twitter Twitter
  • Submit Thread to Digg Digg
Tags - Make this thread easier to find by adding keywords to it!
50mm, aperture, ball, contact, f2, lens, mount, pentax-m, photo, position, screwdriver, screws, slide, smc, tube, youtube

Similar Threads
Thread Thread Starter Forum Replies Last Post
Pentax M 50mm f1.7 aperture ring kbryant Pentax SLR Lens Discussion 1 03-25-2010 10:38 AM
M 50mm/1.7 - aperture ring stuck jzietman Pentax SLR Lens Discussion 12 12-21-2009 12:59 PM
Problem with stuck aperture ring on Pentax KA 50mm f/1.7 jhaji Pentax SLR Lens Discussion 8 08-15-2009 04:10 PM
Use of Aperture-Ring 43mm/1.9 -> no aperture data Deimo Pentax SLR Lens Discussion 7 06-24-2009 03:25 PM
Aperture ring on lenses for Pentax? Duh_Vinci Pentax SLR Lens Discussion 5 12-06-2006 09:24 PM


All times are GMT -7. The time now is 08:45 AM. | See also: NikonForums.com, CanonForums.com part of our network of photo forums!
  • Red (Default)
  • Green
  • Gray
  • Dark
  • Dark Yellow
  • Dark Blue
  • Old Red
  • Old Green
  • Old Gray
  • Dial-Up Style
Hello! It's great to see you back on the forum! Have you considered joining the community?
register
Creating a FREE ACCOUNT takes under a minute, removes ads, and lets you post! [Dismiss]
Top