Forgot Password
Pentax Camera Forums Home
 

Reply
Show Printable Version 61 Likes Search this Thread
45 Likes  
Pentax-A 50mm f1.7 Aperture ring repair
Posted By: Just1MoreDave, 01-24-2010, 07:52 PM

The Pentax-A 50mm f1.7 is a very good lens except for one problem. A tiny part can break and jam the aperture ring at some place other than the A position. It often won't return to the A position, making the lens far less useful and valuable. The fix is not that hard and doesn't require special tools. It is probably better to read through this once before starting, then follow the instructions.

A clean workspace with good light is helpful. You may want a clear plastic bag to control a spring-loaded bearing. More on that later. A good quality Phillips #0 or #00 screwdriver is required to take off the mount. Tweezers, a small dab of lithium grease and a small flat-bladed screwdriver are optional.

I have heard that the mount screws have slots for a slightly different screwdriver head, but Phillips will work OK with proper technique - make sure you have good contact with the slot and apply even pressure. With the lens face-down on the work surface, remove all five screws. Grab onto the bayonet lugs and lift off the mount. You'll see this:
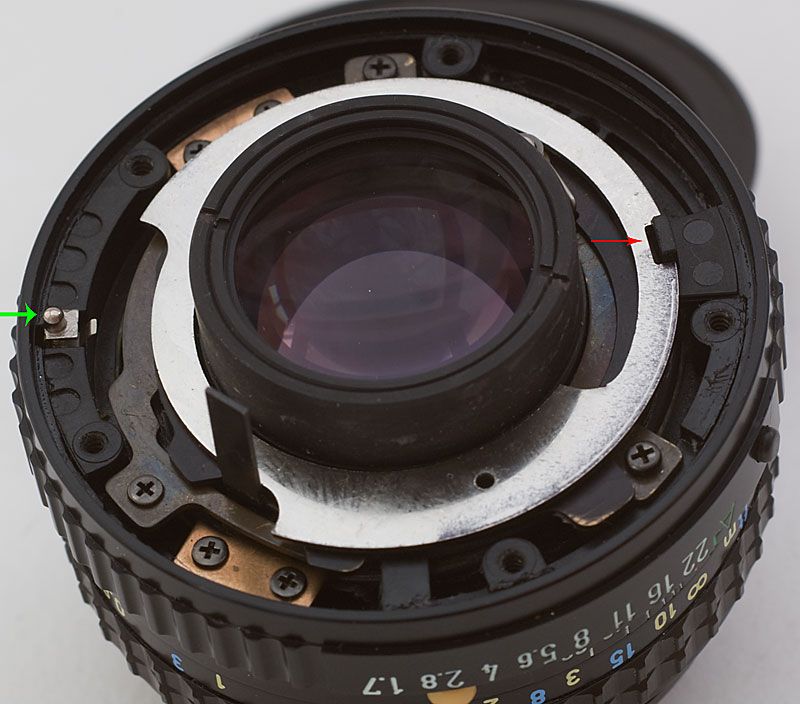


At this point, a lot of things are loose - the mount was holding everything together. The first thing you can do is lift off the stamped steel ring around the rear element. It links the aperture to the aperture ring. This photo will help you put it back in the right place.

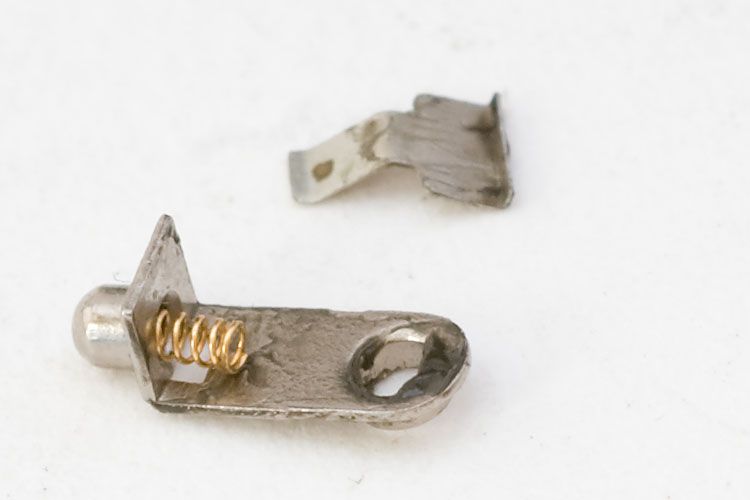
Next, there's a thing on the left side of the photo marked with a green arrow. Pentax calls it the "A-M Selecting Plate", part number 38305.X50801. It has two more associated parts, a tiny spring and a metal plate. This part is critical in telling your camera you've mounted a KA lens. You can slide it out now with the tweezers, or leave it for later. The main thing is, these three parts are important for maintaining the A position functions. A closer photo:
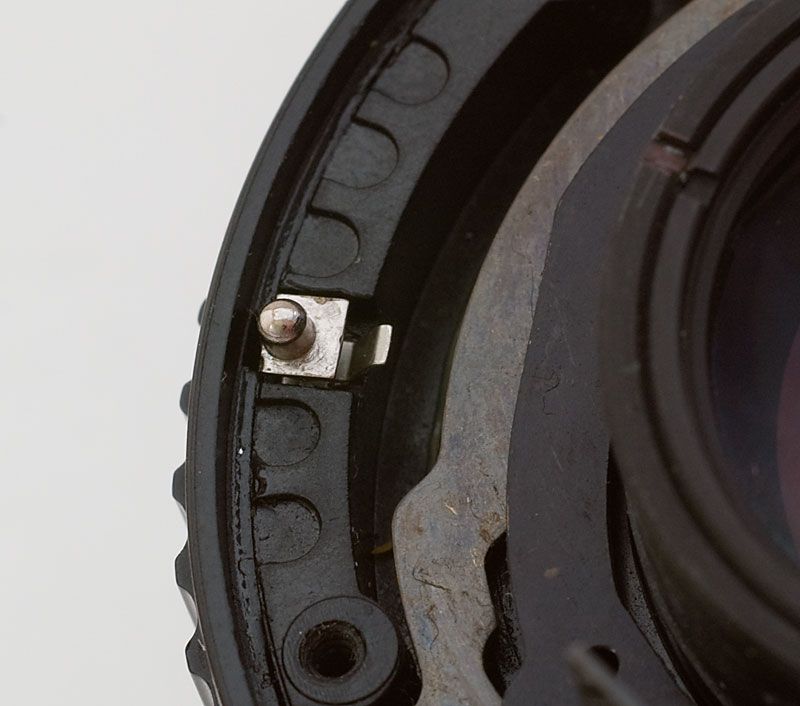


I think it's easiest to take all these off and reinstall them in the final stages, instead of worrying about them staying in place. Here is the part, its spring and contact:


OK, now we'll talk about the second part that you don't want to lose. There's a 1.5mm ball bearing that makes the clicks between aperture settings. A spring is pushing it outward against the aperture ring, so when you remove the aperture ring, this bearing will launch into space. The bearing is just to the right of the off-white bump. In this photo, it is perched on its little spring:


If you have the lens in a plastic bag, when you slide the aperture ring off, the bearing will end up in the bag. I can usually just orient the lens so the bump is in my left palm, slide the ring off with my right, and the bearing is in my hand. This probably only works because I have spare bearings, so losing one is no big deal for me. The spring can also get lost when you're not looking at it, but it usually stays hidden in its hole. The aperture ring has the small black button in it too; keep track of that.

With the aperture ring off, you now have access to the problem. You probably see something like this:
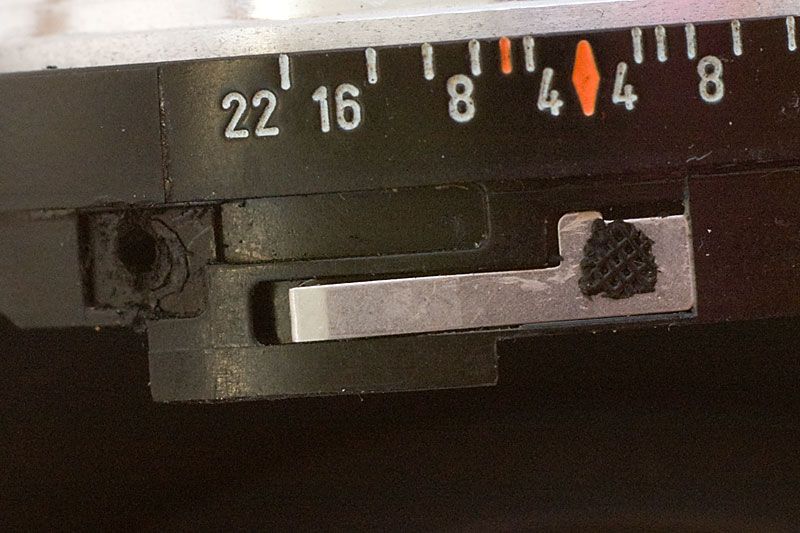


And you have another tiny part falling out, one of those flat steel springs. Pentax put these springs on with a plastic weld, which doesn't last forever. (In their defense, they may not have expected people to be using these lenses 25 years later.) You can fix the spring in several ways. Epoxy glue is one solution. Pentax uses screws on almost all other lenses, if you have some very small screws. Screw heads or epoxy should not stick out at all, because the aperture ring has to slide by them. Here is a successful screw repair:
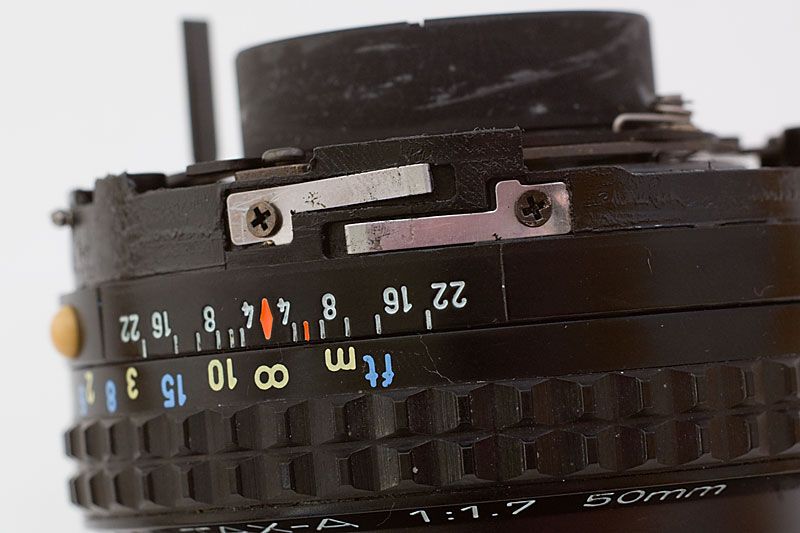


It's a good time to clean the aperture ring of any dirt, and remove other grit or dirt you see. One more photo to show you the little v-grooves that mark each click-stop for the aperture:
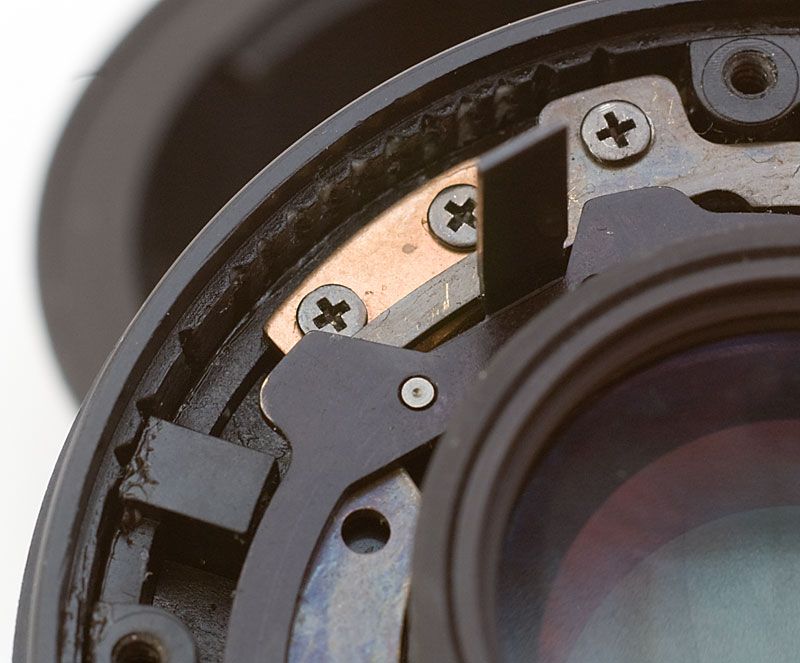


Now all you have to do is reassembly. This can be challenging because of all the tiny unsecured parts moving around. I use a small amount of lithium grease to relube the aperture ring. I also use a bit to stick the A button in place, and stick the ball bearing to its spring on the lens. I hold the lens sideways and orient the ball bearing so it's at the top and not falling off. I hold the aperture ring so the numbers are going the right way and the v-grooves are lined up with the ball bearing.

Then I slide the opposite side of the aperture ring onto the lens first. I keep sliding it on until it runs into the first (lower) flat spring, then use a small flat-blade screwdriver to tuck that flat spring under the ring. Then I slide the ring on a bit more until it's up against the bearing. I use the flat-blade screwdriver to shove the bearing down and slide the ring over it. Then the upper flat spring gets tucked under the ring and the hard part is done. You should be able to move the aperture ring and feel click-stops, and the button to select the A position should work correctly. Set the ring to the A position for the next step.

Next, reinstall the parts for the A contact. The contact plate goes in first. It has a hook that goes over the outer rim. I use a bit of grease to stick this in place too. It should be in this position, except of course your aperture ring is installed now:
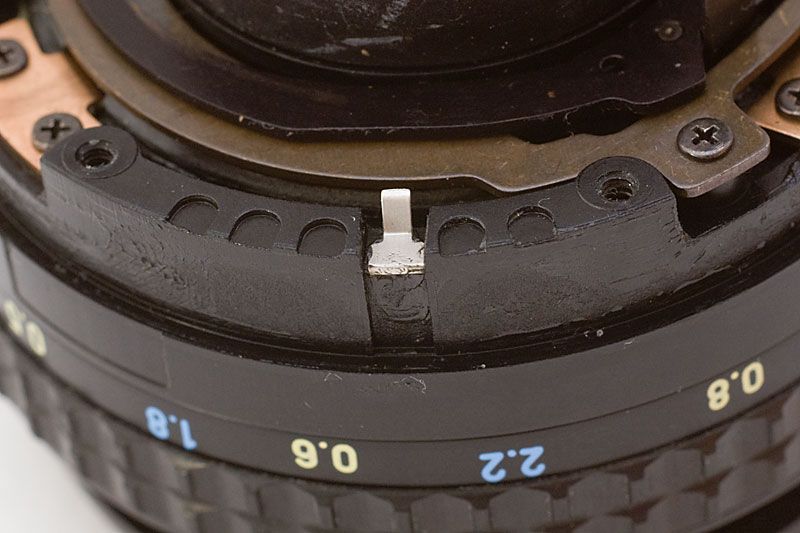


Then just slide the "A-M Selecting Plate" into its slot. The stamped steel plate goes on next, flat side up. Use the first photo to install it; the tab in the aperture ring fits into the slot (red arrow). Line the mount up so the aperture lever will fit through its slot and the A contact will fit into its hole, then put that into place. Reinstall the five screws.

Check your work by mounting the lens on your DSLR. Set the aperture ring to A and see if the camera will recognize the aperture setting. Use the DOF preview to see if the lens stops down to the selected aperture, then change the aperture with the wheel and stop down again. (Exact controls to do this will vary with different camera models.) Then go use your repaired lens.
Views: 73,357
08-08-2015, 06:37 PM   #46
Site Supporter
Site Supporter


Join Date: Sep 2007
Location: Victoria, BC, Canada
Photos: Gallery
Posts: 169
Awesome article - saved me when I needed to fix the A button on this exact lens.

12-08-2015, 11:31 AM   #47
MVK
New Member


Join Date: Dec 2015
Posts: 16
What a fantastic write up with photos. I am gonna try this on one of my Pentax-M 50mm lens. Aperture ring is not moving smoothly.
Thanks for a lovely explanation.
12-09-2015, 12:57 AM   #48
Site Supporter
Site Supporter
willdmo's Avatar

Join Date: Apr 2011
Location: Stuttgart
Posts: 389
QuoteOriginally posted by MVK Quote
What a fantastic write up with photos. I am gonna try this on one of my Pentax-M 50mm lens. Aperture ring is not moving smoothly.
Thanks for a lovely explanation.
Beware, the m lens works differently. Best open from the mount, lens at infinity and take lots of pictures and Mark with a whiteboardmarker the positions.
12-09-2015, 08:31 AM - 1 Like   #49
MVK
New Member


Join Date: Dec 2015
Posts: 16
Thanks willdmo. I will be more careful. I also need to do similar surgery on my A 50mm 1.7
Came across two wonderful videos on you tube posting links below


---------- Post added 12-09-15 at 08:33 AM ----------

Pentax-M 50mm F2.0 repair

Found following link on you tube. Hope it helps


12-13-2015, 05:15 AM - 2 Likes   #50
MVK
New Member


Join Date: Dec 2015
Posts: 16
Repaired my Pentax A 50mm f1.7

Just to update this thread, I would like to give following facts regarding the measurements of the tiny ball bearing and spring which are very prone to getting lost when fixing the Pentax-A lens

1. tiny ball is 1.5mm in diameter
2. tiny spring on which this ball rests is 1 mm outer diameter and 5 mm in height.

I am posting the photos here. Please note that the spring from my lens got little messed up at one end when I was working with it.
My repair of sticky aperture ring was successful.

Hope these photos help someone some day.
Thanks.
Attached Images
   
05-11-2016, 06:08 PM   #51
New Member


Join Date: Apr 2016
Posts: 9
I just successfully made this repair to the spring, a great tutorial!

However, the aperture auto lock button doesn't work after reassembly; the ring can be turned to and from the A setting without pressing it. Any idea what I did wrong?
05-11-2016, 07:30 PM   #52
Moderator
Not a Number's Avatar

Join Date: Mar 2012
Location: Venice, CA
Posts: 10,526
QuoteOriginally posted by rschaffter Quote
However, the aperture auto lock button doesn't work after reassembly; the ring can be turned to and from the A setting without pressing it. Any idea what I did wrong?
The flat springs probably aren't sticking out far enough from the barrel. Make sure that the flat end of the spring with the hole in it is at the proper angle that the spring stick out enough. If you epoxied the springs or screws you can gently bend them. If you bend them too far the ring might start binding.

Ball bearing size is noted on the exploded diagram and parts list that you can find online. Maybe the spring too.

05-17-2016, 02:53 PM   #53
Veteran Member


Join Date: Jun 2015
Location: South West UK
Photos: Albums
Posts: 1,493
Job done! Thank for taking the time to post this.
10-22-2016, 11:42 AM   #54
Junior Member


Join Date: Aug 2007
Location: Belgium
Posts: 26
This post is still very useful!

Just got my 50mm 1.7's aperture ring working smoothly again.
The A-M contact was the hardest part to reassemble, closely followed by the stops-bearing (which I did catch in a plastic bag!).

I certainly would advice to get a (cheap) set of JIS mini-screwdrivers. They fit perfectly.

Also, take care of the little black button to switch to A! It's not mentioned in the OP. I only found it missing after I finally got de aperture ring and the bearing in place. Had to take these off again, to search and find the little black button inside the lens!

Jan V.
04-01-2017, 10:41 AM   #55
Senior Member
Frosty66's Avatar

Join Date: Dec 2016
Location: London, UK
Posts: 181
I've just done this to fix a sticking aperture ring, many thanks for the instructions and pictures, they were very helpful especially knowing in advance what small parts to expect to fall out !

The worst part was keeping all the small parts in place whilst putting the aperture ring back but it worked out in the end !

Last edited by Frosty66; 04-01-2017 at 10:49 AM.
05-01-2017, 07:54 AM   #56
Site Supporter
Site Supporter


Join Date: Apr 2015
Posts: 3,522
QuoteOriginally posted by Just1MoreDave Quote
The Pentax-A 50mm f1.7 is a very good lens except for one problem. A tiny part can break and jam the aperture ring at some place other than the A position. It often won't return to the A position, making the lens far less useful and valuable. The fix is not that hard and doesn't require special tools. It is probably better to read through this once before starting, then follow the instructions.

A clean workspace with good light is helpful. You may want a clear plastic bag to control a spring-loaded bearing. More on that later. A good quality Phillips #0 or #00 screwdriver is required to take off the mount. Tweezers, a small dab of lithium grease and a small flat-bladed screwdriver are optional.

I have heard that the mount screws have slots for a slightly different screwdriver head, but Phillips will work OK with proper technique - make sure you have good contact with the slot and apply even pressure. With the lens face-down on the work surface, remove all five screws. Grab onto the bayonet lugs and lift off the mount. You'll see this:


At this point, a lot of things are loose - the mount was holding everything together. The first thing you can do is lift off the stamped steel ring around the rear element. It links the aperture to the aperture ring. This photo will help you put it back in the right place.

Next, there's a thing on the left side of the photo marked with a green arrow. Pentax calls it the "A-M Selecting Plate", part number 38305.X50801. It has two more associated parts, a tiny spring and a metal plate. This part is critical in telling your camera you've mounted a KA lens. You can slide it out now with the tweezers, or leave it for later. The main thing is, these three parts are important for maintaining the A position functions. A closer photo:


I think it's easiest to take all these off and reinstall them in the final stages, instead of worrying about them staying in place. Here is the part, its spring and contact:


OK, now we'll talk about the second part that you don't want to lose. There's a 1.5mm ball bearing that makes the clicks between aperture settings. A spring is pushing it outward against the aperture ring, so when you remove the aperture ring, this bearing will launch into space. The bearing is just to the right of the off-white bump. In this photo, it is perched on its little spring:


If you have the lens in a plastic bag, when you slide the aperture ring off, the bearing will end up in the bag. I can usually just orient the lens so the bump is in my left palm, slide the ring off with my right, and the bearing is in my hand. This probably only works because I have spare bearings, so losing one is no big deal for me. The spring can also get lost when you're not looking at it, but it usually stays hidden in its hole. The aperture ring has the small black button in it too; keep track of that.

With the aperture ring off, you now have access to the problem. You probably see something like this:


And you have another tiny part falling out, one of those flat steel springs. Pentax put these springs on with a plastic weld, which doesn't last forever. (In their defense, they may not have expected people to be using these lenses 25 years later.) You can fix the spring in several ways. Epoxy glue is one solution. Pentax uses screws on almost all other lenses, if you have some very small screws. Screw heads or epoxy should not stick out at all, because the aperture ring has to slide by them. Here is a successful screw repair:


It's a good time to clean the aperture ring of any dirt, and remove other grit or dirt you see. One more photo to show you the little v-grooves that mark each click-stop for the aperture:


Now all you have to do is reassembly. This can be challenging because of all the tiny unsecured parts moving around. I use a small amount of lithium grease to relube the aperture ring. I also use a bit to stick the A button in place, and stick the ball bearing to its spring on the lens. I hold the lens sideways and orient the ball bearing so it's at the top and not falling off. I hold the aperture ring so the numbers are going the right way and the v-grooves are lined up with the ball bearing.

Then I slide the opposite side of the aperture ring onto the lens first. I keep sliding it on until it runs into the first (lower) flat spring, then use a small flat-blade screwdriver to tuck that flat spring under the ring. Then I slide the ring on a bit more until it's up against the bearing. I use the flat-blade screwdriver to shove the bearing down and slide the ring over it. Then the upper flat spring gets tucked under the ring and the hard part is done. You should be able to move the aperture ring and feel click-stops, and the button to select the A position should work correctly. Set the ring to the A position for the next step.

Next, reinstall the parts for the A contact. The contact plate goes in first. It has a hook that goes over the outer rim. I use a bit of grease to stick this in place too. It should be in this position, except of course your aperture ring is installed now:


Then just slide the "A-M Selecting Plate" into its slot. The stamped steel plate goes on next, flat side up. Use the first photo to install it; the tab in the aperture ring fits into the slot (red arrow). Line the mount up so the aperture lever will fit through its slot and the A contact will fit into its hole, then put that into place. Reinstall the five screws.

Check your work by mounting the lens on your DSLR. Set the aperture ring to A and see if the camera will recognize the aperture setting. Use the DOF preview to see if the lens stops down to the selected aperture, then change the aperture with the wheel and stop down again. (Exact controls to do this will vary with different camera models.) Then go use your repaired lens.
Great!

I bought a disassembled A50/1,7 with missing parts and managed to take all parts from a bad (fungus) A50/2.

Impressions:

- Taking the A50 apart wasn't difficult, the two springs were still on their place.
- Used the recommended plastic bag, but the spring and ball-bearing stayed in place when taking the aperture ring off
- but alas: getting this ring back on was tricky, I put some grease on top of the spring and thus "glued" the ball-bearing on it
but keeping it down to impose the aperture-ring back on was the most tricky part, took me several goes.... the rest was easy.

Thanks for such a precise guidance!
11-18-2018, 07:11 PM   #57
New Member


Join Date: Nov 2018
Posts: 8
Thanks for the explanation. I just used your instructions to fix a sticky contact problem. My camera now sees the lens as an automatic again. Thank you!
02-10-2019, 01:52 PM   #58
Site Supporter
Site Supporter
limestonecowboy's Avatar

Join Date: Aug 2016
Location: Newcastle upon Tyne
Photos: Albums
Posts: 151
QuoteOriginally posted by Nick Siebers Quote
Are those metal springs important? Can you just leave the broken one out?

Ok, some reflections on this:
1) I have repaired a number of M lenses but this was WAY trickier
2) Has anyone seen that little ball bearing? I used the bag for taking the aperture ring off, but getting it back on again - sproing!
3) Eat me, A-M Selecting plate. You want to hide down in the bowels of the lens, stuck for a third time? I am THIS CLOSE to leaving you there!

In conclusion, I have a lens that has no stops and will switch out of (but not into) A without pressing the button; and I will never work on an A lens again. It does work on A, though! Thanks, Just 1 More Dave.
still looking for the blasted ball bearing. Anyone sell these wholesale?
02-10-2019, 04:41 PM   #59
Moderator
Not a Number's Avatar

Join Date: Mar 2012
Location: Venice, CA
Posts: 10,526
QuoteOriginally posted by limestonecowboy Quote
still looking for the blasted ball bearing. Anyone sell these wholesale?
eBay is your friend. Search for "1.5mm ball bearing".
02-13-2019, 02:09 AM - 1 Like   #60
Site Supporter
Site Supporter
limestonecowboy's Avatar

Join Date: Aug 2016
Location: Newcastle upon Tyne
Photos: Albums
Posts: 151
QuoteOriginally posted by Not a Number Quote
eBay is your friend. Search for "1.5mm ball bearing".
Got a 1000 for 5 Quid, should be here shortly. Anyone need 900 ball bearings?
Reply

Bookmarks
  • Submit Thread to Facebook Facebook
  • Submit Thread to Twitter Twitter
  • Submit Thread to Digg Digg
Tags - Make this thread easier to find by adding keywords to it!
50mm, aperture, ball, contact, f2, lens, mount, pentax-m, photo, position, screwdriver, screws, slide, smc, tube, youtube

Similar Threads
Thread Thread Starter Forum Replies Last Post
Pentax M 50mm f1.7 aperture ring kbryant Pentax SLR Lens Discussion 1 03-25-2010 10:38 AM
M 50mm/1.7 - aperture ring stuck jzietman Pentax SLR Lens Discussion 12 12-21-2009 12:59 PM
Problem with stuck aperture ring on Pentax KA 50mm f/1.7 jhaji Pentax SLR Lens Discussion 8 08-15-2009 04:10 PM
Use of Aperture-Ring 43mm/1.9 -> no aperture data Deimo Pentax SLR Lens Discussion 7 06-24-2009 03:25 PM
Aperture ring on lenses for Pentax? Duh_Vinci Pentax SLR Lens Discussion 5 12-06-2006 09:24 PM


All times are GMT -7. The time now is 01:06 AM. | See also: NikonForums.com, CanonForums.com part of our network of photo forums!
  • Red (Default)
  • Green
  • Gray
  • Dark
  • Dark Yellow
  • Dark Blue
  • Old Red
  • Old Green
  • Old Gray
  • Dial-Up Style
Hello! It's great to see you back on the forum! Have you considered joining the community?
register
Creating a FREE ACCOUNT takes under a minute, removes ads, and lets you post! [Dismiss]
Top