Forgot Password
Pentax Camera Forums Home
 

Reply
Show Printable Version Search this Thread
01-13-2012, 10:55 AM   #16
Veteran Member
demp10's Avatar

Join Date: Jun 2011
Location: Atlanta
Photos: Albums
Posts: 602
The idea behind super-resolution it to take several (the more the better) images that do not register exactly. Every image has a small shift (think fractional pixels) but is sharp by itself. You can do that by shifting the sensor, or by shaking the entire camera/lens system. As long as the images are sharp enough you can use them.

The software that puts them together, creates a blank image with higher pixel count (e.g. for every original pixel it can create a 2x2 or4x4 matrix) and then finds the best image(s) to read that sub-pixel. Since every image has a slight shift, some are more “centered” to the particular sub-pixel than others giving a more accurate reading.

This approach does nothing for large uniform areas, but when there are fine details it works very well compared to digitally resampling the image.

If you have a sharp black-and-white border and the pixel is centered on it, the resulting value will be 50% gray (50% white and 50% black).If on another image the pixel is shifted 1/2 pixel toward the white part the pixel will be 75% gray (75% white and 25% black) and so fore. Having enough samples, you can define the black-and-white edge very precisely.

This technique is particularly useful using long telephotos where the pixel count for distant features is naturally low and every pixel really counts. Using a less stable tripod actually helps to introduce vibrations and get the necessary image shift.

01-13-2012, 11:09 AM   #17
Veteran Member
Anvh's Avatar

Join Date: Sep 2011
Posts: 4,616
QuoteQuote:
If you have a sharp black-and-white border and the pixel is centered on it, the resulting value will be 50% gray (50% white and 50% black).If on another image the pixel is shifted 1/2 pixel toward the white part the pixel will be 75% gray (75% white and 25% black) and so fore. Having enough samples, you can define the black-and-white edge very precisely.
You're forgetting the bayer arrangement.
Pixels have a colour filter over them so in your instance for example a Green and Blue pixels are used.
Green pixel sees 50% green and the Blue pixel 50% blue, when you shift white reflects all colour so the green pixels sees 100% green and the blue sees now the black so that sees 0% blue.
You see the problem.
01-13-2012, 11:43 AM   #18
Veteran Member
demp10's Avatar

Join Date: Jun 2011
Location: Atlanta
Photos: Albums
Posts: 602
Anvh, I was providing a general description of the idea. DSLRs with Bayer sensors have their own complexities, but after you convert your RAW data to RGB basically you have an approximation of what was on the ground, so the rest is equally applicable.

Bayer pattern in essence is an attempt to get higher resolution from an image. Instead of using 3 pixels at every location, they use one at a particular color and then put the image together by resampling the colors. The resulting image is not as good as a true RGB image with the same pixel count. A super-resolution technique will actually help remove some of the softness Bayer matrices inherently have.

By far the best application of super-resolution is with video cameras (e.g. surveillance) where you get RGB pixels (or B/W, IR, etc.), very low resolution to start with and a stream of image frames to work with. From my experience, the results can be quite dramatic.
01-13-2012, 11:51 AM   #19
Pentaxian


Join Date: Apr 2007
Location: Sweden
Posts: 2,106
QuoteOriginally posted by Anvh Quote
You're forgetting the bayer arrangement.
Pixels have a colour filter over them so in your instance for example a Green and Blue pixels are used.
Green pixel sees 50% green and the Blue pixel 50% blue, when you shift white reflects all colour so the green pixels sees 100% green and the blue sees now the black so that sees 0% blue.
You see the problem.
But on the other hand, if the target is black and white, for instance a paper with black letters. Then the bayer filter will not matter at all. The red, green and blue pixels will all see the same shade, pretty much as if the sensor where black and white. (I'm speculating as I'm not at all sure about this.)

01-13-2012, 01:43 PM   #20
Veteran Member
Anvh's Avatar

Join Date: Sep 2011
Posts: 4,616
QuoteOriginally posted by demp10 Quote
Anvh, I was providing a general description of the idea. DSLRs with Bayer sensors have their own complexities, but after you convert your RAW data to RGB basically you have an approximation of what was on the ground, so the rest is equally applicable.
Ah okay.
Every Pentax digital camera uses a bayer sensor so they all have those complexities

QuoteOriginally posted by Gimbal Quote
But on the other hand, if the target is black and white, for instance a paper with black letters. Then the bayer filter will not matter at all. The red, green and blue pixels will all see the same shade, pretty much as if the sensor where black and white. (I'm speculating as I'm not at all sure about this.)
A red pixel and blue pixel will probably read roughly the same levels when you are talking about black, white and grey but don't forget they all have their own colour output.
If the edge of black and white would fall on a sensor it would not read it as 50% grey but as 50% red, green or blue.

Here is read about how the sensor works.
Understanding Digital Camera Sensors
01-13-2012, 02:01 PM   #21
Veteran Member
demp10's Avatar

Join Date: Jun 2011
Location: Atlanta
Photos: Albums
Posts: 602
QuoteOriginally posted by Anvh Quote
If the edge of black and white would fall on a sensor it would not read it as 50% grey but as 50% red, green or blue.
To make things even worse, the actual pixels that will be used to derive the RGB values, do not record the same spatial information. If the edge is perfectly centered on the blue pixel, it will read 50/50. On the adjacent red pixel (since it is next to it and not on top) the edge will be off-centered and the reading may be 45/55 depending on the size of the pixels and the edge.

A good de-mosaicking algorithm can use these "discrepancies" to improve detail, almost like super-resolution. On the other hand, these "details" may introduce artifacts.
01-13-2012, 02:35 PM   #22
Veteran Member
Anvh's Avatar

Join Date: Sep 2011
Posts: 4,616
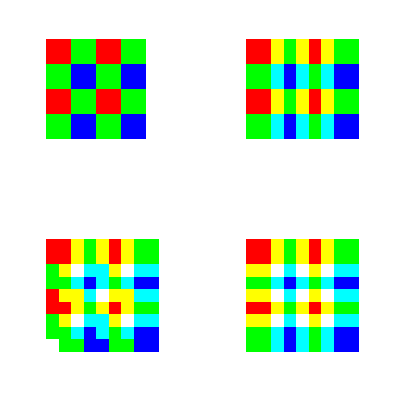
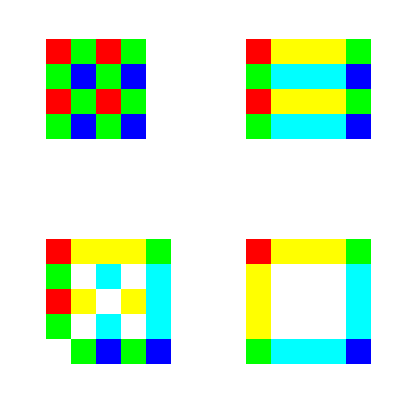
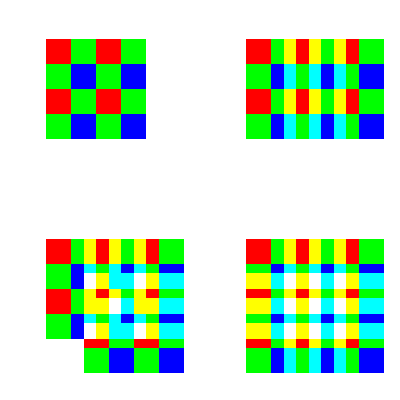
Here is a simple gif to give you the idea, forget the out pixels for a moment but look at the center ones.
I've blend the pixels in such a way that Red Green and Blue mix together will be White so the idea is to have as much white as you can get to have the most information coverage

0.5 pixel shift


1 pix


1.5 pix


I now see that 1.5 pix and 0.5 pix shift gives you the same results....

Looking at it.
1,5 and 0,5 pixel shift gives you:
+ 4 times more pixels
+ ~66% more colour information
- de-mosaicking (since you don't have 100% colour covarge you need to blend the pixels meaning lost in quality, sharpness + colour)

1 pixel shift
+ 100% colour information
+ no de-mosaicking which means increase in sharpness (roughly 3 times better then without colour shift)
+ no increase in pixels or file size but still increase in overall quality.


Last edited by Anvh; 01-13-2012 at 02:48 PM.
01-13-2012, 02:50 PM   #23
Veteran Member
Anvh's Avatar

Join Date: Sep 2011
Posts: 4,616
QuoteOriginally posted by demp10 Quote
To make things even worse, the actual pixels that will be used to derive the RGB values, do not record the same spatial information. If the edge is perfectly centered on the blue pixel, it will read 50/50. On the adjacent red pixel (since it is next to it and not on top) the edge will be off-centered and the reading may be 45/55 depending on the size of the pixels and the edge.

A good de-mosaicking algorithm can use these "discrepancies" to improve detail, almost like super-resolution. On the other hand, these "details" may introduce artifacts.
It's always a middle road you have to find.
I think shifting might help though in the studio.
The idea to leave the SR on and then stack the photos might work quite well.
01-13-2012, 10:14 PM   #24
Site Supporter
Site Supporter
bkpix's Avatar

Join Date: Feb 2010
Location: Creswell, Oregon
Photos: Albums
Posts: 568
I downloaded the free trial version of PhotoAcute today and tried it out with 8 landscape images from my K-5, shot on a tripod with SR on.

To cut to the chase, the result was unimpressive, but I'll probably keep working with the program a while to see if I can milk any resolution advantage from it.

I used 8 DNG files from the camera, shot at ISO 800. (The PhotoAcute docs suggest using high ISO images to keep the shutter speed up; any resulting noise will be averaged out.) I merged them on my laptop (hardly a super computer) to create a super-resolution file.

The computing time for the single image was about 35 minutes, and the resulting file was about 370 megabytes.

BUT, looking at the image closely in LR, I couldn't find a hint of detail that wasn't clearly shown in each of the 8 input files, and I'm confident that uprezzing any of those files would produce essentially the same result, though I didn't actually try that.

I think I'll try working with a smaller number of images and see if I can find any advantage.

Higher resolution would be welcome, as I am almost always printing 20x30 now for my landscapes. The advantage would have to be quite definite for me, though, to spend $149 on the uncrippled version of the software (the trial version saves with a watermark).
01-13-2012, 10:21 PM   #25
Veteran Member
demp10's Avatar

Join Date: Jun 2011
Location: Atlanta
Photos: Albums
Posts: 602
QuoteOriginally posted by bkpix Quote
Higher resolution would be welcome, as I am almost always printing 20x30 now for my landscapes.
Have you consider making panoramas instead? Use a moderate telephoto lens, set the camera in vertical position and shoot 3 or 4 frames with about 30% overlap. You almost trippled your pixels that way.
01-14-2012, 08:08 AM   #26
New Member


Join Date: Jan 2012
Posts: 10
QuoteOriginally posted by bkpix Quote
tried it out with 8 landscape images from my K-5, shot on a tripod with SR on
Were the images RAW or JPG/TIFF? Super resolution works much better with RAW (at least in PhotoAcute).
01-15-2012, 04:05 PM - 1 Like   #27
Veteran Member
falconeye's Avatar

Join Date: Jan 2008
Location: Munich, Alps, Germany
Photos: Gallery
Posts: 6,871
QuoteOriginally posted by bkpix Quote
I downloaded the free trial version of PhotoAcute today and tried it out with 8 landscape images from my K-5, shot on a tripod with SR on.

To cut to the chase, the result was unimpressive
There is a rather steep learning curve involved.

First of all, it is important to actually understand the idea. Some posts here in the thread aren't helpful. One has to separate concerns first:

- the shift which should be fractions of a pixel. Leaving SR on should do the trick if the tripod is bad enough or the focal length is long enough. If not, mildly beating the tripod between shots is recommended, or free hand shots.

- the demosaicing should be done in such a way that each individual image is pixel-sharp; this requires the lowest possible ISO (like 80), best aperture (like f/5), a good prime (like DA70), short exposure or a tripod, AND at least 100% sharpening in the raw converter. Convert to Tiff or DNG.

- Use a lens profile which does as little as possible. PhotoAcute ships with lens profiles. But they are user generated and often describe a lens profile which is softer than the lens. I use the Sigma 30mm f/1.4 on a low resolution camera (Nikon D40 I believe) because this does just as little superresolution sharpening as required if the single frames have been made pixel-sharp. I use this profile for *any* good camera/lens combo.

The PhotoAcute recommendation to go for higher Iso is for low iso simulation from multiple images, not high resolution simulation from multiple images. Don't let be confused. Try to understand how the thing works.

From my experience, I can say that the thing works. But only with outstanding sharpness in the input images. Most images I get to see would lack sufficient sharpness to start with. First, try to get full resolution in your photography before addressing superresolution. It s hard enough, believe me

btw, to do one superresolved 16bpp 64MP image from about 8 16MP images, my computer takes about a minute or two. All image data must fit into memory or you create a heavy load for your hard disk. Note that you can run a preview on a small rectangle which is very fast. Make use of this feature to test things out.

Last edited by falconeye; 01-15-2012 at 04:14 PM.
01-15-2012, 09:46 PM   #28
New Member


Join Date: Jan 2012
Posts: 10
falconeye, thank you for the hints!

a couple of comments:

QuoteOriginally posted by falconeye Quote
Convert to Tiff or DNG
RAW images can be loaded directly into PhotoAcute. Does manual conversion to DNG/TIFF really work better for you?

QuoteOriginally posted by falconeye Quote
recommendation to go for higher Iso is for low iso simulation from multiple images, not high resolution simulation from multiple images
That recommendation just means that sharper but noisy images (short exposure, high ISO) is better that blurry low-noise images (long exposure, low ISO), and that is mainly for handheld shooting.
01-16-2012, 05:23 AM   #29
Veteran Member
falconeye's Avatar

Join Date: Jan 2008
Location: Munich, Alps, Germany
Photos: Gallery
Posts: 6,871
QuoteOriginally posted by EugenePanich Quote
RAW images can be loaded directly into PhotoAcute. Does manual conversion to DNG/TIFF really work better for you?
You're right. But I like to keep control over the conversion parameters. AFAIK, PhotoAcute will use the DNGconverter to read raws. That's ok because it outputs DNG and I could still apply most corrections. But I'd like to input as sharp as possible frames into PhotoAcute and the standard conversion does too little sharpening for my taste, not entirely undoing the AA filter. OTOH, I didn't run a formal side by side comparison.

QuoteOriginally posted by EugenePanich Quote
That recommendation just means that sharper but noisy images (short exposure, high ISO) is better that blurry low-noise images (long exposure, low ISO), and that is mainly for handheld shooting.
This is correct but the comment misses my point: If you already have to care about the compromise between noise and blur, then superresolution is out of scope anyway. In this case, you'd stack images for better quality but don't try to expand resolution to 4x.
01-16-2012, 07:48 AM   #30
New Member


Join Date: Jan 2012
Posts: 10
QuoteOriginally posted by falconeye Quote
AFAIK, PhotoAcute will use the DNGconverter to read raws. That's ok because it outputs DNG and I could still apply most corrections. But I'd like to input as sharp as possible frames into PhotoAcute and the standard conversion does too little sharpening for my taste
Version 3 reads RAWs without DNG Covnerter, but it still does a conversion, of course (using built-in dcraw).
Re sharpening - theoretically, any image processing (including sharpening) applied before super resolution leads to poorer resolution increase. So it's better to apply sharpening after super resolution. But in practice that can be wrong in some cases, of course .
Reply

Bookmarks
  • Submit Thread to Facebook Facebook
  • Submit Thread to Twitter Twitter
  • Submit Thread to Digg Digg
Tags - Make this thread easier to find by adding keywords to it!
camera, dslr, feature, k-5, k-5 ii, k-5 iis, k5, pentax k-5, sensor, shift, stars
Thread Tools Search this Thread
Search this Thread:

Advanced Search


Similar Threads
Thread Thread Starter Forum Replies Last Post
Is Av Shift and/or Tv Shift in TAv Mode possible. robert_s Pentax K-5 & K-5 II 3 09-30-2011 09:03 AM
K200D sensor shift problem Undefined (photo) Pentax DSLR Discussion 6 03-24-2011 03:05 AM
Possible to make a tilt shift lens out of a 50mm on a crop sensor? Abstract Pentax SLR Lens Discussion 10 02-07-2011 03:47 PM
New K-7 owner: ? about sensor shift javarob75 Pentax DSLR Discussion 1 12-26-2009 09:31 AM
Sensor shift during "long" exposures eclipsed450 Pentax DSLR Discussion 11 12-18-2009 12:51 PM


All times are GMT -7. The time now is 03:32 AM. | See also: NikonForums.com, CanonForums.com part of our network of photo forums!
  • Red (Default)
  • Green
  • Gray
  • Dark
  • Dark Yellow
  • Dark Blue
  • Old Red
  • Old Green
  • Old Gray
  • Dial-Up Style
Hello! It's great to see you back on the forum! Have you considered joining the community?
register
Creating a FREE ACCOUNT takes under a minute, removes ads, and lets you post! [Dismiss]
Top