Forgot Password
Pentax Camera Forums Home
 

Reply
Show Printable Version Search this Thread
03-10-2017, 09:23 AM - 5 Likes   #1
Forum Member


Join Date: Jan 2015
Location: Toronto, Canada
Posts: 99
Lens Release Button Steps for Repair

Make sure you have the following items:

Tiny philips screwdriver
Tweezers
One of those squishy airblowers
Replacement Button (Ordered from USCamera Genuine Pentax Replacement Parts from USCamera.com)
Replacement silicon (Ordered from USCamera
Genuine Pentax Replacement Parts from UScamera.com)
C clip (Ordered from USCamera
Genuine Pentax K-3 K5 K7 K10D K50 Kr Lens Lock Button Retaining Clip Replacement Spare Parts | 27030-a358 | uscamera.com)


2) Remove any lens that might be on the body and the battery.

3) Under where it says K-5 on the front, peel back the grip from the top to expose a hidden screw.


4) Photograph all the sides of the body (Top with the flash up, bottom, R side, L side, Back, Front and a second one of the bottom with the battery cover open.) You want a photo of all of the screws. I used an Iphone for this.

5) Open all the photos up in microsoft Word. Basically you want to print each photo so that you can take double sided tape (or normal tape folded over so it is sticky on both sides) and stick it on each photo where each screw is. Every time you take a screw out you will want to stick it to the tape in the correct spot to help remember where it goes. There are different screw lengths, so this is important.


6) Make sure you have a clean, bright working surface with all the parts listed above at the ready.

7)Start unscrewing the screws on the bottom. There are 8 which are visible, plus 2 under the battery flap. There is 1 more way at the bottom of the battery bay. I wasn’t sure if I needed to take it out, but I did anyways. Stick all the screws to the tape on your corresponding papers (the one with battery flap up, the one with it down).


8) Slide off the eyecup from the back. There are 2 screws here. Take them out. Stick them to the second photo of the back. At this point you will want to start keeping track of the order of the pages so that you can reverse order put them back when all is done.


9) Take the screws off of the right side (the shutter button side). There are 3 here. Stick them to the third photo.

10) Take the screws off of the Left side (where it says K-5). There are 3 visible, plus the 1 under the grip that you peeled off slightly before. Stick them to the fourth photo.

11) Pop up the flash. Take out the 2 screws and, you got it, stick it to the photo of the top.


12) Now for the front. Take out the 5 screws around the metal lens mount. Stick them to the last photo. Now all of the screws are out.

13) Take off the bottom plate. It should come out pretty easily.


14) Pull up the top plate a bit. It does not have to come all of the way off. This one should slide up easily, but not as easily as the bottom plate. It is thoroughly attached to the insides by wiring, so don't pull it all the way.


15) Now is the time to try and pull off the front plate. You will need to start working at one of the sides where the back and the front cross over each other. I used tweezers to lift the front plate off from the side. Then you can pull it away. CAREFUL: There are two wires attached near the top of the front plate. You will not be able to remove the front plate completely, just pull it as much as you can without stretching those two wires.


16) My old C clip actually fell out when I opened up the body, so I am keeping it just in case. It’s not worth hunting for it if it does not immediately fall out. That’s why you bought a new one!

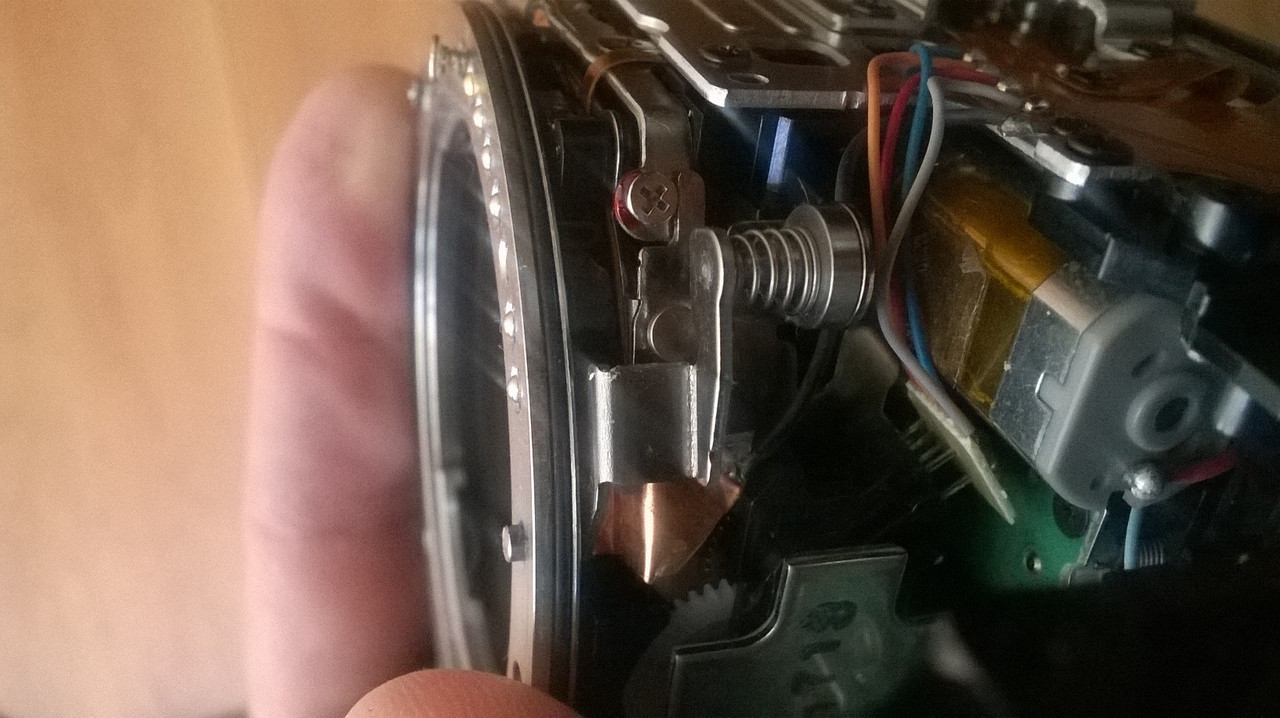
17) You might need to rotate the whole camera body to get the right angle. Put the silicone on the new lens release button (see photo). Take the C clip in between your tweezers (see photo). Push the button through with one hand from the front side of the front plate and then push the C Clip on from the other side using the tweezers. If done correctly your button wont fall out! The silicone acts slightly like a spring, though I imagine its main function is weather sealing.


18) Here is where I had the most difficulty. The rest of the lens release mechanism which is inside the camera fell out of place (see photo) and it was a pain to try and put the front plate back with it in its correct position. I ended up pushing it through the metal lens mount from the back and putting a piece of tape over the nubby as it popped out the front to hold it so that I could lower the front plate down without it falling out over and over again. It took me 6-8 attempts before I got it finally. It has to sit with its spring side in a little hole inside the camera. It should be fairly obvious where it goes, it’s just a matter of lowering the plate down so that it gets in the hole properly. You will know you were successful when you press the lens release button and it feels like it used to (yay!) Also, it wont sit properly unless that piece is in the right place. You will know. ***Note, the second photo has me holding the part between tweezers backwards. The side with the spring goes in the hole inside the camera, the side without the spring sticks out of the metal lens mount***


19) connect the front and back plates on the sides where they overlap. Then lower the top plate back down into place. Sit the whole thing back onto the bottom plate. Use the hand held air blower to get as much dust out as possible.


20) Start screwing all the screws back into place. Start with the front, then the sides, then the top, then the bottom last.

21) Put the eyecup back on and try putting on and removing a lens. You will need to buy some double sided tape to stick the left side grip back into place (under the “K-5”) Hopefully you will have been as successful as I was!

*Note: I read it might be possible to find a screw to remove the wires completely from the front plate (Step 15) which would mean that you could take it off completely to work on it. I was too nervous about this, so I made do with it still attached by wires.


Last edited by jbriginshawphotograp; 03-10-2017 at 10:42 AM.
03-10-2017, 09:45 AM - 2 Likes   #2
Moderator
Not a Number's Avatar

Join Date: Mar 2012
Location: Venice, CA
Posts: 10,503
Excellent. I like the use of photos to keep track of where the screws go. Often these are of different lengths and it is impossible to remember which goes where.

The only change I would make is to use JIS (Japan Industry Standard) cross drivers instead of Philips head screwdrivers. The screws are JIS headed and a Philips screwdriver can strip the heads.

Question: Is the old C clip metal or plastic? I'm curious if it is metal if it is cutting through the shaft of the button or if it is plastic and the clip breaks.

I believe it is standard practice to replace the body weather seals whenever the body is opened however if you make sure the seals and appropriate channels are clean and the seals are properly seated, unbroken or flattened you should be okay.
03-10-2017, 09:49 AM - 1 Like   #3
Site Supporter
Site Supporter
grog85361's Avatar

Join Date: Dec 2010
Location: Phoenix Arizona
Photos: Gallery | Albums
Posts: 893
Thanks for sharing this!
03-10-2017, 09:50 AM - 1 Like   #4
Digitiser of Film
Loyal Site Supporter
BigMackCam's Avatar

Join Date: Mar 2010
Location: North East of England
Posts: 20,504
Thanks for posting this! My own K-5 hasn't had any problem yet, but I guess it's only a matter of time, considering how often I change lenses.

Not exactly an easy job, but should be within the abilities of most, given a little patience. And *much* easier with this guide!

03-10-2017, 09:53 AM   #5
Forum Member


Join Date: Jan 2015
Location: Toronto, Canada
Posts: 99
Original Poster
QuoteOriginally posted by Not a Number Quote
Excellent. I like the use of photos to keep track of where the screws go. Often these are of different lengths and it is impossible to remember which goes where.

The only change I would make is to use JIS (Japan Industry Standard) cross drivers instead of Philips head screwdrivers. The screws are JIS headed and a Philips screwdriver can strip the heads.

Question: Is the old C clip metal or plastic? I'm curious if it is metal if it is cutting through the shaft of the button or if it is plastic and the clip breaks.

I believe it is standard practice to replace the body weather seals whenever the body is opened however if you make sure the seals and appropriate channels are clean and the seals are properly seated, unbroken or flattened you should be okay.
Good tip about the screwdriver. Philips worked fine and didn't strip the screws, but you're right in that it's safer to go with JIS.

The old C-clip, and the new, are plastic. I had read of someone using a tiny washer and cutting out a bit in order to have a metal clip. The old plastic clip that fell out of the body when I opened it up did not appear damaged at all. Very strange. It seemed as though it just fell off.

I did my bast with the seals. I suspect they will be ok. I was amazed at how well the plates fit into each other. I use my K-3II more often these days in all-weather situations anyways, but it's nice to have my second body up and running again.
03-10-2017, 01:07 PM - 1 Like   #6
Site Supporter
Site Supporter


Join Date: Sep 2010
Location: Blue Hill, Nebraska
Photos: Gallery
Posts: 494
You are very brave...
03-10-2017, 02:26 PM   #7
Forum Member


Join Date: Jan 2015
Location: Toronto, Canada
Posts: 99
Original Poster
QuoteOriginally posted by darylk Quote
You are very brave...
Another poster had given a decent run-down on how to do it and it didn't seem too complicated. It would have been a $200 + fix had I brought it in for repair. The parts plus shipping came to $25.

03-11-2017, 12:43 AM - 1 Like   #8
Senior Member


Join Date: Feb 2015
Location: Utrecht
Posts: 124
Great how-to. I had this in mind when I wrote about this, but never got around to doing it all again and making all the pictures. I have a picture here somewhere of the position of the lens release mechanism, I'll add it here.
03-11-2017, 08:13 AM   #9
Moderator
Not a Number's Avatar

Join Date: Mar 2012
Location: Venice, CA
Posts: 10,503
I guess the actual nomenclature for the metal retaining clip is e-clip or e-style clip. The trick is finding the proper size - inside diameter. You should be able find the clips at a well stocked hardware store. Maybe even Home Depot if you don't mind buying a dozen of them. Give/Sell them on the Market Place

QuoteOriginally posted by jbriginshawphotograp Quote
The old C-clip, and the new, are plastic. I had read of someone using a tiny washer and cutting out a bit in order to have a metal clip. The old plastic clip that fell out of the body when I opened it up did not appear damaged at all. Very strange. It seemed as though it just fell off.
What about to old button? Did the end of the shaft the hold the retaining ring break off? I'm curious as to what the exact failure is.
03-12-2017, 04:43 AM   #10
Forum Member


Join Date: Jan 2015
Location: Toronto, Canada
Posts: 99
Original Poster
in my case the button fell off at some point and was not found. This is the case for many K-5 users, though manyrexover it and therefore don't need replacement parts. As far as I know, I haven't heard broken shafts being the issue.
09-03-2017, 03:00 AM   #11
Closed Account


Join Date: Sep 2017
Posts: 1
Just do it

Hi,

I just did this to my K-5. Took about 20 minutes with a "00" Philips bit.

As in your case the c-clip came out intact, so it appears that there is a weakness with this part.

A problem I had, though, was that the purple piece of play dough (?) came out before I had a chance to see where it was sitting. You pictures helped a bit, although it was hard to see its exact location, so I tried to fit it as best as I could. I hope it stays put and serves its purpose with my installation.

Btw. you do need to remove the screw at the bottom of the battery compartment. Otherwise you will not be able to remove the top of the camera body.

Cheers!

Last edited by Unregistered User 8; 09-03-2017 at 03:31 AM.
03-15-2018, 08:57 AM   #12
New Member


Join Date: Feb 2018
Posts: 17
Excellent article

This is a really well done piece. I recently acquired a K20D and its only flaw is this missing button. From what I can see this is the same part as the one replaced here and based on the K20D Part List posted elsewhere in the forums the only piece not available is the original C-Clip. But the one referenced in the article is and should work. Thanks for taking the time to lay this out clearly. Once again the Forum Members come through!
06-12-2018, 06:21 AM   #13
Senior Member


Join Date: Feb 2015
Location: Utrecht
Posts: 124
I once took a picture of how the metal lever and spring assembly behind the lens release button are correctly seated. (pic of a K-30, assembly is the same)

06-12-2018, 07:26 AM   #14
Moderator
Not a Number's Avatar

Join Date: Mar 2012
Location: Venice, CA
Posts: 10,503
For all those concerned you can buy the genuine replacement parts from uscamera.com - the button, WR cone seal and retaining clip. Should fit all bodies.The seal on those with WR.

Pentax Button Retaining Clip 27030-A358 | USCamera parts downloads +USCamera
Pentax Lens Lock Button (77240-A107) - USCamera sells parts.USCamera
Pentax Lens Lock Button Packing 77240-A99 | USCamera Pentax parts +USCamera
06-13-2018, 06:38 AM   #15
New Member


Join Date: Nov 2014
Posts: 20
Now you have me concerned. I recently got a K5 iis to replace a K50 that developed the aperture solenoid problem. My hope was that the K5 would not have inherent problems, just want a reliable camera, the way Pentax film cameras used to be.

Is the lens release button failure common?
Reply

Bookmarks
  • Submit Thread to Facebook Facebook
  • Submit Thread to Twitter Twitter
  • Submit Thread to Digg Digg
Tags - Make this thread easier to find by adding keywords to it!
body, bottom, button, camera, clip, dslr, k-5, k-5 ii, k-5 iis, k5, lens, paper, pentax k-5, photo, plastic, release, replacement, seals, tape, time
Thread Tools Search this Thread
Search this Thread:

Advanced Search


Similar Threads
Thread Thread Starter Forum Replies Last Post
K5 Lens Release Button Fell Off??? jennaann Pentax K-5 & K-5 II 16 03-10-2017 10:01 AM
Pentax ME - Shutter release button stuck Sandra Troubleshooting and Beginner Help 4 01-17-2017 08:38 AM
MG Repair- Release Button Falls Out JamesPocket Troubleshooting and Beginner Help 2 08-16-2014 06:56 AM
Linking ISO steps with EV steps kiwibird Pentax DSLR Discussion 21 01-03-2011 08:51 AM


All times are GMT -7. The time now is 10:50 PM. | See also: NikonForums.com, CanonForums.com part of our network of photo forums!
  • Red (Default)
  • Green
  • Gray
  • Dark
  • Dark Yellow
  • Dark Blue
  • Old Red
  • Old Green
  • Old Gray
  • Dial-Up Style
Hello! It's great to see you back on the forum! Have you considered joining the community?
register
Creating a FREE ACCOUNT takes under a minute, removes ads, and lets you post! [Dismiss]
Top