Forgot Password
Pentax Camera Forums Home
 

Reply
Show Printable Version 2 Likes Search this Thread
11-02-2015, 09:13 PM   #16
Loyal Site Supporter
Nakedgun's Avatar

Join Date: Apr 2014
Location: Southwest
Posts: 1,365
QuoteOriginally posted by Newtophotos Quote
This example couldn't be more telling. Do you mind sharing what strobe light you use?

Also, your rear gradient is amazing. Is the smooth transition from the white table to the background created just by having the transition far from the object being photographed? Is the background black poster board?

Guess he doesn't want to give it all away.

11-03-2015, 06:52 AM   #17
Veteran Member
Edgar_in_Indy's Avatar

Join Date: May 2010
Location: Indiana, USA
Photos: Gallery
Posts: 2,685
QuoteOriginally posted by Nakedgun Quote
Guess he doesn't want to give it all away.
LOL, I don't mind sharing! I've been meaning to get around to posting pics of my setup, so I'll try to do that today.

To answer the previous questions, the background is all white, and the gradient to black is achieved through lighting. My light source is an old Paul C. Buff White Lightning Ultra 600 that I basically got for free of Craigslist.
11-21-2015, 02:05 PM   #18
Veteran Member


Join Date: Aug 2013
Location: Chicago, IL
Posts: 439
Attached are two product photos of a M 100mm f/4 with which I tried using some of your advice Edgar. The background is black story board cardboard and the bottom is shiny pasteboard (although it's a little bent). These obviously aren't up to the level of your photos, is there anything you could suggest to make them better? In addition to having the setup on the floor next to some glass doors on a overcast day at 2 PM with snow providing extra daylight, I tried using a halogen lamp (third photo) I've used for painting in the past to provide extra light.

Do you have a aperture size you recommend to have all or most of a lens in focus while also having the background transition out-of-focus? As a follow-on question, how far do you keep your object from the transition from floor to rear wall to keep it just the right amount of out-of-focus?

---------- Post added 11-21-15 at 03:06 PM ----------

QuoteOriginally posted by Edgar_in_Indy Quote
LOL, I don't mind sharing! I've been meaning to get around to posting pics of my setup, so I'll try to do that today.

To answer the previous questions, the background is all white, and the gradient to black is achieved through lighting. My light source is an old Paul C. Buff White Lightning Ultra 600 that I basically got for free of Craigslist.
Thank you for sharing! It would've been understandable if you didn't want to share your methods as you've obviously worked to develop them.
Attached Images
View Picture EXIF
PENTAX K-30  Photo 
View Picture EXIF
PENTAX K-30  Photo 
View Picture EXIF
PENTAX K-30  Photo 

Last edited by Newtophotos; 11-21-2015 at 02:12 PM.
11-21-2015, 02:25 PM - 1 Like   #19
Veteran Member
Edgar_in_Indy's Avatar

Join Date: May 2010
Location: Indiana, USA
Photos: Gallery
Posts: 2,685
My setup is kind of a poor-man's DIY version of something like this Manfrotto table. (You can click the picture for a link to the table on B&H Photo.)


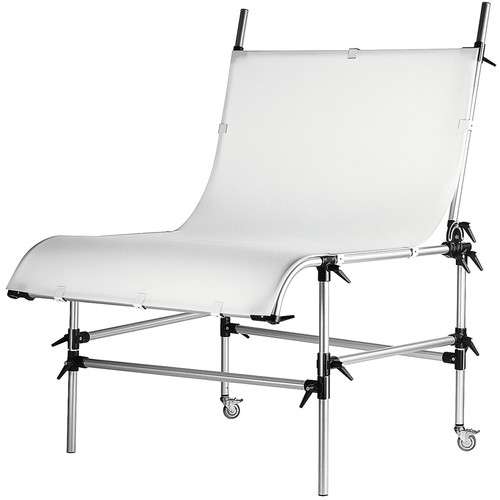
Just like this table, my background is all white. The fade-to-black effect is achieved simply by making my light directional, so it does not hit the background.

Although I've perfected my technique mostly through my own experimentation, I'm not doing anything that isn't already well-known, so I don't really have any trade secrets to maintain.

If you want to achieve a similar effect, you will need to rig up some kind of modifier for your light that directs the light onto the product, and blocks it from hitting the background. It will also help to get the light very close to the subject, and farther from the background. To achieve the black background, you will want to have the light as far from the backdrop as possible.

And since you are using a constant light, instead of a flash, you will need to have the room completely dark, except for that light. Otherwise, the ambient light will probably show up in your photo.

And with that light, instead of a strobe, I would also recommend using a tripod since you will need to have a slower shutter speed in order to keep your ISO levels down, and have your aperture closed down to give some more depth of field and better sharpness.

Strobes are easier to work with since they provide such a bright light that it overpowers any ambient light, and doesn't require a tripod or slow-shutter speed.


Last edited by Edgar_in_Indy; 11-21-2015 at 02:37 PM.
11-21-2015, 02:35 PM   #20
Veteran Member


Join Date: Dec 2010
Location: Ontario
Photos: Gallery
Posts: 3,332
A simple approach to product lighting with a background gradient is attached. The sweep on the backdrop/ground makes it fairly easy to adjust the gradient without re-positioning the top light by adjusting the curve or distance of the subject to the curve. Varying the height and angle of the light above the product can also vary the gradient. It's also important that this light isn't spilling light all over the place - you may need to flag it (with black cardboard) to keep light off the backdrop. Size and position of the reflectors in front will change the front lighting.

If you want a gradient, you don't want the backdrop and ground to be separate surfaces. It doesn't need to be a curved sweep - a large enough table will suffice, but a sweep can make adjustments easier and works well if you have limited space. With a table, you may also end up being limited to shooting from a higher angle, but if you can get the table edge (and the space behind) to fade into pure black, it can be workable (it can be tough to get the table edge to vanish, some editing may be needed).
Attached Images
 
11-21-2015, 02:47 PM   #21
Veteran Member
Edgar_in_Indy's Avatar

Join Date: May 2010
Location: Indiana, USA
Photos: Gallery
Posts: 2,685
Nice diagram!

When I'm trying to achieve a completely black background, I usually have my strobe to one side of the subject, and a reflector on the other side. That way, neither the strobe nor the reflector is directing light towards the background.

Adding a grid to my softbox made it so much easier to keep light from spilling onto the background.

I've never tried putting my main light behind the subject like how you show in your diagram, but then again, I only recently acquired a boom stand, so it would have been difficult to do before that. I may experiment with it.
11-21-2015, 02:55 PM   #22
Veteran Member


Join Date: Dec 2010
Location: Ontario
Photos: Gallery
Posts: 3,332
QuoteOriginally posted by Edgar_in_Indy Quote
Nice diagram!

When I'm trying to achieve a completely black background, I usually have my strobe to one side of the subject, and a reflector on the other side. That way, neither the strobe nor the reflector is directing light towards the background.

Adding a grid to my softbox made it so much easier to keep light from spilling onto the background.

I've never tried putting my main light behind the subject like how you show in your diagram, but then again, I only recently acquired a boom stand, so it would have been difficult to do before that. I may experiment with it.
You posted as I was typing:P. I often tape black cards to my awesome diy-softbox to control the spill for the poor mans barn-door kind of setup.

I didn't have a boom at the time of the santa picture, but it was a small enough little object that a light stand just to the right of the frame allowed my little softbox to be almost directly overhead. I now have a reflector holder/boom arm that makes things much easier, I'm sure you'll enjoy yours.

11-21-2015, 06:54 PM   #23
Veteran Member
Edgar_in_Indy's Avatar

Join Date: May 2010
Location: Indiana, USA
Photos: Gallery
Posts: 2,685
Ok, as promised (a long time ago!), here are some pictures of my setup.


The table is a folding cutting/craft table that I commandeered from my wife. It's nothing special, but here's a link to the table at Jo Ann's:

Sew Essentials Home Hobby Table | Jo-Ann

And here's a picture of the table from the side, so you can see my seemless surface. It's a sheet of thin/flexible plastic material I found at Lowe's. I have it attached to the table with clamps, and it's held onto the wall with three nails along the top edge. I can adjust the rise of the slope by moving the table closer to, or farther from, the wall.


I also stole my wife's pin-cushion to use as a test subject. Here's the setup, with my Paul C. Buff "White Lightening" Ultra 600 strobe to the right, and a folded piece of white cardboard to the left for a reflector. In the left side of the frame, you can also see my Yongnuo YN560-II speedlight mounted on the boom stand, with a small softbox attached. Although I'm not using it for this picture, it can come in handy for providing fill light or back-lighting.


And here's how the picture looks (you can click for the full-size version, to see how sharp everything turns out):


I usually use the reflector, but depending on what I'm photographing, and the look I'm going for, I sometimes move it farther back, or do not use it at all. Here's another picture of the pin cushion, this time without the reflector:


And finally, here's a picture showing the grid that I have installed in my softbox. The grid was a little pricier than you might expect, but it was well worth it, since it makes it much easier for me to control my light for these kinds of shots.

11-21-2015, 08:32 PM   #24
Loyal Site Supporter
Nakedgun's Avatar

Join Date: Apr 2014
Location: Southwest
Posts: 1,365
Brian & Edgar,

Thanks for sharing. Most helpful.
11-21-2015, 09:12 PM   #25
Pentaxian
sherrvonne's Avatar

Join Date: Jan 2014
Location: Texas
Photos: Gallery | Albums
Posts: 1,975
Original Poster
You could not of posted that at a better time. Thanks. May I ask which lens you are prefering for the product photography? I had followed your previous instructions and am still practicing. I have people asking me to help them photograph their products but I know I have a lot to learn.
11-21-2015, 09:29 PM   #26
Veteran Member


Join Date: Aug 2013
Location: Chicago, IL
Posts: 439
BrianR and Edgar your photos and setups are very impressive. Edgar thanks for all the shots of your setup. I think I see a rocket-air peaking out; do you use that to clean any specs of dust off objects?

I tired to copy both of your setups. I used my 20" by 28" poster board in portrait layout (to avoid the break between the horizontal and rear surface), a rigid board to act as reflector, and camera and light on their tripods. I wrapped poster board around the halogen light to act similar to your soft box. I had to take it off before taking the picture of the setup as it started smelling like burning! It helped create the dark background on one side. I suspect I need a longer back surface like you both have.

How do you keep an object from rolling around? I tried using clear packing tape but this doesn't work too well as you can see it in the images and it has a tendency to damage the poster board

Forgive my ignorance, if that light is a strobe does it flash on/off?

For the life of me I can't figure out how to make the setup photo upright! It was taken with an older iPhone.

---------- Post added 11-21-15 at 10:34 PM ----------

QuoteOriginally posted by sherrvonne Quote
You could not of posted that at a better time. Thanks. May I ask which lens you are prefering for the product photography? I had followed your previous instructions and am still practicing. I have people asking me to help them photograph their products but I know I have a lot to learn.
Good question Sherrvonne.

Edgar: Do you find a telephoto (like your 85mm) provides a better perspective? I notice you don't use any Pentax lenses!
Attached Images
View Picture EXIF
PENTAX K-30  Photo 
View Picture EXIF
IPhone 5s  Photo 
11-21-2015, 10:20 PM   #27
Veteran Member


Join Date: Dec 2010
Location: Ontario
Photos: Gallery
Posts: 3,332
QuoteOriginally posted by Newtophotos Quote
I tired to copy both of your setups. I used my 20" by 28" poster board in portrait layout (to avoid the break between the horizontal and rear surface), a rigid board to act as reflector, and camera and light on their tripods. I wrapped poster board around the halogen light to act similar to your soft box. I had to take it off before taking the picture of the setup as it started smelling like burning! It helped create the dark background on one side. I suspect I need a longer back surface like you both have.
I mostly use little flashes, but I've also used desklamps with standard CFL bulbs (to avoid white balance issues, it's usually easiest to use identical bulbs if you have more than one light). CFL bulbs are are not nearly as hot as your halogens and you can use parchment paper or even standard copy paper as a diffuser without lighting anything on fire. Longer exposure times shouldn't be a huge issue with a tripod + timer.

A longer surface definitely helps, but you can manage tight spaces if you can control where your light is going. You can reduce the spill of the light on the background by placing a black piece of cardboard or foamcore between your light and the background, you may want to do the same thing on your reflector side too.

QuoteOriginally posted by Newtophotos Quote
How do you keep an object from rolling around? I tried using clear packing tape but this doesn't work too well as you can see it in the images and it has a tendency to damage the poster board
Assuming your table is relatively level, it shouldn't take much to stop the lens from rolling (use a spirit level and sugar packets under the table legs if necessary). Cut a rubber band into two pieces and make a discrete little trough to put the lens on. Or work with the slant and shoot downhill with something wedged behind the lens (make absolutely sure it can't roll of the table). Or use the lens caps as part of the photo, balancing the lens on the rear cap is pretty standard practice.

QuoteOriginally posted by Newtophotos Quote
Forgive my ignorance, if that light is a strobe does it flash on/off?
If you mean like a disco light, then no (though it may have a mode like that for stroboscopic photos of moving things). Think of it like a large, beefed up version of the flash built into your camera (with a few other whiz bang features).

QuoteOriginally posted by Newtophotos Quote
Edgar: Do you find a telephoto (like your 85mm) provides a better perspective? I notice you don't use any Pentax lenses!
For indoor mini studio stuff, I usually use a 100mm or 50mm. Longer focal lengths let you get away with a smaller background, but too long and you start running out of room to backup.
11-22-2015, 05:18 AM   #28
Veteran Member
Edgar_in_Indy's Avatar

Join Date: May 2010
Location: Indiana, USA
Photos: Gallery
Posts: 2,685
Yes, I use the rocket blower to remove dust from objects I'm photographing, and from the surface. Dust can be magnified with this kind of lighting with such detailed pictures, so when I'm photographing something I usually wipe it down and then use the blower. The blower also comes in handy for sensor cleaning, since shooting at small apertures makes it easier to see dust blobs on the sensor.


Terminology for flashes can be a little confusing for new users since there are several different names that people use.

The kind of flash that goes onto your camera and uses batteries is usually called a Speed Light (or Speedlite, borrowed from Canon's marketing name, kind of like calling any cola a "coke"), but they can also be called flash guns or hot-shoe flashes, or just flash.

The larger flashes that are used in a studio and plug into the wall are often called strobes or studio strobes or studio flashes. They are also frequently referred to as "monolights", since they contain the power pack and flash head all in one unit. You can also buy studio flashes that have the power pack separate, with flash heads plugging into the pack. But monolight strobes seem to be much more common these days...especially for someone who is only using one or two strobes.

If somebody is going to be doing much product photography, I would definitely recommend buying a strobe. It makes things, much much easier. And you can get a basic strobe for $200 or less, especially if you don't mind buying used.


The lens I use most frequently in the studio is the Tamron 28-75mm f/2.8, and I"m usually at the telephoto end. The reason you want to use a telephoto is because your angle of view is more narrow. A narrow angle of view allows you to fill more of your frame with the subject, while capturing less background. So you are able to get away with using a smaller area without capturing the edges of your photo area. As Brian pointed out, you have to have some space to back up, but with small objects that should not be much of a problem. I will even use my Sigma 50-150mm f/2.8 sometimes, when I want an even narrower angle of view.

The other nice thing about the Tamron is that it has a very close focusing distance. Not as close as a true macro, but much closer than most lenses. I used my Sigma 85mm in the test pictures, but that's only because my Tamron recently broke after years of use and tens of thousands of photos. The Sigma is a superb lens, but it's minimum focus distance is much farther than the Tamron.

I have been hesitant to replace the Tamron, since I've started building up my micro 4/3 lens collection, and I'm thinking of switching from APS-C all together. But it I were to replace it, I would probably look at the Sigma 17-70mm or another Tamron 28-75mm since they both focus very closely and are very sharp.

The Pentax 16-85mm would also be a good option, but it is more expensive than the other two options without much of a benefit in a studio situation. But if somebody already had the 16-85mm as a walk-around lens, it would also make a great studio lens. But the Sigma 17-70mm has great image quality, and focuses quite a bit closer than the Pentax, and is a good bit cheaper, so that's probably the way I would go.


And this kind of goes to your question of why I don't have any Pentax lenses. I've had some in the past, but for my purposes, I have found that 3rd-party lenses provide a better value. Pentax does have some very nice lenses though. I'm actually looking at the Pentax 10-17mm fisheye lens to add to my collection. It's a very good lens that is rather unique.

Last edited by Edgar_in_Indy; 11-22-2015 at 05:24 AM.
12-04-2015, 06:14 PM   #29
Veteran Member


Join Date: Aug 2013
Location: Chicago, IL
Posts: 439
Thank you both for all your great advice!
12-04-2015, 06:23 PM   #30
Veteran Member
Edgar_in_Indy's Avatar

Join Date: May 2010
Location: Indiana, USA
Photos: Gallery
Posts: 2,685
You're welcome!

I bought a set of colored gels on Amazon today for my speedlight, so I'm going to have fun experimenting with throwing some different colors on the background.
Reply

Bookmarks
  • Submit Thread to Facebook Facebook
  • Submit Thread to Twitter Twitter
  • Submit Thread to Digg Digg
Tags - Make this thread easier to find by adding keywords to it!
background, board, box, diffuser, edgar, flash, lamp, light, lighting, lights, lots, photo studio, photos, pm, post, poster, product photos, setup, sheet, strobist, surface, table, tent, thanks, type

Similar Threads
Thread Thread Starter Forum Replies Last Post
Advice for product photography schnitzer79 Photographic Industry and Professionals 6 12-16-2014 02:55 AM
Best lens for small product photography? Mirrie Dancer Pentax SLR Lens Discussion 34 07-02-2014 08:45 AM
Product Photography and ability to "live view" on a computer _Bergman_ Pentax K-30 & K-50 20 03-15-2013 05:19 AM
Product photography lenses Tony3d Pentax SLR Lens Discussion 11 03-24-2010 10:45 AM
Product photography - a lit torch George Lama Photographic Technique 2 01-04-2009 08:01 PM


All times are GMT -7. The time now is 06:35 PM. | See also: NikonForums.com, CanonForums.com part of our network of photo forums!
  • Red (Default)
  • Green
  • Gray
  • Dark
  • Dark Yellow
  • Dark Blue
  • Old Red
  • Old Green
  • Old Gray
  • Dial-Up Style
Hello! It's great to see you back on the forum! Have you considered joining the community?
register
Creating a FREE ACCOUNT takes under a minute, removes ads, and lets you post! [Dismiss]
Top