Forgot Password
Pentax Camera Forums Home
 

Reply
Show Printable Version 8 Likes Search this Thread
03-22-2018, 05:01 PM   #16
Site Supporter
Site Supporter
jlstrawman's Avatar

Join Date: Feb 2010
Location: Midwest US
Photos: Gallery
Posts: 1,058

Staff note: This post may contain affiliate links, which means Pentax Forums may earn a small commission if a visitor clicks through and makes a purchase. If you would like to support the forum directly, you may also make a donation here.


Make your own for a whole lot cheaper.

03-22-2018, 05:10 PM   #17
Site Supporter
Site Supporter


Join Date: Aug 2010
Posts: 107
Original Poster
I think Im off to the dollar store, seems like an easy DIY project.
03-22-2018, 05:21 PM - 1 Like   #18
Pentaxian


Join Date: May 2016
Photos: Gallery
Posts: 3,725
QuoteOriginally posted by SpecialK Quote
a hand held paper towel reflector
I use a paper towel looped vertically around the flash head, attached on either side with a bit of tape. Makes a reasonable flash diffuser for macro, I've seen others around here use a paper cup to similar effect.

03-22-2018, 09:13 PM - 2 Likes   #19
Loyal Site Supporter


Join Date: May 2007
Location: Flagstaff, Arizona
Posts: 1,637
PVC tubing and remnant cloths can be your friends!

Here are a couple of shots of my setup in my bathroom for shooting Ebay product photos:


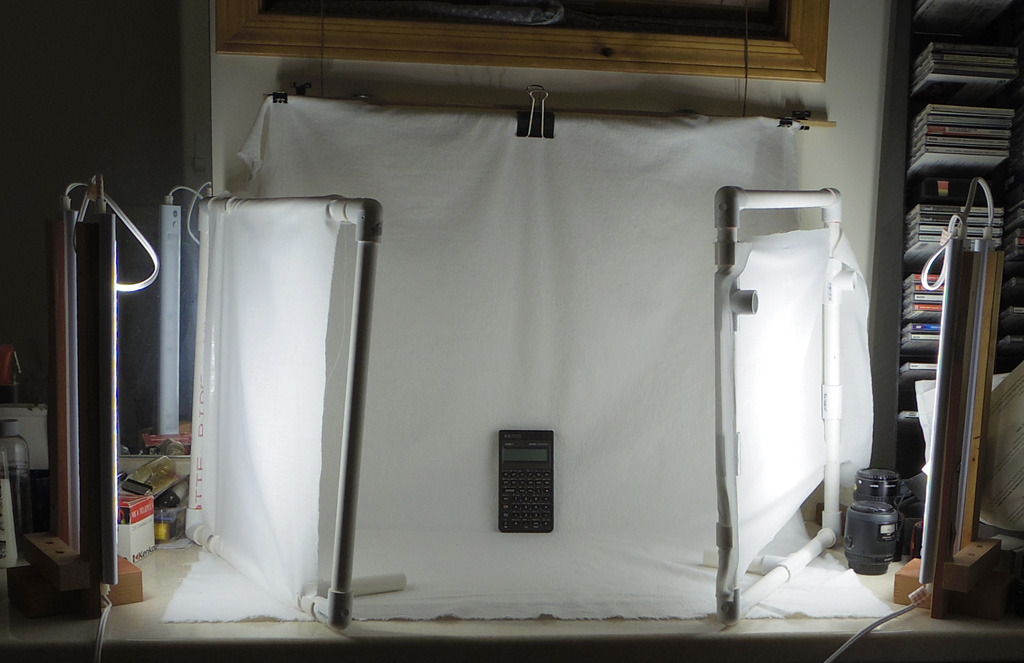
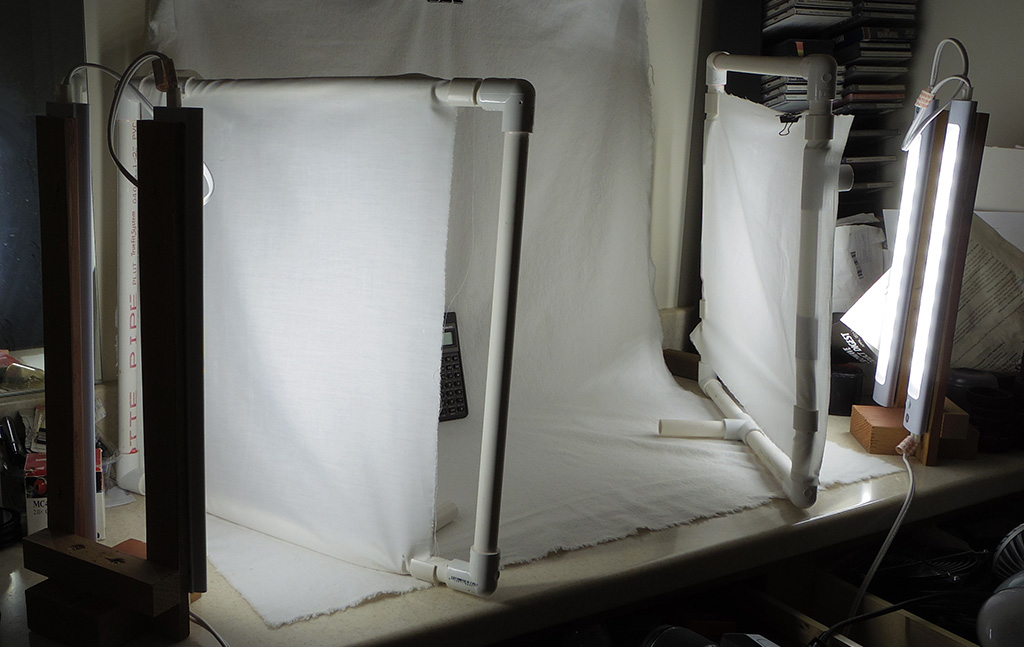
The frames are made from PVC tubing and couplers available at Home Depot (and other hardware stores, I’m sure) for a few bucks. The lights are GE LED kitchen lights, mounted on wood. (These are probably the most expensive part of this set up - they were around $20/pair on Ebay.) Almost any other lights will work, too. The cloth diffusers are remnant pieces you can find for 50 cents to a buck at Michaels/JoAnnes/Walmart. I made some clips from other pieces of PVC to hold them in place, but tape works well, too.

As others have noted, the background is a piece of cloth (another remnant may well work here, too), hanging from a towel rack here. Pick up various colors to make backgrounds that suit a particular item. I have black, grey, white, pale blue, and pale yellow. Some items display better when placed on little support stands (blocks of wood, books, etc.) a few inches high that can go under the cloth.

THE FARTHER AWAY YOU KEEP THE LIGHTS FROM THE CLOTH DIFFUSERS, THE SOFTER (MORE UNIFORM) YOUR LIGHTING WILL BE. More extended light sources help with this, too - that’s why I’ve used the double light strips. Put your diffusers at an angle of around 45 degrees with respect to the background. Sometimes, even more front-on lighting will work best.

You need a tripod! Since you are shooting stationary objects, long exposures are not a problem, so if the light winds up being rather faint after diffusion, don’t worry if your exposure times are a second or so. Use the 2 second delay mode to avoid camera shake.

MAKE SURE YOUR WHITE BALANCE IS CORRECT!! If you don’t know how to do a custom white balance, now is the time to learn. As long as your lighting doesn’t change, you can store the WB in one of the custom slots and come back to it whenever you are shooting in your “studio.”

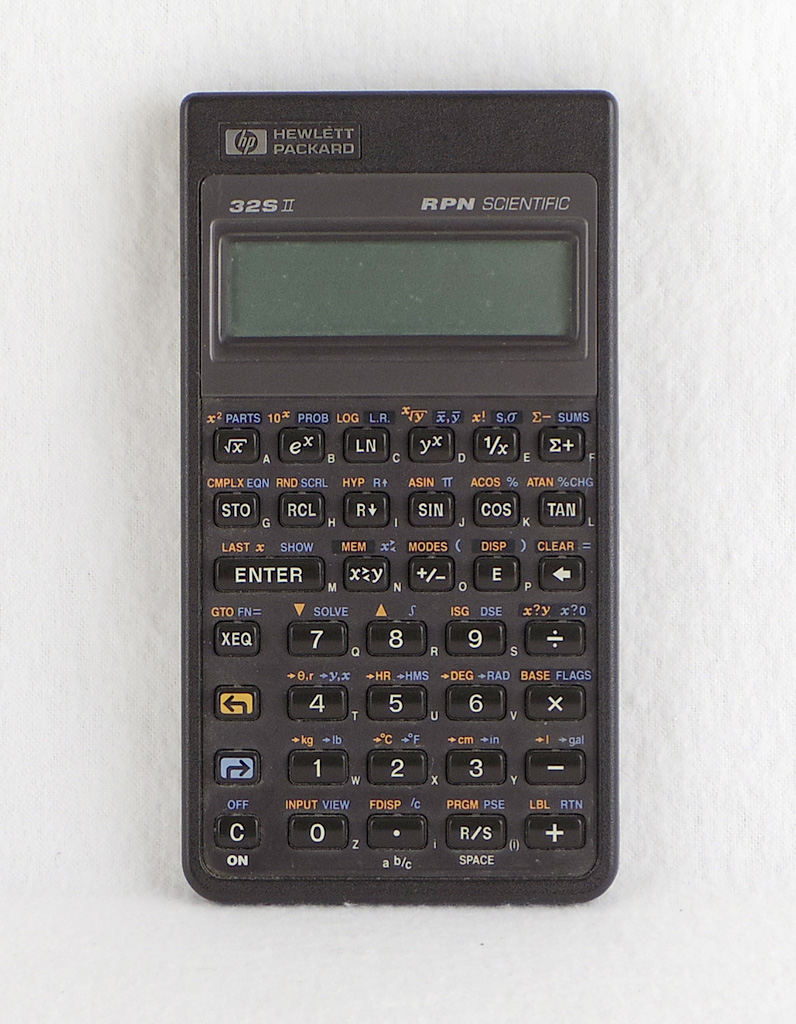
Lastly, here’s a shot of one of my calculators (as an astronomer, scientific calculations are near and dear to my heart!) taken with this setup, showing how uniform the lighting is - note the minimal shadowing around the edges. I made some feeble effort to brush off any dust - you will find brushes and air blowers necessary for getting your objects free of contamination. You will be surprised how dusty almost any room can be. You can clean your objects first, or spend a lot of time in post!


Last edited by AstroDave; 03-22-2018 at 09:16 PM. Reason: fix image links
03-23-2018, 10:09 AM   #20
Loyal Site Supporter
UncleVanya's Avatar

Join Date: Jul 2014
Photos: Gallery | Albums
Posts: 28,404
03-23-2018, 10:21 AM   #21
Site Supporter
Site Supporter


Join Date: Aug 2010
Posts: 107
Original Poster
Thanks, those last two were also very helpfull. I might not even need the flashes I have.
03-23-2018, 10:34 AM   #22
Loyal Site Supporter
UncleVanya's Avatar

Join Date: Jul 2014
Photos: Gallery | Albums
Posts: 28,404
QuoteOriginally posted by mapguy Quote
Thanks, those last two were also very helpfull. I might not even need the flashes I have.
In theory you can leave out the constant source lights and use the flashes - which is fine with the diffusion but focusing may be harder. You could also combine flash and constant source if you can get the color cast correct.

Reply

Bookmarks
  • Submit Thread to Facebook Facebook
  • Submit Thread to Twitter Twitter
  • Submit Thread to Digg Digg
Tags - Make this thread easier to find by adding keywords to it!
backdrop for product, camera, flash, lighting, lot, photo studio, pictures, project, setup, strobist, stuff

Similar Threads
Thread Thread Starter Forum Replies Last Post
Help with backdrop in garage/studio sebas77 Flashes, Lighting, and Studio 2 03-11-2018 04:38 PM
Studio backdrop. Culture Flashes, Lighting, and Studio 9 02-24-2017 01:51 AM
Home studio backdrop - what do you use and recommend? Tommy Flashes, Lighting, and Studio 9 11-25-2016 09:59 PM
Floating "Product" shots? Favorite techniques? BrianR Photographic Technique 2 08-28-2016 06:51 PM
Trashy Studio Lighting/Backdrop on a Budget - decent results! Ryan Trevisol Photographic Technique 3 06-22-2011 07:49 PM


All times are GMT -7. The time now is 03:36 PM. | See also: NikonForums.com, CanonForums.com part of our network of photo forums!
  • Red (Default)
  • Green
  • Gray
  • Dark
  • Dark Yellow
  • Dark Blue
  • Old Red
  • Old Green
  • Old Gray
  • Dial-Up Style
Hello! It's great to see you back on the forum! Have you considered joining the community?
register
Creating a FREE ACCOUNT takes under a minute, removes ads, and lets you post! [Dismiss]
Top