 Originally posted by THoog
Here's my take on this image: (Googlish in blue, my version in black)
Left side:
провода отвалились после 5 загибаний !!!
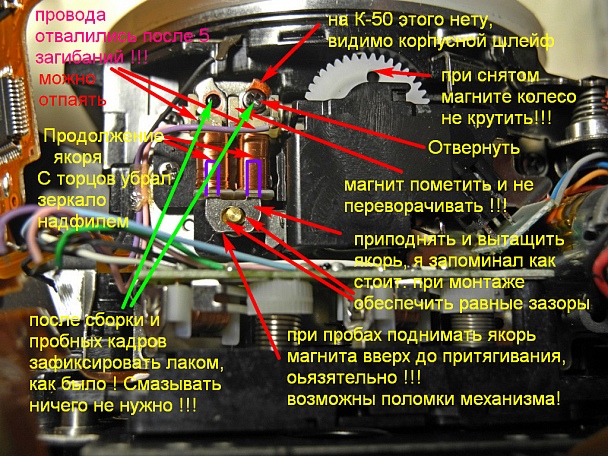
wires have fallen off after 5 bending !!!
можно отпаять
You can unsolder
(Pink and purple wires may break off - unsolder them before removing the armature)
(red arrows pointing to purple boxes indicating armature arms)
Продолжение якоря
Extension anchor
С торцов убрал зеркало надфилем
With the anchor ends removed mirror needle files
(This is the armature or "anchor". Remove the armature and polish it - but which sides?)
All ends. Earlier I thought they were referring to the part that's facing in the picture, but I think they are referring to the two ends that are inside the magnet.
(green arrows)
после сборки и пробных кадров зафиксировать лаком, как было ! Смазывать ничего не нужно !!!
after assembly and trial images with lacquer , as it was ! grease do not need anything !!!
(After reassembly and testing, fix the armature in place with nail polish or locktite. Do not use any lubricant.)
Right side:
на K-50 этого нету, видимо корпусной шлейф
on K- 50 that is not present, apparently housing trail
(Apparently, the mounting in the K-50 is slightly different from the picture)
(arrorw to white gear)
при снятом магните колесо не крутить !!!
when removed magnet wheel do not twist !!!
(Do NOT turn the gear with the actuator removed!)
Отвернуть
Unscrew
(To remove the actuator, you will have to break the lacquer seals and remove the screw)
магнит пометить и не переворачивать !!!
Magnet mark and turn !!!
(I think Google omitted a 'NOT' here - Note the correct position of the actuator and do not turn over)
Correct.
(arrows to either side of the brass pin)
приподнять и вытащить якорь, я запоминал как стоит. при монтаже обеспечить равные зазоры
lift and pull out anchor, I remembered how worth . mounting ensure equal gaps
(Lift and remove armature. Note position and when reassembling, align correctly with equal spacing.)
при пробах поднимать якорь магнита вверх до притягивания, оьязятельно !!! возможны поломки механизма!
when samples raise anchor magnet to pull up , oyazyatelno!!! possible failure mechanism !
(This one worries me, but I think it is: When testing, be SURE to lift up the actuator to avoid possible damage to the mechanism!)
You are right: When testing, be sure to lift armature until it sticks to the magnet to avoid possible damage.
---------- Post added 05-26-16 at 09:11 AM ----------
Here is the step by step process with photographs from here:
???????? ? ?30! - ?????? ?????-????? - ???????? 7
1.Remove bottom cover
2.Remove all screws from the top and front cover
3.Put the camera body with LCD screen down
4.Carefully move the top cover up
5.Put the AF.S/С/MF switch into any extreme position and remeber which position it is
6.Carefully remove the front cover - it sits tightly on the mount
7.Holding the mount, remove the screw that holds the magnet (screwdriver can only be inserted at an angle because of the battery compartment and I didn't feel like removing it). Apply little yet sufficient force not to break the pins or anything else
8.Using a blade, carefully remove the magnet. In addition to the screw, it is attached by laquer as well
9.Holding the magnet, remove armature arms
10.(Translator's comment: the original fix involved putting armature arms into a vise so that ends of arms are in line with the lips of the vise) . If you don't have access to a vise, put a file on a flat surface and holding armature arms make a couple of passes to remove the polished surface at the ends of the arms
11.Use fine sanding paper to remove burr at the edges of the armature
12.Wipe armature to remove any possible metal dust from the surfaces
13.Using tweezers, wash armature arms in alcohol, wait till it dries, and put them back in.
14.Attach the magnet using the screw and add a drop of nail polish on the pin and the strew
15.Carefully put the front cover on the mount and make sure the AF.S/С/MF switch is in the correct position by going through all three possible positions of the switch (AF.S, AF.C, and MF)
16. Put the covers back on
---------- Post added 05-26-16 at 09:12 AM ----------
Originally posted by JoseFF I think Goodman had good results that lasted. What was his solution?
That was Goodman's solution, which is actually a documentation of the storvn73 solution.


 Post #572 by Will in Seattle
 Similar Threads


