| Pentax/Camera Marketplace |
| Pentax Items for Sale |
| Wanted Pentax Items |
| Pentax Deals |
| Deal Finder & Price Alerts |
| Price Watch Forum |
| My Marketplace Activity |
| List a New Item |
| Get seller access! |
| Pentax Stores |
| Pentax Retailer Map |
| Pentax Photos |
| Sample Photo Search |
| Recent Photo Mosaic |
| Today's Photos |
| Free Photo Storage |
| Member Photo Albums |
| User Photo Gallery |
| Exclusive Gallery |
| Photo Community |
| Photo Sharing Forum |
| Critique Forum |
| Official Photo Contests |
| World Pentax Day Gallery |
| World Pentax Day Photo Map |
| Pentax Resources |
| Articles and Tutorials |
| Member-Submitted Articles |
| Recommended Gear |
| Firmware Update Guide |
| Firmware Updates |
| Pentax News |
| Pentax Lens Databases |
| Pentax Lens Reviews |
| Pentax Lens Search |
| Third-Party Lens Reviews |
| Lens Compatibility |
| Pentax Serial Number Database |
| In-Depth Reviews |
| SLR Lens Forum |
| Sample Photo Archive |
| Forum Discussions |
| New Posts |
| Today's Threads |
| Photo Threads |
| Recent Photo Mosaic |
| Recent Updates |
| Today's Photos |
| Quick Searches |
| Unanswered Threads |
| Recently Liked Posts |
| Forum RSS Feed |
| Go to Page... |
PentaxForums.com → Digital Cameras → DSLR-Specific Forums → Pentax K-30 & K-50
→
Manual solenoid replacement Pentax K30 / Discharge flash-condenser / Solenoid choice
 |
| 107 Likes | Search this Thread |
| 03-24-2019, 07:31 AM - 24 Likes | #1 |
| Manual solenoid change Pentax K30/50/500 +discharge flash-capacitor+correct solenoid Solenoid replacement: Pentax K-30 K-50 + K-500 (K-S1 Repairmanual you find HERE , K-S2 and K-70 are pretty similar to K30/50!) Tools: - 1x Precision soldering iron with pencil-tip. (No butan-gas soldering-pen: Too hot!) - 1x Screwdriver JIS 000 or PH00 + PH000 (JIS is better, Pentax screws are JIS!) - 1x Tweezers or precision pliers - Headlamp is useful! - Photos of all sides of K30/50/500 Preparation: Print out the photos with the location of the screws, glue them on cardboard and drill 1.5 - 2mm holes where the screws are located. Thus you can place all of the screws into those holes because they are of different length:  Magnetize the tip of your screwdriver (there is no danger to the camera!) so the screws "stick"to the tip of the screwdriver. Make sure the body-cap covers the opening of the lens-mount for protection of the sensor etc.! Take the battery out and open the pop-up flash. Attention: Be careful that you don't charge the flash-condenser, you should anyway discharge it later on (or at least don't touch it) This black condenser is situated left to the AF/C/M- switch. The Plus (+) contact is to the front, minus (-)sits behind. The danger isn't in touching the Plus-contact but in touching the circuit-board above: On the photo you see the blue wire which carries the high voltage of the flash-condenser!  Discharge of the flash-condenser: Best done with an old fashioned wolfram-filament ca. 60W light-bulb (or a 1 - 1,6 k ohms/10W resistor). A Light-bulb is better because you see the discharge! Solder some insulated wires directly onto the light bulb or on a lamp-socket and insulate any contacts! Have the other ends of the wires 0.5 cm bare (soldered). With one of those wire-ends you touch the metal K-bayonet (which is minus) and with the other end, you touch the front contact ofthe flash-condenser (Remember, this goes for the K30/50/500! For other Pentax DSLR make sure you identify which contacts are plus and minus!) The light bulb will illuminate until the condenser is discharged. The other option is to remove the battery and leave the camera without it for at least 48 hours. The condenser will discharge within that time. The photo shows how I discharge the condenser: I use measuring cables because I do it more often.  Sequence of opening the body: (Body-cap on the body!) 1. Remove all screws from the bottom part. Do not forget the long silver screw inside of the battery compartment! When the bottom-part is off, you can see one small screw next to the grey battery holder, it belongs to the frontpart. Take that one off as well and make sure you dont forget this one later!  2. Remove the screws which hold the front part: There are 3 screws on the left side: 2 of them hidden underneath the rubber. On this side you remove the rubber completly, otherwise the USB-cap will be stuck:  And there are 2 screws on the right (grip-) side, the upper one hidden as well, you just partly remove the rubber here so you get this one out:  3. Take all screws of the top part: 1 screw on each side where you fix the strap and 3 screws unterneath the pop-up-flash (which you opened without battery, remember!).The K50/500 has only 2 screws here)  and then 2 screws on the backside behind the rubber-eyepiece:  You have to lift the top part slightly so it doesn't hold the front-part anymore. But don't lift it off completely! This lifting of about 1 cm is important because otherwise you will find it more difficult assembling the front part back into its position and thus adjusting the external part of the AF.S-C-M-switch to its internal counterpart! Also you have much better access to the left pink wire on the solenoid. But if it happens that you lifted the top part off completely then just be very careful: There are critical wires and one flat ribbon wire which can easily get damaged. 4. Lift the front-part off. Have the AF-switch on position AF.S = upwards but ..the inner counterpart opposite = downwards and check this again before you later place the front part back into its position! In almost every K-30/50 etc. repaired by myself I found that this inner part moves, doesn't stay in the AF.S-position. So this is check is very important! In AF.S position the screw-drive-mechanism pushes through that tiny hole in the bayonet to drive the AF of the lens! In C-position as well. In M-position it moves back, so the lens is in manual position. Best to move the AF switch a few times to understand its function! The AF.S-C/M-switch in AF.S-position: 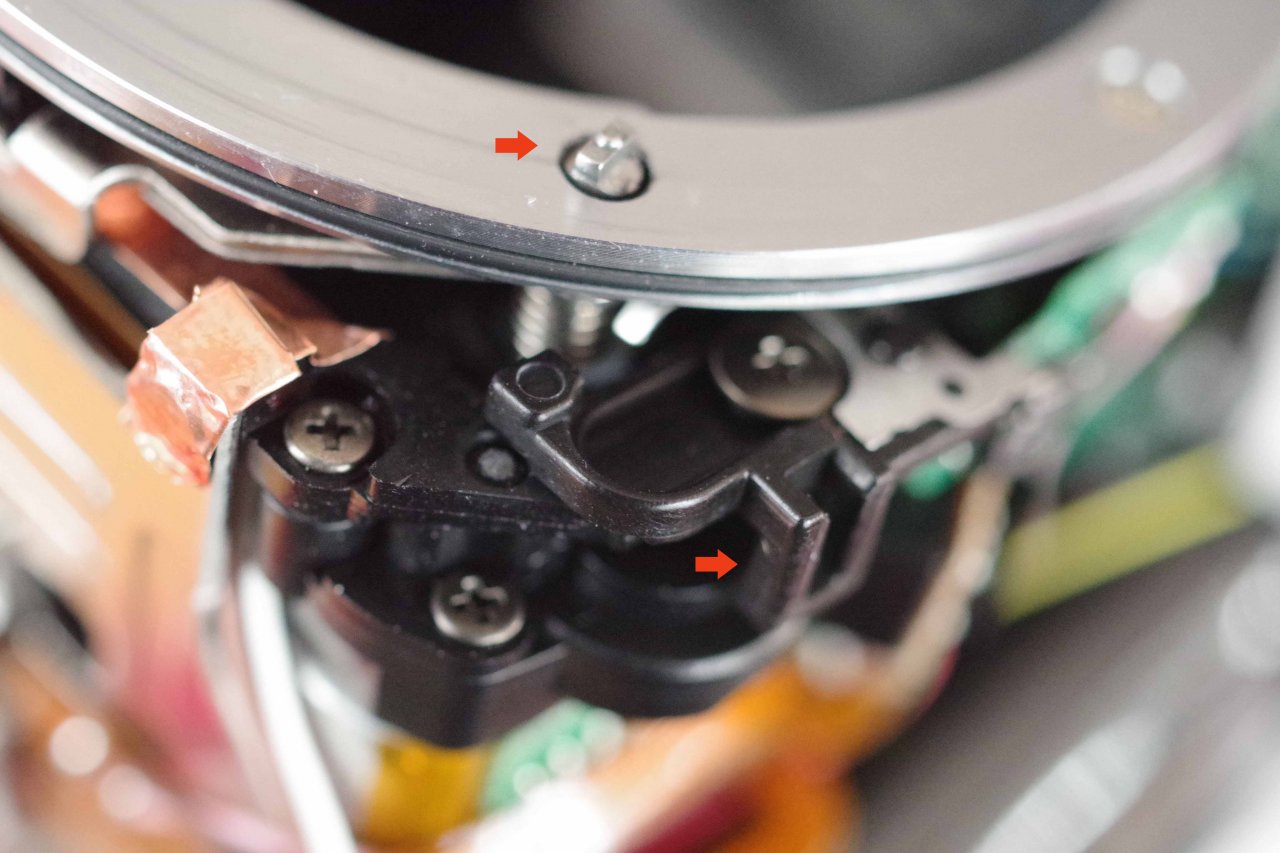 You can clearly see, the screwdrive-mechanism extents out of the small hole! Here the inner side of the external part of the AF.S/C/M-switch:: The metal rod has to fit exactly onto the inner part of the switch! If you follow the steps as explained nothing to worry about! 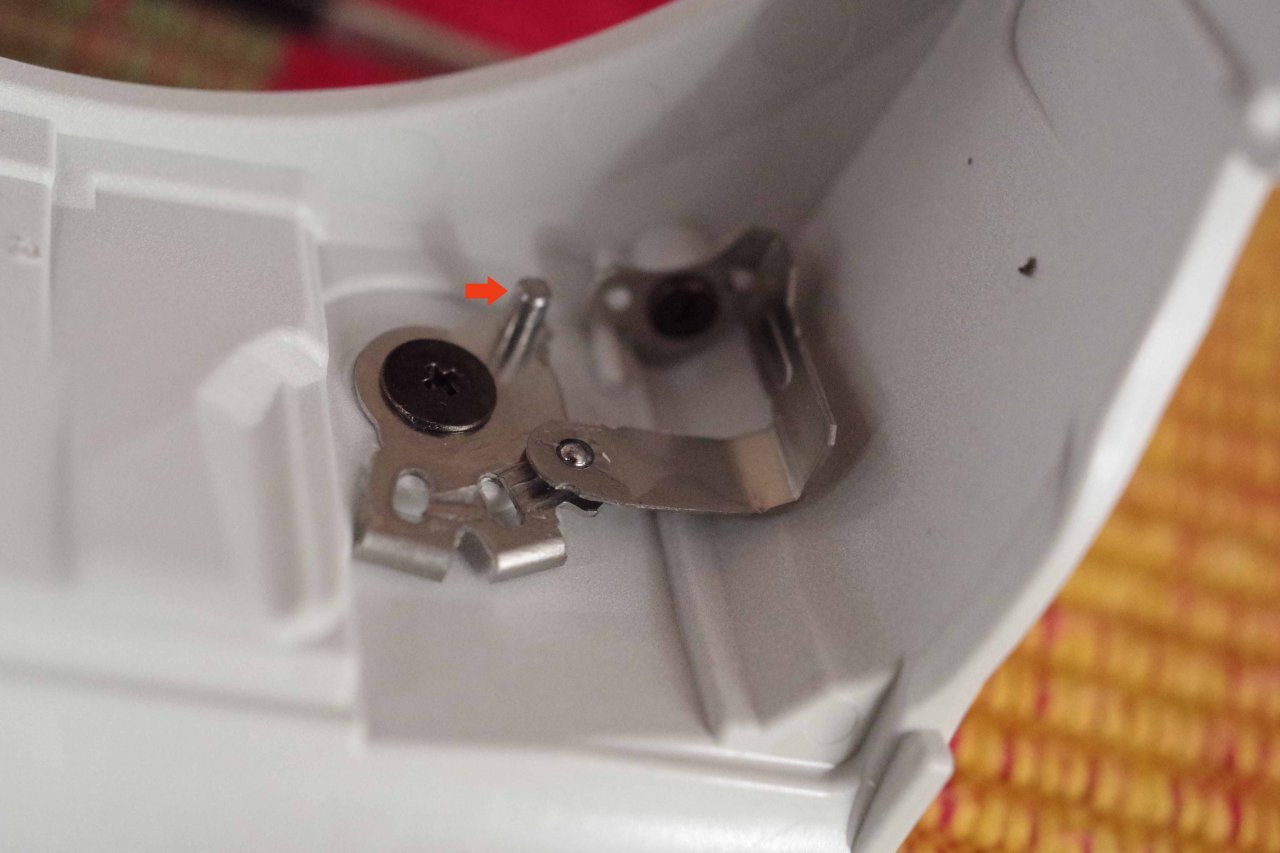 Below this rod you can see also this tiny ball which stops in those 3 different positions AF.S/C/M. Make sure you don't lose it (it sits there pretty well jammed, so very unlikely to go lose) Exchange of Solenoid: Place the body on a soft tissue with the LCD-display downwards, the side of the grip facing towards yourself. Now you have a good view on to the solenoid itself (and a headlamp would be useful!).  a) Unsolder the two wires (pink and lilac) off the solenoid. With the pliers, you hold the wire, then a short contact with the tip of the hot soldering iron. Not too long because you don't want to melt the PET plastic of the green solenoid nor later the PTFE of the white solenoid! b) Unscrew the solenoid. The solenoid is fixed with a tiny screw on the right, left to it it sits on a plastic mandrel. It is fixed as well with red thread-locking-lacquer. On the bottom you can see the plunger which sits on the metal lever. - With a very small flat screwdriver, you go behind the metal top part of the solenoid to get it loose. - Then you grap it with tweezers on the top metal-body and tilt it forward and take the plunger off the lever it sits on. - Don't touch the 2 coils, the copperwire is sensitive! You've got the green gremlin out. You can see very clearly one of the reasons it works bad: The two coils are not parallel but the plunger has to move within those 2 coils:  c) Now place a tiny amount of solder onto the ends of those two (pink and lilac) wires which have to be soldered back onto the pins of the new solenoid. d) Built in the white solenoid. Place it first with the plunger onto the lever (green arrow) and make sure the solenoid sits on this plastic mandrel (small red arrow):  e) Carefully insert the tiny screw and tighten it:  You can add some thread-locking-lacquer as well or just use some nail-varnish. Solder the wires back on. - Make sure each time you solder, you clean the tip of our soldering-iron first, you don't want to bring burned carbon residue into the melted solder. - Make sure as well, that the solder really melts, don't just "glue" it, solder it! Solder has to "flow"! - Make sure that the wires and particular the left pink wire are soldered onto the pins from the left side and not from the front. There is very little space for the wires as soon as the top-part is placed back on its place:  - Then check that the wires are tight. For this you hold the wire with tweezers and pull gently. It must hold well! (If necessary google how to solder) - Now bring first the front-part back into position! Make sure you have the external part of the AF.S/M-switch on AF.S and the inner counterpart downwards so the screwdrive-mechanism is extended! - Only then* push the top part of the camera back into its position and fix it with 2 of its screws! *If you would start with the top-part as many show on their videos, you have to jam the frontpart in with the risk of badly squeezing the wires! You want to avoid this! Function-Test: Close the flash! Put the battery into the battery-compartment, plug an AF lens onto the body, switch your Pentax on and take some pictures with a low aperture value (such as f2, 2,8, 3,5 or even lower depending on your lens). You can see the solenoid in action each time you take a photo. Check again that the AF.S-C-M switch works! (If not, the alignement wasn't done proberly, easy to fix now, you don't want to find out a bad alignment after you assembled the complete body! Take the lens off, battery out and then open the pop-up flash again so you can screw the 3 (2 for the K50/500) screws there back in and continue with all the other screws. Don't forget the tiny screw next to the batterylever and the long screw inside the battery-compartment!   If it's the K50/500 you repair, take care as well with the rubberdoor which closes the USB-connector:   Part II: How to chose the right solenoid? Several approaches have been tried, such as: 1. Exchange of the solenoid with the white colored "made in Japan" solenoid used in early DSLR bodies (the only real way!) 2. Exchange with the green colored "made in China" solenoid to be found cheaply on evilBay (Repeating error) 3. Sanding/filing the plunger of the existing solenoid not such a good idea 4. Soldering the plunger of the existing solenoid: very bad idea 5. Selecting solenoids from CD/DVD-ROM drives. very bad idea 1. This is after all the only long term satisfying method. All solenoids which were made in Japan have worked for long times and there were no reported issues that one of them ever failed. They were already used in old analog SLR bodies (with minor differences and sometimes opposite polarization) as well as in the earlier Pentax DSLR bodies such as: *ist D, *ist DS (Samsung GX1), *ist DS2(Samsung GX1s), K100D, K110D, K200D, K-m (2000), K-x, K-r (all those have 2 solenoids built in: One in the aperture circuit, one in the flash circuit). The made in Japan solenoid was also used in the K10D (Samsung GX10) and K20D(Samsung GX20). High shutter count was achieved with them and never any reported solenoid failure. Those were then the cream-of-the-crop! The body of the green made in China solenoid is made out of PET. The white made in Japan solenoid uses PTFE (Teflon), a superior and much longer lasting material. The green solenoid was first sometimes applied in the flash compartment of some (not all!) Pentax K100D, K110D, K200D, K-m, K-x and K-r (it seems mostly Europe). The first body with the green solenoid used in the aperture-circuit was the Pentax K30. It was the K30, followed by the K50 and K500 which stirred up users because of pictures almost completely dark i.e. underexposed: The reason was the plunger of the solenoid remaining stuck to the hold of the permanent magnet which sits in the small long sleeve on top of the two coils. Those 2 coils act as an electromagnet, producing an opposing magnetic field to the existing magnetic field of the permanent magnet. When this magnetic field in annulled, the plunger moves out according to the readings of a small sensor reading the applied aperture. There is a defined holding force of the permanent magnet in relation of how much the plunger can be magnetized. It has been measured, that the holding force of the "green made in China solenoid" is larger than the holding force of the white "made in Japan" solenoid. This is also very easy to just "sense" when one pulls the plunger out of the body of the white solenoid compared with the green solenoid. The difference is pretty obvious. You need much more force for the plunger of the green solenoid. There is a tiny difference hardly noticeable between the older solenoids used in the analog Pentax SLR bodies and those out of the early DSLR bodies: The earlier analog SLR versions release that tiny bit quicker (even less holding force) but also they sit with a minimal tilt when built in into a Pentax DSLR and thus the plunger sits slightly tilted on the aperture-control-mechanism:  Compared to this 100% accurate straight line of a 'DSLR white made in Japan solenoid':  I myself and a few others in Europe also came across opposite polarized solenoids in the MZ-Series. This is very easy to check: The left contact (solenoid in K30 aperture mechanism!) pink wire is plus (+),the right contact (lilac) is minus (-). Solder long wires onto the pins, connect them for a short moment to a 3V battery: If the plunger can be pulled out without almost zero resistance: Polarity is correct. If the plunger sits even tighter: Opposite polarization. But even then they can be used but one has either to change the wires in the Pentax or adding length to the pink left wire so it can be soldered to the right side. I have found correct polarized solenoids on MZ50 and MZ7 "made in Japan", but opposite polarized solenoids in those assembled in Philippines. It seems most MZ-Series Pentax' sold to Europe were assembled in the Philippines. I have not invested further because the solenoid from the early DSLR bodies anyway is better. The price for a damaged *ist or K100D is pretty much the same as for a MZ-series. So why bother! Using the DSLR "made in Japan white solenoid" is the only save way to allow the aperture mechanism not to fail again! 2: It is obvious that this method by using the same faulty solenoid again is prone to fail again. Nothing more needs to be said about this method. It would be rather silly to take on all this work of disassembling your K30, 50 etc but only do it half hearted and cheap. Repetition of the same problem. This brings us to 3: Sanding, filing even grinding the plunger. This method was invented in Russia and promised a cheap and safe way to go. It is applied by some repair-shops, but there have been reported problems! A camera is a precision instrument and the sanding / filing solution introduces more problems than it fixes. To achieve a similar holding force such as the white made in Japan solenoid guarantees this method changes the movement of the plunger in the already cheaper and easier to be worn out PET body of the green solenoid. A tilted plunger can eventually lead to a complete blockade of the mechanism: See the next photos of how tilted the plunger of the green solenoid sits compared to the straightness of the white made in Japan solenoid:   The mechanism which the solenoid brings into action is itself quite complicated and demands the solenoid to work very precise:  With sanding the plunger quite often the wheels get stuck or get de-arranged. The plunger tilts even more:  If a sanded solenoid does more damage such as shown HERE, you need to replace the complete socalled diaphragm-control-block : A very complicated undertaking! Changing the solenoid is almost peanuts compared to this work. It takes hours and one needs to know a lot to take this on! An almost complete disassembly of the camera! In March 2017 I took those photos to show the difference between the green and white solenoid:   One can clearly see that the plunger of the green solenoid has more "play" to all sides, i.e. it will already move with less guidance. The body with the 2 coils acts as a kind of bearing. The plunger moves in and out of this bearing. With more play there is more danger of tilt which is enhanced when filing/grinding the plunger. Also very clearly visible: Corrosion on the plunger. The material of the green "made in China" solenoid is not of the same quality as the material used with the white solenoid. If there is corrosion where the plunger sits on the lever, there will be as much corrosion on the parts which are filed/sanded! I came across a few K30's with "sanded plungers". And on a few I did notice corrosion when grinding was applied. 4: This method of applying solder to the plunger and file excess solder away is not to be recommended at all. Very bad idea! The idea itself is similar as in method #3, i.e. to bring the plunger that amount away from the magnetic field of the permanent magnet and thus decrease the holding force. But this will push the plunger further downwards, its position on the aperture control mechanism is wrong! Again this can lead to further failure. Most likely even quicker. I never tried it because logically it made no sense. There is another method I have tried, decreasing the size of the magnet. I have tried it a few times, it never worked out, either the problem remained the same or the opposite was achieved, the holding force was not enough. I also tried exchanging magnets: No luck either: Failure. 5: Beware of solenoids from DVD-ROM and CD-ROM Drives! They are usually blue colored and are made in China as well. They have usually another impedance (often 15 ohms) which can lead to damage on the main-board of your Pentax as well as dead coils.I have come across one single solenoid from a Sony walkman: Not quite the sameas in the Pentax DSLR and too strong holding force either. Also forget other solenoids such as from Korea (Moatech): They will not work: 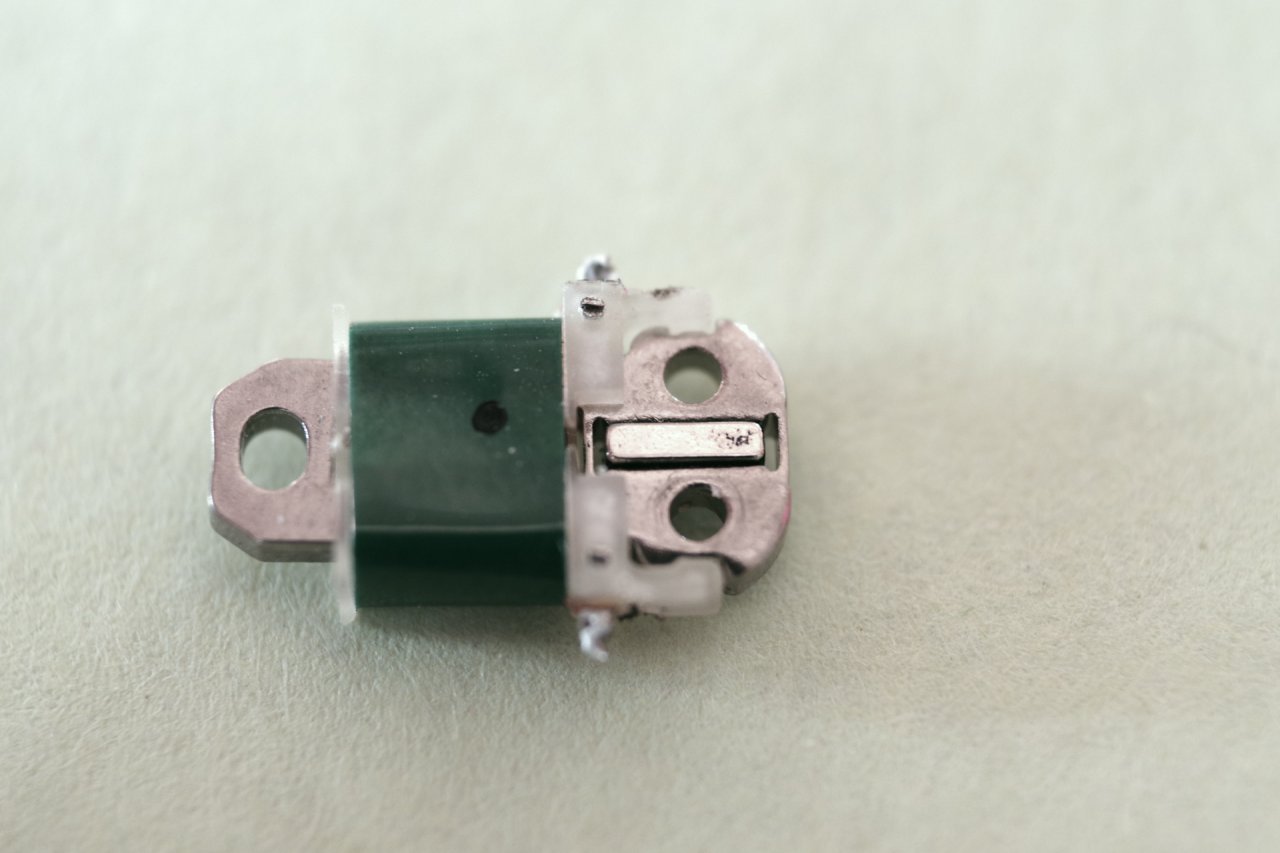 Here a short video showing the solenoid in action: Last edited by photogem; 01-13-2020 at 03:23 PM. Reason: added features/pictures | |

| These users Like photogem's post: |

| 03-24-2019, 08:16 AM - 2 Likes | #2 |
|
Thank you photogem. Your dedication to the K30/K50 community is very much appreciated. I could not have fixed my K50 without your posts. It is my first dSLR so I was happy to fix the aperture block issue. To all those forum members with old digital Pentax bodies that your not longer using (k-r and older); please consider donating your body to Pentax forum members with the aperture block failure. If you take a peak in the K30/K50 specific forum you will see how widespread this problem has become. There are 2 white solenoids in many of these old cameras so you we can save two K30/K50s for every donation. I can assist any users in the GTA with this repair. Please DM me. -Adam | |

| These users Like K5-0's post: |
| 03-24-2019, 09:42 AM | #3 |
|
Among all the various tutorials about K-30 fix, this is among the better, if not the better one period. Just one single tip from my personal experience with the undertaking: the red lacquer is easily dissolved with a drop of alcohol on a cotton swab (q tip). | |
| 03-24-2019, 10:31 AM - 1 Like | #4 |
|
Nicely detailed description. Thanks for your contribution! It would appear that the major hurdle is sourcing the proper solenoid. As such, I will mention that the Pentax-made full controller assembly is available as a new part from U.S. Camera. The part illustrated in the item description looks to have greenish plastic, but whether the color is diagnostic as an indication of source/quality/suitability is disputable.* Pentax K-S2 K30 K50 Diaphragm Control Block. USCamera Pentax PartsUSCamera Steve (...no relation to U.S. Camera and no flesh in the game other than historic role...) * Not wishing to start any arguments, but given the huge number of combination of suppliers and makers, color alone is risky IMHO. Much better might be a verified source and catalog number. Last edited by stevebrot; 03-24-2019 at 10:38 AM. | |
| These users Like stevebrot's post: |
| 03-24-2019, 10:45 AM | #5 |
| Loyal Site Supporter   |  Nicely detailed description. Thanks for your contribution! It would appear that the major hurdle is sourcing the proper solenoid. As such, I will mention that the Pentax-made full controller assembly is available as a new part from U.S. Camera. The part illustrated in the item description looks to have greenish plastic, but whether the color is diagnostic as an indication of source/quality/suitability is disputable.* Pentax K-S2 K30 K50 Diaphragm Control Block. USCamera Pentax PartsUSCamera Steve (...no relation to U.S. Camera and no flesh in the game other than historic role...) * Not wishing to start any arguments, but given the huge number of combination of suppliers and makers, color alone is risky IMHO. Much better might be a verified source and catalog number. Fascinating browse.  |
| 03-24-2019, 11:16 AM | #6 |
| It would appear that the major hurdle is sourcing the proper solenoid. As such, I will mention that the Pentax-made full controller assembly is available as a new part from U.S. Camera: Pentax K-S2 K30 K50 Diaphragm Control Block. USCamera Pentax PartsUSCamera To find a vintage Pentax sold on ebay for parts is much cheaper, particular because at least in USA there are usually 2 white Japan solenoids to be found. In Europe in most cases just one because from the introduction of the K100D they already tested the green China-solenoid in the popup-flash circuitry. There it never failed, that was the reason why they finally built it into the aperture-control- /diaphragm control unit. But latest with the K-r one could find the green solenoid in the popup-flash all over the world! They even show it in its very green colour in the service-manual of the K-r The part illustrated in the item description looks to have greenish plastic, but whether the color is diagnostic as an indication of source/quality/suitability is disputable.* Diagnosis has to be done "live", i.e. by studying all those solenoids [url=https://www.pentaxforums.com/forums/151-pentax-k-30-k-50/389194-little-bit-history-development-solenoid-pentax-cameras.htmlwhich me and others have done[/url]. So there is zero to be disputed. * Not wishing to start any arguments..... ....but given the huge number of combination of suppliers and makers color alone is risky IMHO. It is and was only one supplier with some very few options for different impedances and different holding-forces which I have explained here And this supplier moved his machines and production from Japan to China and "that was it". No return. Much better might be a verified source and catalog number. G100 for the solenoid for aperture control: but G119 for the very same solenoid in the popup-flash circuit As you can see it is named "Pop-up-magnet". Samsung gave it the very same partnumbers but named it simply "Relay". Last edited by photogem; 11-26-2019 at 04:13 PM. | |
| 03-24-2019, 11:40 AM - 1 Like | #7 |
| Nicely detailed description. Thanks for your contribution! It would appear that the major hurdle is sourcing the proper solenoid. As such, I will mention that the Pentax-made full controller assembly is available as a new part from U.S. Camera. The part illustrated in the item description looks to have greenish plastic, but whether the color is diagnostic as an indication of source/quality/suitability is disputable. Not wishing to start any arguments, but given the huge number of combination of suppliers and makers, color alone is risky IMHO. Much better might be a verified source and catalog number. | |
| These users Like reh321's post: |
| 03-24-2019, 11:55 AM | #8 |
| But even if one would have to exchange this complete block: You ought to know way way more to get this done right. Very complicated and long work! Not recommended.  I am quite certain that catalog number is of little use in separating "good" solenoids from "bad" solenoids. @photogem , do you have a recommended source for new solenoids or is scavenging from an older body the best option at present? Steve (...has a close friend with a repaired K-50...should the repair not hold, knowing the options might be helpful...) | |
| 03-24-2019, 02:29 PM | #9 |
| @photogem , do you have a recommended source for new solenoids or is scavenging from an older body the best option at present? If you have any Pentax body such as an *ist, K100D, K200D, K-2000, K-x up to the K-r you could even swap solenoids with those. It was only in Europe where about 50% of those already got the green China solenoid but only in the flash circuit. Not US bodies as far as I know! Europeans served as kind of guinea-pigs to test the green solenoid. As it never failed there, this was enough evidence to test it in what is called the "diaphragm-control-block" (which I think is not a proper name for it!) Too bad, the beginning of a complicated story.... So best one of these and you can swap. The old one a nice backup or to change lensroms or whatever... Or buy a broken early Pentax DSLR. Last edited by photogem; 03-24-2019 at 03:00 PM. | |
| 03-24-2019, 03:09 PM | #10 |
|
Literally minutes after reading this I noticed a dark frame followed by normal exposure at same settings on my K-S2. Only ~5k shutter actuations. I've had it since 2017, but have been using it alot more in the last few months. May need these tips sooner rather than later! | |
| 03-24-2019, 05:07 PM - 1 Like | #11 |
| Moderator Site Supporter |
Brilliant post @photogem! I hope you don't mind, I made the text normal size. It was much too small to read easily. |
| These users Like MarkJerling's post: |
| 03-25-2019, 12:13 AM - 4 Likes | #12 |
| Solenoid change on Pentax K-S2, disassembly etc. Literally minutes after reading this I noticed a dark frame followed by normal exposure at same settings on my K-S2. Only ~5k shutter actuations. I've had it since 2017, but have been using it alot more in the last few months. May need these tips sooner rather than later! 1. Do NOT take the screw out in the battery-compartment, not necessary! 2. The hidden screws under rubber are 5: 3 on the right-grip-side (SD card), 2 on the other side. Again, no need to take it completly off (+ under eye-cup) 3. The top-part is quite "jammed" in, you need to wiggle a bit more to get it out, no need to worry doing so, it is fine! 1cm lifting is enough here as well! 4. Taking the front-part off, begin on the right "grip-side" (SD-card), then lever a bit for lifting it off on the left side, it sits a bit strong at the microphone-plug 5. The flash-condenser is on the other side in front of the solenoid, but well protected. Little danger to get a shock, and yet, better leave the body stand for 24 hrs. 6. The AF-switch has just 2 positions: Again, leave it on M, the screwdrive rod is retreated. The inner part has to be upwards and you can feel it lock into position! Change of solenoid similar as in K30, test with an AF lens but again here: close flash first when inserting the battery! Assembly of course reverse 7. Take battery out again and open it for a better grip 8. Be careful that the frontpart clicks in well without too much force. If it doesn't click in, something is not straight: Check again! 9. Top-part clicks now well in 9. all screws back into position IMO the biggest hinderance (for some at least) is one's own fear! It is pretty straight forward. @Marc Jerling: Thank you! I had written most of it in "MS WORD" and copied it out. But when I clicked "Preview Post", the formatting was all the sudden completly different and when I clicked on size, I had the option 1/2/3 but size 1 showed already quite large (on my monitor!). Also at many places gaps between words were missing. So a lot of correcting. I had sold my Sigma EM-140G as I hardly used it, for those photos it would have been useful. | |
| These users Like photogem's post: |
| 03-25-2019, 04:17 AM | #13 |
| The K-S2 is almost identical. Differences are: 1. Do NOT take the screw out in the battery-compartment, not necessary! 2. The hidden screws under rubber are 5: 3 on the right-grip-side (SD card), 2 on the other side. Again, no need to take it completly off (+ under eye-cup) 3. The top-part is quite "jammed" in, you need to wiggle a bit more to get it out, no need to worry doing so, it is fine! 1cm lifting is enough here as well! 4. Taking the front-part off, begin on the right "grip-side" (SD-card), then lever a bit for lifting it off on the left side, it sits a bit strong at the microphone-plug 5. The flash-condenser is on the other side in front of the solenoid, but well protected. Little danger to get a shock, and yet, better leave the body stand for 24 hrs. 6. The AF-switch has just 2 positions: Again, leave it on M, the screwdrive rod is retreated. The inner part has to be upwards and you can feel it lock into position! Change of solenoid similar as in K30, test with an AF lens but again here: close flash first when inserting the battery! Assembly of course reverse 7. Take battery out again and open it for a better grip 8. Be careful that the frontpart clicks in well without too much force. If it doesn't click in, something is not straight: Check again! 9. Top-part clicks now well in 9. all screws back into position IMO the biggest hinderance (for some at least) is one's own fear! It is pretty straight forward. @Marc Jerling: Thank you! I had written most of it in "MS WORD" and copied it out. But when I clicked "Preview Post", the formatting was all the sudden completly different and when I clicked on size, I had the option 1/2/3 but size 1 showed already quite large (on my monitor!). Also at many places gaps between words were missing. So a lot of correcting. I had sold my Sigma EM-140G as I hardly used it, for those photos it would have been useful. | |
| 03-25-2019, 07:31 AM | #14 |
|
I uploaded a short video showing the solenoid in a K30 in action. Sadly I could not upload an MP4 video which would have had the typical sound of the white solenoid. This would be insofar intesting because for two good ears* the difference is quite noticable, i.e. faster and more accurate compared to the green solenoid. *this is for M.J. | |
| 03-25-2019, 07:58 AM | #15 |
| Literally minutes after reading this I noticed a dark frame followed by normal exposure at same settings on my K-S2. Only ~5k shutter actuations. I've had it since 2017, but have been using it alot more in the last few months. May need these tips sooner rather than later!  | |
|
« How to exchange battery-hook on Pentax K-30/K-50/K-70/K-500 and K-S2
|
[Astrophotography] Pentax-K30 and flats »
| Bookmarks |


| Tags - Make this thread easier to find by adding keywords to it! |
| battery, bit, body, change, clicks, discharge, front, grinding sanding, japan, k-30, k-50, k-s2, lens, method, pentax, pentax k-30, pentax k30, pentax k50, photo, position, screws, size, solenoid, video, wires, youtube |
 Post #1 by photogem
  Similar Threads
 | ||||
| Thread | Thread Starter | Forum | Replies | Last Post |
| Who can repair a K-30 aperture block if I have the white solenoid? | steamloco76 | Repairs and Warranty Service | 14 | 04-14-2019 06:20 PM |
| K-30 mirror doesn't return fully to default position after aperture solenoid repair | RayeR | Pentax K-30 & K-50 | 6 | 03-18-2019 02:54 AM |
| Aperture block failure: solenoid repair success poll | CarlJF | Pentax K-30 & K-50 | 7 | 05-17-2017 12:23 AM |
| Do flash capacitors discharge over time? | JoseFF | Pentax K-30 & K-50 | 14 | 06-05-2016 10:03 AM |


