Forgot Password
Pentax Camera Forums Home
 

Reply
Show Printable Version Search this Thread
09-03-2015, 02:44 AM   #31
Inactive Account


Join Date: Sep 2015
Posts: 2
@changgull I'm also about to take my GR apart and clean its dusty sensor. Could you please elaborate on which screw it is that needs to be removed to take the back cover off without breaking the top wiggle? Very much appreciated. Cheers!

---------- Post added 09-03-15 at 02:45 AM ----------

QuoteOriginally posted by changgull Quote
I don't usually register to a forum but I had to just to thank i83N. I was pretty much bothered by those pictures from my Alaska trip. I was able to stamp out most of the marks but the one with high contrast B&W didn't come off well due to the grainy noise texture which I like very much. The stamp tool couldn't integrate the patch gradually to match the texture well.

Anyway, all clean now. For the issue of taking the back cover off (as indicated by bobobo25), I found an easy way - the screw at the top of the side where the hidden screw was taken off: that's the key. It had to be taken off even if it does not hold anything for the back panel because the upper panel wiggle much after taking that piece out. So the upper panel has to be gently pushed up to have the back panel can come off (and back on).
I'm also about to take my GR apart and clean its dusty sensor. Could you please elaborate on which screw it is that needs to be removed to take the back cover off without breaking the top wiggle? Very much appreciated. Cheers!

09-05-2015, 08:51 AM - 1 Like   #32
New Member


Join Date: Sep 2015
Posts: 2
First of all, thanks 83N for the great tutorial. It got me started, but I also learned some more things that I think may help people. I had a hair caught in my camera that showed up in every photo. I tried vacuuming it to no avail.


- Use a piece of gaffer's tape to tape the battery door closed after removing the battery. Tape it firmly to the front housing. This will avoid having to get the spring loaded pin back correctly. The door can stay with the front the whole time.

- When removing the first screw that 83N calls out under the grip skin, there are three nearby screws. Remove the one he shows, <i>and</i> one of the other two, which will make it easier to remove the back because the top will be able to be lifted slightly. <b>DO NOT</b> remove all three. Basically all three go into a small metal plate with three threaded holes in it. If you remove all three, this plate will be loose inside the camera, and you won't have threads to let you replace the screws. Don't ask how I know this, or how long it took me to figure this out and get the plate back in place.

- The other three screws to remove are the two on the bottom that go through the back shell, and the one on the bottom of the left side, again through the back shell.

- Remove the hot shoe. The first piece to remove is the spring, which can just be pried forward after lifting the back slightly. Then remove four screws and remove the other metal piece. The pins stay behind. Don't pull on them, or a piece of ribbon cable will come out and it's a pain to get back in place. Again, don't ask.
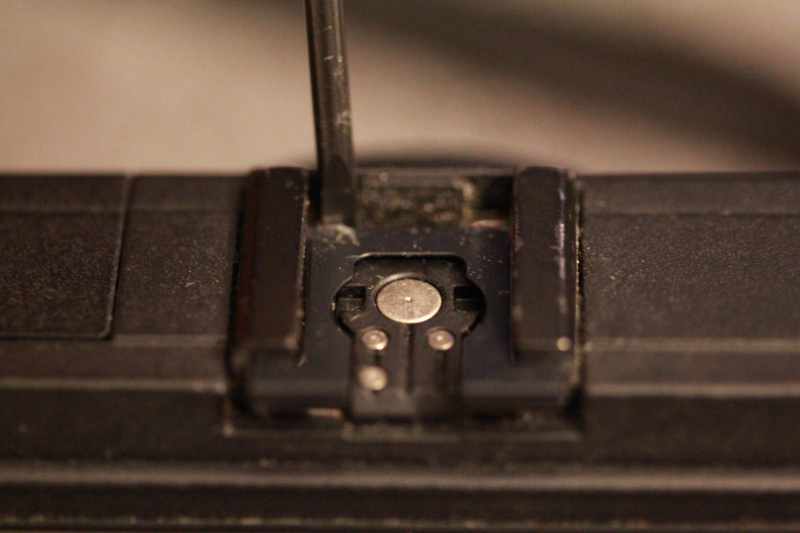
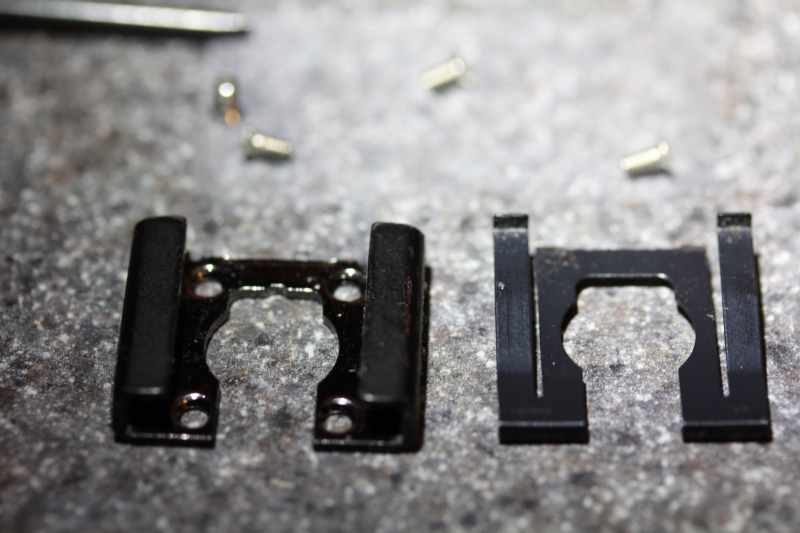


- When removing the back start prying at the bottom, then the top left. To get the top right out, it is sort of trapped under the ADJ. ISO wheel. Just pry the top up a little (easy because of removing that extra screw earlier) and it will be freed up.

- I could not get the ribbon cable pulled to flip the display over to the left. I was afraid to break it. Instead, I removed the red and black wires all the way around and flipped it to the right.
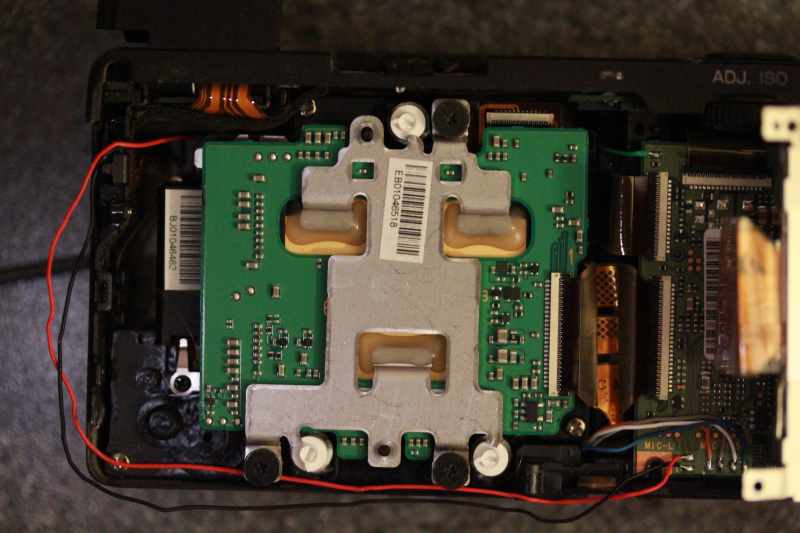


- I had to go in deeper than the sensor to get the hair out. The next level of disassembly removes the blue-green filter shown below. You can see the hair behind it.
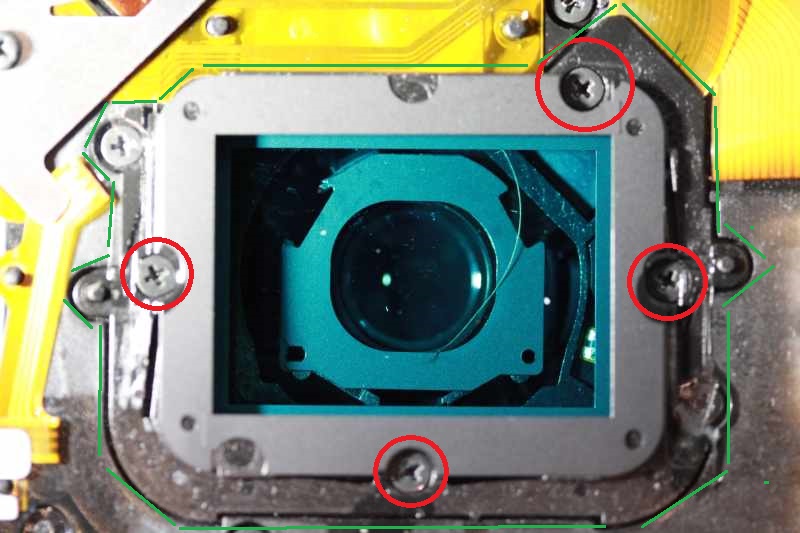


Remove the four screws shown circled in red, and pry up the entire cover outlined in green. The glass stays behind, and is loose in a depression. It can be lifted up carefully with a tool levered next to it. It's about 1/8" thick.

I hope this helps someone as much as finding this thread helped me.
Attached Images
View Picture EXIF
Canon EOS 60D  Photo 
View Picture EXIF
Canon EOS 60D  Photo 
View Picture EXIF
Canon EOS 60D  Photo 
View Picture EXIF
Canon EOS 60D  Photo 
View Picture EXIF
GR  Photo 

Last edited by Andy_S; 05-10-2016 at 08:11 PM.
10-02-2015, 05:27 AM   #33
New Member


Join Date: Oct 2015
Posts: 2
Hi all. Have just had a second go at cleaning the sensor. First time around I did this, everything went fine. However this time around the white and blue cable that connects the control pad on the back of the camera has disconnected from the circuit board somewhere on the inside of the camera. Does anyone have any experience with having to access this part of the camera to reconnect the cable?
Attached Images
 
10-03-2015, 02:48 AM   #34
Inactive Account


Join Date: Sep 2015
Posts: 2
QuoteOriginally posted by ambw Quote
Hi all. Have just had a second go at cleaning the sensor. First time around I did this, everything went fine. However this time around the white and blue cable that connects the control pad on the back of the camera has disconnected from the circuit board somewhere on the inside of the camera. Does anyone have any experience with having to access this part of the camera to reconnect the cable?
This has happened to me too. It wasn't easy but I managed to reattach the cable without having to further disassemble the camera. Don't remember the details, though.

10-25-2015, 11:15 AM   #35
New Member


Join Date: Dec 2009
Location: Ramsey, NJ
Posts: 18
It wasn't easy for me to do this but I eventually cleaned the sensor. Thank you so much for this info!
10-30-2015, 02:01 AM   #36
mh2
New Member


Join Date: Oct 2015
Posts: 1
Hi, thanks for these instructions. The disassembly and cleaning seemed easy enough for me and went fine.
However I ran into the same problem as ambw. I disconnected the white/blue cable. Does anyone have experience in reconnecting it? The connection is on the other side of the circuit board and seems hard to reach without further removing parts...
10-30-2015, 06:46 AM   #37
Veteran Member
i83N's Avatar

Join Date: Mar 2009
Location: Lithuania
Photos: Gallery
Posts: 1,203
Original Poster
QuoteOriginally posted by mh2 Quote
Hi, thanks for these instructions. The disassembly and cleaning seemed easy enough for me and went fine.
However I ran into the same problem as ambw. I disconnected the white/blue cable. Does anyone have experience in reconnecting it? The connection is on the other side of the circuit board and seems hard to reach without further removing parts...
So with that white solution is just tugged a longer one. I went to electronic shop and found one.

01-07-2016, 02:23 PM   #38
New Member


Join Date: Jun 2015
Posts: 8
Hi,

thanks to "i83N" for this description!!
My GR has a shutter count of over 15k, and the sensor definitely needed a cleaning, which worked quite well, thanks to this description.

Except one little thing, which I messed up: Instead of carefully reading the description I started to unscrew a couple of screws. Including the one marked with a green arrow. (See attachment. (I used "i83N"s photo. I hope, that's okay.))
By doing this, I loosened a counter plate. And it took me quite some time to get it in place again.
Maybe I can prevent someone, from doing the same stupid thing.

Regarding stupidity:
My rather uneducated impression is, that the sealing of the sensor is not well designed. From my point of view it shouldn't be too hard to keep the sensor free of dust.
I am aware, that the retractable lens causes a certain airflow into-, and out of the camera. So it might be hard to totally keep dust away from the inside of the camera. But it should be easily possible, to keep at least the sensor free of dust.

I am still more than happy with my GR, but there's at least room for improvement.

Cheers,

P.
Attached Images
 
04-28-2016, 06:41 PM   #39
New Member


Join Date: Apr 2016
Posts: 1
Reconnecting the menu ribbon?

ambw, jkbrzt, Cristian Galvez, YvainB, and myself all seem to have had issues with the Menu ribbon. I pulled it out accidentally like a couple other people here. Does anyone know how to reconnect it to the camera body? Thankfully the camera is still usable without the menu but I don't really want to send it in to Precision camera just to reconnect a cable.

One user suggested no further disassembly would be required although I find that hard to believe. But if it can be done, I'd appreciate knowing how!
04-29-2016, 12:09 AM   #40
New Member


Join Date: Oct 2015
Posts: 2
Yeah so I managed to get it back in in the end with some perseverance. I didn't have to disassemble any more but instead used a pin to push the ribbon back into it's socket. With a little bit of prying, if you look down inside the gap where the ribbon is meant to be coming out of, you can see the socket that it fits into. Basically what I did was while prying the camera casing a little, I used the pin to apply force onto the side of the end of the ribbon. It took a while but eventually the plastic end of the ribbon lined up perfectly with the socket and with the force of the pin managed to reconnect. It wasn't an ideal solution but it can be done. Obviously having to apply any kind of force to the camera's casing isn't ideal but my camera still works fine now having gone through the procedure. I suggest anyone giving it a go might want to post some photos/video of the process because it seems this is a common problem. I didn't think about it at the time since I was too worried that i wouldn't be able to get my camera working before travelling the next day. It can be done though.
10-04-2016, 09:53 AM   #41
Junior Member


Join Date: Jan 2016
Location: Pistestii din Deal
Posts: 27
The retracting lens mechanism is a bad idea. A new design must avoid that as there is no sensor protection from that. The need to have a sensor clean service for a sealed compact camera is pure stupidity. Hope you learn your lessons Ricoh and stop wasting people's money. Remember? Japan quality grade!
10-07-2016, 06:28 PM   #42
Site Supporter
Site Supporter


Join Date: Jul 2012
Location: Albuquerque
Posts: 1,132
QuoteOriginally posted by funlw65 Quote
The retracting lens mechanism is a bad idea. A new design must avoid that as there is no sensor protection from that. The need to have a sensor clean service for a sealed compact camera is pure stupidity. Hope you learn your lessons Ricoh and stop wasting people's money. Remember? Japan quality grade!
Bad idea compared to what? I hear what you're saying, and I had a fat dust spot on mine (that resolved itself thankfully), but if I can't fit the GR in a jacket or back-pants pocket it just won't come along with me most of the time. And that's the reason for the retracting design, compactness. Ideally, I'd have a GR built into my cell phone but that just isn't happening because physics. So for now I'll take a retracting design if it means I can slot it into my motorcycle jacket pocket instead of leaving it at home.

Not trying to be snarky/combative, truly...I want a "perfect" compact camera too. The GR (to me) is great because it homes in on its niche and focuses on excellence there rather than trying to be "good enough" everywhere.

Now if the GR were priced like a Leica, then yeah, I'd be screaming too!
10-07-2016, 06:44 PM   #43
Site Supporter
Site Supporter
geomez's Avatar

Join Date: Mar 2013
Location: Roanoke, Virginia, USA
Photos: Gallery
Posts: 1,760
QuoteOriginally posted by filoxophy Quote
Bad idea compared to what? I hear what you're saying, and I had a fat dust spot on mine (that resolved itself thankfully), but if I can't fit the GR in a jacket or back-pants pocket it just won't come along with me most of the time. And that's the reason for the retracting design, compactness. Ideally, I'd have a GR built into my cell phone but that just isn't happening because physics. So for now I'll take a retracting design if it means I can slot it into my motorcycle jacket pocket instead of leaving it at home.

Not trying to be snarky/combative, truly...I want a "perfect" compact camera too. The GR (to me) is great because it homes in on its niche and focuses on excellence there rather than trying to be "good enough" everywhere.

Now if the GR were priced like a Leica, then yeah, I'd be screaming too!
I've owned probably 15 point and shoot cameras over the last 13ish years. GR is the only one that had a dust issue. I've owned two GRs and have had them sent in for sensor cleaning on multiple occasions. My current GR currently has a dust issue and I keep it in a waterproof bag whenever I'm not shooting with it. All of my other point and shoots have lived in my dusty/linty pockets and still no dust problems.
I know that a retractable lens is a necessity, but there has to be something Ricoh is doing wrong and everybody else is doing right about keeping dust out
10-08-2016, 10:20 AM   #44
Junior Member


Join Date: Jan 2016
Location: Pistestii din Deal
Posts: 27
Maybe it has something to do with the big area that has to be protected... point and shoot cameras have a minuscule sensor surface. Fuji approach seems to be better. But our approach (trowing the camera in a pocket) not so good. A nice leather small bag/case (like a sheath) tied to the wrist (and eventually temporarily hidden in your jacket pocket ) may be a better habit.
10-20-2016, 12:41 PM - 3 Likes   #45
Master of the obvious
Loyal Site Supporter
savoche's Avatar

Join Date: Jun 2011
Location: Lowlands of Norway
Posts: 18,311
Found a blog with a very detailed step-by-step description of the process - and linking back to this thread as a source

A guide to disassembling the Ricoh GR for sensor cleaning – Jamie Collinson
Reply

Bookmarks
  • Submit Thread to Facebook Facebook
  • Submit Thread to Twitter Twitter
  • Submit Thread to Digg Digg
Tags - Make this thread easier to find by adding keywords to it!
appreciated, cheers, digital camera, gr, gr for sensor, lcd, panel, ricoh gr, screw, screws, sensor, stamp, texture, wiggle
Thread Tools Search this Thread
Search this Thread:

Advanced Search


Similar Threads
Thread Thread Starter Forum Replies Last Post
Alternative ideas for sensor cleaning? (I tried something that's worked before but no Quazimoto Troubleshooting and Beginner Help 5 12-28-2012 07:00 PM
Sensor cleaning for the clueless Seafood Pentax DSLR Discussion 3 03-26-2010 11:00 PM
sensor cleaning for k10d chicochongchu Pentax DSLR Discussion 16 02-03-2009 11:35 PM
What spatula size for sensor cleaning? raider Pentax DSLR Discussion 3 01-06-2009 08:28 AM
Sensor cleaning: Pec-Pads or Sensor Swabs gadgetnu Pentax Camera and Field Accessories 29 09-24-2007 10:52 AM


All times are GMT -7. The time now is 09:17 AM. | See also: NikonForums.com, CanonForums.com part of our network of photo forums!
  • Red (Default)
  • Green
  • Gray
  • Dark
  • Dark Yellow
  • Dark Blue
  • Old Red
  • Old Green
  • Old Gray
  • Dial-Up Style
Hello! It's great to see you back on the forum! Have you considered joining the community?
register
Creating a FREE ACCOUNT takes under a minute, removes ads, and lets you post! [Dismiss]
Top