Forgot Password
Pentax Camera Forums Home
 

Reply
Show Printable Version 36 Likes Search this Thread
06-29-2017, 01:45 PM - 11 Likes   #1
Loyal Site Supporter


Join Date: May 2007
Location: Flagstaff, Arizona
Posts: 1,648
So you wanna photograph the Eclipse - what you need to know in (sorta) a nutshell

As you probably know, unless you have lived in a cave for the last year, there will be a total eclipse of the sun on August 21,2017. The narrow path of totality crosses the US from Oregon to South Carolina. Taking photographs of an eclipse is not difficult, but you do need the right equipment.

Here are some technical details about taking eclipse pictures, which I hope will answer many of the type of questions we have been seeing here recently on the Forum. This was intended to be a quick note, but seems to have grown. I hope I have covered the most critical items: lens focal length, supporting your camera, filters, and typical exposures.

If you read no farther, here are the quick answers:

1) You need a long lens - 300mm or longer if you want even modest size solar images
2) Use a tripod if you have one
3) You need around 13 stops of solar filtration; an ND 4.0 filter is about right
4) If you have a ND 4.0 filter, a typical exposure will be 1/2000 sec for ISO=100 and f11


I leave the esthetics of eclipse photography up to your artistic talents!


1) WHAT FOCAL LENGTH DO I NEED / SHOULD I USE TO PHOTOGRAPH THE ECLIPSE?

The sun has a diameter of slightly more than half a degree (about 31.6 arcminutes at the epoch of the eclipse). If you know the field of view for your camera/lens combination or the pixel scale, you can calculate how big the solar image will be in your frame.

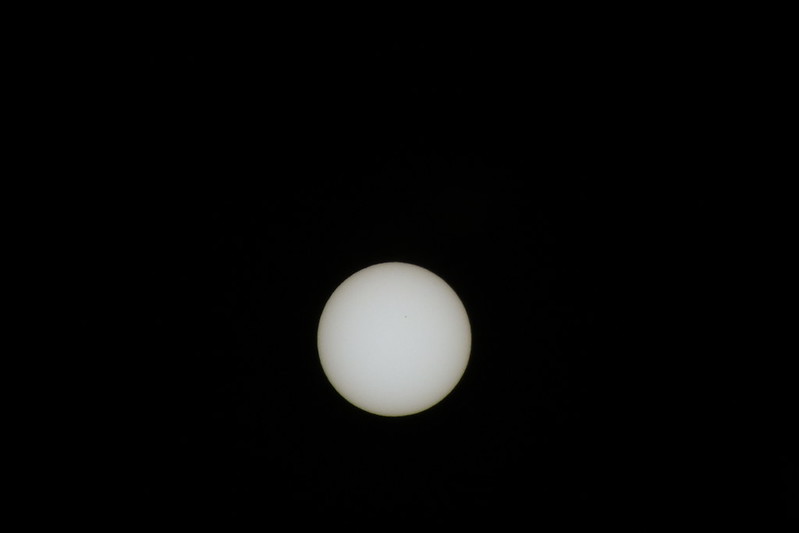
The easy way, though, is to just take a picture and see what you get: below is the (reduced in pixel size) complete frame of a picture of the sun taken on June 27 with my Pentax K-3 and Pentax-DA* 300mm F4 ED [IF] SDM lens. I used an ND 4.0 filter (more on filters and exposure below).

The important thing to notice here is that the image of the sun is not all that large!

For this APS-C camera and lens, the image of the sun is about 685 pixels across; only a bit more than a tenth of the total 6016 pixel width of the K-3 image. This fractional width will hold for any APS-C imager and a 300mm focal length lens.

The sun is not very large in the frame! If you are hoping for the sun to more completely fill your image frame, you NEED A LONG FOCAL LENGTH LENS. To even half fill an APS-C frame, you will need an effective focal length of well over 1000mm. Bring on the TC(s) - I have used two and even three TCs stacked to get large images of the sun (Magnification Factors for several Kenko Teleconverters on K5 - PentaxForums.com).

With a 300mm lens, though, you will still get reasonable images of the various eclipse phases.

The situation for full-frame (i.e. K-1) is even worse - for a given lens, the image fractional size on FF will be only 2/3 as big as for APS-C.

During totality, the Sun’s corona provides a neat photo opportunity. Generally, the corona can be seen to several times the size of the sun, depending on how deep a photograph goes. Take a look at Wide angle image of solar corona, Bert Halstead's Solar Eclipse Page, and 2005 Total Solar Eclipse - Photo Gallery B for some examples and suggested exposure parameters.

Here your 300mm lens may be just about right!

Maybe you want to do a composite of the eclipse - taking a photo every 5 minutes or so for the full duration of the entire eclipse event as the sun moves across the sky (without moving your camera). In this case, you will want a wide-ish lens.

How wide? Throughout the US, if you are on the path of totality, the duration of the eclipse from first contact (the moon just begins to cover up the sun) to last contact (the moon leaves the scene) is somewhat more than 2 hours. (Go here to get ALL the details for your location: NASA - Total Solar Eclipse of 2017 Aug 21 . Just zoom in and click on the map. Note that all times are in UT!) For instance, I plan to be near Rexburg, Idaho for the eclipse, where it begins at 16:45:42 UT (10:45:42 MDT) and ends at 18:58:24 UT, or not quite 2 hours and 15 minutes.

The sky appears to turn 15 degrees per hour, so in 2:15 the sun will “move” some 34 degrees. (Yeah, yeah, there are various corrections for this: declination of the sun, hour angle of the sun, latitude of the observer, etc. Don’t bother telling me - I know all about that, and how to calculate it from scratch if I have too. I am just trying to get an upper bound ball-park estimate.) Leave some room on both ends of the eclipse path, so you will want a FOV of around 50 degrees. You then want a lens of around 25 mm focal length or less on your APS-C camera, or about 40 mm on full-frame.


2) HOW DO I SUPPORT MY CAMERA?

Ideally, if you want pictures of various phases of the eclipse, you would use a tracking mount that can follow the sun across the sky as the earth turns. Once you have the sun centered in your camera, you just shoot when desired. Unless you have a fancy tracker mount, though, you may want to make minor pointing corrections due to the fact that the sun moves at a rate slightly different from sidereal (the rate at which the Earth actually turns: about once per 24 hours). The sun moves about a degree per day with respect to the background sky. During the 2+ hours of the eclipse, this will amount to only 5 or 6 arcminutes (a fifth the size of the sun).

Otherwise, a good tripod will do. As noted below, your exposures may well be as short as 1/1000 or 1/2000 second, so camera wobble should not be a problem! You will have to continually re-aim your camera as the sun moves. This can be a bit of a nuisance. Depending on your location, the sun may be high enough in the sky that looking through your camera requires you to stoop rather low. At totality, the altitude of the sun ranges from 40 degrees in Oregon to 64 degrees in Illinois. If you have never taken a picture at such angles with a camera on a tripod, you may find it to be a rather uncomfortable, awkward experience! Practice! Finding the sun can be a problem, too - you will be looking through the solar filter, which is so dark that you can not see ANYTHING unless you have the sun in the field of view. Again, practice ahead of time.

If you have a tilt-out view screen, life will be easier if you use it along with your tripod.

Of course, you can hand hold, too. The short exposures should minimize camera shake, but hefting your telephoto lens up in the air may be tiring!

For long lenses, focusing is critical. Autofocus may work if you can put the edge of the sun on a focus sensor. I much prefer using (zoomed in) live view to check focus.


3) WHAT KIND OF FILTER(S) DO I NEED? WHAT EXPOSURE DO I WANT?

These are the biggies! And, of course, are closely related.

Basically, the sun is VERY BRIGHT.

The most important statement in this whole article is:

NEVER LOOK AT THE UN-ECLIPSED SUN, OR POINT YOUR CAMERA AT THE SUN WITHOUT PROPER (EYE) PROTECTION!

Other than brief glances at the sun (we’ve all done this, at least inadvertently, without real damage - just some after glows that may last a while), looking at the sun with eyes or imaging equipment can lead to severe damage. (The Apollo 12 astronauts learned this the hard way.)

A parallel very important statement: THE SOLAR PROTECTION SHOULD BE AHEAD OF ANY OPTICS. Why is this? A filter somewhere in the image path may be subjected to focused solar energy and heat up to very high temperatures. (Ever burn an ant or newspaper with sunlight and a magnifying glass!?) The high temperature could lead to melting or shattering of the filter. Some long lenses (just what you want for large solar images!) have filter holders at the camera end of the lens, so that smaller filters can be used. DO NOT PUT ANY SOLAR FILTER THERE!

You need something on the order of at least 12-13 stops of filter to take photographs of the sun. Be careful when you buy a conventional lens filter that you fully understand how its value is given.

Typical neutral density (ND) filters used in photography attenuate light by up to just a few stops of exposure. Such filters are often noted as ND 2, 4, or 8. In this case, the number represents that amount by which light is attenuated. 2 means a factor of 2, or one stop. 4 and 8 will give you 2 or 3 stops, respectively. Filters can be stacked, and the values multiply (or stops add). If you have a 2,4,8 set, putting them all together would give you 6 stops total (and possibly lots of internal reflections!) - nowhere near enough for the sun.

You need a filter designated with a decimal point, such as ND 3.0 or ND 4.0 . For these filters, the number represents the power of ten by which the light is attenuated. ND 3.0 means ten to the third power, or a factor of 1000. ND 4.0 is a factor 10,000.

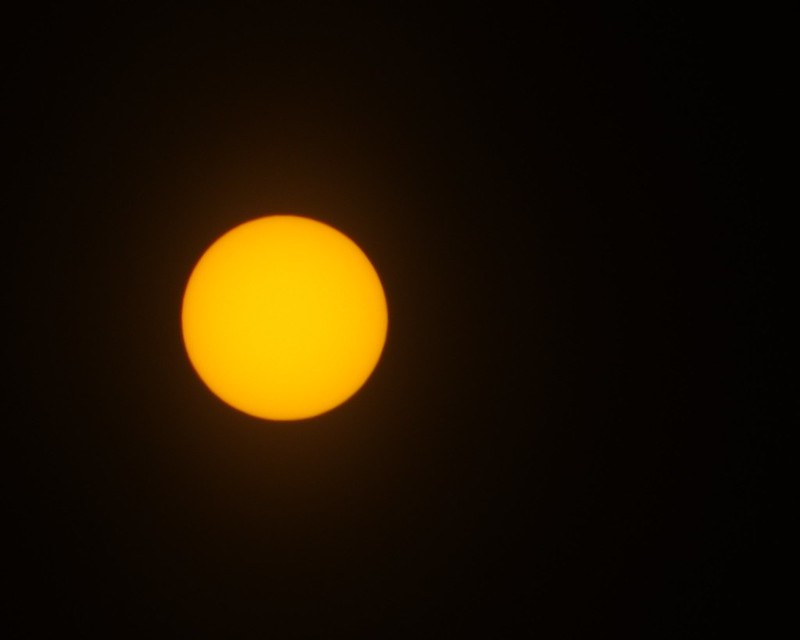
An ND 4.0 filter is just about right for the sun. It provides a bit more than 13 stops of attenuation. The photo above is taken with an old Kodak ND 4.0 gel filter which I got in 1979 to take pictures of the total eclipse in Winnipeg. This filter adds a yellowish cast to the image - I wouldn’t call it “neutral” density.

The exposure info for this image is ISO 100, f11, 1/2000 sec shutter speed

I also took a picture through some aluminized mylar film, which has a couple stops more attenuation. An exposure at ISO 100, f 5.6, and 1/2000 sec gave a nice result. The mylar adds a very bluish cast to the image. These mylar filters are more or less the standard inexpensive telescope filter

Teleconverters will add to the attenuation: 1 stop for a 1.4x and 2 stops for a 2.0X . If you are using a TC, you can probably get away with an ND 3.0 filter. If you need another stop, you can add a polarizing filter.

I think an ND 5.0 filter is verging on overkill. With a filter like this, my sun shot would have a shutter speed of 1/250 or 1/125 (for ISO 100 and F11). For long lenses, you may see camera shake at such speeds. You can always open your aperture up, although I like f11 since it eases focusing requirements, or up the ISO.

Check Amazon (where else!?) for solar filters. They have inexpensive Thousand Oaks (a reliable company; I have no affiliation with them or Amazon) black polymer filters at quite reasonable prices. You can cut it to fit your lens. MAKE SURE ANY FILTER CAN NOT FALL OFF DURING USE!

Note that during the totality phase, you may want longer exposures (a few seconds, even) if you are trying to get the extended corona. There’s a nice table here (Observing and Photographing the 2017 Total Solar Eclipse) of suggested exposures for the corona.


Hope this is useful.


For lots more overall on the eclipse, check out these web sites:

| Total Solar Eclipse 2017

How to Photograph a Solar Eclipse - LOTS of useful information, repeating much of the above in more detail. Espenak has been doing eclipses for a long time, and is a retired NASA astrophysicist. He’s the expert on this stuff!!

Attached Images
View Picture EXIF
PENTAX K-3  Photo 
06-29-2017, 01:53 PM   #2
Pentaxian
jimr-pdx's Avatar

Join Date: May 2010
Location: now 1 hour north of PDX
Photos: Gallery | Albums
Posts: 3,897
Good stuff, thanks for all the detail!
06-29-2017, 02:37 PM   #3
Moderator
Site Supporter
Loyal Site Supporter
MarkJerling's Avatar

Join Date: May 2012
Location: Wairarapa, New Zealand
Photos: Gallery | Albums
Posts: 20,423
Very nicely explained, thank you!
06-29-2017, 02:58 PM   #4
Veteran Member
enoeske's Avatar

Join Date: Jul 2009
Location: Surprise, Az
Photos: Gallery
Posts: 2,136
Whats the difference in safety when using no filter, or using, say, a 10 stop filter but increasing your exposure time to get the same exposure as no filter? How is that better for the sensor?

06-29-2017, 03:48 PM - 1 Like   #5
Loyal Site Supporter


Join Date: May 2007
Location: Flagstaff, Arizona
Posts: 1,648
Original Poster
QuoteOriginally posted by enoeske Quote
Whats the difference in safety when using no filter, or using, say, a 10 stop filter but increasing your exposure time to get the same exposure as no filter? How is that better for the sensor?
With no filter, you will need either an exposure time of a millionth of a second or so (my camera won't do that), or use an f stop of around f1000 or smaller (diffraction would kill your image!). The mirror might protect a DSLR by aiming the sun out through the viewfinder (but you will wreck your eye when you look in there!) if you leave your camera pointed at the sun. If you try that with any other kind of camera, you will probably damage something inside where the focused sunlight falls (shutter leaves or curtain) or the sensor itself if the shutter is totally electronic.

Even $100 for a filter is cheaper than $1000 for a new camera, and I don't know where to buy new eyes.

Please, USE A FILTER!
06-29-2017, 05:20 PM   #6
Veteran Member
Topsy's Avatar

Join Date: Feb 2014
Photos: Gallery | Albums
Posts: 625
Brilliant post!

Another good tip is to buy the filter early. Before the last partial eclipse here (2015 I believe) every shop had no stock of any filters, neither camera or eyewear, anymore.

I ended up shooting through an old pair of protection glasses we still had from the 90s I think..

(300mm on crop)
06-29-2017, 05:34 PM - 1 Like   #7
Moderator
Site Supporter
Loyal Site Supporter
MarkJerling's Avatar

Join Date: May 2012
Location: Wairarapa, New Zealand
Photos: Gallery | Albums
Posts: 20,423
QuoteOriginally posted by enoeske Quote
Whats the difference in safety when using no filter, or using, say, a 10 stop filter but increasing your exposure time to get the same exposure as no filter? How is that better for the sensor?
No filter will kill your camera, your eyes or both.

06-29-2017, 06:31 PM - 2 Likes   #8
dmr
Senior Member
dmr's Avatar

Join Date: Feb 2017
Location: Somewhere in Middle America
Posts: 106
This will probably be my last chance to view and photograph a solar eclipse.

I've been following a discussion over at Cloudy Nights (an astronomy board) where they have a NASA SME who has taken a few of these in consultancy. Here's the URL, not to be hijacking people to another board.

North American Total Solar Eclipse 2017 - Cloudy Nights

I've been doing some test shots in preparation. I got a Marumi ND 100000 solar filter and test shots have been going fairly well. I've been zeroing in on exposure for the crescent shots, going for "tone without texture" of the afternoon sun. The test shot below was done at ISO 100, f/11, and 1/500. At the suggestion of Gordon over on Cloudy nights I've adjusted things to ISO 200 and f/16 as the base. This test shot was only sized for the web. No level adjustment or anything.


The main difference between my test shots and Gordon's is that mine are that mine are coming out very close to neutral in color cast and his were yellow/orange. Further discussions confirm that the filter is the difference. I've apparently got a true neutral density filter, where Gordon and some others have filters that give a cast. Before I asked at CN, a discussion over at APUG pretty much confirmed that I was correct in that I should be seeing a whitish image, since the color temperature of the sun is about 5600k, which is about as white as white can be and the camera is indeed white balanced for daylight.

Anyway, my next steps are to zero in on the exposures needed for the second and third contact phenomena. I want to capture the Bail(e)y Beads if I possibly can, and most definitely the "diamond ring" effect, and some corona images during totality.

I also want to use a second camera for some terrestrial scenes during totality.
06-29-2017, 08:04 PM   #9
Forum Member


Join Date: Jan 2008
Location: Vancouver, WA, 98682
Posts: 93
Here's my first test shot... Using a 5" square SolarLite filtersheet from Thousand Oaks Optical. I think I need to work on my focus.

K-3, f/16, 1/20, ISO 100, cropped
06-30-2017, 12:32 AM   #10
dmr
Senior Member
dmr's Avatar

Join Date: Feb 2017
Location: Somewhere in Middle America
Posts: 106
How are you focusing? I hope not trying to auto focus.
06-30-2017, 03:06 PM - 3 Likes   #11
dmr
Senior Member
dmr's Avatar

Join Date: Feb 2017
Location: Somewhere in Middle America
Posts: 106
Here's kind of a plan from the NASA guy which looks like a good one to follow, particularly someone like me who has never done this before ...


From Gordon:


demare,

For your system, you are the best judge of your shutter speeds, but they sound reasonable, from the way I look at, which is how many stops you are under or over the proper exposure for the properly exposed full Sun disk image.

Here is I how I lecture on the order to do things:

1. If you are using my partial phase image sequence calculator to get you 10 image sequence between C1 and C2 you would have taken you 10th image when my timer says "2nd contact in 2 minutes." {now remember the last crescent image, or event the last 2, before totality have to be about 1 shutter speed slower that what you were using for the previous 8 partial phases because these last 2 put out less light} Print out my worksheet from my website http://www.solarecli.../docs/PPISC.pdf

2. Right after you take that crescent phase at 2 minutes before C2, change your shutter speed to 1/4000 so you are ready.

3. After you change your shutter speed take some peaks at the crescent with your solar glasses and alternate with taking some looks to the Northwest to see if you can see the shadow coming in.

4. When my timer says "60 seconds" it will remind you to look for shadow bands, now, switch to looking at the ground around you for shadow bands.

5. When my timer says "30 seconds" have you hand on you filter ready to pop it. As you continue to look for shadow bands.

6. When my timer says "20 seconds" either pop you filter then, or wait 2 or 3 seconds more and pop your filter and immediately begin taking rapid exposures all the way through the timer tone for C2 and the announcement for "glasses off."

7. You are in totality now, take some time to look at it with your eyes and a quick peek with binoculars

8. Now back to you camera, start taking exposures one at a time, 1/2000, 1/1000, 1/500, etc. all the way up to about 1 second, if you are not guiding.

9. Then set your shutter speed back to 1/4000 to be ready for C3.

10. Now look again at totality with your eyes.

11. The timer will count down to max eclipse, mark it with a tone and remind you to look at the horizon. Take a horizon picture with another camera NO FLASH!. Take a totality with Jupiter wide angle image. NO FLASH!

12. Look at totality again with your eyes.

13. The timer will announce 3rd contact in 20 seconds, get back to your camera and be ready

14. "10 seconds" start taking exposures, and at 5 seconds start taking them more rapidly, all the way through C3, it will get really bright fast, but don't stop yet, take exposures for about 10 seconds. Then replace your solar filter.

15. Set your shutter speed back to the setting for the thin crescents so you are ready to take the 1st image of the sequence at 2 minutes after totality.

That's it! You did it! High five you friends! Try not to be distracted by the party that will start and finish your 10 image sequence after totality.

Gordon
06-30-2017, 03:08 PM   #12
Seeker of Knowledge
Loyal Site Supporter
aslyfox's Avatar

Join Date: Aug 2016
Location: Topeka, Kansas
Photos: Gallery | Albums
Posts: 24,583
this site may be of interest

Total Solar Eclipse 2017 - Interactive Google Map

it leads to a google map with details of what will happen at the locale you select

Last edited by aslyfox; 08-10-2017 at 06:37 PM.
06-30-2017, 10:02 PM   #13
Forum Member


Join Date: Jan 2008
Location: Vancouver, WA, 98682
Posts: 93
QuoteOriginally posted by dmr Quote
How are you focusing? I hope not trying to auto focus.
Just a quick live view... Didn't zoom in or anything. I don't know why staring at the sun makes me so nervous, but I think I just need to slow down.
07-02-2017, 01:10 PM   #14
dmr
Senior Member
dmr's Avatar

Join Date: Feb 2017
Location: Somewhere in Middle America
Posts: 106
I did a manual focus but I had some difficulty determining what was sharpest looking at the sun through the filter via live view. I ended up focusing manually on a far-away terrestrial target and that seemed to work quite well.
07-06-2017, 09:30 PM   #15
Veteran Member
Alliecat's Avatar

Join Date: Dec 2010
Location: East of Everywhere, Canada
Posts: 740
Baader solar filter material is pretty cheap.
Astro-Physics Inc.
I got some for a few bucks when I bought my telescope some years ago, and am planning to use the extra sheets to make a filter with a step-up ring. Not sure I'd trust an ND filter... especially if you wanted to watch through the camera.
Good info; thanks. Will have a longer look at the links.

Anyone have recommendations for good safe eclipse glasses? Most of the ones I see look like cheap cardboard; I'd like something a little more substantial.

Last edited by Alliecat; 07-06-2017 at 10:08 PM.
Reply

Bookmarks
  • Submit Thread to Facebook Facebook
  • Submit Thread to Twitter Twitter
  • Submit Thread to Digg Digg
Tags - Make this thread easier to find by adding keywords to it!
animals, apsc, camera, drive, eclipse, eclipses, exposure, eyes, ff, filter, filters, frame, head, image, length, lens, miles, mm, moon, photography, post, scientists, sun, time, washington

Similar Threads
Thread Thread Starter Forum Replies Last Post
Macro You wanna share.................... eaglem Post Your Photos! 2 08-12-2016 01:20 AM
Changing Directions..... 'sorta. Dewman Pentax SLR Lens Discussion 8 03-08-2016 10:31 PM
Nutshell version; what is wrong with the K7? Lurch Pentax DSLR Discussion 23 05-21-2011 03:47 PM
So I got a K20D... sorta. Lurch Pentax DSLR Discussion 9 04-16-2011 04:48 AM
So you wanna be a pro? benjikan Photographic Industry and Professionals 9 04-16-2010 12:32 PM


All times are GMT -7. The time now is 05:59 PM. | See also: NikonForums.com, CanonForums.com part of our network of photo forums!
  • Red (Default)
  • Green
  • Gray
  • Dark
  • Dark Yellow
  • Dark Blue
  • Old Red
  • Old Green
  • Old Gray
  • Dial-Up Style
Hello! It's great to see you back on the forum! Have you considered joining the community?
register
Creating a FREE ACCOUNT takes under a minute, removes ads, and lets you post! [Dismiss]
Top