Forgot Password
Pentax Camera Forums Home
 

Reply
Show Printable Version 10 Likes Search this Thread
03-27-2019, 05:58 PM - 4 Likes   #1
Veteran Member


Join Date: Nov 2006
Location: Candiac, QC, Canada
Photos: Gallery
Posts: 403
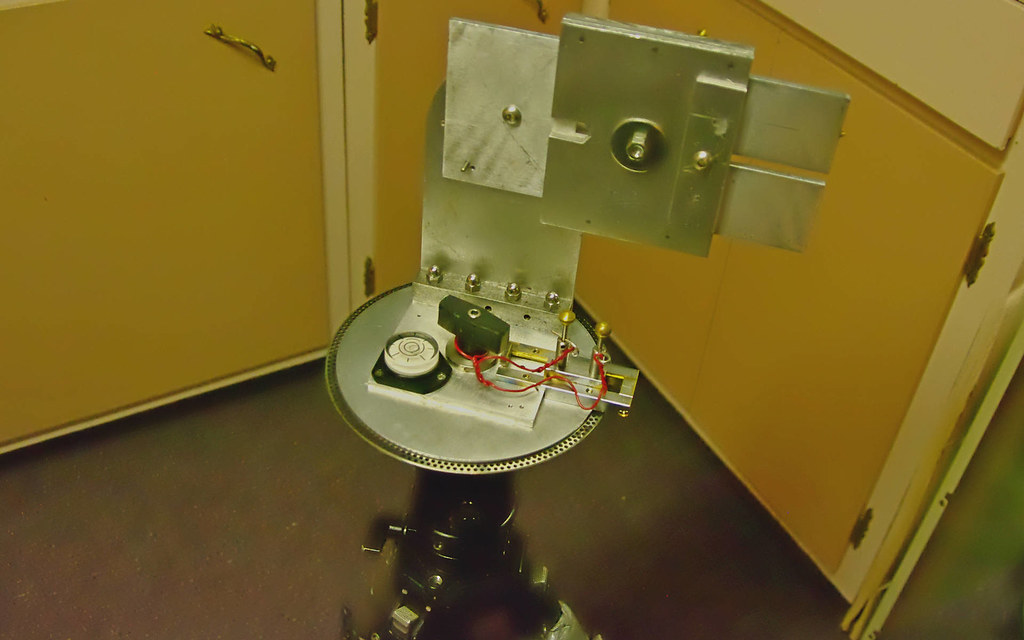
A contraption for taking panoramas with the camera in portrait mode.

After watching the Panorama course by Hudson Henry, I decided that I didn't want to spend a fortune in building a nodal node adapter for using a camera in portrait mode for panoramas. I bought a couple of slides from Amazon and did some metal work to fit it all together. The pictures give a good idea if you care to build one. For the pictures, I installed the camera in reverse so the details of the contraption could be seen. For using it, you install the camera so the lens is over the center of the tripod. The first thing you have to do before using it for the first time is to define the exact point for minimizing the parallax error for each lens and put that in a notebook. There is a scale with numbers on the upper rail so it's easy to do. If you have access to the panorama course, Hudson explains how to calibrate it, otherwise look in Youtube for ideas.

Attached Images
View Picture EXIF
DSC-RX100M3  Photo 
View Picture EXIF
DSC-RX100M3  Photo 
03-27-2019, 06:23 PM   #2
Pentaxian
swanlefitte's Avatar

Join Date: May 2015
Location: Minneapolis
Photos: Gallery
Posts: 4,068
Nice. I did something similar with 2 metal brackets like the bottom one only longer. I then drilled out a slide hole. For furthur stability I attached a square of wood to the top piece that butts against the bottom piece to keep it level.
Yours looks much nicer than mine.
03-27-2019, 06:28 PM   #3
Veteran Member


Join Date: Nov 2006
Location: Candiac, QC, Canada
Photos: Gallery
Posts: 403
Original Poster
With the kind of tripod head I have, the contraption doesn't have to be perfectly level, because I can level the head perfectly using the electronic levels in my K1.
03-27-2019, 07:03 PM   #4
Pentaxian
swanlefitte's Avatar

Join Date: May 2015
Location: Minneapolis
Photos: Gallery
Posts: 4,068
I had trouble with my tension screw not tight enough pulling the camera down between shots with a heavy lens.

03-27-2019, 07:32 PM   #5
Veteran Member


Join Date: Nov 2006
Location: Candiac, QC, Canada
Photos: Gallery
Posts: 403
Original Poster
Here it works fine.
03-27-2019, 07:47 PM   #6
Moderator
Not a Number's Avatar

Join Date: Mar 2012
Location: Venice, CA
Posts: 10,526
Very nice.

I would have thought one would want the axis of rotation based on the center of the image circle and the sensor plane. Also I would expect a lot of vibration considering the length of the "arm" and all the weight at the end.

Post some results.
03-27-2019, 08:11 PM - 1 Like   #7
Pentaxian
swanlefitte's Avatar

Join Date: May 2015
Location: Minneapolis
Photos: Gallery
Posts: 4,068
QuoteOriginally posted by Not a Number Quote
Very nice.

I would have thought one would want the axis of rotation based on the center of the image circle and the sensor plane. Also I would expect a lot of vibration considering the length of the "arm" and all the weight at the end.

Post some results.
Think of the camera the opposite direction. Its like that to show the tool.

Here is one of mine with my similar set up. This still took a huge arc to get so it did and does have artifacts.


edit. Yeah and 5 security stopped me because this was useful for terrorism apparently. They finally conceded but the best light and weather had past. Only took a half hour of security detaining me. If I wasn't polite and confident I think I wouldn't have my equipment anymore and I would be out lots of money for a lawyer to get out of jail.


Last edited by swanlefitte; 03-27-2019 at 08:17 PM. Reason: story
03-27-2019, 08:12 PM   #8
Veteran Member


Join Date: Nov 2006
Location: Candiac, QC, Canada
Photos: Gallery
Posts: 403
Original Poster
Nice picture seanlefitte. Haven't taken pictures yet, too cold around here for now. The sensor plane has nothing to do here. You want the lens optical center or entrance pupil to be the center of rotation, not the sensor. This is to correct the parallax error. Don't forget that the camera will be mounted backwards to what you see in the pictures, so the lens is over the center of the tripod plate. I won't be taking long exposures with that, onl;y normal daylight shots.
03-27-2019, 08:35 PM   #9
Pentaxian
swanlefitte's Avatar

Join Date: May 2015
Location: Minneapolis
Photos: Gallery
Posts: 4,068
QuoteOriginally posted by swanlefitte Quote
Think of the camera the opposite direction. (
Got that.
Yeah I calibrated mine for the nodal point of a few lenses and marked it. I am within less than a mm of true.
03-27-2019, 08:38 PM   #10
Pentaxian
Arjay Bee's Avatar

Join Date: Sep 2006
Location: Horn Island, Torres Straits, Q
Photos: Gallery
Posts: 4,715
QuoteOriginally posted by Not a Number Quote
would have thought one would want the axis of rotation based on the center of the image circle and the sensor plane. Also I would expect a lot of vibration considering the length of the "arm" and all the weight at the end.
The rotation point is somewhere inside the lens where the light rays invert bringing the parallax error to as close to zero as possible. All explained better than me on various web locations.

One example:
Finding the nodal point in panoramic photography?
03-27-2019, 08:41 PM - 1 Like   #11
Site Supporter
Site Supporter


Join Date: Oct 2009
Photos: Gallery
Posts: 983
Back when I got my K20D, I had an idea for a panoramic head. My Dad built the unit, I drilled the indexing plate. There are 8 or 9 different angles from which to choose. The outer two sets of holes are each 3 degrees, offset so one can choose 1.5 degree increments. I did not have the foresight to build in flexibility. It would take a bit of reworking to use with the K-1.


Homemade Panoramic Head
03-27-2019, 08:48 PM - 1 Like   #12
Pentaxian
swanlefitte's Avatar

Join Date: May 2015
Location: Minneapolis
Photos: Gallery
Posts: 4,068
Here is another pano with the set up based on my sigma 70mm. The boat was slightly smaller than 1 frame. so with overlap this was about 10 frames and about 90 degrees of rotation.


this was landscape mode.

Last edited by swanlefitte; 03-27-2019 at 08:50 PM. Reason: clarification
03-27-2019, 11:37 PM   #13
Loyal Site Supporter


Join Date: May 2015
Location: Melbourne
Posts: 1,515
QuoteOriginally posted by VE2CJW Quote
After watching the Panorama course by Hudson Henry, I decided that I didn't want to spend a fortune in building a nodal node adapter for using a camera in portrait mode for panoramas. I bought a couple of slides from Amazon and did some metal work to fit it all together. The pictures give a good idea if you care to build one. For the pictures, I installed the camera in reverse so the details of the contraption could be seen. For using it, you install the camera so the lens is over the center of the tripod. The first thing you have to do before using it for the first time is to define the exact point for minimizing the parallax error for each lens and put that in a notebook. There is a scale with numbers on the upper rail so it's easy to do. If you have access to the panorama course, Hudson explains how to calibrate it, otherwise look in Youtube for ideas.
I have stitched hundreds of panos almost all handheld with very few issues, most of which caused by an object very close which appears in more than one shot. The simple solution in those cases is to do some masking in some of the shots.
So my view is that such devices are not really needed if you take only a small amount of care in how you move your camera when handheld shooting.
My 2 bob's worth.

Cheers,
Terry
03-28-2019, 12:58 AM - 2 Likes   #14
Pentaxian


Join Date: Feb 2015
Photos: Gallery
Posts: 12,245
That setup WILL work. The no parallax point is always in front of the camera and located between the lens diaphragm and the front element of the lens. An L-bracket, $20 arca rail, gimbal allows to rotate the system for both vertical and horizontal panning around the no-parallax point.
Attached Images
View Picture EXIF
VTR-L09  Photo 

Last edited by biz-engineer; 03-28-2019 at 01:23 AM.
03-28-2019, 01:11 AM   #15
Pentaxian
swanlefitte's Avatar

Join Date: May 2015
Location: Minneapolis
Photos: Gallery
Posts: 4,068
QuoteOriginally posted by VE2CJW Quote
For the pictures, I installed the camera in reverse so the details of the contraption could be seen. For using it, you install the camera so the lens is over the center of the tripod. The first thing you have to do before using it for the first time is to define the exact point for minimizing the parallax error
I think you should edit your post to put spaced lines around this to help it stand out.
Reply

Bookmarks
  • Submit Thread to Facebook Facebook
  • Submit Thread to Twitter Twitter
  • Submit Thread to Digg Digg
Tags - Make this thread easier to find by adding keywords to it!
camera, camera in portrait, contraption, course, hudson, lens, panorama, panoramas, photography, pictures, portrait

Similar Threads
Thread Thread Starter Forum Replies Last Post
Landscape Some Panoramas edri Post Your Photos! 6 01-27-2019 12:53 AM
Stitching panoramas of 645Z images John Trammell Pentax Medium Format 23 10-22-2018 12:00 AM
Steadicam contraption I fashioned for my K-x stringbox Video Recording and Processing 2 10-17-2011 06:56 AM
Do my panoramas not look like panoramas? ftpaddict Post Your Photos! 22 04-21-2010 11:18 AM
Check out this contraption! SouthShoreRob Post Your Photos! 22 03-11-2008 06:49 AM


All times are GMT -7. The time now is 10:15 AM. | See also: NikonForums.com, CanonForums.com part of our network of photo forums!
  • Red (Default)
  • Green
  • Gray
  • Dark
  • Dark Yellow
  • Dark Blue
  • Old Red
  • Old Green
  • Old Gray
  • Dial-Up Style
Hello! It's great to see you back on the forum! Have you considered joining the community?
register
Creating a FREE ACCOUNT takes under a minute, removes ads, and lets you post! [Dismiss]
Top