| Pentax/Camera Marketplace |
| Pentax Items for Sale |
| Wanted Pentax Items |
| Pentax Deals |
| Deal Finder & Price Alerts |
| Price Watch Forum |
| My Marketplace Activity |
| List a New Item |
| Get seller access! |
| Pentax Stores |
| Pentax Retailer Map |
| Pentax Photos |
| Sample Photo Search |
| Recent Photo Mosaic |
| Today's Photos |
| Free Photo Storage |
| Member Photo Albums |
| User Photo Gallery |
| Exclusive Gallery |
| Photo Community |
| Photo Sharing Forum |
| Critique Forum |
| Official Photo Contests |
| World Pentax Day Gallery |
| World Pentax Day Photo Map |
| Pentax Resources |
| Articles and Tutorials |
| Member-Submitted Articles |
| Recommended Gear |
| Firmware Update Guide |
| Firmware Updates |
| Pentax News |
| Pentax Lens Databases |
| Pentax Lens Reviews |
| Pentax Lens Search |
| Third-Party Lens Reviews |
| Lens Compatibility |
| Pentax Serial Number Database |
| In-Depth Reviews |
| SLR Lens Forum |
| Sample Photo Archive |
| Forum Discussions |
| New Posts |
| Today's Threads |
| Photo Threads |
| Recent Photo Mosaic |
| Recent Updates |
| Today's Photos |
| Quick Searches |
| Unanswered Threads |
| Recently Liked Posts |
| Forum RSS Feed |
| Go to Page... |
PentaxForums.com → Digital Cameras → DSLR-Specific Forums → Pentax K-S1 & K-S2
→
Manual: Solenoid replacement: Pentax K-S1
 |
| 28 Likes | Search this Thread |
| 03-10-2021, 06:56 AM | #31 |
 Ah yes, you are familiar with that solenoid... Remember Tony's K-S2? He gave it to me because I was going to try to see if I could fix it or at least use it for a video project, as video was working (that project, I ended up not doing). After realizing there was no viable fix, I took the white solenoid out of the K-S2 to put in my K-S1. Tony had bought a good white solenoid but he had used the propane gun to solder it - I knew it probably wasn't good anymore, but I was hoping I would be lucky. Hey it was a white solenoid, so I thought I'd try. It didn't even look damaged! But it was dead... The K-S2 was given away to use for parts. That is the story of that solenoid. It's in my trash can right now... Well, I wasn't quite aware that you'd use that solenoid. But at least it was dead and not functioning like a sanded green or a SLR Japan-Solenoid out of a MZ, because you kept possible havoc away. Well done! How did you solve those issues were you "cracked the plastic"? Superglue or did you find any other clue? | |

| 03-10-2021, 07:08 AM | #32 |
| Pentaxian   | Well done! How did you solve those issues were you "cracked the plastic"? Superglue or did you find any other clue? Well the main crack at the corner is still there - and there is a part of the trim that broke off as well. I don't remember ever dropping this camera but as I said my sons and my wife have used it and they're not very careful with this kind of equipment (my wife usually breaks her phone screen within weeks of getting a new one...)  When I put it back together this time I was able to at least close the gap on the side. There might still be a little bit of dust coming in there, but hopefully not much.  |
| 03-12-2021, 02:47 PM | #33 |
|
I am wondering - does this repair also apply to the K100D? Is it fairly similar? I think I have the same problem. My camera just clicks, won't take a picture, won't adjust the aperture, - everything else is working.
| |

| 03-13-2021, 02:01 AM | #34 |
| I am wondering - does this repair also apply to the K100D? Is it fairly similar? I think I have the same problem. My camera just clicks, won't take a picture, won't adjust the aperture, - everything else is working. It is not similar, because the K100D uses the Japan-DSLR-Solenoid. This Japan-made solenoid never fails (if nobody tampered with it). In this thread I explained as well, why this repair-shop you visited with your K100D was not only wrong, when claiming that "the aperture-control-unit of your K100D needs to be repaired" but also why they possibly try to give you this idea! (post #12) Just for clarity: The "aperture-control-unit" is the solenoid:  The "diaphragm-control-unit" is the complete board: 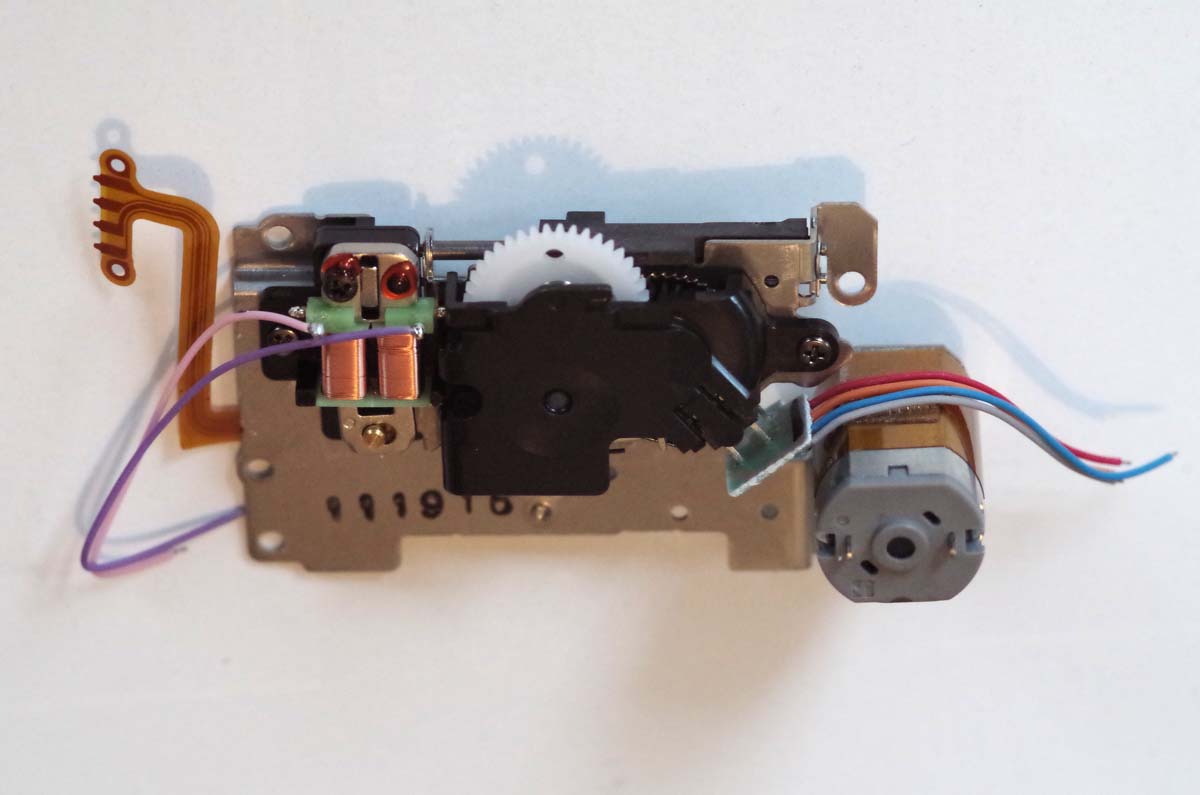 Now, to exchange the solenoid takes about 30min - 60min depending on a few factors, one could ... if everything such as tools etc. is ready do it within maybe 20min (I never like to rush) To exchange the latter, you need to disassemble the camera almost complety right down to the last few steps: For the K30/K50 it takes these steps: (which is easier than for the K-S1, K-S2 and K-70 because they have a much smaller mainboard, trickier soldering points and lands... I challenge those who claim they have done so) Disassembly of main body - removal bottom cover - removalt op cover (discharge main capacitor, unsolder 5 leads) - removal front cover - removal back cover Now we come to the real serious stuff: - removal of the mainboard (unsolder 10 leads) - removal the shake reduction block - removal the tripod plate - removal of the flex board (unsolder 10 wires, unsolder 22 lands!) - removalof the flash pc-board (unsolder 7 wires, unsolder 11 lands) - removal of the R-Plate - removal ofthe upper relay flex circuit block (unsolder 17 wires, unsolder 4 lands) - removal of the G-shoulder-plate - removal of the front housing assembly - removalof the battery case assembly and related parts - removal of the top-board covering the 2 solenoids for the shutter (countless different screws not to mention, all those need to be placed accordingly!) So believe me: Nobody will do this for even $ 250! Precision chargeds $ 250 for just the exchange of the solenoid (same China solenoid which costs them possibly peanuts) (if still on warranty, the might go the whole hog, but actually: I have serious daubts!) Others charge $ 100 for filing/sanding (about the same work-flow involved) A few days ago I disassembled a K100D, the mainboard was finished, so first I took the solenoids out and then continued just for fun to see how easy it is to get the diaphragm-control-unit out (it is designed with the same principal but is slighty different, one could not swap it for use in the K30): I am now pretty fast with such work and I can guarantee you: Nobody in the world would exchange that block except for HARAKIRI! It's the most idiotic thing you can do because it is in 99,999% just the solenoid. But of course, if the sparkplugs of your engine need to be exchanged, you can first take the whole engine out for better access to the sparkplugs. Or this way? Here you can watch a rough (damaging) disassembly of the K100D: Last edited by photogem; 03-13-2021 at 02:22 AM. | |
| 06-21-2021, 06:28 AM | #35 |
|
Hello. Thanks to Photogem for making a very useful repair guide - I intend to follow it in the near future. I would like to know whether it's okay to use a solenoid taken out of an old broken MZ-7. They look quite similar, although I have not yet opened up my Ks-1 and wasn't able to examine the solenoid inside of it. On a side note, should I take the risk of trying to remove the remains of the yellow flexible pcb from the solenoid or is it going to be fine to leave it on? | |
| 06-21-2021, 10:43 AM | #36 |
|
Study this thread: A LITTLE BIT OF HISTORY: Development of the solenoid in Pentax cameras - PentaxForums.com A friend just purchased a (white) solenoid on ebay Germany for her K-S2. Her son was going to replace it, he'd done it before on a K30. But it didn't work out. I checked it yesterday: It was an MZ-Solenoid made for 6V instead of 7.2V. If you know about cars, you know about good and bad engine oil. If you want your car and engine run well, you use the best oil, change always the oilfilter and in a certain intervall. Here it is much more simple: Only one change and to do it right. Any extra opening of the Pentax will do damage to the plastic threads of the screws. Particular two screws are very vulnerable and the screw holding the solenoid as well, as it deals with sudden impact vibrations when the solenoid actuates. We have a few cases here in the forum when things went wrong with this MZ solenoid and I know a few ones from forummembers in 2 German forums. But you can also try it does work. In emergencies. Last edited by photogem; 06-22-2021 at 12:29 AM. | |
| 11-16-2021, 06:10 AM | #37 |
| Solenoid-Replacement Pentax K-S1 Tools required: - Soldering iron with precision soldering-tip (such as Ersa Multi-Pro 20W, no butan-gas soldering-pen: Too hot!) - Screwdrivers JIS 000 or PH000 + PH00 (JIS size works for all screws, PH000 for solenoid screw. JIS is preferable!) - Tweezers or precision pliers - Headlamp is very useful, makes things easier - photos of K-S1 with location of screws, you find them HERE Preparation: - Print out all those photos, glue them on some cardboard, drill 2mm holes were the screws are located so you can later on stick all those screws into those holes. Makes it easier and safe due to different length of the screws. - Make sure you took the battery out 24 hours prior undertaking the repair. This is for discharging the flash-condenser, which is well protected within the K-S1, nevertheless you don't want to risk getting a nasty shock! This condenser charges as soon as you open the pop-up-flash with battery inside the switched-on camera! So don't open the flash prior removal of the battery! You need to open it for access of 3 screws! - For another option how to discharge the flash-condenser read HERE Sequence of opening the body (Body-cap is mounted on the K-mount for protection of sensor etc.) 1. Remove all screws from the bottom part: 6 x screws direct access, 2 x when the battery-door is opened: Careful: One of these screws holds a small metal plate which partly holds the right plastic side! Take this metal piece off with tweezers! There is another screw: 1 x deep within battery-case left side. The next photo shows this metal plate. Don't lose it! 2. Remove all 3 x screws from the left side (direct access) 3. Removal of screws right side: Open the HDMI/USB rubberdoor. Take off the HDMI/USB-sticker! Now you have access to the 2nd screw holding the plastic-side-piece. Unscrew it and take the plastic-side-piece off. Now you have access to 4 more screws, but you only need to unscrew the 2x front screws! 4. Removal of screws front: Take the rubber on the left side off. Now you have access to 3x screws, remove them. Photo: Front rubber + HDMI-USB-sticker: Photo: Hidden screw underneath HDMI-USB-Sticker: Photo: Right plastic-side is removed: Red dots indicate the front screws which have to be removed: Photo: Hidden screws underneath front rubber: 5. Take of the eye-piece: Unscrew the 2 x screws behind it. 6. Open the pop-up-flash (remember, no battery inside your camera!). Remove the 3 screws there plus the 2 screws next where the strap is fixed 7. Lift the top part with the flash about 1/2" inch. Don't lift it off completely! This is necessary to take of the front part and to slide it off. The top part "hooks" into the frontpart! 8. AF/M-Switch on M! This has to be checked later on again! 9. Gently "pull off" the front part. There is a kind of nose which has to be lifted, here marked with red dots: Now you have access to the solenoid. Place the camera on some soft tissue as shown here: Unsolder the solenoid. For this gently pull the wires forward, because they are fixed with some elastic glue to the left! First unsolder the right purple wire: Gently hold the wire with the tweezers while you touch the bare end soldered onto the solenoid until it comes off Next 2 photos have been taken by a kind person not knowing about "DOF" and never had used my KP before... so when I noticed it this K-S1 was reassembled, it was too late. Anyway, these photos show you how easy it is to solder off the wires! Don't be scared! Same for the left pink wire: Photo: Solenoid with wires off: Now you can unscrew the solenoid, the screw and right side of the solenoid is fixed with red thread-locking-lacquer which comes off easily. You can see clearly were the solenoid is fixed to: Left the nose and right the hole for the solenoid screw: The lever for the plunger of the solenoid. It moves the shutter-mechanism: Now solder a tiny amount of solder onto the bare ends of the pink and violet wire! Screw the white "made in Japan" solenoid in. Why this solenoid and no other one nor filing/sanding the faulty China-solenoid you can read about HERE =Manual for solenoid-replacement Pentax K30/50/500 You might fix the screw and the left hole with some thread-locking-lacquer or nail-varnish: Solder the wires back onto the solenoid. Make sure the solder holds well (Test by pulling the wires gently with the tweezers!): Re-Assembling of the body: - Check that the inner and outer part of the AF/M-Switch are on M: The inner part is on M when the screw-drive gear in this small hole in the metal K-bajonett is retreated! Now the part "which demands good patience": - Gently plug-on the front part again. You can see on the linked photo why this is a bit fiddly: The ON/OFF switch has to fit as well as the AF/M-Switch! This "nose" which I mentioned for the disassembly part: Make sure you don't hurt the flat ribbon wire that sits at this very region this nose slides back onto the main body! Sounds complicated but "when you are there" it is easy to understand and follow. Also be careful: The inner part of the AF-M-switch has a tiny metal ball which stops at those 2 positions AF and M. Don't lose this ball (it actually sits there very tight, only rough treatment will get it lose!). Remember to llift the top-part with the flash for this 1/2" again! Make sure the front sits well. Take your time, be patient. Don't push or force anything! - Screw in the 3 screws which were hidden under the rubber. Fix the rubber to its place. - Screw in the 2 screws in the right (grip) side. Fix the plastic-side-piece on the right side. Fix the small screw which was covered by the HDMI/USB strip! Fix that one as well back on its place! - Screw in the 3 screws for the left side and all 5 screws on the top! - Fix the bottom part with all screws plus the small metal piece - Insert the battery, an AF Lens and take a test photo with AV, TV or TAV and large or open aperture such as f2,8. All should be fine. I did take off the sticker, unscrewed but cannot take plastic side piece off. I really tried hard from all sides, but cannot pickup opposite side of screw , could you please help me ? | |
| 11-16-2021, 07:48 AM | #38 |
| "Take off the HDMI/USB-sticker! Now you have access to the 2nd screw holding the plastic-side-piece. Unscrew it and take the plastic-side-piece off." I did take off the sticker, unscrewed but cannot take plastic side piece off. I really tried hard from all sides, but cannot pickup opposite side of screw , could you please help me ? Did you unscrew the screw deep inside the battery chamber? There are 5 screws which hold the plastic-side piece: The 2 on the left side when the rubber is off hold the side piece together with that one inside of the battery-chamber and the small one underneath the HDMI/USB sticker. Attached a photo of this part: Arrows show where it is fixed with screws: 2 x red: underneath rubber (right hand grip) 1 x white: deep inside battery compartment 1 x yellow: bottom 1 x green: under HDMI/USB Last edited by photogem; 11-17-2021 at 03:30 AM. | |
| 11-17-2021, 01:24 AM | #39 |
| Did you take the rubber (of the right hand-grip) off to get to the 3 screws hidden by the rubber? Did you unscrew the screw deep inside the battery chamber? There are 4 screws which hold the plastic-side piece: The 2 on the left side when the rubber is off hold the side piece togetzer with that one inside of the battery-chamber and the small one underneath the HDMI/USB sticker. | |
| 04-07-2022, 05:45 AM | #40 |
| Thank you it was beacase of 3 screws under right hand grip. I resolved it. If you do that, you will have no difficulty, but it should be restated that two of the three screws hidden under the rubber grip on the front also secure the silver panel. So basically if you remove the screws in the base, under the usb/hdmi sticky label, and the two under the rubber grip, the panel will just pull off cleanly. Apart from that, the dismantle, repair and reassembly is straightforward so long as you are careful - DON'T lift the top more than 1cm to free the front panel, and when replacing the front, ensure the black plastic slot that engages with the Manual/AF rotary lever on the front is clicked upwards so it locates cleanly on the pin of the lever which should be-as Photogem says-at the M setting. And be careful you do not damage the metal contacts of the on/off switch as the front is manouvered back in place-the front has to be slid backwards, and it is not really possible to lower and slide the front at the same time because of the shape of the moulding. The important thing is, it is a quite straightforward proceedure, the soldering points are very accessible ( just desolder the purple wire first to avoid touching this wire when desoldering the pink one-there is not much clearance, and no slack in the wire which prevents moving the wire away from the pink solder post. On resoldering, solder the purple wire last.) You may find the solenoid will not move even after the single mounting screw has been removed-this is because there may be a touch of locking lacquer on the locating pin as well. Just lever the body gently off the mount with a small screwdriver inserted between the camera plastic mounting point and solenoid metal body-a slight lift will break the lacquer. Don't forget to rehook the lower end of the replacement solenoid over the aperture mechanism pin. Incidentally as a precaution, after I had replaced the front, but before any screws were replaced, I inserted the battery, checked the camera turned on, that it fired, and that the M/AF lever worked correctly. I then removed the battery again, and finished the reassembly. After which I was delighted to see, with suitable lens in palce, the solenoid was again working correctly. Fingers crossed it will not need doing again, but if I have any issues, I will report them. Cost, £9 plus VAT, and a couple of hours of my time! | |

| 04-07-2022, 11:56 PM | #41 |
| I also had some problems (as member @eybaby) removing the silver side-panel , simply because I followed Photogem's guide without reading the whole first! member @eyebaby just forgot to take the rubber of and remove those 3 screws. Step #4 clearly states that you have to do so and all others managed to disassemble their K-S1. I think it isn't a problem of the tutorial but a problem of attention, i.e. just missing a step and then being stuck (following the solenoids example:-)) If you do that, you will have no difficulty, but it should be restated that two of the three screws hidden under the rubber grip on the front also secure the silver panel. So basically if you remove the screws in the base, under the usb/hdmi sticky label, and the two under the rubber grip, the panel will just pull off cleanly. Why just 2 of those hidden screws? Who wants just to remove the panel, doesn't make sense to me? For the disassembly you need to take all 3 screws out because the 3-rd one fixes the front part! Last edited by photogem; 07-21-2022 at 05:18 AM. | |
| 04-08-2022, 01:43 AM | #42 |
| I thought Step #4 is clear and obvious. member @eyebaby just forgot to take the rubber of and remove those 3 screws. Step #4 clearly states that you have to do so and all others managed to disassemble their K-S1. I think it isn't a problem of the tutorial but a problem of attention, i.e. just missing a step and then being stuck (following the solenoids example:-)) The panel can be silver but often has different colors. Why just 2 of those hidden screws? Who wants just to remove the panel, doesn't make sense to me? For the disassembly you need to take all 3 screws out because the 3-rd one fixes the front part! Anyway, I already had changed the same tutorial in the DIY section: Manual: Solenoid replacement: Pentax K-S1 - PentaxForums.com Today I added something completly different because the 3-rd screw underneath the front-rubber can do some damage if mixed up! I followed the tutorial EXACTLY, and there lay the problem, not a 'lack of attention', which as someone who like yourself can spend many hours of painstaking work on a single camera is not something I suffer from- probably comes from years of perusing legal documents in a previous life, where any such lack of attention inevitably gets punished subsequently in court! You refer to step 4 which is 'clear and obvious' , but it is step 3 which contains the problem - quote '3. Removal of screws right side: Open the HDMI/USB rubberdoor. Take off the HDMI/USB-sticker! Now you have access to the 2nd screw holding the plastic-side-piece. Unscrew it and TAKE THE SIDE-PIECE OFF ( my capitals) . Now you have access to 4 more screws, but you only need to unscrew the 2x front screws'. So you can see clearly that step says that at this stage you can take the side piece off, whereas until the two screws under the rubber grip are removed that side piece will NOT come off. The simple amendment I suggest is that reference to removal of the side piece be moved from step 3 to step 4, nothing more. Can't quite understand where you arrived at the conclusion I was only trying to remove the side-plate-after all I was relating my experience with dismantling the K-S1 to replace the soelnoid. My reference to the two screws rather than three under the rubber grip is that only two relate to the side plate, and it was solely the side-plate where I, and eybabi ,had issues.Once that side-plate is off, the rest follows in natural progression as outined in your excellent tutorial. Incidentally I fully agree with your emphasis on the paramount importance of ensuring that all screws go back into exactly the same holes they came from. I just drew rough shapes of the plates onto pieces of scrap twin-walled cardboard from a box, and then pushed the screws through the representative locations, noting if any were hidden or recessed,such as in the battery compartment. This avoids the '3rd screw' under the rubber issue that caused you some puzzlement when rectifying a repair where the wrong screw had been used here by a previous repairer. | |
| 04-08-2022, 08:08 AM | #43 |
| A bit puzzled by that reply. We bring puzzles together. I followed the tutorial EXACTLY, and there lay the problem, not a 'lack of attention', which as someone who like yourself can spend many hours of painstaking work on a single camera is not something I suffer from- probably comes from years of perusing legal documents in a previous life, where any such lack of attention inevitably gets punished subsequently in court! Anyway, it is not so easy for me to follow your words. So I missed the real message. You refer to step 4 which is 'clear and obvious' , but it is step 3 which contains the problem - quote '3. Removal of screws right side: Open the HDMI/USB rubberdoor. Take off the HDMI/USB-sticker! Now you have access to the 2nd screw holding the plastic-side-piece. Unscrew it and TAKE THE SIDE-PIECE OFF ( my capitals) . Now you have access to 4 more screws, but you only need to unscrew the 2x front screws'. So you can see clearly that step says that at this stage you can take the side piece off, whereas until the two screws under the rubber grip are removed that side piece will NOT come off. I can't correct that thread yet as in the DIY section but make sure it will be done. First I have to correct it in the DIY section but it will take a little time. Incidentally I fully agree with your emphasis on the paramount importance of ensuring that all screws go back into exactly the same holes they came from. I just drew rough shapes of the plates onto pieces of scrap twin-walled cardboard from a box, and then pushed the screws through the representative locations, noting if any were hidden or recessed,such as in the battery compartment. This avoids the '3rd screw' under the rubber issue that caused you some puzzlement when rectifying a repair where the wrong screw had been used here by a previous repairer. But if a screw was screwed in at the wrong place already, you hardly will notice that. I only found out when I disassembled a 2-nd K-S1 and had the screws next to each other. It is a tiny but then damaging difference. | |
| 04-08-2022, 08:28 AM | #44 |
| Isn't that a good sign? We bring puzzles together. Don't make it too complicated. I don't know about previous lives, only remember this one. Anyway, it is not so easy for me to follow your words. So I missed the real message. You are absolutiy right about this.... sorry... somehow this got mixed up and I shall correct this. I can't correct that thread yet as in the DIY section but make sure it will be done. First I have to correct it in the DIY section but it will take a little time. As you know I have printed photos of all sides with holes punched in. But if a screw was screwed in at the wrong place already, you hardly will notice that. I only found out when I disassembled a 2-nd K-S1 and had the screws next to each other. It is a tiny but then damaging difference. As for previous lives, all our experience is built on what went before-sometimes for the better, but not always! Yes, I saw your suggestion about printing out your photos as templates for the panels and screw locations, but I hate printing out anything if I can help it! Saves the ink and paper, so I just sketched out the panels directly on the cardboard I used. Enjoy your weekend. | |
| 07-21-2022, 05:16 AM | #45 |
| Update and a very interesting story Update and a very intesting story: Here an update to a very strange problem: I got a K-S1 which didn't work at all. It was sold for good money on ebay France as "almost new, aperture-block-failure" (for parts only, no warranty, no return possible) A friend purchased it and wanted to repair it but when he received the camera he couldn't switch it on, it seemed dead as dead could be. So the camera came to me and I started to research. The fault was really odd: As soon as the front part was back in place the camera worked but as soon as the screws insereted it stopped working. I was puzzled but I wanted to find out and finally noticed that the problem was a tiny switch:  I decided to wait until I had another K-S1 for repair so I could measure what the proper function of this switch which finally happened last week: This switch simply bridges two contacts for powering the K-S1 off when opening the battery-door and removing the battery. But as soon as the battery is inserted back in and the battery-door closed the K-S1 switches on again. This switch had been damaged by a wrong (too long) screw, it had a dimple on the top:  I removed the switch by clipping of the contacts (two red arrows) a simple solution, now one just has to switch the K-S1 on again on the main On/Off-switch if the battery is removed, that's all. happened when the K-S1 was assembled originally and it just wasn't tested for function I also exchanged the solenoid and then did the first 6 testshots. Then I uploaded the last photo to find out the shuttercount: It was 6!!! So I got curious. Through good contacts and the serialnumber I could verify the history if this Pentax: It was regularely sold in UK by a Pentax dealer but returned because it didn't work at all. Ricoh couldn't find the fault and chucked it. Somebody close to the repairshow somehow got hold of it and then sent it to his brother in France who finally sold it on ebay France (both knowing it didn't work... the UK adress was still under the French shipping label!) | |
|
| Bookmarks |


| Tags - Make this thread easier to find by adding keywords to it! |
| access, aperture block failure, battery, front, k-s1, k-s2, made in japan, metal, pentax k-s1, photo, repair, rubber, screw, screws, selenoid, solenoid |
 Post #1 by photogem
  Similar Threads
 | ||||
| Thread | Thread Starter | Forum | Replies | Last Post |
| Manual solenoid replacement Pentax K30 / Discharge flash-condenser / Solenoid choice | photogem | Pentax K-30 & K-50 | 204 | 03-20-2024 01:14 AM |
| Solenoid replacement | BugsDogsAndSunsets | Pentax K-S1 & K-S2 | 13 | 02-04-2021 01:25 PM |
| Genuine Aperture Solenoid Plunger Part K-30 K-50 K-S1/S2 K-500 | jhaji | Repairs and Warranty Service | 2 | 04-24-2019 03:40 PM |
| Who can repair a K-30 aperture block if I have the white solenoid? | steamloco76 | Repairs and Warranty Service | 14 | 04-14-2019 06:20 PM |


