Recently I bought a P3N with an F 50/1.7 attached on Mercari. I already have the lens, but I got the combination for a good price. The individual selling it really didn't know much about it, she thought something was wrong with the camera's shutter because there were black marks on the focus screen. Looks like the camera should be OK, but I noticed a little fungus starting on the inside of the front element of the lens. I knew it would not effect the lens now, but it needed to be stopped if it is active. So I decided to try to remove the fungus myself, I figured this lens might be an easy one to try. I started this Monday night during a hurricane, probably not a good idea, my first hurricane and it was predicted to not be too bad.
I tried to do this a few years ago on an M 40-80 that was really unsalvageable with fungus and failed with the wrong tools. So this was really by first serious attempt, I had read that the 50s were pretty simple in design, so why not. I've got a few 40-80 parts if anyone needs them

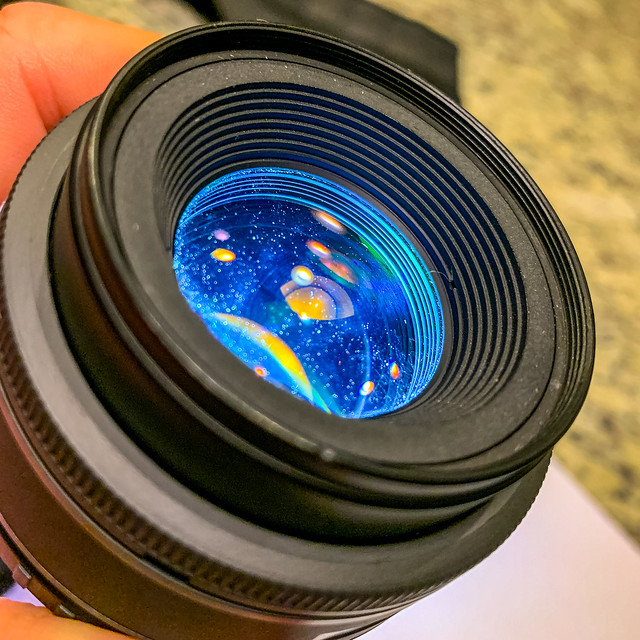
Here's the pre-disassembly view of the front element. Dust is more prominent than the fungus in this view:
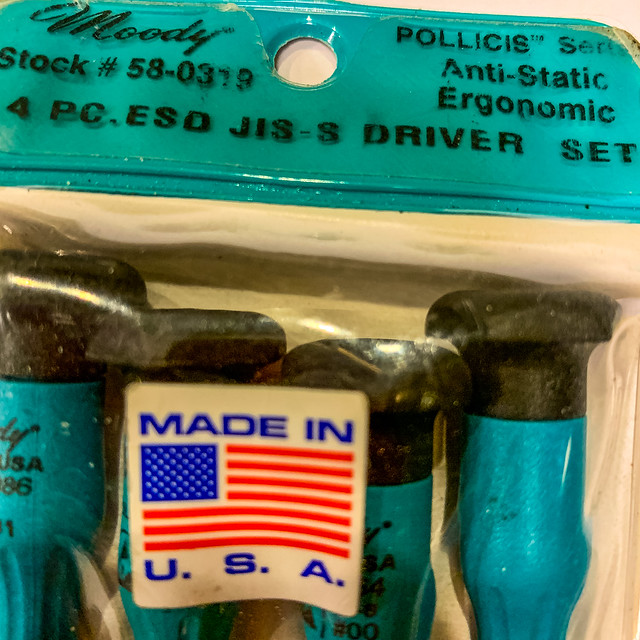
The tools I started with, thanks to the many people of the years in this forum that have mentioned the JIS screwdrivers, they are a must:
The first screws to remove are these on the inner barrel that moves in and out with focus, rotate until it is out all of the way and you'll see them, there are three, I used the #0 JIS screwdriver.:

This is a magnetic arm band (laying on the work surface) I'm using to keep the screws in order, they are very tiny and need to be held in place. I have a magnetic tray in my shed, but there was hurricane outside when I started this, so I decided to use the armband which worked OK. There will be different size screws here so I wanted to keep them separated:

The first part removed:

About this time the power went out. I spent the next morning and afternoon cleaning up debris, not damage to the house! The power came back on after 5:00 PM, later that night I got back to the lens. Next I took off some parts that did not have to come off, namely the focus ring, I won't show that part, so we will go on to this next ring, I'm not sure what it is called, it's kind of conical in shape and the small part contacts the front element, I don't have a picture of the removal, it just screws out, to loosen it I used a flat rubber jar opener, it was pretty easy:

I removed these three screws with a JIS #00, I'm really not sure they needed to be removed, they may have been holding the optics assembly, but I don't really think so.:

Once that part is out you can lift out the front optics assembly, notice it has two indentations on the edge for a spanner:

Here is what the assembly looks like, it holds the front element and the next two elements I believe:

At this point I had to stop, because I did not have the spanner and was not willing to jury rig something together, went to Amazon and ordered the spanner that was able to be delivered soonest without additional cost, the
Andoer DSLR Camera Tool Set 3 Tips Lens Repair Set 6 Screws and 2 Hexagon Wrench cost me $21.34 with tax, I ordered it Tuesday night after 9:14PM and received it at 10:09 this morning (Thursday), pretty fast shipping!

With the spanner I loosened the retaining ring holding the front element in place and was able to remove it and inspect the element behind it, which was clean. It was hard getting a good photo here as I was using a cell phone and holding the element in the light, but you can kind of see the fungus:

With a new microfibre cloth I cleaned the element with alcohol, then put it in a bath of hydrogen peroxide to soak. After soaking I wiped it down with another new microfibre cloth, then cleaned it again with the hydrogen peroxide and dried it with the part of the cloth still dry. Looked at the optic assembly agin to make sure the glass looked clean, blew it out with a rocket blower, blew off the front element with a rocket blower, seated it and screwed the retainer back in and hand tightened it:

Blew out the open lens with several blasts from the rocket blower and reassembled. I mounted it on the KP (which is getting cleaned tonight) and took a couple of test shots. It dawned on me that I had not even tested this lens yet, so I was at least glad to see that the autofocus works.


I cleaned the other non element parts of the lens as I disassembled them using a microfibre cloth and Monster Screenclean
Tools and supplies used:
JIS Screwdrivers, sizes #0 and #00
Andoer lens spanner
Rocket Blower
Three microfibre lens cloths, 2 NEW
small portable battery operated LED lights
LED flashlight
Alcohol
Hydrogen Peroxide
Magnetic holder for screws
white paper for work surface visibility (easier to see a tiny screw on than kitchen counter)
magnifying glass
notepad, pen, and camera, I just used an Iphone rather than setting a camera up, that would have been better, but this is what I did.
Last edited by ramseybuckeye; 08-06-2020 at 07:04 PM.


 Post #1 by ramseybuckeye
 Similar Threads


