Sandy asked about my sharpening workflow (If I have something like that

)
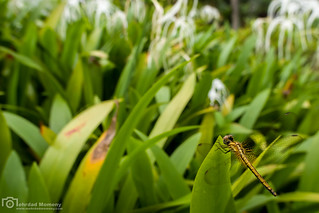
Because you asked under this photo from today, and I should say it's one of those photos which I had quite a lot of sharpening applied, I'd explain in detail over it:
So here is the explanation:
First of all, I start it in the detail tab of lightroom, and here is my guide in that:
Guid to Image Sharpening
And here is my detail tab for that specific photo:
First, The photo were shot without flash and at ISO1600, and that's a big challenge in sharpening! (flash adds a lot of contrast to the photo which results in it look sharper, and ISO1600, you know that)
 Note: This is one of rarest times I pushed the Amount and Radius sliders so much
. You will find more info about this part in the article mentioned above.
But here that wasn't enough!
Here is when selective sharpening comes!
Here I had two local things running on the photo, one Graduated filter on top, because the top side is in fact out of focus, and shouldn't be bothered with my sharpening, and due to UWA funkiness, it looks quite weird, so this filter will compensate for those things:

Now comes the area around dragonfly:
Note: local adjustment is the only place I touch clarity slider (Well, TBH, I rarely do move it to +5 or +10 in landscape shots where everything is in focus)

Not a great brush work
, but that's fine for web view.
Well, that's all related to my sharpening workflow.
And at this time if I were you, I would like also to see the basic tab adjustments, so here it is:

And there was also a small Radial filter around the dragonfly with -100 in highlights slider, because I thought that would be helpful too.

That's all for this photo.
I hope it helps.


")


 Fingers crossed for you.


 Post #198 by severalsnakes
 Similar Threads


