Forgot Password
Pentax Camera Forums Home
 

Reply
Show Printable Version Search this Thread
05-31-2010, 01:50 PM   #16
Veteran Member
JohnBee's Avatar

Join Date: Sep 2008
Location: Newrfoundland
Photos: Albums
Posts: 4,667
Original Poster
QuoteOriginally posted by ASammet Quote
All sent!
Thanks very much for all your efforts!
I'll give them a good looking over tonight and post an update afterward.

05-31-2010, 02:59 PM   #17
Veteran Member
JohnBee's Avatar

Join Date: Sep 2008
Location: Newrfoundland
Photos: Albums
Posts: 4,667
Original Poster
QuoteOriginally posted by ASammet Quote
Well I have a few samples for you, unfortunately it totally slipped my mind when I was out that you wanted specific shutter speeds. Would you still like to see them?
Without even trying, I think we can safely say we can push things up to the ISO4000 region. Your ISO3200 samples are exceptionally good btw. I don't think there is much to do other than basic PP on any of them other than a little blotching in the train surfaces, I can't see much reason to push anything any further.

I feel kind of bad also, because if I could of seen these prior to sending them, I would of just say... lets move onto the next level.

Having said that... I've had the luxury of trying two different K7's at or around the time they were released and I was never able to come close to the output you posted here(and were not subtle differences here). You files(as they look now) are more like the ISO1600 files I had with our own K7's when I was trying them out.

So I'm now wondering if I shouldn't look at the K7 again. Because I'm really starting to think that I may have had some bad units altogether. You thoughts on this?

PS. you up to some 4000 and 6400 ISO samples? These were low light right?
05-31-2010, 04:53 PM   #18
Site Supporter
Site Supporter
Clarkey's Avatar

Join Date: Jan 2008
Location: Brampton, ON, Canada
Photos: Gallery
Posts: 2,456
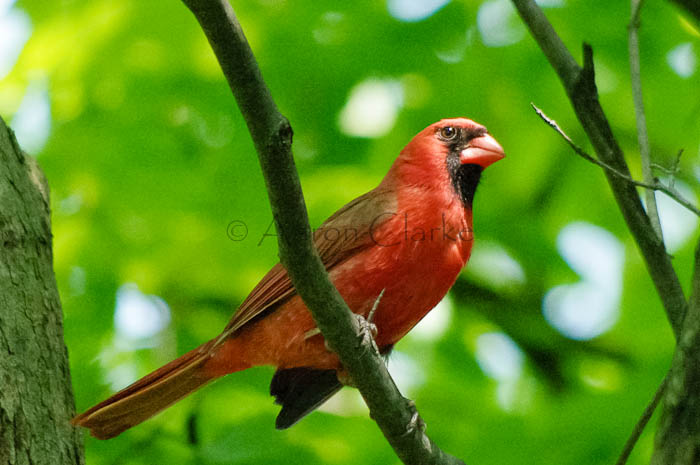
Hi, and thanks for the previous response. How clean is clean? I'm always curious about the before and after. I'm struggling to get good wildlife shots at 1600 sometimes!:


(Lightroom 3 beta with enhanced NR)
05-31-2010, 05:50 PM   #19
Veteran Member


Join Date: Nov 2006
Location: Near Montréal, Canada
Photos: Gallery
Posts: 1,716
QuoteOriginally posted by JohnBee Quote
So I'm now wondering if I shouldn't look at the K7 again. Because I'm really starting to think that I may have had some bad units altogether. You thoughts on this?
Let me know if you want samples from an "early" unit (manufacture date 2009-07-02, production code 2.1 according to ExifTool) to compare.

06-01-2010, 10:23 PM   #20
New Member
ASammet's Avatar

Join Date: May 2010
Location: South Florida
Photos: Albums
Posts: 14
QuoteOriginally posted by JohnBee Quote
Without even trying, I think we can safely say we can push things up to the ISO4000 region. Your ISO3200 samples are exceptionally good btw. I don't think there is much to do other than basic PP on any of them other than a little blotching in the train surfaces, I can't see much reason to push anything any further.

I feel kind of bad also, because if I could of seen these prior to sending them, I would of just say... lets move onto the next level.

Having said that... I've had the luxury of trying two different K7's at or around the time they were released and I was never able to come close to the output you posted here(and were not subtle differences here). You files(as they look now) are more like the ISO1600 files I had with our own K7's when I was trying them out.

So I'm now wondering if I shouldn't look at the K7 again. Because I'm really starting to think that I may have had some bad units altogether. You thoughts on this?

PS. you up to some 4000 and 6400 ISO samples? These were low light right?
Yeah, I can shoot what ever you would like. You think those are okay? The green one with the broken gauge i thought was very noisy.
06-02-2010, 05:30 AM   #21
Veteran Member
JohnBee's Avatar

Join Date: Sep 2008
Location: Newrfoundland
Photos: Albums
Posts: 4,667
Original Poster
QuoteOriginally posted by ASammet Quote
Yeah, I can shoot what ever you would like. You think those are okay? The green one with the broken gauge i thought was very noisy.
Great news!

I already called my dealer not far from here regarding some K7 trials, sadly he had non in stock. And according to him, there hasn't been any demand since he first stocked them and so they haven't bothered to replenish. And the problem is(now)... that I'll have to give a deposit which I'll loose if we don't take them(two units).

Anyways, that's neither here nor there, I just though I'd update the thread with regards to trying some newer units.

On the issue of the green dial image, I found it to have most most excellent detail retention. Though the large uniform texture seems to make it a little harder to assess the overall image definition.

But for the sake of effort, I will PP the images using my methods and post them results here and on the high ISO forum as well(shortly). I have some focusing screen testing to carry out today, but I think we can bounce between tasks. If anything, PP'ing is more like a break than a chore in this house

Cheers!
06-07-2010, 09:32 AM   #22
Veteran Member


Join Date: Jun 2009
Posts: 1,689
QuoteOriginally posted by JohnBee Quote
Great news!

I already called my dealer not far from here regarding some K7 trials, sadly he had non in stock. And according to him, there hasn't been any demand since he first stocked them and so they haven't bothered to replenish. And the problem is(now)... that I'll have to give a deposit which I'll loose if we don't take them(two units).

Anyways, that's neither here nor there, I just though I'd update the thread with regards to trying some newer units.

On the issue of the green dial image, I found it to have most most excellent detail retention. Though the large uniform texture seems to make it a little harder to assess the overall image definition.

But for the sake of effort, I will PP the images using my methods and post them results here and on the high ISO forum as well(shortly). I have some focusing screen testing to carry out today, but I think we can bounce between tasks. If anything, PP'ing is more like a break than a chore in this house

Cheers!
Funny you say this....

I bought my K7 when it was just released, a few months ago I had some issues and the local distributor here replaced the entire PCB and updated the firmware to 1.03.

There was a purple line appearing in my videos which after this had vanished.

Ever since I noticed that my high ISO performance had improved greatly, which led me to theorise that there has been some minor hardware revisions to the K-7 since it was first released.

I received some word that my theory may actually be correct from a tech but no there definitive way to actually back that.

But I find my high ISO images even up to 3200 can be clean if shot right.

06-07-2010, 09:38 AM   #23
Veteran Member


Join Date: Jun 2009
Posts: 1,689
Here this was shot at 2000 iso under absolutely TERRIBLE lighting conditions at f2.8 at 135mm.

With the naked eye he was pretty hard to see, this was just shot in RAW and converted in LR 2.6 to JPEG with no resizing, given the conditions it turned out pretty well.


Original full size
http://www.flickr.com/photos/cmt83/4679345712/sizes/o/
06-07-2010, 09:43 AM   #24
Veteran Member


Join Date: Jun 2009
Posts: 1,689
And here's another shot at 2000 ISO, horrid lighting, under exposed and only processed in LR 2.6 with standard NR and converted to jPEG not resized.


Full size
Flickr Photo Download: _IGP0062
06-12-2010, 06:39 PM   #25
Veteran Member
JohnBee's Avatar

Join Date: Sep 2008
Location: Newrfoundland
Photos: Albums
Posts: 4,667
Original Poster
QuoteOriginally posted by ASammet Quote
All sent!
Hi, ASammet, sorry for the delay's in coming back with this. I've been so busy with school end and preparing for summer that I haven't had much time at all to man the workstation. However... I expect to get the entire set done over the weekend and I look forward to finally publishing my the workflow that goes along with it(fun).

Click on the image to view it in a larger size


I'm happy to say that this one was the most challenging of the entire set.
I'd rate the others from "very good" to "excellent", and so I look forward to publishing them shortly.

Thanks again for your help with this.

...the end
06-12-2010, 07:02 PM   #26
Site Supporter
Site Supporter
Clarkey's Avatar

Join Date: Jan 2008
Location: Brampton, ON, Canada
Photos: Gallery
Posts: 2,456
Well, I'll certainly be looking forward to applying the results if you publish the workflow. Most intrigued.
06-12-2010, 07:44 PM   #27
Veteran Member
JohnBee's Avatar

Join Date: Sep 2008
Location: Newrfoundland
Photos: Albums
Posts: 4,667
Original Poster
QuoteOriginally posted by Clarkey Quote
Well, I'll certainly be looking forward to applying the results if you publish the workflow. Most intrigued.
Hi, thanks for the encouragement.

I was working on a K20D advanced NR method until I received K-7 files. At which point I decided it would be better to center the tutorial around the K-7 since it's a tougher subject as well as the current flagship camera.

However, if you'd like to try your hand at this yourself while I finish, then here is a quick and dirty summary of the process

It all starts with what I would call the image grain phase. Which is to achieve the highest pixel fidelity as possible while eliminating as much noise as possible in the process.
This is the most crucial step of all as it sets the stage for the entire workflow and every detail counts... positive or negative!

1. ACR: Everything 0 except for the color noise reduction controller(Color Detail 0 also)

2. CS5: Name and duplicate layer(always leave a copy behind).

3. Dfine: Apply debanding(as needed, if not skip this step), use blue channel to help identify and correct. Only use what's needed, debanding is quite abrasive.

4. CS5: Name and duplicate layer(for reference).

5. TDN: Start(create flat preset 0,0,0,), identify noise types in image and adjust sliders accordingly. If you are dealing with aggressive noise patterns(color blotching etc), then target those areas specifically and create layers(properly named) from which to mask with when you are done. The biggest mistake users make with NR is in with global noise reduction.

And there you have it... this is pretty much how it goes down in a nutshell. The big trick of course is in identifying noise types and using the proper NR methods to address them.
To which I'd add, that the Topaz Denoise manual can be pretty helpful, as it explains the various functions of the program as well as the noise types associated with it.

Of course there is much to talk about within the scope of noise types and where to draw the lines within each stage of the NR workflow. And this is something that I cover in depth throughout the sections of my tutorial.

JohnB

Last edited by JohnBee; 06-12-2010 at 07:55 PM.
06-15-2010, 08:49 PM   #28
New Member
ASammet's Avatar

Join Date: May 2010
Location: South Florida
Photos: Albums
Posts: 14
QuoteOriginally posted by JohnBee Quote
Hi, ASammet, sorry for the delay's in coming back with this. I've been so busy with school end and preparing for summer that I haven't had much time at all to man the workstation. However... I expect to get the entire set done over the weekend and I look forward to finally publishing my the workflow that goes along with it(fun).

Click on the image to view it in a larger size


I'm happy to say that this one was the most challenging of the entire set.
I'd rate the others from "very good" to "excellent", and so I look forward to publishing them shortly.

Thanks again for your help with this.

...the end
Damn! That came out fantastic! almost as if it was shot at 400-800
06-16-2010, 03:37 AM   #29
New Member


Join Date: Dec 2009
Location: Ljubljana, Slovenia
Posts: 9
Interesting thread! I was wondering if there could be some before and after shots to take a peek?

cheers, Luka
06-16-2010, 03:51 AM   #30
Veteran Member
JohnBee's Avatar

Join Date: Sep 2008
Location: Newrfoundland
Photos: Albums
Posts: 4,667
Original Poster
QuoteOriginally posted by flat4 Quote
Interesting thread! I was wondering if there could be some before and after shots to take a peek?

cheers, Luka
Here's the original... with RAW default only

Reply

Bookmarks
  • Submit Thread to Facebook Facebook
  • Submit Thread to Twitter Twitter
  • Submit Thread to Digg Digg
Tags - Make this thread easier to find by adding keywords to it!
files, image, iso2500, k7, management, noise, photography, photoshop, pp, results, time

Similar Threads
Thread Thread Starter Forum Replies Last Post
K7 high iso noise comparison cyy47 Pentax DSLR Discussion 24 08-02-2010 02:19 AM
getting the most noise free high iso from k7 opiedog Pentax DSLR Discussion 40 03-27-2010 02:29 AM
More to KX high ISO than low noise telfish Pentax DSLR Discussion 1 02-11-2010 02:22 PM
the high iso/low noise conundrum nostatic Pentax DSLR Discussion 39 08-05-2009 03:31 PM
K20D - High ISO Noise Reduction - How? How much? When? ksignorini Pentax DSLR Discussion 4 04-13-2008 01:14 PM


All times are GMT -7. The time now is 10:02 PM. | See also: NikonForums.com, CanonForums.com part of our network of photo forums!
  • Red (Default)
  • Green
  • Gray
  • Dark
  • Dark Yellow
  • Dark Blue
  • Old Red
  • Old Green
  • Old Gray
  • Dial-Up Style
Hello! It's great to see you back on the forum! Have you considered joining the community?
register
Creating a FREE ACCOUNT takes under a minute, removes ads, and lets you post! [Dismiss]
Top