 Originally posted by Ole
That's impressive (and a nice dog at that)! When you get your technique down, please share! I find Refine Edge somewhat confusing and could use some hints!
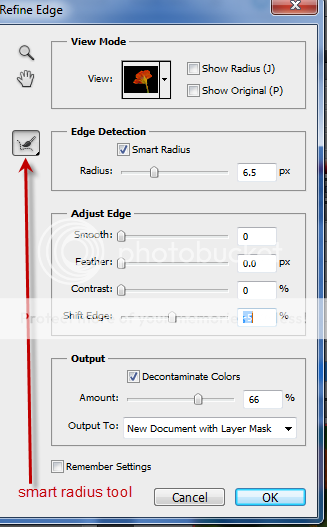
Here you are, Ole, my mini guide to using the Refine Edge option.

(See picture below for settings.)
1. Use the Quick Selection Tool for a first selection.
2. Click on Select>Refine Edge (or click the Refine Edge button in the tool bar).
3. You can change the colour of the background under View Mode.
4, Click on Smart Radius and move the slider up to between 6-7 (or more, keep an eye on the preview and see what looks best).
5. Click on he Radius Tool and paint the areas that need adjusting
6. Click on Shift Edge and set to e.g. -4.
7. Click on Decontaminate colours and set it to sth like 70.
8. If wanted, set feather and smooth (you'll have to play with the settings - they vary per picture).
9. Under
Output to click on
New Document with Layer Mask and click OK.
10. A new document will open with your cut-out subject.
11. Rightclick the adjustment layer and click Convert to Smart Object.
12.That's it, you're done! If you feel that the edges are too sharp, you can try to soften 'em a bit by using the blur tool.


 ), I compare the various methods, combine them, make a few notes and save 'em for future reference. I did that today as well, but it's all in Dutch, which probably won't be of much use to you.


 Post #1 by lidy
 Similar Threads


