Forgot Password
Pentax Camera Forums Home
 

Reply
Show Printable Version 1 Like Search this Thread
09-12-2010, 04:28 PM - 1 Like   #1
Site Supporter
Site Supporter


Join Date: Jul 2009
Photos: Gallery | Albums
Posts: 534
CS5 - Refine Edge

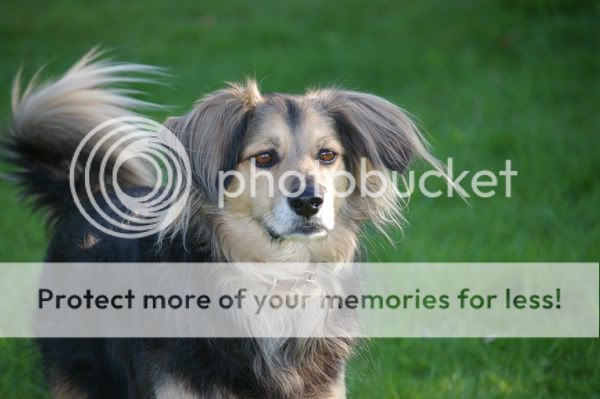
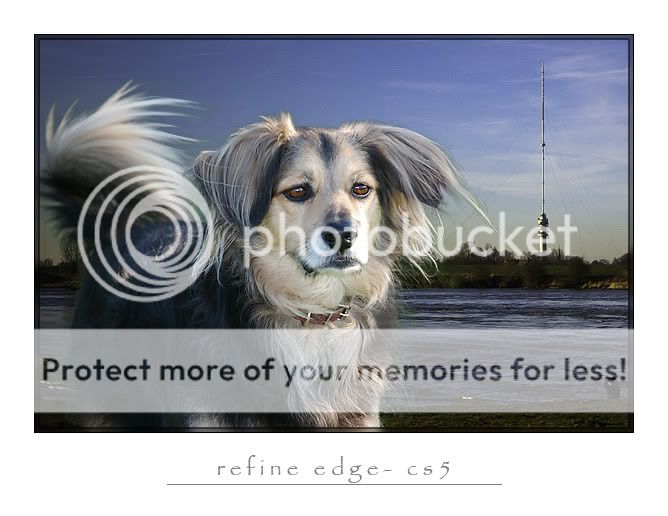
I'm absolutely over the moon about some of the improved features in CS5. I had a go at the Refine Edge thing today, for which I used a picture of one of our dogs, taken some time ago. I've tried to separate him from the background many times and it's taken hours and hours of work and brought a lot of frustration. I was never quite satisfied with the results. There were always too many flaws: parts missing or parts that shouldn't be there. With this new CS5 feature it took me about 10 mins to get this result. #1 is the original picture, #2 is the cut-out version stuck onto a different background. Not yet perfect, I know - but that's mainly due to it being new to me and being unfamiliar with all the nuances and settings. A huge improvement nevertheless. I love this Refine Edge thingy!


09-12-2010, 04:59 PM   #2
Ole
Administrator
Ole's Avatar

Join Date: Sep 2006
Location: Copenhagen, Denmark
Photos: Gallery | Albums
Posts: 4,408
That's impressive (and a nice dog at that)! When you get your technique down, please share! I find Refine Edge somewhat confusing and could use some hints!
09-12-2010, 05:08 PM   #3
Veteran Member
JohnBee's Avatar

Join Date: Sep 2008
Location: Newrfoundland
Photos: Albums
Posts: 4,667
Good job!
The hair looks intact.
09-12-2010, 05:21 PM   #4
Site Supporter
Site Supporter


Join Date: Jul 2009
Photos: Gallery | Albums
Posts: 534
Original Poster
QuoteOriginally posted by Ole Quote
That's impressive (and a nice dog at that)! When you get your technique down, please share! I find Refine Edge somewhat confusing and could use some hints!
Thx, Ole (on behalf of Lex (our dog) as well)! :-) What I usually do when I try something new, is, I look for info on the net, watch some video tuts, do as they say (which usually takes more time than doing the actual thing ), I compare the various methods, combine them, make a few notes and save 'em for future reference. I did that today as well, but it's all in Dutch, which probably won't be of much use to you. I'll translate it tomorrow though and post it here and really, it's dead easy. You'll love using it!

09-12-2010, 05:24 PM   #5
Site Supporter
Site Supporter


Join Date: Jul 2009
Photos: Gallery | Albums
Posts: 534
Original Poster
QuoteOriginally posted by JohnBee Quote
Good job!
The hair looks intact.
Thanks, John!
09-12-2010, 09:12 PM   #6
Loyal Site Supporter
davidreilly3207's Avatar

Join Date: Sep 2009
Location: South Jersey
Photos: Gallery | Albums
Posts: 720
Try blurring the new background for a more natural look, matching the f stop of the original.
09-12-2010, 11:36 PM   #7
Veteran Member
Derridale's Avatar

Join Date: Jan 2008
Location: Brisbane, Australia
Posts: 412
Very good result there - even the hairs near the dog's chest are intact. Very impressive indeed. And a nice-looking pooch it is too

The dog has been sharpened in the second picture, so having a sharper background doesn't really clash, but I agree that throwing the background just slightly out of focus would make it look even more convincing that the dog was actually there.

The only jarring note I can spot is that the dog is sunlit from our right, while the tower in the background is sunlit from our left.

Excellent job - must have a go at that!

09-13-2010, 06:54 AM   #8
Inactive Account


Join Date: Jan 2010
Location: Upstate New York
Posts: 203
Here's a few good video tutorials I've found:
http://av.adobe.com/russellbrown/CS5MaskBasics_SM.mov

http://av.adobe.com/russellbrown/CS5AdvancedMask_SM.mov

And for those adventurous souls who what to get deeper into compositing, here's a good one with lot's of great techniques:
The Complete Picture with Julieanne Kost - The Creative Composite | Adobe TV
09-13-2010, 09:03 AM   #9
Site Supporter
Site Supporter


Join Date: Jul 2009
Photos: Gallery | Albums
Posts: 534
Original Poster
QuoteOriginally posted by mdave13 Quote
Try blurring the new background for a more natural look, matching the f stop of the original.
Thx, Dave. You mean like this?

09-13-2010, 09:08 AM   #10
Site Supporter
Site Supporter


Join Date: Jul 2009
Photos: Gallery | Albums
Posts: 534
Original Poster
QuoteOriginally posted by Derridale Quote
Very good result there - even the hairs near the dog's chest are intact. Very impressive indeed. And a nice-looking pooch it is too

The dog has been sharpened in the second picture, so having a sharper background doesn't really clash, but I agree that throwing the background just slightly out of focus would make it look even more convincing that the dog was actually there.

The only jarring note I can spot is that the dog is sunlit from our right, while the tower in the background is sunlit from our left.

Excellent job - must have a go at that!
Thanks, Pete. While adfding the frame, some sharpening was applied, you're right!

As to the sunlight - right again. I must admit that I didn't pay much attention to the background picture at all. I was just so pleased with the results and the little time it took to achieve them that I didn't do any of the other stuff that I usually do, like softening some edges, adding a dropshadow etc.
09-13-2010, 09:14 AM   #11
Site Supporter
Site Supporter


Join Date: Jul 2009
Photos: Gallery | Albums
Posts: 534
Original Poster
QuoteOriginally posted by Ole Quote
That's impressive (and a nice dog at that)! When you get your technique down, please share! I find Refine Edge somewhat confusing and could use some hints!
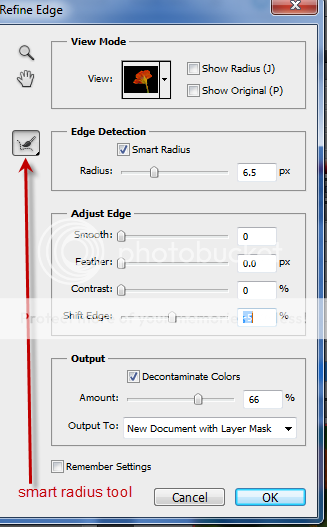
Here you are, Ole, my mini guide to using the Refine Edge option. (See picture below for settings.)

1. Use the Quick Selection Tool for a first selection.
2. Click on Select>Refine Edge (or click the Refine Edge button in the tool bar).
3. You can change the colour of the background under View Mode.
4, Click on Smart Radius and move the slider up to between 6-7 (or more, keep an eye on the preview and see what looks best).
5. Click on he Radius Tool and paint the areas that need adjusting
6. Click on Shift Edge and set to e.g. -4.
7. Click on Decontaminate colours and set it to sth like 70.
8. If wanted, set feather and smooth (you'll have to play with the settings - they vary per picture).
9. Under Output to click on New Document with Layer Mask and click OK.
10. A new document will open with your cut-out subject.
11. Rightclick the adjustment layer and click Convert to Smart Object.
12.That's it, you're done! If you feel that the edges are too sharp, you can try to soften 'em a bit by using the blur tool.
09-13-2010, 04:30 PM   #12
Loyal Site Supporter
davidreilly3207's Avatar

Join Date: Sep 2009
Location: South Jersey
Photos: Gallery | Albums
Posts: 720
Much better, IMHO.
09-13-2010, 07:03 PM   #13
Ole
Administrator
Ole's Avatar

Join Date: Sep 2006
Location: Copenhagen, Denmark
Photos: Gallery | Albums
Posts: 4,408
QuoteOriginally posted by lidy Quote
Here you are, Ole, my mini guide to using the Refine Edge option. (See picture below for settings.)

1. Use the Quick Selection Tool for a first selection.
2. Click on Select>Refine Edge (or click the Refine Edge button in the tool bar).
3. You can change the colour of the background under View Mode.
4, Click on Smart Radius and move the slider up to between 6-7 (or more, keep an eye on the preview and see what looks best).
5. Click on he Radius Tool and paint the areas that need adjusting
6. Click on Shift Edge and set to e.g. -4.
7. Click on Decontaminate colours and set it to sth like 70.
8. If wanted, set feather and smooth (you'll have to play with the settings - they vary per picture).
9. Under Output to click on New Document with Layer Mask and click OK.
10. A new document will open with your cut-out subject.
11. Rightclick the adjustment layer and click Convert to Smart Object.
12.That's it, you're done! If you feel that the edges are too sharp, you can try to soften 'em a bit by using the blur tool.
Thanks, I appreciate it!
09-14-2010, 01:38 AM   #14
New Member


Join Date: Feb 2009
Location: Wageningen, The Netherlands
Photos: Gallery
Posts: 15
Well done Lidy ;-)
09-15-2010, 03:37 PM   #15
Veteran Member
KxBlaze's Avatar

Join Date: Feb 2010
Location: California
Photos: Gallery
Posts: 1,602
The level of detail you have is amazing. How did you get the almost individual hairs? I have a similar picture and if I try to use the quick selection tool on hairs that thin it will select everything that is near that hair.
Reply

Bookmarks
  • Submit Thread to Facebook Facebook
  • Submit Thread to Twitter Twitter
  • Submit Thread to Digg Digg
Tags - Make this thread easier to find by adding keywords to it!
background, cs5, edge, hours, photography, photoshop, picture

Similar Threads
Thread Thread Starter Forum Replies Last Post
CS5 is so fast! NicK10D Digital Processing, Software, and Printing 3 07-13-2010 12:14 PM
CS5 vs. Lightroom Bmer Digital Processing, Software, and Printing 7 07-10-2010 10:56 AM
CS5 Books and Training Bmer Pentax DSLR Discussion 1 06-04-2010 08:40 PM
CS5 hdr bimjo Digital Processing, Software, and Printing 11 05-16-2010 06:07 PM
CS5 tone mapping bimjo Digital Processing, Software, and Printing 1 05-12-2010 09:39 AM


All times are GMT -7. The time now is 03:40 PM. | See also: NikonForums.com, CanonForums.com part of our network of photo forums!
  • Red (Default)
  • Green
  • Gray
  • Dark
  • Dark Yellow
  • Dark Blue
  • Old Red
  • Old Green
  • Old Gray
  • Dial-Up Style
Hello! It's great to see you back on the forum! Have you considered joining the community?
register
Creating a FREE ACCOUNT takes under a minute, removes ads, and lets you post! [Dismiss]
Top