Forgot Password
Pentax Camera Forums Home
 

Reply
Show Printable Version Search this Thread
02-06-2008, 06:13 AM   #1
Veteran Member
bluespearbone's Avatar

Join Date: Jul 2007
Location: Derbyshire, United Kingdom
Posts: 325
Disappointment

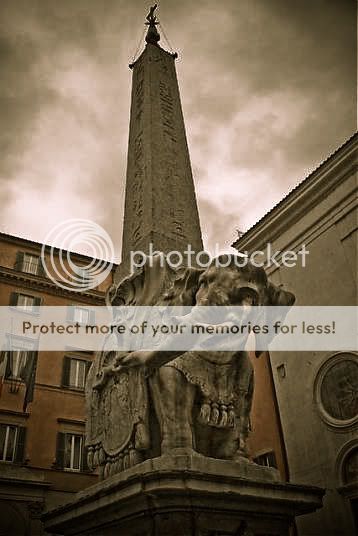
Thought I would start a thread with a photo that obviously needs some P+P work, in competent hands, and learn of you guys on the way.

Kit lens at 18mm
ISO 800: 1/60 @ f11
Straightened/Cropped, added a fair amount of fill light in an attempt to avoid loss of detail - raising the exposure/brightness just killed what little detail in the grey sky there is.

Subject and Composition on this one am relaxed with - though feel free to C+C as all help is welcome.
At a loss though as to where to start with actually bringing this one to something of a worthwhile record.

So a free for all, whether by actual edits/adjustments or by advice and suggestions.
Will try to carry out your leads - it will be good to see what can be salvaged.

Attachment 8240

Thanks in advance


Last edited by bluespearbone; 03-12-2008 at 11:43 PM.
02-06-2008, 06:25 AM   #2
Pentaxian
Moderator Emeritus


Join Date: May 2007
Location: Edmonton Alberta, Canada
Photos: Gallery | Albums
Posts: 10,643
It's fairly hard to adjust an image that is so small but from the original I'd suggest you adjust everything but the sky with levels and add a little contrast. Possibly a little saturation. From what you posted the camera did a pretty good job of capturing the foreground and not blowing out the brighter sky.

Dull cloudy days often create dull shots much of the time.
02-06-2008, 06:41 AM   #3
Veteran Member
Mike Cash's Avatar

Join Date: Jan 2007
Location: Japan
Photos: Gallery
Posts: 6,950
I'm already overdue for bed or I'd have a go at it this evening. I'll leave you with a suggestion, though.

Duplicate your base layer, create a new layer and bucket fill it with orange. Merge that down in Overlay mode. Create a layer mask blacking out everything but the sky, then merge it down in Divide mode at somewhere between 50% and 70%. That will put some blue in your sky. Fiddling with the percentages lets you decide how much.
02-06-2008, 07:12 AM   #4
Veteran Member
bluespearbone's Avatar

Join Date: Jul 2007
Location: Derbyshire, United Kingdom
Posts: 325
Original Poster
Thanks for the direction Peter.
QuoteOriginally posted by Peter Zack Quote
From what you posted the camera did a pretty good job of capturing the foreground and not blowing out the brighter sky.
Trying to get the knack of exposure. In this instance took a reading (with the K100D) of the sky, then of the subject, finally making a compromise between the two. Clearly, whilst not blowing the sky, I blew something.

Have adjusted the levels in all but the sky (by selecting it and then inverting)

a) First making a levels (RGB) adjustment by clipping.
b) Then going to levels again, and selecting the enhance per channel contrast - which i think introduced some saturation

Very pleased with your enhancement.
Sorry for keeping the image down to 640pix, but I don't want to clog things up as I post my efforts to follow advice.

Attachment 8241

Mike, thanks, will have a try at that later (when I can find divide..multiply is there...arrrgh) and post the outcome


Last edited by bluespearbone; 03-12-2008 at 11:43 PM.
02-06-2008, 11:30 AM   #5
Veteran Member
bluespearbone's Avatar

Join Date: Jul 2007
Location: Derbyshire, United Kingdom
Posts: 325
Original Poster
QuoteOriginally posted by Mike Cash Quote
Duplicate your base layer, create a new layer and bucket fill it with orange. Merge that down in Overlay mode. Create a layer mask blacking out everything but the sky, then merge it down in Divide mode at somewhere between 50% and 70%. That will put some blue in your sky. Fiddling with the percentages lets you decide how much.
Well, never found divide but stubborness pushed along.
Wanting to follow your advice, from the second image again began by selecting the sky -this time expanding by a pixel. Then copied and pasted into a new layer - which created an accompanying mask. Instead of orange, selected a skyish pale blue (as best as this red-green deficient sight saw), and used the bucket tool to fill the new layer. Set the blend mode to Overlay, left Opacity at 100% but moved Fill to 68%.

The result, to me, looks like a reasonable introduction of sky blue to accompany the previous adjustment without contradicting the level of highlights and shadows.

Attachment 8244

Overall, the picture is definately improving - but am sure you guys can do a better job than my attempts to follow your advice. My thanks to both Peter and Mike, the outcome has been very encouraging.
C+C+Advice can continue - if you know ways to improve, then please direct.

Last edited by bluespearbone; 03-12-2008 at 11:43 PM.
02-07-2008, 01:26 AM   #6
Veteran Member


Join Date: Feb 2007
Location: Toronto
Posts: 329
Name:  ForPForum[1]-Donald.jpg
Views: 643
Size:  82.4 KB

duplicate layer, soft light, opacity 80%, fill 40% (learned this from one of Benjamin's post processing threads, it is useful technique on a lot of photos)
wand select sky, adjustment layer photo filter pantone 279 at 100%
inverse previous sky selection, adjustment layer levels, high range to 200
02-07-2008, 08:42 AM   #7
Senior Member


Join Date: Sep 2007
Location: Melbourne (Cranbourne) Australia
Posts: 121
Just to be different and lazy I ran the image through a HDR program and this is the result

cheers
Keith


02-10-2008, 03:11 AM   #8
Veteran Member
bluespearbone's Avatar

Join Date: Jul 2007
Location: Derbyshire, United Kingdom
Posts: 325
Original Poster
Thanks Donald, Giving the colour and layer blending has really heped reduce the trial, error and guesswork out of finding a starting point for sky repair. Looks like I need to do some work on my concept of light balance too

Quite a dramatic result Keith, Like it. Thanks
02-10-2008, 08:19 AM   #9
Senior Member
Mikhail's Avatar

Join Date: Jul 2007
Location: York Region, ON
Posts: 277
Well no one yet has attempted to do it this way but heres a take on it...


When adding skies though you have to take into account the perspective but more importantly (IMHO) is the lighting of the sky compared to the lighting of the picture. In this case they dont really match perfectly but good enough. But this was done in CS3 in 5 mins with a very small jpeg so its rough around the corners (bad jpeg compression even though it was "12"... because it looks much cleaner on in PS) and I was too lazy to find a better suiting sky..

Thanks

EDIT: I totally forgot to adjust the rest of the picture (slight underexposure) but I think you can do that quite easily with curves (or levels).
02-12-2008, 03:04 AM   #10
Veteran Member
bluespearbone's Avatar

Join Date: Jul 2007
Location: Derbyshire, United Kingdom
Posts: 325
Original Poster
Very intersting take Mikhail, thanks
02-15-2008, 08:00 AM   #11
Senior Member


Join Date: Mar 2007
Location: Ireland
Photos: Gallery
Posts: 107
Rome is a nice city indeed! lots of interesting things to photograph. i have a very similar picture of the same statue in a folder i was just looking at today. it was a sunnier day though as the sky is a nice blue colour! something like Mikhails image!
02-15-2008, 02:44 PM   #12
Veteran Member
bluespearbone's Avatar

Join Date: Jul 2007
Location: Derbyshire, United Kingdom
Posts: 325
Original Poster
QuoteOriginally posted by oinkely Quote
... i have a very similar picture of the same statue in a folder i was just looking at today...
And your reluctance to post is? Join in , whether by this thread or a fresh one.
03-01-2008, 06:49 AM   #13
Veteran Member
Jasvox's Avatar

Join Date: Oct 2007
Location: Melbourne, Australia
Posts: 3,107
If this statue were in the film "300"...


Jas

Last edited by Jasvox; 03-01-2008 at 06:51 AM. Reason: wrong image code
03-02-2008, 10:30 AM   #14
Veteran Member
Pentaxtic's Avatar

Join Date: Nov 2007
Location: Vancouver
Photos: Gallery
Posts: 417

lomography style?
03-02-2008, 10:54 PM   #15
Veteran Member
KungPOW's Avatar

Join Date: Nov 2007
Location: Vancouver, Canada
Photos: Gallery
Posts: 1,699
A little Warhol maybe?

Last edited by KungPOW; 04-28-2008 at 05:35 PM.
Reply

Bookmarks
  • Submit Thread to Facebook Facebook
  • Submit Thread to Twitter Twitter
  • Submit Thread to Digg Digg
Tags - Make this thread easier to find by adding keywords to it!
detail, loss, photography, photoshop

Similar Threads
Thread Thread Starter Forum Replies Last Post
Overall Disappointment with Pentax JamesD Pentax DSLR Discussion 57 10-13-2010 10:15 PM
Mono mike disappointment RobG Video Recording and Processing 5 05-27-2010 02:23 PM
No Disappointment Today Sailor Post Your Photos! 9 07-06-2009 09:46 AM
Disappointment Sailor Post Your Photos! 13 06-19-2009 07:00 PM
Disappointment... Buddha Jones Photographic Technique 44 01-18-2009 08:46 AM


All times are GMT -7. The time now is 08:13 AM. | See also: NikonForums.com, CanonForums.com part of our network of photo forums!
  • Red (Default)
  • Green
  • Gray
  • Dark
  • Dark Yellow
  • Dark Blue
  • Old Red
  • Old Green
  • Old Gray
  • Dial-Up Style
Hello! It's great to see you back on the forum! Have you considered joining the community?
register
Creating a FREE ACCOUNT takes under a minute, removes ads, and lets you post! [Dismiss]
Top