Forgot Password
Pentax Camera Forums Home
 

Reply
Show Printable Version 3 Likes Search this Thread
11-10-2014, 01:01 PM   #1
Veteran Member
FantasticMrFox's Avatar

Join Date: Oct 2014
Location: Munich
Posts: 2,339
How to get this look?

I have recently got the Adobe Creative Suite and am starting to get into Lightroom (savouring Photoshop for later). I shoot a lot of landscapes and have achieved some decent first results, but there is a certain look I have come across a couple of times in the past and always wondered how it is done.

I am talking about the look of this picture: Erik McRitchie, Lake Louise

Here is a similar example (but more saturated): https://flic.kr/p/htGrs8

What I am after is this incredibly clear, sharp look. The water almost looks crystal, you can see the sharp reflection of the mountain.

I think one of the aspects is the quality of the lens used - I originally thought that the main difference between cheaper and more expensive lenses is sharpness but realised that colour rendition and clarity also differ quite a bit when I got my first lens past the 18-55 kit, an SMC-A 50 f/1.7. What I have concluded about post-processing in Lightroom is that he probably increased contrast and clarity quite a bit while slightly reducing overall saturation and increasing the saturation (and luminance?) of blue and aqua. But beyond that, I have no clue.

Same for the second picture, just that the saturation for yellow and blue seems to have been increased.

Does anyone know how this look is achieved and would care to share his wisdom with a novice like me?

11-10-2014, 01:26 PM   #2
Pentaxian
zzeitg's Avatar

Join Date: Sep 2014
Location: South Bohemia
Photos: Gallery | Albums
Posts: 4,017
IMHO these guys can play with the software really good. I'd consider it arguable, but since we don't work with analog equipment anymore anyway, the post-processing just helps to go behind the limits of the apparatus.
11-10-2014, 01:57 PM   #3
Master of the obvious
Loyal Site Supporter
savoche's Avatar

Join Date: Jun 2011
Location: Lowlands of Norway
Posts: 18,311
You can get that sort of effect by doing a simple HDR.

This is a composite of three frames with different exposures:
11-10-2014, 02:02 PM   #4
Pentaxian
ChristianRock's Avatar

Join Date: Jul 2013
Location: People's Republic of America
Photos: Gallery | Albums
Posts: 9,910
Before the actual experts get here, a few observations regarding both pictures:

. Taken with wide/ultrawide angle lenses
. The lenses are sharp edge to edge (especially the 2nd image) and seem to be tuned for landscape
. Aperture seems to stay within the optimum range of f8 to f11, for good DOF before diffraction starts to show in the picture
. Pictures were taken when the light was optimal. You can't fake good light with PP.
. Depending on what you are trying to do, high quality filters help a lot, but they're not essential
. Once you have that perfectly exposed picture, PP will become much easier and rewarding... but of course it still needs a lot of practice.

Two Pentax lenses that can give you that look are the DA 12-24mm and the DA 15mm Limited. For third party options there's a few more.

DA 12-24: https://www.flickr.com/search/?q=pentax+da+12-24mm+landscape
DA 15: https://www.flickr.com/search?sort=relevance&text=pentax%20da%2015mm%20landscape

11-10-2014, 02:12 PM   #5
Veteran Member


Join Date: Oct 2014
Location: Washington
Photos: Gallery
Posts: 2,176
First of all, there must be absolutely no wind...perfectly still. Second a very good lens. And the rest was done in Photoshop or some other program such as HDR.
11-10-2014, 02:13 PM   #6
Loyal Site Supporter
blackcloudbrew's Avatar

Join Date: Mar 2009
Location: Cotati, California USA
Photos: Gallery | Albums
Posts: 4,461
I think one of the very important things about these images is patience in waiting for the right shot in the right location at the right time. Their is a lot to be said for that. Good gear can help but moments like those have to be anticipated.

OTOH, I'm not a user of it but I have seen some good post processing results with Topaz's Clarity software.
11-10-2014, 02:18 PM   #7
Moderator
Site Supporter
Loyal Site Supporter
Sandy Hancock's Avatar

Join Date: Feb 2012
Location: Adelaide Hills, South Australia
Photos: Gallery | Albums
Posts: 11,275
Right place, right time, right weather. Superb optic. HDR. I think that's about it.

11-10-2014, 02:23 PM - 2 Likes   #8
Site Supporter
Site Supporter
mattb123's Avatar

Join Date: Apr 2010
Location: Colorado High Country
Photos: Gallery
Posts: 10,873
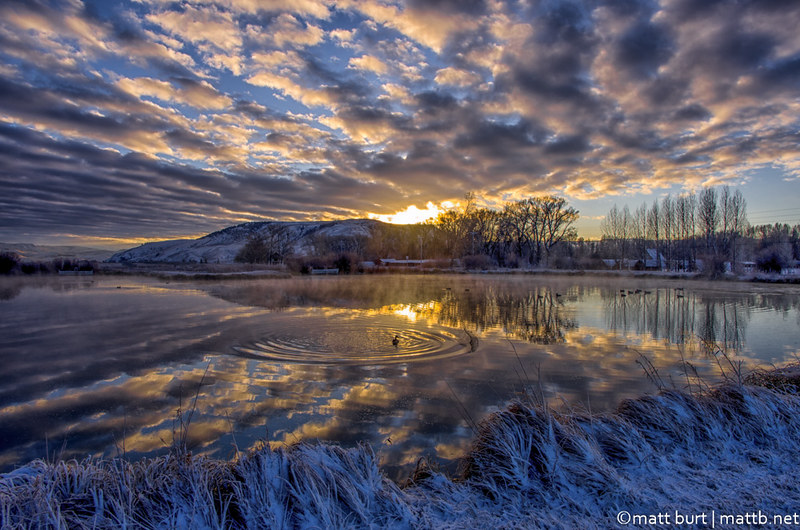
Yeah, the primary factors I see going into that look:

UWA lens, I usually grab the DA 15 if I'm after this kind of composition.
Stopped down, foreground to background is sharp. Hyperfocal can work for this too.
Probably used a tripod.
Got up early for the light and very calm water.
Backlight
Probably exposed for the sky and brought up the shadows (based on not much blown out in the sky). A grad ND could work for that too. Or HDR.
Low ISO (low noise)

As for processing, like I said earlier a way to get this look is to expose for the brighter sky and rely on dynamic range to bring detail back into the shadows.
Definitely some sharpening. I like Nik plugins for the Detail Extractor which can make things very sharp and help with shadow detail.

Here's one of mine where I used all of these techniques. Not perfect but it was the best I could get that morning.
11-10-2014, 02:25 PM   #9
Site Supporter
Site Supporter
rayallen's Avatar

Join Date: Jul 2007
Location: Forresters Beach, NSW, Australia.
Photos: Gallery | Albums
Posts: 3,014
QuoteOriginally posted by Sandy Hancock Quote
Right place, right time, right weather. Superb optic. HDR. I think that's about it.
And I would add one more thing - knowing how to get the best out of the software you use to PP.
11-10-2014, 02:25 PM   #10
Veteran Member


Join Date: Oct 2014
Location: Washington
Photos: Gallery
Posts: 2,176
QuoteOriginally posted by savoche Quote
You can get that sort of effect by doing a simple HDR.

This is a composite of three frames with different exposures:
What a great example of HDR.
11-10-2014, 02:29 PM   #11
dms
Site Supporter
Site Supporter


Join Date: Aug 2011
Location: New York, NY
Photos: Gallery
Posts: 2,192
Try "midtone sharpening"

I suggest trying what is often called a midtone sharpening. I use unsharp mask filter and as a start values of: (amount) 15 to 60%, 12 Pixels, and (threshold) 0 levels. I do it for most of my photo's, and although they are generally theatre photo's, the above values would likely be a good starting point. You can follow up with a regular unsharp mask, or other vatiations of same.

The sharpening makes the picture "pop" and the particular one I give above makes the mid tones deep/saturate more. I picked it up from articles by ctein and Ken Rockwell. It can easily be overdone--and I think the examples you show are overdone (unnatural).
11-10-2014, 02:29 PM   #12
Loyal Site Supporter
Wingincamera's Avatar

Join Date: Oct 2012
Location: Pine Haven, Wyoming
Photos: Gallery | Albums
Posts: 1,182
As Sandy and others said, patience for the right time, weather and luck. I live in Washington and wanted a sunrise reflection picture of Reflection Lake at Mt Rainier. It takes me three hours just to get there and I have no way of knowing what the weather will be ahead of time (concerning wind or clouds). It took four trips for me to finally get the picture in the right conditions. The others weren't wasted trips, because overcast days are great for other types of photography, I just wouldn't need to get up at 3:30AM for that.
11-10-2014, 02:31 PM   #13
Veteran Member


Join Date: Sep 2008
Location: Phoenix, AZ
Posts: 1,448
QuoteOriginally posted by ChristianRock Quote
Before the actual experts get here, a few observations regarding both pictures:
. Taken with wide/ultrawide angle lenses
. The lenses are sharp edge to edge (especially the 2nd image) and seem to be tuned for landscape
. Aperture seems to stay within the optimum range of f8 to f11, for good DOF before diffraction starts to show in the picture
. Pictures were taken when the light was optimal. You can't fake good light with PP.
. Depending on what you are trying to do, high quality filters help a lot, but they're not essential
. Once you have that perfectly exposed picture, PP will become much easier and rewarding... but of course it still needs a lot of practice.
. The lenses are sharp edge to edge (especially the 2nd image) and seem to be tuned for landscape - High quality lenses are the first part of the equation - other lenses he didn't mention are the sigma 10-20 and tamron 17-50 and pentax 20-40. Those would actually be my recommendations over the DA15 or 12-24
. Aperture seems to stay within the optimum range of f8 to f11, for good DOF before diffraction starts to show in the picture - Using and knowing how to use sharpening tools in PP is a class unto itself. I recommend one of several books out there. I like Scott Kelby, others despise him.
. Pictures were taken when the light was optimal. You can't fake good light with PP. -this is the biggest thing. everything from angle of lighting to atmospheric distortion can mess with your images. Cold, dry days with low light angles will give you the best contrast. There are many stories about planning shoots months and years in advance for that one photo. I'm not a nat geo pro, but I do spend several weeks planning my photo trips, starting from the time I decide on a location. I have sunrise and sunset times for the area, travel times and hiking distances. I've decided whether it's a sunrise or sunset location and as soon as the long range weather forecast comes out, I start tracking it. Often I'll move subjects around depending on weather for a day. For instance, waterfalls might move to a Cloudy Tuesday and coastal pics to a partly cloudy Wednesday instead of original plan.
. Depending on what you are trying to do, high quality filters help a lot, but they're not essential - My Cokin filter system is some of the best money I've every spent on photography. Once I learned to manage the handling and multi tasking involved, its results have done wonders for my images
. Once you have that perfectly exposed picture, PP will become much easier and rewarding... but of course it still needs a lot of practice.- Know how to shoot to your histogram. Learn about things called "expose to the right" and the zone system. They may not be applicable all the time, but you'll be better educated about the decision to make regarding exposure. Understand terms like micro contrast and black point. Get a couple books, and now you have the perfect excuse to go take more pics. Cuz you HAVE to practice! Also, one of my go-to websites is Luminous Landscapes. I have learned a lot of stuff reading their articles and how-tos.

Last edited by nomadkng; 11-10-2014 at 02:37 PM.
11-10-2014, 02:37 PM   #14
Veteran Member
FantasticMrFox's Avatar

Join Date: Oct 2014
Location: Munich
Posts: 2,339
Original Poster
I'm aware of the basics - wide-angle, roughly f/11, tripod, ND filter, low ISO, right time of the day etc.

I was really just after the coolish clarity in the image. Based on your answers I guess it must be high quality lense + right light + good PP. The Topaz products look great, but they are bloody expensive too.

QuoteOriginally posted by ChristianRock Quote
Once you have that perfectly exposed picture, PP will become much easier and rewarding... but of course it still needs a lot of practice.
QuoteOriginally posted by Rimfiredude Quote
And the rest was done in Photoshop or some other program such as HDR.
QuoteOriginally posted by rayallen Quote
And I would add one more thing - knowing how to get the best out of the software you use to PP.
And that was my main question - what exactly did he do in PP? I was after suggestions of specific steps he took in Lightroom (description says he used LR).
11-10-2014, 02:49 PM   #15
Master of the obvious
Loyal Site Supporter
savoche's Avatar

Join Date: Jun 2011
Location: Lowlands of Norway
Posts: 18,311
QuoteOriginally posted by Rimfiredude Quote
What a great example of HDR.
Thanks, but following Matt's advice above will definitely yield better results than my handheld use of a 18-55
Reply

Bookmarks
  • Submit Thread to Facebook Facebook
  • Submit Thread to Twitter Twitter
  • Submit Thread to Digg Digg
Tags - Make this thread easier to find by adding keywords to it!
bit, clarity, lens, lightroom, look, photography, photoshop, picture, saturation

Similar Threads
Thread Thread Starter Forum Replies Last Post
Need Help, how to make this photo look good julbelle Photographic Technique 17 06-11-2014 03:22 PM
Misc how to achieve this look with wider lens sactodaddyo Post Your Photos! 3 01-29-2014 05:12 AM
How do I get this manual lens to work? Michael Piziak Troubleshooting and Beginner Help 29 12-29-2013 02:13 PM
Re: How to get that saturated, artsy, HDR look candgpics Digital Processing, Software, and Printing 5 09-20-2009 09:30 AM
anyone know how this shot was processed to look like this qksilver Digital Processing, Software, and Printing 15 07-11-2008 12:49 AM


All times are GMT -7. The time now is 03:28 AM. | See also: NikonForums.com, CanonForums.com part of our network of photo forums!
  • Red (Default)
  • Green
  • Gray
  • Dark
  • Dark Yellow
  • Dark Blue
  • Old Red
  • Old Green
  • Old Gray
  • Dial-Up Style
Hello! It's great to see you back on the forum! Have you considered joining the community?
register
Creating a FREE ACCOUNT takes under a minute, removes ads, and lets you post! [Dismiss]
Top