Forgot Password
Pentax Camera Forums Home
 

Reply
Show Printable Version Search this Thread
05-11-2019, 04:26 PM   #1
Site Supporter
Site Supporter
BruceBanner's Avatar

Join Date: Dec 2015
Posts: 5,405
Batch Processing with Bordering and Watermarking

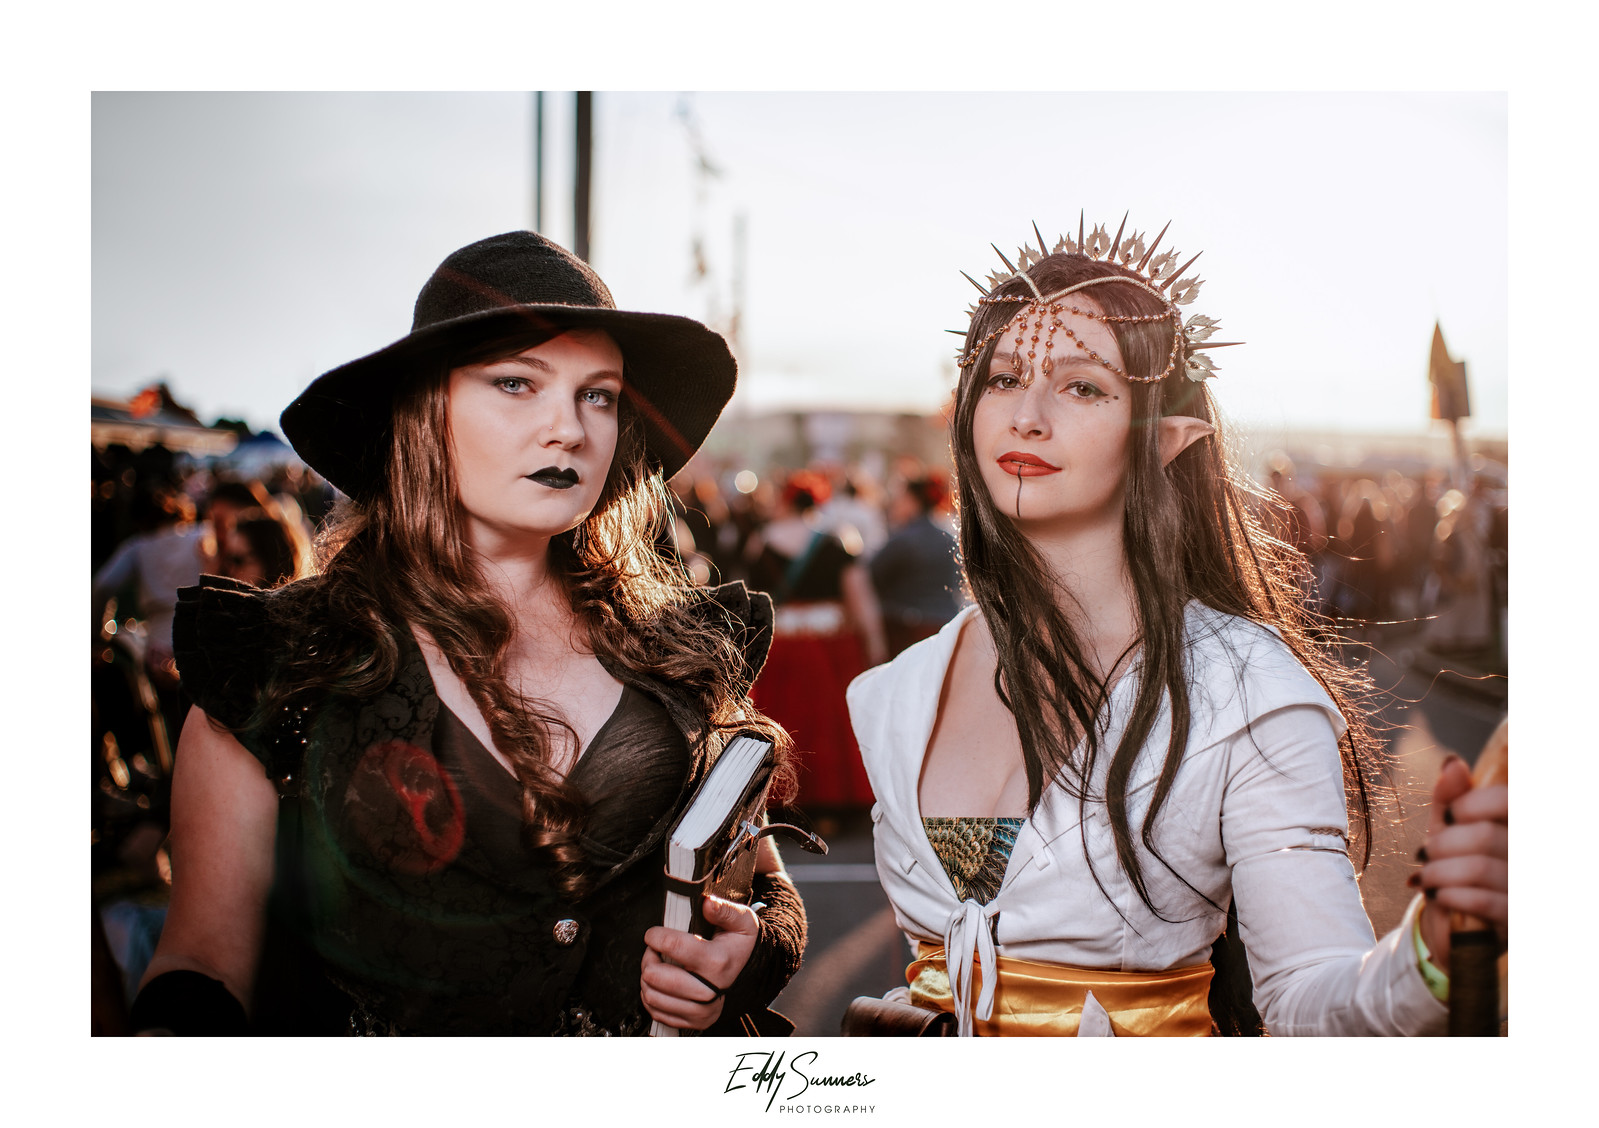
I'm looking for a solution to batch processing images where I can add white bordering and my signature/watermark inside the bordering, like shown below;


Probably hard to see on this forum due to the white background, but the signature is sitting in a white border frame.

Thus far I have done this process by taking the image to PS (if not already in PS) and then increasing Canvas size and dragging my PNG water mark inside and resizing and positioning it (ZZzzzz....)
It's ok when doing it for a shot here or there, but I also do event work (paid and non paid), the non paid stuff I tend to always watermark like this, but if there are 20, 40, 100 shots like this... that means popping into PS for each and every shot (for this process) whereas it's quite feasible I edited things purely in LR (and used Syncing features) to be quick about things, popping into PS for this process for each and every shot kinda defeats the purpose. There has to be a quick way to handling this, even outside of LR/PS?

I tried the LR/Mogrify2 plugin. It was ok, but it seems restrictive with applying bordering in terms of only pixel parameters and not percentage. Even if two images are same aspect ratio, if one is heavily cropped and the other native, applying the same border will mean different thickness. The same can be said for watermarking.
I don't even mind sorting the images out in terms of orientation (portrait shots vs landscape), and then processing them separately, but the Mogrify 2 has no preview mode, so you're also just having to wait for the export of 'x' amount of shots, then go back and see which images have the bordering and watermark in really bad placements and go back and try fixing again.

I'll have a look again, I might be missing some options, I don't know the plugin that well.

I dunno.. it strikes me this part of photography isn't getting enough attention, is there an advanced program that might do what Mogrify 2 can do but better, with previews etc?


TIA!

Bruce

05-11-2019, 10:43 PM   #2
Pentaxian
swanlefitte's Avatar

Join Date: May 2015
Location: Minneapolis
Photos: Gallery
Posts: 4,068
You need to record your action then batch process with that action. I haven't done it in years.
05-11-2019, 11:10 PM   #3
Site Supporter
Site Supporter
BruceBanner's Avatar

Join Date: Dec 2015
Posts: 5,405
Original Poster
QuoteOriginally posted by swanlefitte Quote
You need to record your action then batch process with that action. I haven't done it in years.
I don't think that would work though. I would be recording a procedure that would work for that certain image, but then apply it to a mass of images... nope, it'll come out screwy I think.

Like imagine you have a 36mp non cropped native aspect ratio 3:2 image. You now want to border that shot (not overlay bordering, but add it onto the image) and then also have the signature inside the bordering with the right distance inside (centred justification etc, not too high up or down, in the middle middle of the lower border frame).

You could record that, but then if you have a 24mp shot, cropped to 1:1 aspect ratio and want the bordering to represent the same approximate thickness as before, with the signature scaled down to fit in the same way... it would be another recording surely.

The issue is that bordering and watermark plugins seen thus far focused on 'pixels' rather than 'percentages' of the image. 450 pixels to the top, bottom, left and right will work ok for some images and be too thick for others...

Hence I wondered if there was an advanced program that you could use after PS and LR because I think both can't do this properly for mass images.
05-12-2019, 12:35 AM   #4
Pentaxian
swanlefitte's Avatar

Join Date: May 2015
Location: Minneapolis
Photos: Gallery
Posts: 4,068
So for one image you might want a 100 pixel border and a 50 pixel for another? Then I don't know. It would need a resize by percentage I guess.
If you always want a specific width on all sizes you could make this action.
Choose Image > Canvas Size, make sure the Relative checkbox is selected, and type the number of pixels to add around the image. Each number is split between edges, so entering 200 pixels in each field results in a border width of 100 pixels. Also ensure that the Anchor is set to the center square, and then click OK.

05-12-2019, 12:38 AM   #5
Moderator
Loyal Site Supporter
Wheatfield's Avatar

Join Date: Apr 2008
Location: The wheatfields of Canada
Posts: 15,991
QuoteOriginally posted by BruceBanner Quote
I don't think that would work though. I would be recording a procedure that would work for that certain image, but then apply it to a mass of images... nope, it'll come out screwy I think.

Like imagine you have a 36mp non cropped native aspect ratio 3:2 image. You now want to border that shot (not overlay bordering, but add it onto the image) and then also have the signature inside the bordering with the right distance inside (centred justification etc, not too high up or down, in the middle middle of the lower border frame).

You could record that, but then if you have a 24mp shot, cropped to 1:1 aspect ratio and want the bordering to represent the same approximate thickness as before, with the signature scaled down to fit in the same way... it would be another recording surely.

The issue is that bordering and watermark plugins seen thus far focused on 'pixels' rather than 'percentages' of the image. 450 pixels to the top, bottom, left and right will work ok for some images and be too thick for others...

Hence I wondered if there was an advanced program that you could use after PS and LR because I think both can't do this properly for mass images.
I could be wrong, but I think you can position by percentage rather than by pixel count in Photoshop.
05-12-2019, 12:39 AM   #6
Pentaxian
swanlefitte's Avatar

Join Date: May 2015
Location: Minneapolis
Photos: Gallery
Posts: 4,068
This might help by percentage with some modifications.
How to Resize to Percentages in Photoshop | Chron.com
05-12-2019, 01:36 AM   #7
Site Supporter
Site Supporter
BruceBanner's Avatar

Join Date: Dec 2015
Posts: 5,405
Original Poster
QuoteOriginally posted by swanlefitte Quote
So for one image you might want a 100 pixel border and a 50 pixel for another? Then I don't know. It would need a resize by percentage I guess.
If you always want a specific width on all sizes you could make this action.
Choose Image > Canvas Size, make sure the Relative checkbox is selected, and type the number of pixels to add around the image. Each number is split between edges, so entering 200 pixels in each field results in a border width of 100 pixels. Also ensure that the Anchor is set to the center square, and then click OK.
Yeah that's what I do currently for solo shots, like not batch stuff (I said as much in OP hehe).

QuoteOriginally posted by Wheatfield Quote
I could be wrong, but I think you can position by percentage rather than by pixel count in Photoshop.
Yeah I think you can.

QuoteOriginally posted by swanlefitte Quote
This might help by percentage with some modifications.
How to Resize to Percentages in Photoshop | Chron.com
Cheers will look at that.

I saw this today;


If I choose percentage instead of pixels I think that would work across a number of varying mega pixel images, would have bordering applied throughout accurately regardless of aspect ratio etc.

But then I still need to have process for getting the watermark into the image, via a percentage and also positioned exactly right... ouch, I think that part will be tricky and possibly impossible to do batch wise...

05-12-2019, 01:56 AM   #8
Pentaxian
swanlefitte's Avatar

Join Date: May 2015
Location: Minneapolis
Photos: Gallery
Posts: 4,068
If you are that close you could still apply signature and end the batch with a layer at the right place and just be left with resizing the sig. Not ideal but only one step.
05-12-2019, 08:48 AM   #9
Loyal Site Supporter


Join Date: Sep 2016
Location: Central Iowa, USA
Photos: Albums
Posts: 173
I think I can get pretty close to what you are looking for using Darktable

I used version 2.6.2 of darktable in this example.

You will need to create your signature as a SVG format file and put your signature file into the correct darktable folder ($HOME/.config/darktable/watermarks). Then use darktable's Watermark tool to add your signature to ONE of your images. I don't have any experience with creating watermarks, so my sample image below just uses one of the example watermarks darktable comes with. I positioned the watermark to the bottom right of my image, and chose to scale it for a smaller border.

Then use darktable's Framing tool to put a frame around your image. My first example image is a full frame image from my K-1. The frame I created for this image has an 11x14 aspect ratio instead of the 3:2 ratio of the image that came from my camera. To do this is a bit tricky, so here's the Framing settings I changed:
  • Border size (I used to get a tiny side border for image cropping by printer): .8%
  • Aspect: <click dropdown for list of aspect ratios - you won't see 11:14 in the list, you need to key it in> 11:14 <press Enter> (or whatever aspect ratio you want)
I also made the frame an ugly gray so the frame shows up on the web page. There are other settings that allow you to fiddle with the positioning of the image within the framing, but I have not played with them much.

So... at this point, all you've done is added your signature to one image. So...

Go back to lighttable view, make sure the image you just changed is selected. On the right side of the screen in the History Stack section, click on the Copy button. You will be asked what items of your history stack you want to copy. For this example, I deselected everything but Watermark and Framing.

Select your target images and again in the History Stack section, click on the Paste button. Your Watermark and Framing changes are then applied to all selected images. For the record, in my testing I made all my original Watermark and Framing changes on an image in portrait format. I then pasted my changes to images that were in both portrait and landscape formats - and even one square image - and it worked* for all images.

...I think this is pretty close to what you are wanting to do...

Copying the same history stack as I used in the first example, I pasted it into a Q7 image, which is the second image below. This Q7 image is cropped (in both dimensions) into a 16:9 aspect ratio so this image has a different aspect ratio than the first image (a K-1 image with a 3:2 aspect ratio). While the JPEGs I am have linked to both have the same dimensions, the raw images they were created from were very different in size. Also, original changes I copied from were in a different darktable folder than the destination images, so it is possible to copy watermark and framing settings from one folder to another.

* "Worked" in this case means that I got the correct aspect ratio frames and a watermark in the bottom right. However a 3:2 image in portrait format in a 11x14 aspect ratio frame ends up with most of the white space of the frame on the sides of the image. To fit the signature at the bottom you will need more border there. Everyone will have a different idea as to how they want their framing and watermarks to appear, so there probably cannot be a one-size-fits-all frame that works for all portrait, landscape and square format images.

These images are some that I pasted my history stack changes to:
Attached Images
View Picture EXIF
PENTAX K-1  Photo 
View Picture EXIF
PENTAX Q7  Photo 

Last edited by wm_brant; 05-12-2019 at 04:25 PM. Reason: Argh! Originally used garbage pic as example. Used better ones now.
05-12-2019, 04:55 PM   #10
Veteran Member
CarlJF's Avatar

Join Date: Sep 2014
Location: Quebec City
Posts: 1,185
I think you can do it in LR. You create the watermark as png or jpg image (including the white portion). Then, in the watermark option, select a graphic watermark instead of text one. Choose the file with watermark png and the as you would with text.

After that, it's just a matter of doing a batch export in LR with the watermark on.
Reply

Bookmarks
  • Submit Thread to Facebook Facebook
  • Submit Thread to Twitter Twitter
  • Submit Thread to Digg Digg
Tags - Make this thread easier to find by adding keywords to it!
aspect ratio, darktable, frame, images, mogrify, photography, photoshop, plugin, process, ps, shot, shots, terms, watermarking

Similar Threads
Thread Thread Starter Forum Replies Last Post
Watermarking yes or no? pentax360 General Photography 34 04-25-2019 02:52 AM
Watermarking advice (and how to). BruceBanner Digital Processing, Software, and Printing 7 06-25-2017 11:50 PM
Watching Film Camera Auctions is Bordering on Compulsive - It's a Sickness Eyewanders Film SLRs and Compact Film Cameras 19 04-19-2017 11:14 AM
Watermarking a picture for protection mdaaug58 Troubleshooting and Beginner Help 7 06-01-2011 10:05 AM
Batch Watermarking made easy ftpaddict Photographic Technique 3 04-16-2008 02:07 AM


All times are GMT -7. The time now is 10:11 PM. | See also: NikonForums.com, CanonForums.com part of our network of photo forums!
  • Red (Default)
  • Green
  • Gray
  • Dark
  • Dark Yellow
  • Dark Blue
  • Old Red
  • Old Green
  • Old Gray
  • Dial-Up Style
Hello! It's great to see you back on the forum! Have you considered joining the community?
register
Creating a FREE ACCOUNT takes under a minute, removes ads, and lets you post! [Dismiss]
Top