Forgot Password
Pentax Camera Forums Home
 

Reply
Show Printable Version Search this Thread
04-08-2009, 10:40 AM   #16
Veteran Member
jeffkrol's Avatar

Join Date: Sep 2006
Location: Wisconsin USA
Photos: Gallery
Posts: 8,434
As hard or as simple as you like.

I recommend reading these by the late Mr. Fraser:
Out of Gamut: Thoughts on a Sharpening Workflow | CreativePro.com
Real World Image Sharpening Tips From Expert Bruce Fraser > Traditional Prepress Sharpening

04-10-2009, 11:46 AM   #17
Veteran Member


Join Date: Dec 2006
Location: Toronto, Ontario, Canada
Posts: 1,759
Josh,

"If you're interested, I'd recommend you perform a similar test with your often used lenses, though of course if you're getting the results you like from your technique, the you can safely ignore my pixel-peeping drivel, and just enjoy your photography (in fact that's what I'd recommend )."


I am aware of diffraction degradation but have always ignored it.
Now that you have aroused my curiosity I shall perform the test you reccomend in the next few days and report my results.

Mickey
04-11-2009, 11:24 PM   #18
Veteran Member


Join Date: Dec 2006
Location: Toronto, Ontario, Canada
Posts: 1,759
Sharpening

Josh,

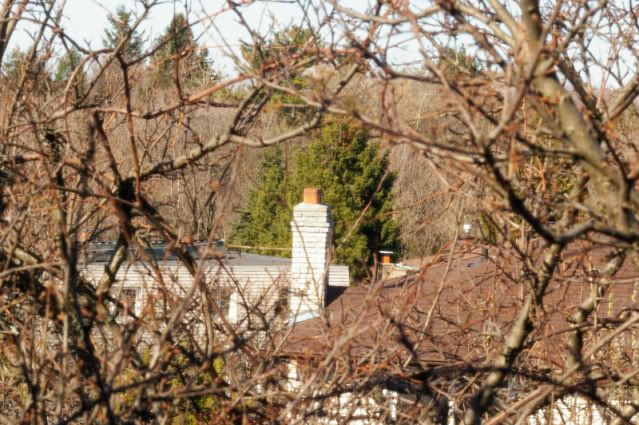
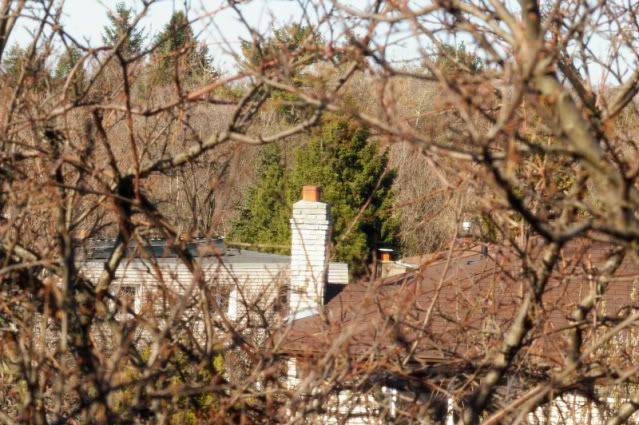
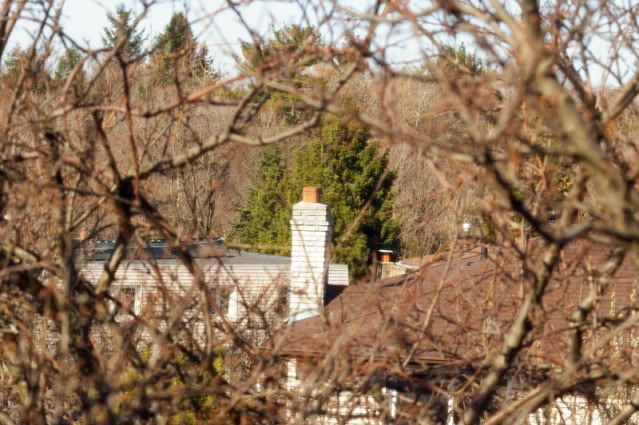
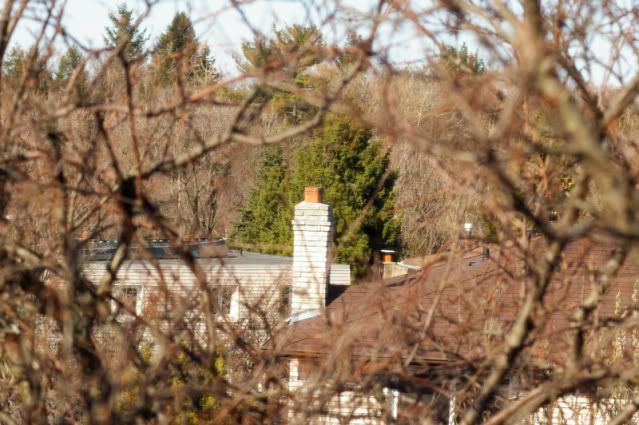
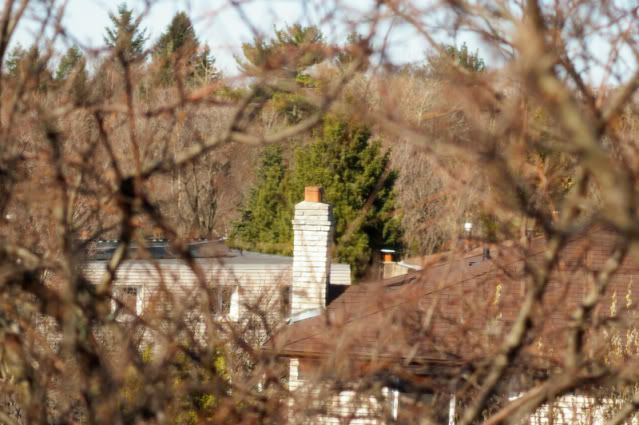
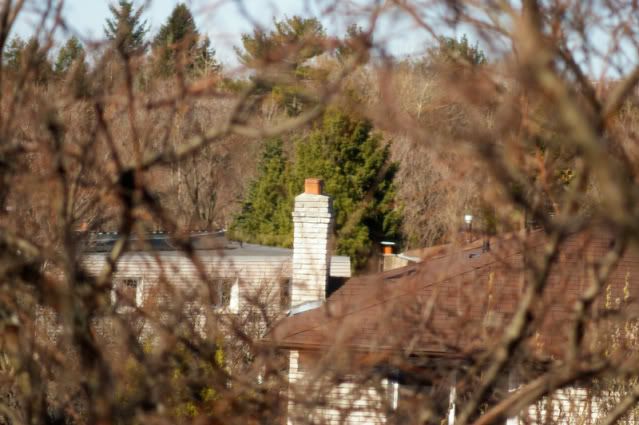
I did the test you suggested. I used my Pentax K100D with a Tamron Adaptal 80 to 210 mm zoom set at 90 mm. The camera was mounted on a tripod and I used a wireless remote shutter release.

Sure enough there is some degradation as the aperture gets smaller but I can only notice it as a slight loss of detail in the bright chimney and clapboards in the bottom right corner. I purposely selected this scene to show the increasing depth of field which is quite noticable in the foreground branches and the evergreens in the far distance. The differences are more apparent on the original full size photos which are much sharper than these.

This proves you are correct.

However, I think the added depth of field makes the photo appear sharper which more than offsets the loss of highlight detail.

If you feel I have not performed the test correctly please advise me and I shall do it in accordance with your - or anyone's specifications.

I have never done a test before and this has taught me a few things about my camera for which I thank you.

f22


f16


f11


f8


f5.6


f4


Mickey

Last edited by mickeyobe; 04-11-2009 at 11:33 PM.
04-11-2009, 11:57 PM   #19
Ash
Loyal Site Supporter
Ash's Avatar

Join Date: Mar 2007
Location: Toowoomba, Queensland
Photos: Gallery | Albums
Posts: 23,920
Different photos require different techniques and levels of sharpening IMO.

PS's Smart Sharpen and Unsharp Mask functions are quite different in the way they perform their sharpening, and despite reading the theory of these techniques, I've found a trial of each method and review at 100% the best gauge of effect to the desired level.

Personally, I've preferred USM at about 1.2-1.5 radius at 100% with threshold from 5-10 for most of my shots, but I've found Smart Sharpen's Lens blur feature useful at times also.

07-11-2009, 09:07 PM   #20
Senior Member


Join Date: Oct 2007
Location: Northern Virginia
Photos: Gallery
Posts: 131
am I the only one that sharpens the image and then masks out out-of-focus areas like the background so the sharpening is only applied to the subject/s that I want to draw the eye towards?
07-11-2009, 09:44 PM   #21
Senior Member


Join Date: Oct 2006
Location: Montreal
Photos: Gallery
Posts: 179
QuoteOriginally posted by qksilver Quote
am I the only one that sharpens the image and then masks out out-of-focus areas like the background so the sharpening is only applied to the subject/s that I want to draw the eye towards?
Nope. I do this, too, depending on the specific image. For example, in a portrait, it is sometimes useful to apply sharpening only to the eyes, mouth, and hair, so that skin pores are not brought into sharp relief.
07-13-2009, 03:44 PM   #22
Loyal Site Supporter
Canada_Rockies's Avatar

Join Date: Nov 2007
Location: Sparwood, BC, Canada
Photos: Gallery | Albums
Posts: 12,385
QuoteOriginally posted by heliphoto Quote
... <snip> ...
Most lenses will have an aperture which is the sharpest, and almost always this isn't the smallest aperture available. Below a certain aperture the effects of diffraction become more and more appearent, causing a progressive degradation of sharpness. For instance the DA* 16-50 claims (using the MTF program line) it's sharpest at f/4 (if I remember correctly - it's out in the truck right now). ... <snip> ...
The MTF program used against Pentax lenses that offer it is marvellous. The DA* 16-50 at ISO 100 will generally hang around f/4, sometimes to f/5.6, as above. The DA* 50-135 also hangs around the f/4 mark quite a bit.

If your lens does not support the MTF program line, the old news photographer's mantra of "f/8 and be there" is a pretty good compromise setting.

07-13-2009, 04:32 PM   #23
Senior Member
Lazaruscomeout's Avatar

Join Date: Dec 2008
Location: Grimsby, Ontario, Canada
Photos: Gallery
Posts: 153
I sharpen all of my images as the final viewing requires, which means that I take my original image (after all post processing is done) and resize it to the final resolution and dimensions. For print, I generally use 300 dpi.

Once the resizing is done, Unsharp Mask at 100% - 120% with a radius of 1 - 1.2 pixels viewed at 100% is generally good. The image seems over sharpened on the display, but tends to print well.

Gerry
07-13-2009, 06:01 PM   #24
Inactive Account


Join Date: May 2007
Location: Indianapolis, Indiana
Posts: 652
Look into this book:
Amazon.com: Real World Image Sharpening with Adobe Photoshop CS2: Bruce Fraser: Books

Also check the links someone posted earlier about Bruce Fraser, he's the sharpening masta.

Nutshell: Do sharpening in 3 steps. First a small amount to regain sharpness lost from capture(sensor/lens), creative sharpening to add sharpness to certain parts of the image you want to draw attention to, and a final sharpening at your final output size.

I'd suggest doing minimal sharpening in aperture(if that's what you use) then invest in something like QImage that automatically applies the perfect(for me anyway) amount of output sharpening based on your output size. Photokit sharpener is also great, but too pricey in my opinion. It's based on the above books method.
07-13-2009, 07:18 PM   #25
Forum Member


Join Date: Mar 2007
Location: Calgary, Alberta, Canada
Posts: 91
Dedicated sharpening software can help

I'm onside with the 3-step approach to sharpening but I've never got along well with USM except to boost local contrast.

Your raw converter of choice will likely apply a minimal level of sharpening, particularly if it has a default profile for your specific camera body. I tend to use Silkypix for converting my PEF files and I don't muck around with its' default sharpening.

For midstage sharpening, I use dedicated sharpening software. I prefer Focal Blade (plug-in for PS/PS Elements) which offers a sharpening setting for SCREEN and PRINT. There is a noticeable difference between the two settings; sharpening for print is much more obvious.

For final sharpening when printing, I use Qimage as others have mentioned. It takes the guess work out of sharpening amount versus print size.

Maybe my older eyes are more forgiving than those of younger photographers but I never see sharpening halos in either my online gallery images or in my prints using this sharpening methodology.
07-13-2009, 08:33 PM   #26
Veteran Member
heliphoto's Avatar

Join Date: May 2008
Location: Region 5
Photos: Gallery
Posts: 2,539
QuoteOriginally posted by mickeyobe Quote
Josh,

I did the test you suggested. I used my Pentax K100D with a Tamron Adaptal 80 to 210 mm zoom set at 90 mm. The camera was mounted on a tripod and I used a wireless remote shutter release.

Sure enough there is some degradation as the aperture gets smaller but I can only notice it as a slight loss of detail in the bright chimney and clapboards in the bottom right corner. I purposely selected this scene to show the increasing depth of field which is quite noticable in the foreground branches and the evergreens in the far distance. The differences are more apparent on the original full size photos which are much sharper than these.

This proves you are correct.

However, I think the added depth of field makes the photo appear sharper which more than offsets the loss of highlight detail.

If you feel I have not performed the test correctly please advise me and I shall do it in accordance with your - or anyone's specifications.

I have never done a test before and this has taught me a few things about my camera for which I thank you.

Mickey
(Don't know how I missed this reply way back when - sorry)...
Glad to hear you could observe this. I agree that in some cases, the overall DOF gained outweighs the small diffraction effects, however, it's usefull to know that some lenses are actually sharpest near their widest aperture. For instance, the camera mounted with the DA* 16-50mm will often choose f/4 when set to MTF mode, and therefore, if sharpness is the goal, and if a relatively shallow DOF is desirable as well, it's good to know that f/4 is indeed the best choice while the older conventional wisdom might point to a smaller aperture for maximum sharpness...

QuoteOriginally posted by Canada_Rockies Quote
The MTF program used against Pentax lenses that offer it is marvellous. The DA* 16-50 at ISO 100 will generally hang around f/4, sometimes to f/5.6, as above. The DA* 50-135 also hangs around the f/4 mark quite a bit.

If your lens does not support the MTF program line, the old news photographer's mantra of "f/8 and be there" is a pretty good compromise setting.
I agree that the MTF line is great, though I must say that I don't so much use it regularly as just try it out and try to remember what it tells me for use later in Av mode.
07-14-2009, 01:00 AM   #27
Inactive Account


Join Date: Sep 2008
Location: Finland
Photos: Gallery
Posts: 308
My USM web-sharpening for 800x web images:

Fine detail with macro lens - 300-400%, radius 0.2, threshold 1-3
Normal cases - 150%, radius 0.3, threshold 1-3

With large resolution I just switch to 100% pixel size on my 30" screen, put photoshop to fullscreen mode and adjust how I see fit. It's super easy.
07-14-2009, 05:30 AM   #28
Veteran Member


Join Date: Jun 2009
Photos: Albums
Posts: 1,674
QuoteOriginally posted by Damn Brit Quote
From a printing POV I have heard that it is desirable to slightly oversharpen the image, haven't tried it myself yet.
I don't have too much problem when I sharpen pictures for on screen viewing, I zoom to print size and focus on the important areas, one way to judge it is to at the same time watch the background areas as this is where noise increase the more you sharpen.
Do you use LR2.x? I am going to have to play around with the setting that allows output sharpening for different target devices plus it allows to adjust the degree of output sharpening. Must play with that one my color laser (yeah, I know it's not the best thing for images but it's what I have... ) Need to order more toner though, a couple of the carts are getting low.

As for sharpening in general, I usually keep it to a minimum anymore. 99% of my shots are for the web and personal enjoyment so I don't usually need to do more. Plus for shots I really want right I use one of the labs via SmugMug who is pretty cool at helping PP dolts like me get it right before it reaches their lab. Plus the prints are really inexpensive!

BTW, I use both USM as well as High Pass, often in combination. And often get, ummm, 'interesting' results. For my USM I typically am around 90, 0.6, 1-5 for the threshold...

Gonna have to see what Maffer's 300-400% does to macro as I tend to sharpen my macro shots the least, if at all...I do sometimes focus stack though, using CombineZ, which makes it easier.
07-14-2009, 05:42 AM   #29
Veteran Member


Join Date: Jun 2009
Photos: Albums
Posts: 1,674
QuoteOriginally posted by alehel Quote
I use Apple Aperture and photograph in PEF. As far as I've understood, settings applied to the RAW file in camera are not interpreted by Aperture. For this reason, I have often concidered going over to using Pentax Photo Lab, but when I tried it last, I missed the freedom it gave me.

I often wonder though if it's worth shooting in RAW. I've just started shooting in RAW+ as this gives me complete freedom. I may well chose to stop using RAW as I'm often quite satisfied with the jpeg. I might contiue to shoot in RAW+ though as it's great to be able to fall back on the RAW file, should I wish to do so.
Can't you setup something like a LR preset in Aperture that will apply the same sharpening levels, as well as other adjustments to batches? I am on a MS PC so dunno how Aperture works.

I know presets might be less than ideal, but there is a reason these programs have such abilities. It might take some time to setup presets for each body and maybe even each lens if you really wish to fine tune things, but it might be worth the effort in the long term.
07-16-2009, 12:24 PM   #30
Veteran Member


Join Date: Mar 2009
Location: Midwest
Photos: Gallery
Posts: 1,407
QuoteOriginally posted by pawzitiv Quote

Your raw converter of choice will likely apply a minimal level of sharpening, particularly if it has a default profile for your specific camera body. I tend to use Silkypix for converting my PEF files and I don't muck around with its' default sharpening.

.
Yeah, you have to sharpen output from a bayer sensor a bit, as every pixel is interpolated in two color planes. I tend to leave all settings zeroed (most shouldn't make any difference anyway, as I shoot RAW) and deal with everything else in LR/Aperture/PS. The processor in our cameras - as amazing as it is - is considerably less powerful than those in our computers, and doesn't allow me to select the algorithm used for PP (sharpening, in this case), or to selectively apply that algorithm. As others have pointed out, one can obtain better overall results by selectively applying PP - on a macro shot, I've often bumped sharpness on the focus object, and then inverted selection and applied heavy-handed noise-reduction to the bokeh - no particular loss of detail because there *isn't any to speak of*. Great stuff - I love digital photography.
Reply

Bookmarks
  • Submit Thread to Facebook Facebook
  • Submit Thread to Twitter Twitter
  • Submit Thread to Digg Digg
Tags - Make this thread easier to find by adding keywords to it!
photography, photoshop

Similar Threads
Thread Thread Starter Forum Replies Last Post
Digital sharpening Adam Lucas Digital Processing, Software, and Printing 1 09-16-2010 08:00 AM
Sharpening setting yipchunyu Troubleshooting and Beginner Help 2 02-04-2009 10:34 AM
Sharpening Urmas R. Digital Processing, Software, and Printing 8 11-20-2008 08:58 AM
hardest decision ever. period. jshurak Monthly Photo Contests 0 10-31-2007 06:34 PM
Sharpening Simon Digital Processing, Software, and Printing 15 03-29-2007 09:09 AM


All times are GMT -7. The time now is 12:29 AM. | See also: NikonForums.com, CanonForums.com part of our network of photo forums!
  • Red (Default)
  • Green
  • Gray
  • Dark
  • Dark Yellow
  • Dark Blue
  • Old Red
  • Old Green
  • Old Gray
  • Dial-Up Style
Hello! It's great to see you back on the forum! Have you considered joining the community?
register
Creating a FREE ACCOUNT takes under a minute, removes ads, and lets you post! [Dismiss]
Top