Forgot Password
Pentax Camera Forums Home
 

Closed Thread
Show Printable Version Search this Thread
05-21-2009, 10:57 PM   #1
Site Supporter
Site Supporter
Hannican's Avatar

Join Date: Oct 2007
Location: Irvine, CA
Photos: Gallery
Posts: 485
Is there an easy way to fix haze in Photoshop?

Hey all,

I'm going through some year old photos from back when I shot with my kit lens unfiltered and basically had no clue what I was doing... my shots from Thailand are just drenched with haze!

Anyone know if it's possible to do something quickly to clean that muck up with Photoshop?

Thanks in advance!

-Tim

05-22-2009, 12:06 AM   #2
Damn Brit
Guest


Why don't you post a couple in this thread and let people play with them for you.
05-22-2009, 12:53 AM   #3
Senior Member


Join Date: Sep 2006
Location: Tartu, Estonia
Posts: 159
Something I have used

You can try this Lunacore Photoshop Training - Remove a Blue Haze tutorial or do a little bit googling as several good tutorials and hints are available online :-)
Best and happy de-hazing, JR
05-22-2009, 03:34 AM   #4
Veteran Member
netuser's Avatar

Join Date: Oct 2008
Location: Azores Islands, Portugal
Photos: Gallery
Posts: 2,236
QuoteOriginally posted by Reps Quote
You can try this Lunacore Photoshop Training - Remove a Blue Haze tutorial or do a little bit googling as several good tutorials and hints are available online :-)
Best and happy de-hazing, JR
Seems really a good Hint.
Thanks

05-22-2009, 04:44 AM   #5
Loyal Site Supporter
ismaelg's Avatar

Join Date: Apr 2009
Location: Puerto Rico
Photos: Gallery
Posts: 2,681
I've had some success tightening the levels and increasing contrast. I think that translates into a tighter "S" curve.

Thanks,
05-23-2009, 03:42 AM   #6
Veteran Member


Join Date: Sep 2006
Location: WV
Posts: 1,495
If the haze is uniform throughout the image, click auto levels. If that alters the image's colors, undo it and click auto contrast. That's the fastest and easiest method I know of, but it only works if the haze is uniform.
05-24-2009, 09:27 PM   #7
Veteran Member


Join Date: Sep 2008
Posts: 484
It depends on what kind of haze you are talking about, some samples might help!
But one of the best techniques is called local contrast enhancement, which is basically just an unsharp mask with settings:
Radius: 40-60
Amount: 0.10-0.20
Threshold: 0

Note: I use GIMP, not Photoshop, so the scales might be different, but the idea is to have a very large radius and a small amount, instead of the other way around which is used for normal sharpening.

Note 2: The speed of the unsharp mask operation is dependent on the radius, so be prepared to wait a minute or two!

05-28-2009, 08:58 PM   #8
Site Supporter
Site Supporter
Hannican's Avatar

Join Date: Oct 2007
Location: Irvine, CA
Photos: Gallery
Posts: 485
Original Poster
Sorry everyone- I completely forgot that I had posted this! Thanks for the advice all! I've been playing around with that tutorial that you posted Reps, but apparently I have a different version of Photoshop than he does? I have no experience using these layers and such so it's pretty confusing for me, but I'm trying to figure it out!

Here is a sample image that I'm trying to "de-haze". I think the haze is only over the water and the hills on the other side of the harbor. I need to remove that haze and perhaps do some sharpening here- plus add a ton of contrast (I love heavy contrast!)

Anyone want to take a shot at this? I'd really appreciate it! I've got a couple of versions that I've worked on, but I want to see what you guys can come up with.

I appreciate the effort, thanks in advance.

05-28-2009, 09:12 PM   #9
Loyal Site Supporter
ismaelg's Avatar

Join Date: Apr 2009
Location: Puerto Rico
Photos: Gallery
Posts: 2,681
I tried with RGB levels and boost contrast a bit. I didn't like the results with individual channel level adjustments.
Attached Images
 
05-28-2009, 09:18 PM   #10
Site Supporter
Site Supporter
Hannican's Avatar

Join Date: Oct 2007
Location: Irvine, CA
Photos: Gallery
Posts: 485
Original Poster
Thanks Ismael! I was playing with the RGB too- the individual sliders didn't seem to work all that well...
05-28-2009, 09:35 PM   #11
Veteran Member


Join Date: Sep 2008
Posts: 484
Here are my quickie attempts. The first uses the technique I mentioned, first unsharp mask with large radius and small amount for
local contrast enhancement, then unsharp mask with small radius and large amount for a bit more detail. I think I used r 40, a 0,2 and r 0,2 a 0,8.
The second one uses tone mapping in addition to the other techniques, which is also a local contrast enhancement technique. It is often used in
HDR, but can also be used for single exposures. Hope this helps! The mountains are still a bit hazy, I guess it would be possible to create a
layer mask just for the mountains and then apply a stronger de-hazing here, but I like the picture with the mountains like this.

05-28-2009, 09:57 PM   #12
Veteran Member


Join Date: Dec 2006
Location: Pennsylvania, USA
Photos: Gallery | Albums
Posts: 797
Personally, I would leave the far mountain a bit hazy to look natural. I think EricT did a good job on his second version.

In this version, I obliged to your desire for lots of contrast and sharpening. I used several layer of levels and curves for the foreground, mid, and far ground. A high pass filter layer with Linear Light blend is used for sharpening.

Last edited by song_hm; 05-28-2009 at 10:03 PM.
05-28-2009, 10:07 PM   #13
Site Supporter
Site Supporter
Hannican's Avatar

Join Date: Oct 2007
Location: Irvine, CA
Photos: Gallery
Posts: 485
Original Poster
Jeez you guys these look great! I just wish I understood what you are talking about- I need to do some Photoshop tutorials because I don't understand how to use it AT ALL!

Now I know what to aim for at least =)
05-29-2009, 10:27 PM   #14
Site Supporter
Site Supporter
Hannican's Avatar

Join Date: Oct 2007
Location: Irvine, CA
Photos: Gallery
Posts: 485
Original Poster
Here's my 2nd attempt- using some of the stuff you guys were talking about... high pass filters with soft blend, layers, etc. I don't get any of this stuff, but I just pushed sliders all around and this is what I came up with... how can I make the mountains sharper?? (Edit: Added all three to compare them side by side... I like #3 best, but I want it just a tad darker, and to keep the details on the right side beach's sand... finding it difficult to get that perfect mix!)


Last edited by Hannican; 05-29-2009 at 10:47 PM.
05-29-2009, 10:32 PM - 1 Like   #15
Veteran Member


Join Date: Oct 2006
Location: Albuquerque, NM
Photos: Gallery | Albums
Posts: 308
Hi Tim.
QuoteQuote:
...I just wish I understood what you are talking about- I need to do some Photoshop tutorials because I don't understand how to use it AT ALL!
Most PS tutorials don't really help one understand how to use it. Here's my attempt a mini tutorial that hopefully explains what is going on. Try it out and play with it. Hopefully you will start to understand what PS is doing under your direction.

All color images can be treated as the sum of Red, Green, and Blue components [channels]. Photoshop displays the separate RGB component intensities as shades of gray with black = no intensity & white = largest possible.

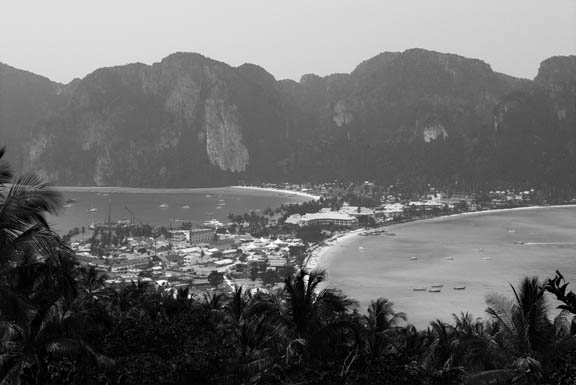
Step 1. Inspect the RGB channels of your original image. The R & G channels look ok. The B channel shows the problem and explains what the haze is in this case: The background of the image has a B channels that is mushy (globally low contrast, devoid of details), and light gray (lots of blue):


To counter-act this you need to 1. darken the blue channel and 2. increase its contrast &/or 3. add some details. I accomplished 1 and 2 with a Levels adj layer. I set the sliders [input levels] of the "RGB" channel to 14 and 232, stretching the overall histogram to make the darks darker and the lights lighter (increasing overall contrast of all channels). For the B channel only, I set the left slider to 18 (making the darks darker) and center to one to 0.89 (making the midtone grays darker). Since only the background of the image has the haze, I added a very simple gradient mask to "hide" the effect of the Levels layer on the foreground. Now the B channel looks better, but still lacks detail:


To add some detail, I used a masked (same mask from Levels) Channel Mixer layer to put some of the R and G channels (which have lots of detail) into B channel. First I "hid" the Levels layer. Then I set the B channel to 50% B, 38% G, and 16% R. This layer alone fixed a lot of haze problem, but shifts the sky color too much in my opinion. So I altered the mask by selecting the sky region and filling the selected area of the mask with black. After turning the Levels layer back on, I decided the Channel Mixer was too strong, so I "dimmed" its impact by lowering the opacity to 50%. Here's the B channels with just the Channel Mixer adjustment (Levels adj turned off):


Note that all my setting values for Levels, Channel Mixer, Opacity, etc. were obtained by eye (watching the effect on the image). Here is the resulting color image (lowish quality JPG):


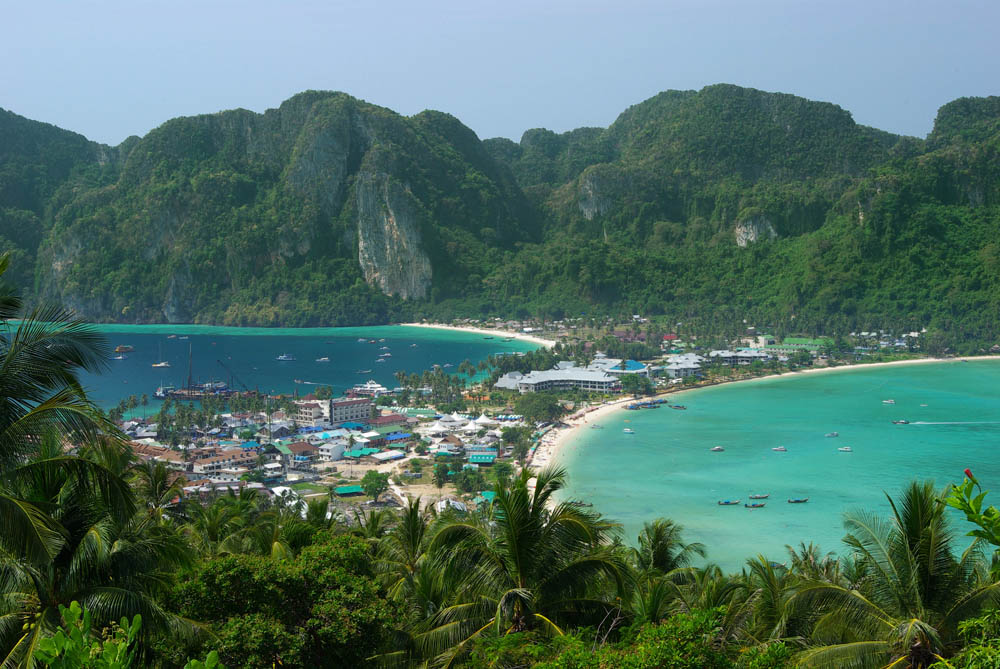
I think this is a good amount of hazy reduction. It's a matter of opinion if I went too far or not far enough. Regardless, its easy enough to make the effects stronger or weaker.

Now that the B channel is "repaired", you might consider some sharpening. I don't consider this part of the haze reduction, but I thought it helped the image. First I merged the previous results into a new layer so I could use the PS filters on it. I used the Unsharp Mask filter twice. Once at low amount (11) and large radius (13) to provide "local" contrast enhancement and again at high amount (50%) and small radius (0.7) for small detailed sharpening. This improved the background but it over sharpened the foreground and brighter regions of the mid-ground. I fixed the former by "painting" simple black-to-transparent gradients on the layer mask. I fixed the latter with "Blend If". For beginners, just paint on the mask in the bright mid-ground regions with a soft, low opacity brush. Paint over the oversharp areas repeatedly until the mask is dark enought to fix the problem to your liking.

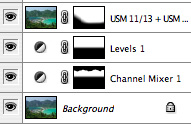
Here's a screen capture of my Layers palette so you can see the masks I used:


Here's the final result (high quality JPG):


I think this is easy enough to apply to most of your pictures if you just use the masked levels adjustment. You can even copy this adjustment layer from one image to another and customize for each photo with the mask and maybe opacity adjustment. For your keepers, you might want go further than I have here. It won't be "easy" or "fast". But if you understand what needs fixed and a few simple PS tools to make the corrections. It will be moderately quick and easy to turn your keepers into breath-taking images.

Cheers.

-Mark
Closed Thread

Bookmarks
  • Submit Thread to Facebook Facebook
  • Submit Thread to Twitter Twitter
  • Submit Thread to Digg Digg
Tags - Make this thread easier to find by adding keywords to it!
haze, photography, photoshop
Thread Tools Search this Thread
Search this Thread:

Advanced Search


Similar Threads
Thread Thread Starter Forum Replies Last Post
photoshop help: fix window glare dj_saunter Digital Processing, Software, and Printing 6 10-01-2010 09:28 PM
Which freeware photoshop alternative can apply photoshop plugins in batch raider Digital Processing, Software, and Printing 1 01-28-2010 10:54 PM
Opening Photoshop-saved RAW in Photoshop jzietman Digital Processing, Software, and Printing 4 12-09-2009 10:49 PM
Haze Scott_the_Artist Troubleshooting and Beginner Help 1 07-31-2009 09:34 PM
ME Super Mirror Stuck up- easy fix?? tvfd911 Film SLRs and Compact Film Cameras 4 04-07-2009 06:04 PM


All times are GMT -7. The time now is 09:20 PM. | See also: NikonForums.com, CanonForums.com part of our network of photo forums!
  • Red (Default)
  • Green
  • Gray
  • Dark
  • Dark Yellow
  • Dark Blue
  • Old Red
  • Old Green
  • Old Gray
  • Dial-Up Style
Hello! It's great to see you back on the forum! Have you considered joining the community?
register
Creating a FREE ACCOUNT takes under a minute, removes ads, and lets you post! [Dismiss]
Top