Forgot Password
Pentax Camera Forums Home
 

Reply
Show Printable Version 11 Likes Search this Thread
07-13-2014, 03:19 PM   #31
Loyal Site Supporter


Join Date: Jun 2009
Location: Tumbleweed, Arizona
Photos: Gallery | Albums
Posts: 5,707
Original Poster
I have been playing around with the images I have and have come to a few conclusions. I also downloaded the 30 day trial of Topaz - their entire suite, primarily for the denoise and the remask capability, but have been playing around with all of their utilities.
  • I have found that I really do not like Topaz denoise. Maybe its their interface, a bit too heavy handed - and LR4 is just fine.
  • On the topic of noise, there are two distinct areas that I need to look at 1) the sky and 2) the landscape component.
    • The landscape component I actually made worse by not reducing the ISO to 80 like I usually do. Also, I have found that a series of say 5 shots at 30 seconds stacked (and I use Oloneo HDR software here), removes essentially all traces of noise and an excellent image becomes an outstanding one.
    • On the sky, I am finding LR4 noise reduction is just fine.
  • Topaz Remask has problems with the blurring of the landscape vs the clean cut of the landscape shot (shot with out the GPS Astrotracker on). I sent them samples and wrote a problem report. I was also using their PhotoFXLab umbrella utility to composite the 2 masked images together. It may have been better to use Photoshop, but I only have lightroom and I really do not like Adobe's software subscription business plan.
  • I still have not approached adding any color to the Milky Way band other than what just comes as a byproduct of the processing I have been using. Also, the approach for me is not solid always being perfectly repeatable. It really is more art than science.
  • I am finding that location becomes reasonably critical when you include an item of landscape to this, especially if you are going to cut or mask it in - from shooting a second image with out tracking enabled.
  • Also, when stitching vertical, you tend to loose a bit of width due to the projection used to stitch the images together. There is an element of cropping applied - not much, but if it is not planned, and you shoot too tight, then you start to loose your composition. I guessing you loose less than 5%, but with a fixed focal length prime, either go a bit wider, back up with your feet, or find a better location. It's just for me with the 31Ltd having the f1.8 and my next best with an f2.8 at either 28 or 25, you go to the width, but loose a stop of light. If I need to wider than 25, I have a 20, but that's another half stop of light at f3.5, then its f4 for the 12-24 and f4.5 for the 8-16. All of this translates to bumping up the ISO, or adjusting the shutter speed up by probably another minute or two - which will impinge on the 5 minute maximum - plus the stars begin to trail in the corners.
  • The gimble capability on my ballhead comes in very handy for vertical stitching. You need to combine that with the K5 level function, to level the bottom image, or you loose even more to the stitching crop when you combine everything together.
  • On the topic of ballheads, I really love my Acratech GP, but in the dark and leveling things up on a single axis any ball head is going to have problems when it comes to Astro work. A geared head like the Manfrotto 410 would provide an advantage here.
  • All of this, and with the GPS Astrotrack enabled, I am finding that changing the ISO becomes a lot of button pushes. Essentially leaving the GPS menu system - going all the way out to change the ISO, and then going all the way back in. Changing the ISO becomes very expensive in terms of time and button pushes - especially in the dark.
Also, I am thinking that the K5IIs without the AA filter (providing an additional 8% increase in resolution) would be perfect for this work. Its higher ISO is cleaner than the K3. I really don't know how much additional pop the 24MP would add to all of the against a bit more noise in the ISO area. Bottom line, right now the K5 is what I have and thus its perfect for what I am doing. I think that the only other sensor that would be really worth getting and using would be the 645Z and that is NOT in the retirement budget. The moral of the story here is to be happy with what you have!!!


Last edited by interested_observer; 07-13-2014 at 03:29 PM.
07-13-2014, 05:55 PM   #32
Site Supporter
Site Supporter


Join Date: Jun 2013
Location: Montreal, Canada
Photos: Gallery | Albums
Posts: 573
Topaz has excellent tutorial videos, it's worth taking the time to go through some of these because tools like denoise allow many different approaches to denoising an image. I also really like the Clarity tool which lets you control the contrast of an image and Adjust with its adaptative exposure tool which acts like hdr processing and helps bring out the fainter nebulosities without burning the brighter regions of an image.

Was in Virginia Beach last new moon and didn't find dark skies over there which was too bad because Scorpio is a good 10 degrees higher than it is from home.

Clear skies!
07-13-2014, 07:47 PM   #33
Loyal Site Supporter


Join Date: Jun 2009
Location: Tumbleweed, Arizona
Photos: Gallery | Albums
Posts: 5,707
Original Poster
Well today and this evening we are having dark and stormy skies here in the Valley of the Sun. I washed my truck the other day and now it looks like I just rolled it in the desert. I have been making my way through the Topaz videos, since the first of the month. They are very well done over all - and just a lot of information. There are a couple of generalities that I have come across - and it just may be that I did the 30 day test drive.
  • There are a lot of presets, across all of the tools - to the point that a lot of the information that a new user consumes just gets lost.
  • Another generality that I have come across is that in some of the tools (and I can't rattle off which ones at the moment), seem to pull a semi-opaque sheet across the image. I have not kept good notes on this, but on some of the items I have tried, I just controlled Zed out - to back out the settings. There probably is some way to identify the ones that are good for your style (or the job at hand) as opposed to others.
My first foray into denoise was not that productive. I do need to figure that one out a bit more. I probably have spent the most time with remask, and sent in a set of technical questions. I have played around with clarity and it shows promise. Topaz adjust also appears to be helpful. I am finding that there is just so much, that I need to start keeping some notes.

So, I am plodding through all of this. I will say, that I started by pulling the entire suite into the sales cart, then backed it out. I received and email from Topaz asking if something was wrong. I had just had new tires put on my truck and having another charge on the credit card was not going to agree with my wife. So I did the 30 day trial - as a way to space out the charges. When I posted the technical question, I see that they had sent me (via their own email system on their site) a 30% off coupon (about 8 to 10 days later) - whacking about $120 off the $380 price bringing the price down to about $260 (as a further inducement to buy the package). I am going to have to remember this approach in the future - maybe B&H will do the same - probably not.

07-22-2014, 02:55 PM   #34
Site Supporter
Site Supporter
mattb123's Avatar

Join Date: Apr 2010
Location: Colorado High Country
Photos: Gallery
Posts: 10,872
Interesting thread! I just ordered a O-GPS1 for my K-3. I was also hoping to be able to lower ISO and compensate with longer exposures. I have seen great results with people taking a shot without astrotracking and using that for the foreground elements blended with a astrotracked sky. That's what I'd like to try. I'll report back. Thanks for all the good info!

07-31-2014, 07:02 PM   #35
Loyal Site Supporter


Join Date: Jun 2009
Location: Tumbleweed, Arizona
Photos: Gallery | Albums
Posts: 5,707
Original Poster
In terms of post processing on the Milky Way, I have been looking of late on the brush type processing of the MW structure itself. I came across this video that does a pretty good job of laying out an approach.


I also came across yet another post processing that I though was somewhat helpful. The camera body used was a Nikon D7000 which is the same sensor as the K5 family (K5/II/IIs/30/50/-01) and obviously no GPS with Astrotracking. He uses Photoshop for stitching, but Microsoft ICE does the same thing. What I found interesting was his approach with the Topaz denoise. I was trying something different and did not do as well. So, picking us some technique here and other technique there... Back to the D7000. Since it can not track, the images were boosted to I think ISO 9000 or something. With the GPS, the K5 does not need to go that high, I have been successful at ISO 1600, running for 2+ minutes. So, for the K family, the stars should be captured with a result very similar to a full frame sensor. What goes astray is the landscape smearing (hence the remasking of the it without the GPS).


I had been planning on going out during the New Moon in July. However, I had a bit of planned surgery and was laid up. In addition the weather was not that cooperative during that weekend - dust storm, heavy clouds, high heat (110+), and then a rain storm - whipped out two days. There was one day that appeared to be relatively good, but I was not feeling up to it. So, the next really good opportunity is in mid to late August. (it appears to be about 7 days of no moon in the evening leading up to the new moon).

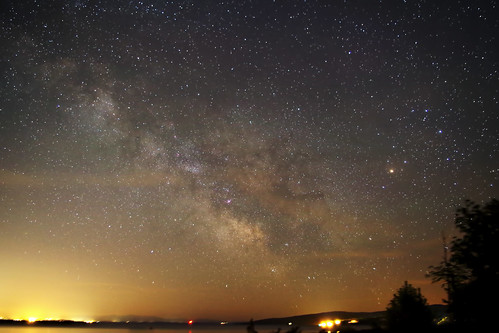
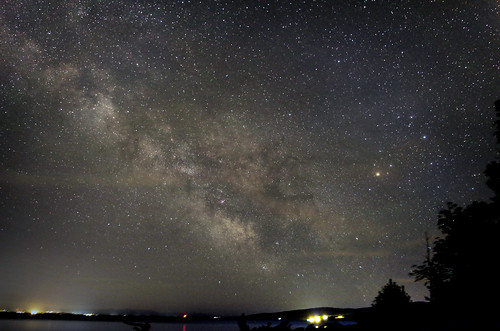
I have some what of a list of things to do, essentially putting everything - all the individual parts together. I have good shots of the stars - with the GPS, but forgot to lower the ISO for the landscape shots (without the GPS). I have several lenses that should do very good here - in particular the 31 Ltd and the ZK25, each doing a vertical stitch. I think I now have a good masking approach to combine everything together - the landscape with the stars. On the landscape part, want to use ISO80 and stack probably 5 to 10 bracketed images together. After three different locations, the best is the state park for the most spectacular landscape view. In terms of post processing, after masking the parts together, I have several approaches that should work and address all the parts. So, its just putting all of this together, all at once.


Last edited by interested_observer; 07-31-2014 at 08:37 PM.
08-01-2014, 08:17 AM   #36
Site Supporter
Site Supporter
mattb123's Avatar

Join Date: Apr 2010
Location: Colorado High Country
Photos: Gallery
Posts: 10,872
I got my O-GPS1 a few days ago and it's been stormy every nice since!
I did get a nice lightning shot last night but I'd really like to try some astro tracking!
08-01-2014, 08:30 AM - 1 Like   #37
Veteran Member
JimmyDranox's Avatar

Join Date: Oct 2012
Location: Ploiesti, Romania
Photos: Gallery | Albums
Posts: 1,632
First rule of amateur astronomy: Wherever you buy a new (astronomy) tool, the weather turns bad.

Second rule of amateur astronomy: More expensive the new tool is, the longer the period of bad weather..

08-01-2014, 08:45 AM   #38
Site Supporter
Site Supporter
mattb123's Avatar

Join Date: Apr 2010
Location: Colorado High Country
Photos: Gallery
Posts: 10,872
Well at least I got a good deal on it then!
08-07-2014, 06:41 PM   #39
Site Supporter
Site Supporter


Join Date: Jun 2013
Location: Montreal, Canada
Photos: Gallery | Albums
Posts: 573
Greetings!
It’s been a long time since I had the chance of taking astrophotos. It’s given time to watch interested_observer’s videos. I’m learning new tricks every time, thank you very much! I’ve also been trying a new technique to remove sky gradient from the light polluted locations I shoot from. I’ve been using the “auto” setting in Iris for some time (as explained in this thread: https://www.pentaxforums.com/forums/32-digital-processing-software-printing/2...beginners.html )

But when foreground objects are present the process is not as good as it is influence by those objects. Iris allows the creation of a mask manually by clicking points on the background sky (up to 2500!). This makes possible the creation of a mask that excludes foreground objects, stars, nebulae or the Milky Way itself, very very useful. Although Iris has functions to use such masks on a picture, I found that they do not work very reliably, especially since I upgraded to windows 7 a few years ago. I then thought of using the mask as a flat field in DeepSky Stacker. And to my surprise it worked:

Original


Mask


Final image:


As a bonus it not only removes the gradient but also corrects much of the vignetting and corrects to a certain point the sky color!
But then after looking more closely I saw that banding in the Milky Way was very very obvious (Darn!) I’ve tried to reduce the banding by blurring the image and adding a bit of noise but once retouched in pse11, DSS will not take the flat field anymore (Double Darn!). I’ve also tried to use the mask in pse11 using the “difference” and “hard light” settings but, although it helps a bit, the results are far from what I got with DSS.

So I’m facing three dead ends: Iris that won’t work properly on win 7, DSS that doesn’t accept retouched flat fields, and pse11 that won’t use gradient masks very effectively.
If anyone could hint at a solution for any of those I’d be very very grateful!

Regards
09-16-2014, 09:21 PM   #40
Loyal Site Supporter


Join Date: Jun 2009
Location: Tumbleweed, Arizona
Photos: Gallery | Albums
Posts: 5,707
Original Poster
I happened across this video. It is advertised as "Medium Format Astrophotography with Panorama Stitching " - which is true for about the first third of the video - essentially stitching to get a medium format sized image with a normal focal length lens. The last two thirds goes over his post processing workflow using LightRoom. After watching it twice, I think that this is one of the best soup to nuts overview for Milky Way shooting I have come across.

Last edited by interested_observer; 09-16-2014 at 09:30 PM.
09-16-2014, 10:20 PM   #41
Veteran Member


Join Date: Jul 2011
Location: Adelaide
Posts: 4,546
Thanks for this thread but I feel that I should chime in and say that the night sky is not dark blue but is in fact a reddish colour - due to it being mostly Hydrogen gas. The blue colour that we actually see is only blue due to the limited nighttime colour sensitivity of our eyes. This is why red lights are the go for operating equipment at night - it doesn't interfere with our "night vision".

I much prefer the reddish coloured images to be honest.
09-17-2014, 05:16 AM   #42
Loyal Site Supporter


Join Date: Jun 2009
Location: Tumbleweed, Arizona
Photos: Gallery | Albums
Posts: 5,707
Original Poster
Morning Bossa, I absolutely agree. This particular thread was somewhat documenting my learning to shoot and process the MW with using the GPS unit - and whatever the problems encountered. Trials and tribulations - what works on bringing out the details and busts up on coloring. Its gone is directions that I never expected - learning a lot (of what not to do). I go hot and cold on post processing. A big part of it is finding a good work flow and approach (at least for me) that does have a realistic look. The too blue, too red, too brown casts - I am trying to avoid. So, as I stumble across things, I have been posting - the good, bad and unfortunately - the ugly. There are a lot of videos out there that may work for others, but have not worked for me. I sort of started looking for parts of one that worked to a degree, to combine with other parts that worked in other areas. I will say that the last one that I just posted, does have a nice approach, and what was very interesting - was his step by step documenting his approach.

It's all a learning process - which can be very messy at times (and what you are seeing here are a mixture of failures (capturing and post processing) - what may not have worked, along with some minor successes - that succeeded in one area at least. It's all about finding the minor successes and string them together into creating a major success.

It looks like I am going to go back out this weekend, trying out a new location. We will see how successful the take actually is and how well I can process it. Right now the rain is back. We had a storm that came up from Baja California that dumped 5 inches of rain in 3 hours, last week. Now a new storm is coming..... Our annual rainfall is 2 inches for an entire year.

09-18-2014, 05:56 AM   #43
Veteran Member


Join Date: Jul 2011
Location: Adelaide
Posts: 4,546
I commend you and your efforts I_O. My comment wasn't meant to be a negative contribution even though I come across like that too often - sorry.

I have put off buying an O-GPS1 for two years for some reason but I may yet buy one as threads like this are an inspiration.

Cheers
Steve
09-19-2014, 07:44 PM   #44
New Member


Join Date: Sep 2014
Posts: 5
moments of the universe is wonderful, if they witnessed nothing can be more perfect
09-22-2014, 10:09 AM   #45
Site Supporter
Site Supporter
mattb123's Avatar

Join Date: Apr 2010
Location: Colorado High Country
Photos: Gallery
Posts: 10,872
QuoteOriginally posted by SunValley Quote
Greetings!
It’s been a long time since I had the chance of taking astrophotos. It’s given time to watch interested_observer’s videos. I’m learning new tricks every time, thank you very much! I’ve also been trying a new technique to remove sky gradient from the light polluted locations I shoot from. I’ve been using the “auto” setting in Iris for some time (as explained in this thread: https://www.pentaxforums.com/forums/32-digital-processing-software-printing/2...beginners.html )

But when foreground objects are present the process is not as good as it is influence by those objects. Iris allows the creation of a mask manually by clicking points on the background sky (up to 2500!). This makes possible the creation of a mask that excludes foreground objects, stars, nebulae or the Milky Way itself, very very useful. Although Iris has functions to use such masks on a picture, I found that they do not work very reliably, especially since I upgraded to windows 7 a few years ago. I then thought of using the mask as a flat field in DeepSky Stacker. And to my surprise it worked:

Original


Mask


Final image:


As a bonus it not only removes the gradient but also corrects much of the vignetting and corrects to a certain point the sky color!
But then after looking more closely I saw that banding in the Milky Way was very very obvious (Darn!) I’ve tried to reduce the banding by blurring the image and adding a bit of noise but once retouched in pse11, DSS will not take the flat field anymore (Double Darn!). I’ve also tried to use the mask in pse11 using the “difference” and “hard light” settings but, although it helps a bit, the results are far from what I got with DSS.

So I’m facing three dead ends: Iris that won’t work properly on win 7, DSS that doesn’t accept retouched flat fields, and pse11 that won’t use gradient masks very effectively.
If anyone could hint at a solution for any of those I’d be very very grateful!

Regards
For software that prefers an older OS you could set up a virtual machine. I use Oracle Virtual Box a lot in my software job and it great. It's also free, but you need to come up with the operating system to install. Usually older OS versions are easy to locate, especially if you used to run it yourself.
You install the older OS, (like Win95 or whatever) into VirtualBox and the OS thinks it's running on standard hardware when it's actually running inside an application emulating that hardware. Worth a try if you are a little technical and it's usually not difficult. Once set up it's very easy to use.
Reply

Bookmarks
  • Submit Thread to Facebook Facebook
  • Submit Thread to Twitter Twitter
  • Submit Thread to Digg Digg
Tags - Make this thread easier to find by adding keywords to it!
camera, gps, image, images, iso, landscape, light, phoenix, photography, screen, shot, unit

Similar Threads
Thread Thread Starter Forum Replies Last Post
In the Field with the Pentax K-3 - First Impressions Albert Siegel Pentax K-3 & K-3 II 40 11-02-2013 06:46 AM
Night My first attempt to shoot the Moon :) manntax Post Your Photos! 8 10-22-2013 06:14 AM
How do you show your portfolio out in the field? slackercruster Photographic Technique 10 07-07-2012 08:09 AM
Nature Pentax K5 out in the field Larsenio Post Your Photos! 4 04-16-2012 04:39 PM
My first attempt in the pentaxforums thesimson01 Photo Critique 6 05-08-2009 04:36 AM


All times are GMT -7. The time now is 02:29 PM. | See also: NikonForums.com, CanonForums.com part of our network of photo forums!
  • Red (Default)
  • Green
  • Gray
  • Dark
  • Dark Yellow
  • Dark Blue
  • Old Red
  • Old Green
  • Old Gray
  • Dial-Up Style
Hello! It's great to see you back on the forum! Have you considered joining the community?
register
Creating a FREE ACCOUNT takes under a minute, removes ads, and lets you post! [Dismiss]
Top