Forgot Password
Pentax Camera Forums Home
 

Reply
Show Printable Version 32 Likes Search this Thread
01-04-2023, 04:47 AM   #1
Forum Member


Join Date: Dec 2012
Posts: 74
Star trail Photography with Pentax KP

Staff note: This post may contain affiliate links, which means Pentax Forums may earn a small commission if a visitor clicks through and makes a purchase. If you would like to support the forum directly, you may also make a donation here.


Hi All,

Happy new year! I hope all of you are doing well.

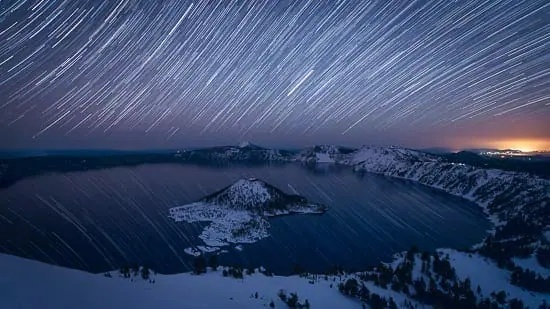
I wanted to try getting some star trail photos like the one below. I've tried finding some online resources, but most of them are for the K1 which has a intervalometer. I did find plenty of generic articles, but am looking for some KP specific advice on what camera settings etc. I would need to use. Also, if there is post processing involved, which I am sure there will be, I could find some resources for Darktable (which is what I use), but I would need to know specifically what to look for.

I have a Pentax KP, decent tripod + the following lenses -

Pentax DA 18-135mm F3.5-5.6
Pentax HD DA Limited 15mm F4
Pentax DA 50mm F1.8
Pentax DA 200mm F2.8

Any help or advice would be much appreciated.

Thanks,
Ducky


01-04-2023, 04:59 AM - 2 Likes   #2
Pentaxian


Join Date: Nov 2018
Photos: Gallery
Posts: 586
How To Photograph Star Trails - The Ultimate Guide To Star Trail Photography might be useful.

And this https://www.pentaxforums.com/articles/photo-articles/composite-photos-in-camera-guide.html

Your KP does have a built in intervalometer.
01-04-2023, 05:08 AM - 1 Like   #3
Loyal Site Supporter
robgski's Avatar

Join Date: Nov 2012
Location: Shenandoah Valley, Virginia
Photos: Gallery | Albums
Posts: 8,799
The KP has a "Star Stream" option under its own Intervalometer menu. Make sure your firmware is up to date and you should access it by hitting the rightmost directional button, then selecting "INT" in the sub menu, and you will see the "Star stream" option.

I'm no expert on star streams, so I advise you to experiment a lot, and pay attention to every setting and time you use.
To create a shot like the one you posted you'd probably choose the DA 15 to get the widest view. On APSC, I"ve used the Rokinon 8mm Fisheye to good results.
Since you are trying to get starstreams, the max aperture of f4 is not an issue, and a wider angle lens should allow you to get enough DOF so everything is in focus from foreground to the stars.
Fortunately, I think you can use ISO6400 without much worry about noise. Again, experiment.

Good luck, I look forward to seeing your images.
01-04-2023, 07:52 AM - 3 Likes   #4
Loyal Site Supporter
MossyRocks's Avatar

Join Date: Nov 2017
Location: Minnesota
Photos: Gallery | Albums
Posts: 2,982
The image you showed was taken with an ultrawide lens with over 90 degrees horizontal field of view. The upper left of the image is somewhat close to the celestial pole and about 2/3s of the way across along the top is the celestial equator. So given your lenses the 15mm would be the one you want. As far as how to shoot them my general preference is to do the following:
1. Full manual mode
2. Shutter speed 30s
3. ISO - take a couple of test shots at your F-stop and test ISO and see if you like the number of stars. Too many stars will have a very dense set of trails which gets distracting.
4. F-stop pick one where your lens gets good enough.
5. Drive mode - On my cameras I set the drive mode to high speed continuous. There is less delay than using an intervolometer.
6. Make sure you have slow shutter noise reduction turned off.
7. Use a big heavy tripod. For stuff like this my light tripod I use is an old Manfrotto 3058 for perspective.
8. Use a wired release cable that has a mode that holds the button down.
9. Shoot a big pile of shots. I would guess the trail lengths in the picture above are in the 7 to 10 degree range so the total exposure time they used was somewhere around 30 to 40 minutes. The earth rotates at 15 degrees per hour so that is where the total exposure time comes from.
10. Shoot some dark frames at the end. Put the lens cap on and cover the optical viewfinder and shoot a bunch of dark frames (pictures of the back of the lens cap) as you pack up everything else. Use the exact same settings as you did when shooting the stars.
11. There are all sorts of programs you can use for combining things in various ways. Some of the programs one can use have the ability to create a master dark from a pile of darks and then subtract that from the light frames. Various astro stacking programs will do that and I believe that RawTherapee does as well but I haven't used it there. For getting the trails to appear stack the images and set the blend mode to brightest. With such a huge pile of shots there are other tricks one can do like do average stacking for the foreground and makes the results of that stack in which would allow a substantial reduction in noise or an additive stacks for the foreground to brighten it up, or a mix of the 2 for some benefit in both areas.

That is a very high level of the process I have used for shots like this but I don't do them all that often. If you have questions on a specific aspect ask and I can go into further detail. The tools I use are RawTherapee, GIMP, and Hugin and could accomplish everything mentioned here with those assuming the master dark functionality in RawTherapee works.

A brief bit on the master dark frame. Shooting your own dark frames at the end and creating a master dark frame will produce better results than the slow shutter noise reduction (in camera dark frame subtraction). This is because you will be able to capture more light frames for a given time out but also the mast dark that is created has more of the true random noise removed leaving a better more accurate representation of the systematic error you are trying to remove but subtracting it. True random noise in dark frames adds error but the systematic error that was captured is still greater but not by a huge amount anymore so a master dark drives down the true random part so that systematice error can be properly removed.

01-04-2023, 09:10 AM - 2 Likes   #5
Senior Member


Join Date: May 2019
Posts: 148
I have a KP and a SMC Limited 15mm F4. I have noticed coma with the 15mm at F4. When I stop down to F5.6 the coma is reduced enough (for me) for star photography. However, I have to be careful of bright objects such as planets. The coma is especially noticeable on my lens on the left side (landscape format), so I take care to focus in Live View on the left side.

I hate to add anything to what MossyRocks wrote. I seek out his posts on astrophotography all the time. I am a novice and am wanting to take star trail photos myself. So take the following with a massive bit of skepticism.

Prior to MossyRocks' post, while preparing for star trail photography, I found 2 YouTube videos on the subject from Cape Nights Photography (Cape Nights Gallery - Cape Night Photography - YouTube). I created a user mode with the following parameters: Bulb mode; shutter speed 2 minutes; drive mode Interval Composite (interval = 2 seconds, number of shots = 12, start interval = 2 second timer, save process checked on); shutter and ISO noise reduction off; ISO = 400 as a starting point.

Edit: I forgot to include the interval composite mode = Bright.

Last edited by Ausable; 01-04-2023 at 09:22 AM.
01-04-2023, 09:37 AM   #6
Forum Member


Join Date: Dec 2012
Posts: 74
Original Poster
Thank you all for such informative and helpful answers. I genuinely appreciate that.

I'm going to try a few test shots in the coming days, but I live in London so clear skies are quite rare :-D. I'll definitely need some practice before the big trip to Iceland in Feb, so I hope that I'll get at least a few days of clear skies between now and then, and obviously in Iceland too.

One noobie question - How do I update my firmware?

@MossyRocks, your post is exactly what I am looking for. Thank you so much. Just a couple of questions though -

QuoteOriginally posted by MossyRocks Quote
5. Drive mode - On my cameras I set the drive mode to high speed continuous. There is less delay than using an intervolometer.
If I am setting it to high speed continuous then why would I need a wired release cable (point 8 in your post)? Apologies but I'm very unfamiliar with this feature.

QuoteOriginally posted by MossyRocks Quote
6. Make sure you have slow shutter noise reduction turned off.
Under which menu would this be? I can't find the option to do this.

QuoteOriginally posted by MossyRocks Quote
8. Use a wired release cable that has a mode that holds the button down.
Is there a way around this if I don't own a release cable? Or is it a must have? I don't want to be standing behind the camera and pressing the shutter release every 30 seconds for half an hour, so I have a feeling that it is a requirement unless the camera has a setting or feature that does this .

Note that I have taken plenty of Northern lights and one presentable milky way photo in the past, but all of them were taken using a single photo with 30 second exposure. I used the 2 second delay for the shutter to avoid vibrations.

Thank you again and I really appreciate the help.

Ducky
01-04-2023, 10:23 AM - 1 Like   #7
Senior Member


Join Date: May 2019
Posts: 148
In the KP, you can turn noise reduction off under the Record Mode Menu 2 (press MENU button; go to camera icon tab 2). You may also find both ISO and shutter noise reduction options in the control panel when you press the INFO button, depending on how you set up your control panel.

To update your firmware, go to https://www.ricoh-imaging.co.jp/english/support/download_digital.html and download the firmware from there. Instructions are included in the download package.

01-04-2023, 02:58 PM - 2 Likes   #8
Pentaxian
Grimmus's Avatar

Join Date: Jun 2010
Location: Newcastle (Aust.)
Photos: Gallery | Albums
Posts: 345
To add to the info from @Mossyrocks and other good information above:
1. The Kp has a really good feature that means you won't need an intervalometer. You can set the mode dial to "B" and toggle between the traditional Bulb mode or a timed B mode by pressing the green button. When in the timed B mode, you can set exposures up to 20 minutes in 10 second increments and most importantly, can still set interval shooting as the drive mode (apparently this is not possible on the K-1). This allows you to take for example, a mass of 1, 2 or 3 minute exposures, cutting down the number of shots you have to take for any given final star trail length you want and create individual images for processing in post. Set the "Standby Interval" in the interval shooting drive mode to "minimum". Setting up a user mode as @Ausable said is a great idea!
2. I would suggest you do the trail processing in post (rather than in camera) as this will mean you will be able to adjust individual shots (exposure, colour balance etc) - or when someone turns up and shines their torch into your lens or a plane flies through your scene. StarStax and Startrails are 2 free programs that allow you to composite your image, and have tools that allow you to close gaps in the trails. StarStax is fast and simple. Doing the stacking in post also allows you to taper the ends of your star trails if this floats your boat.
3. Experiment with ISO and aperture but for trails, you don't need to shoot too wide or with ISO cranked too high. Make sure you are not blowing out and losing colour in the stars - they are not white. Suggest around f5.6 on your DA15 or DA18-135 and ISO 800 as a start point but the light pollution/ambient will have a big influence on this. Don't forget you can push each of your images a stop or 3 in post before stacking. And the performance of your lens at the chosen aperture will have an impact of the thickness of the trails (the coma mentioned by @Ausable).
4. As @Robski says, do lots of testing - amazing how many things/settings/circumstances pop up and have to be solved in the dark when you are stressed. Getting out of London for conditions similar to those you want to shoot in would be a good idea - light pollution increases the difficulty tenfold.

Good luck!
01-04-2023, 03:43 PM   #9
Forum Member


Join Date: Dec 2012
Posts: 74
Original Poster
Thanks both. Much appreciated. Really helpful :-)
01-04-2023, 10:42 PM - 1 Like   #10
Site Supporter
Site Supporter


Join Date: Mar 2008
Location: Prince George, BC
Photos: Gallery | Albums
Posts: 3,546
Hi, Ducky. When I was shooting slide film many, many years ago, I loved doing star trails. Glad to see someone getting a kick from it now. One bit of advice I could give you anytime you are in the dark shooting long exposures is to toss a black winter hat over the viewfinder to keep stray light from potentially entering the optical path. Pentax sells their cameras with a plastic black viewfinder blind that purchasers usually toss out. If you still have it, it is the best option for tripod work. - Jack
01-04-2023, 10:54 PM - 1 Like   #11
Loyal Site Supporter


Join Date: Jun 2009
Location: Tumbleweed, Arizona
Photos: Gallery | Albums
Posts: 5,707
Just to add a bit to the excellent information you have already received here.
  • Just shoot 30-second frames in Manual mode. Have the continuous shooting set and the camera will shoot one frame after the next as long as the shutter is active.
  • The reason why you want to use a 30-second exposure for each frame, shooting continuously - is this enables you to stack as many or as few frames together in post-processing to create the star trails. I like to stack about 20 frames together, which is about 10 minutes of shooting. I probably shoot about 20 to 30 minutes of frames at a time, so that I have enough material to use. In this way, you can make the star trails as dense or as sparse as you may desire. Also, there are quite a few post-processing tricks you can apply as you may desire - like making the trails look like little comets.
  • The reason why you want to shoot in continuous mode is so that you have the absolute minimum time between frames, so that during post-processing, the trails will look continuous without any noticeable gaps. Some post-processing utilities will also detect and fill in the gaps.
Once you have done this a couple of times, you will be amazed at how simple star trails really are. Also, I have a friend who has used the "Star Stream" functionality. It's easy and quick - plus the results are really nice. I would suggest trying both approaches.


Last edited by interested_observer; 01-04-2023 at 11:02 PM.
01-05-2023, 01:38 AM - 1 Like   #12
Pentaxian
rpjallan's Avatar

Join Date: Aug 2010
Location: Adelaide, South Australia
Photos: Albums
Posts: 999
I used to do star trails on my old Pentax MX back in the day. I need to get out & give this a go again with my K-3 II. There is some great info here...
01-05-2023, 04:54 AM   #13
Forum Member


Join Date: Dec 2012
Posts: 74
Original Poster
Thanks all. Any recommendations for an inexpensive wired shutter release that will hold the button down? I found THIS on Amazon. Will it be sufficient?

QuoteOriginally posted by interested_observer Quote
Use a wired shutter release like this one ---- amazon.com : JJC Wired Intervalometer Timer Shutter Release Remote for Pentax K-70 KP Fujifilm Fuji X-S10 X-T200 Replaces Pentax CS-310 : Electronics?tag=pentaxforums-20& Notice the orange tab under the main button. This is a slide that when you press the button just slide it and it will keep the shutter depressed until you slide it off. So, there is no need for you to stand there holding the shutter button down or pressing it repeatedly.
Thanks @interested_observer. Unfortunately that one isn't available. I've found an alternative (see above), but not sure if it's suitable. Any thoughts?
01-05-2023, 10:30 AM - 1 Like   #14
Site Supporter
Site Supporter
pixelsaurus's Avatar

Join Date: Jul 2007
Location: Te Kuiti, NZ
Photos: Gallery | Albums
Posts: 986
You could probably dispense with a self locking cable switch by reprogramming the shutter release button in B mode (page 51 in the KP Users Manual. You will find it in the Custom Menu, ( item 7 on a K70 : Bulb (B) Mode Options), set it to Type 2 - it will push to open, push to close. Back in the day, it was designated T setting.
01-05-2023, 11:11 AM - 1 Like   #15
Loyal Site Supporter
MossyRocks's Avatar

Join Date: Nov 2017
Location: Minnesota
Photos: Gallery | Albums
Posts: 2,982
QuoteOriginally posted by Ducky13 Quote
If I am setting it to high speed continuous then why would I need a wired release cable (point 8 in your post)? Apologies but I'm very unfamiliar with this feature.
The need for a wired release cable is because you need something to "hold the button down" to keep the camera shooting continuously. That can be the actual shutter button on the camera or the one on the release cable connected to the camera.

QuoteOriginally posted by Ducky13 Quote
Under which menu would this be? I can't find the option to do this.
I don't know off hand. It is one of those things that I set when I first get a camera and then never touch again. It looks like others know where to find this.

QuoteOriginally posted by Grimmus Quote
The Kp has a really good feature that means you won't need an intervalometer. You can set the mode dial to "B" and toggle between the traditional Bulb mode or a timed B mode by pressing the green button. When in the timed B mode, you can set exposures up to 20 minutes in 10 second increments and most importantly, can still set interval shooting as the drive mode (apparently this is not possible on the K-1). This allows you to take for example, a mass of 1, 2 or 3 minute exposures, cutting down the number of shots you have to take for any given final star trail length you want and create individual images for processing in post. Set the "Standby Interval" in the interval shooting drive mode to "minimum". Setting up a user mode as @Ausable said is a great idea!
For doing star trails I am not a real big fan of intervolometers either built in or external as there is a delay between of 1 to a few seconds typically between shots. Depending on how point like the stars are and what focal length is used this may result in start and stops in the trails. You are correct in that they would allow for several minutes of exposure but in that case a bad single frame (god knows I have gotten a lot when out at night) would make a big gap in the trails.

QuoteOriginally posted by Ducky13 Quote
I've found an alternative (see above), but not sure if it's suitable. Any thoughts?
The intervolometer I have is this one. I use it for running a camera with my big lens using astrotracer as I can't stick it on my little equatorial. For the cameras on my equatorial I either use the official pentax wired remote or one of the wired releases I've made (they aren't hard to make but you need a long 3 conductor 2.5mm male ended audio cable a project box, and depending on what you need various buttons or switches).

QuoteOriginally posted by Ducky13 Quote
I used the 2 second delay for the shutter to avoid vibrations.
I thought the KP has an electronic shutter mirror up mode that would avoid that. I don't worry about that with my shorter lenses mostly because my small astro tripod is the big old Manfrotto 3058 with the 3057 head. That dampens any minor shake from an APS-C mirror without problem. When I say I don't worry about it I used shooting method I described with my K-3ii and Laowa 12mm F/2.8 lens to capture this image which combined 30 shots that were 20s each:

Mirror slap and all
Reply

Bookmarks
  • Submit Thread to Facebook Facebook
  • Submit Thread to Twitter Twitter
  • Submit Thread to Digg Digg
Tags - Make this thread easier to find by adding keywords to it!
advice, airplane, camera, da, dew, focus, gaps, image, intervalometer, kp, look, night, pentax, photography, photography with pentax, resources, star, star trail photography, technique, trail, trails

Similar Threads
Thread Thread Starter Forum Replies Last Post
My dismal first attempt at star trail(s) Michael Piziak Troubleshooting and Beginner Help 78 10-18-2021 03:57 AM
Night First Star Trail Attempt bertwert Post Your Photos! 2 01-18-2016 01:37 PM
moon lit star trail Aaron28 Monthly Photo Contests 6 08-19-2015 07:25 PM
Star Trail Photography rustynail925 Photographic Technique 15 03-09-2010 11:12 AM
Moon and first star trail shot jbrowning Post Your Photos! 9 02-14-2008 08:41 AM


All times are GMT -7. The time now is 05:23 PM. | See also: NikonForums.com, CanonForums.com part of our network of photo forums!
  • Red (Default)
  • Green
  • Gray
  • Dark
  • Dark Yellow
  • Dark Blue
  • Old Red
  • Old Green
  • Old Gray
  • Dial-Up Style
Hello! It's great to see you back on the forum! Have you considered joining the community?
register
Creating a FREE ACCOUNT takes under a minute, removes ads, and lets you post! [Dismiss]
Top