Forgot Password
Pentax Camera Forums Home
 

Reply
Show Printable Version 1 Like Search this Thread
01-07-2016, 07:48 PM   #1
Pentaxian
micromacro's Avatar

Join Date: Jan 2014
Location: Florida
Photos: Gallery
Posts: 3,722
B&W, as usual need an opinion

I've tried to bring attention to the cat, but it seems it goes on fire hydrant no matter what.
To continue, or just adjust an original in color and bigger size?

Original is not edited.

Attached Images
   
01-07-2016, 07:53 PM   #2
Loyal Site Supporter
Canada_Rockies's Avatar

Join Date: Nov 2007
Location: Sparwood, BC, Canada
Photos: Gallery | Albums
Posts: 12,385
Perhaps if you reduced the overall exposure and then brought the cat back to normal?
01-07-2016, 07:58 PM   #3
Pentaxian
micromacro's Avatar

Join Date: Jan 2014
Location: Florida
Photos: Gallery
Posts: 3,722
Original Poster
Maybe, but that hydrant is still brighter than cat. Maybe, I live this one for later when I learn photophop? It seems that lightroom somehow is not enough.I really want to keep the wall pattern as well. Shadows will kill that "vanished" look.

I like that pics in general as a challenge to get a cat in focus at night with long exposure
01-07-2016, 08:20 PM   #4
Loyal Site Supporter
Canada_Rockies's Avatar

Join Date: Nov 2007
Location: Sparwood, BC, Canada
Photos: Gallery | Albums
Posts: 12,385
In Lightroom, reduce the overall exposure 1 stop and another copy 2 stops so you can pick and choose which you prefer. Same thing from 1 stop below to 2 stops:

  1. Create a Virtual copy of the original and reduce the exposure 1 stop
  2. Go to the Develop module and select the brush.
  3. Set the brush to + 1 stop.
  4. Brush an oval around the cat with feathered edges to give a vignette effecct.
Adjust the stop count to get the image you picture in your head. -2 overall needs +2 in the brush etc.

---------- Post added 2016-01-07 at 20:43 ----------

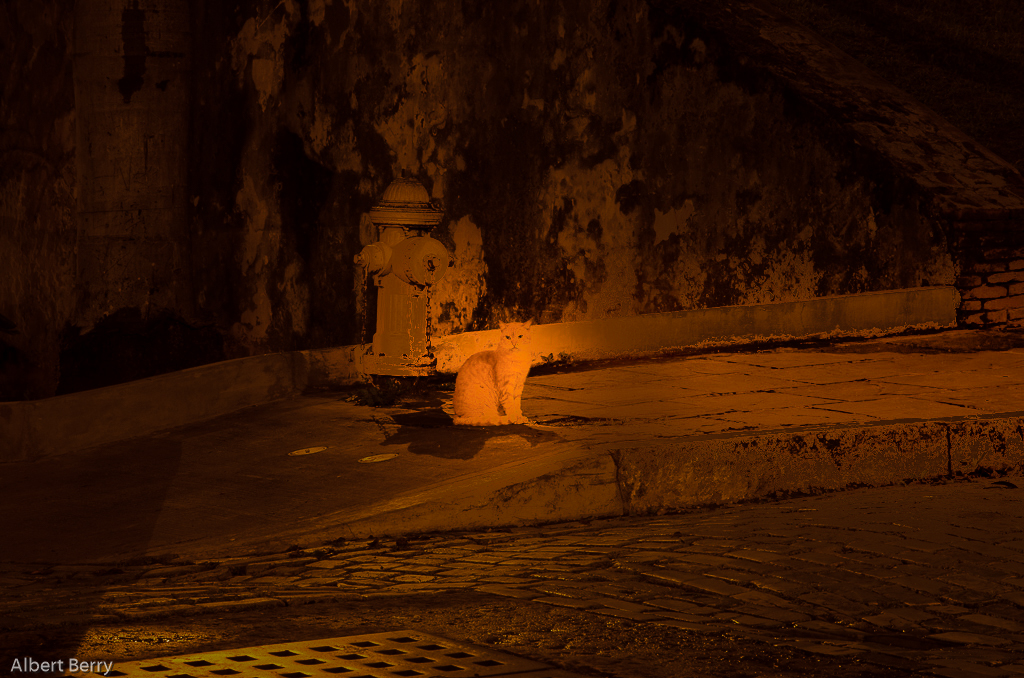
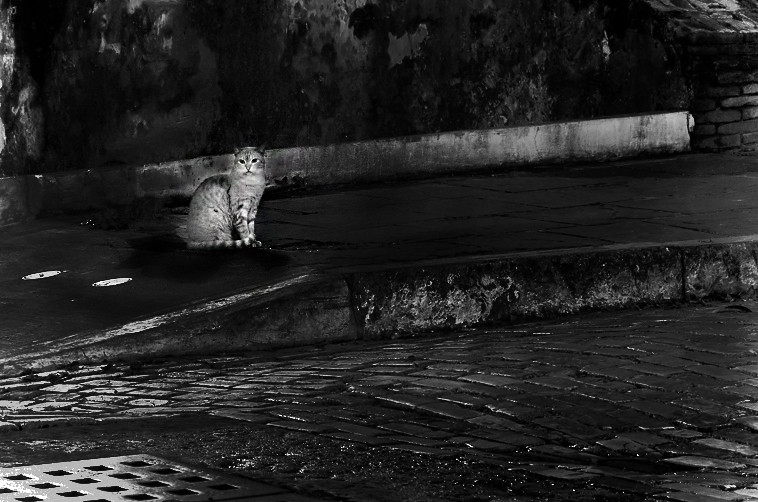
I downloaded the original, reduced the exposure in 3 stops in the Library Quick Develop, then switched to the Develop Module.

I added a brush stroke (right end icon)
Exposure +2
Size 20
Feather 19
Flow 99
Auto Mask Checked
Density 100

This is the result. Obviously not final, but it will give you the idea. These steps took me about a minute.


Last edited by Canada_Rockies; 01-07-2016 at 08:45 PM. Reason: Added BB Code to Flickr image
01-08-2016, 03:29 AM - 1 Like   #5
Master of the obvious
Loyal Site Supporter
savoche's Avatar

Join Date: Jun 2011
Location: Lowlands of Norway
Posts: 18,312
Would this be cheating too much?

All done in Lightroom.
Attached Images
 
01-08-2016, 09:32 AM   #6
Loyal Site Supporter
Canada_Rockies's Avatar

Join Date: Nov 2007
Location: Sparwood, BC, Canada
Photos: Gallery | Albums
Posts: 12,385
Your image must be true art, Savoche - it is altered reality.
01-08-2016, 09:36 AM   #7
Site Supporter
Kath's Avatar

Join Date: Jan 2014
Location: Portland, OR
Photos: Gallery
Posts: 737
QuoteOriginally posted by savoche Quote
Would this be cheating too much?

All done in Lightroom.
Cheating? As long as you're not planning to use it in a photojournalism article about cats and fire hydrants, it's your art. You can do whatever you want.

For what it's worth, I like it minus the hydrant.

01-08-2016, 10:46 AM   #8
Master of the obvious
Loyal Site Supporter
savoche's Avatar

Join Date: Jun 2011
Location: Lowlands of Norway
Posts: 18,312
QuoteOriginally posted by Canada_Rockies Quote
Your image must be true art, Savoche - it is altered reality.
True, I wouldn't usually do such a thing. It's more to show what is possible by spending a few minutes with Lightroom. (And really, my quick and clumsy edit does not show the full potential of LR.)

That said, I agree with Kath:

QuoteOriginally posted by Kath Quote
Cheating? As long as you're not planning to use it in a photojournalism article about cats and fire hydrants, it's your art. You can do whatever you want.

For what it's worth, I like it minus the hydrant.
In this case the image is micromacro's, I just "artified" it But yes, I believe there is no limit for how much you can edit or alter your images. It is indeed your art.

Now, presenting that altered reality as "truth" is another thing completely.
01-08-2016, 04:18 PM   #9
Pentaxian
micromacro's Avatar

Join Date: Jan 2014
Location: Florida
Photos: Gallery
Posts: 3,722
Original Poster
Thanks, guys.
I really like the idea to get rid of hydrant.
So, cheating is the way In Photoshop, good to practice.
01-09-2016, 05:16 PM   #10
PEG Moderator
Loyal Site Supporter
Kerrowdown's Avatar

Join Date: Aug 2008
Location: Highlands of Scotland... "Hold Infinity in the palm of your hand" - William Blake
Photos: Gallery
Posts: 57,864
QuoteOriginally posted by micromacro Quote
but it seems it goes on fire hydrant no matter what
In Lightroom both the local adjustment brush or the radial filter will help you to push or pull your cat for the best effect.
01-11-2016, 01:06 PM   #11
Master of the obvious
Loyal Site Supporter
savoche's Avatar

Join Date: Jun 2011
Location: Lowlands of Norway
Posts: 18,312
QuoteOriginally posted by micromacro Quote
Thanks, guys.
I really like the idea to get rid of hydrant.
So, cheating is the way In Photoshop, good to practice.
QuoteOriginally posted by Kerrowdown Quote
In Lightroom both the local adjustment brush or the radial filter will help you to push or pull your cat for the best effect.
Yep, you don't really have to use Photoshop for this. That is, I find that Photoshop can give you a better end result - if you invest the (sometimes lot of) extra time and patience required over using Lightroom.

Then again, the more time you spend with Photoshop, the less effort it takes to do amazing things
01-13-2016, 05:01 PM   #12
Senior Member
OldGeaser's Avatar

Join Date: Jan 2014
Location: Thousand Oaks, CA
Posts: 221
Interesting picture. Just to play around, I just used Photoshop plus Topaz Remask and Topaz Adjust to bring the cat up to match the Hydrant. But then the foreground competes for attention so tried a Crop.
Attached Images
   
01-13-2016, 07:29 PM   #13
Senior Member
OldGeaser's Avatar

Join Date: Jan 2014
Location: Thousand Oaks, CA
Posts: 221
And what it looks like back close to the original tone
Attached Images
 
01-13-2016, 07:43 PM   #14
Veteran Member
LeDave's Avatar

Join Date: Jun 2009
Location: Minneapolis - St. Paul
Photos: Gallery
Posts: 3,067
Reply

Bookmarks
  • Submit Thread to Facebook Facebook
  • Submit Thread to Twitter Twitter
  • Submit Thread to Digg Digg
Tags - Make this thread easier to find by adding keywords to it!
brush, copy, critique, develop, exposure, module, photography, stop

Similar Threads
Thread Thread Starter Forum Replies Last Post
B&W Darkroom: Water as Stop Bath? AquaDome Film Processing, Scanning, and Darkroom 12 06-05-2015 01:49 AM
My first photoshoot - the pictures - need an opinion donpjt General Photography 18 03-19-2015 09:02 PM
Need an Opinion M36 Film SLRs and Compact Film Cameras 7 09-13-2014 04:20 PM
Is there a difference between shooting b&w and processing as b&w? justtakingpics Digital Processing, Software, and Printing 5 04-25-2010 07:10 PM
For Sale - Sold: DA 50-200mm, B&W Polarizer, B&W Step Up Ring camperguy01 Sold Items 5 02-15-2009 08:39 PM


All times are GMT -7. The time now is 09:27 AM. | See also: NikonForums.com, CanonForums.com part of our network of photo forums!
  • Red (Default)
  • Green
  • Gray
  • Dark
  • Dark Yellow
  • Dark Blue
  • Old Red
  • Old Green
  • Old Gray
  • Dial-Up Style
Hello! It's great to see you back on the forum! Have you considered joining the community?
register
Creating a FREE ACCOUNT takes under a minute, removes ads, and lets you post! [Dismiss]
Top