| Pentax/Camera Marketplace |
| Pentax Items for Sale |
| Wanted Pentax Items |
| Pentax Deals |
| Deal Finder & Price Alerts |
| Price Watch Forum |
| My Marketplace Activity |
| List a New Item |
| Get seller access! |
| Pentax Stores |
| Pentax Retailer Map |
| Pentax Photos |
| Sample Photo Search |
| Recent Photo Mosaic |
| Today's Photos |
| Free Photo Storage |
| Member Photo Albums |
| User Photo Gallery |
| Exclusive Gallery |
| Photo Community |
| Photo Sharing Forum |
| Critique Forum |
| Official Photo Contests |
| World Pentax Day Gallery |
| World Pentax Day Photo Map |
| Pentax Resources |
| Articles and Tutorials |
| Member-Submitted Articles |
| Recommended Gear |
| Firmware Update Guide |
| Firmware Updates |
| Pentax News |
| Pentax Lens Databases |
| Pentax Lens Reviews |
| Pentax Lens Search |
| Third-Party Lens Reviews |
| Lens Compatibility |
| Pentax Serial Number Database |
| In-Depth Reviews |
| SLR Lens Forum |
| Sample Photo Archive |
| Forum Discussions |
| New Posts |
| Today's Threads |
| Photo Threads |
| Recent Photo Mosaic |
| Recent Updates |
| Today's Photos |
| Quick Searches |
| Unanswered Threads |
| Recently Liked Posts |
| Forum RSS Feed |
| Go to Page... |
PentaxForums.com → Camera Help Central → Pentax Articles → Pentax DSLR and Camera Articles
→
Go all manual and get exactly the picture you want!
 |
| 2 Likes | Search this Thread |
| 2 Likes | #1 | ||
| |||
| Views: 7,400 | |||
PALADIN85020 | |
 | View full profile |
| Contact via private message | |
| Find other posts by PALADIN85020 | |
| Find threads started by PALADIN85020 | |
| Find threads in which PALADIN85020 has posted | |
| These users Like PALADIN85020's post: |

| 12-10-2014, 09:29 AM | #2 |
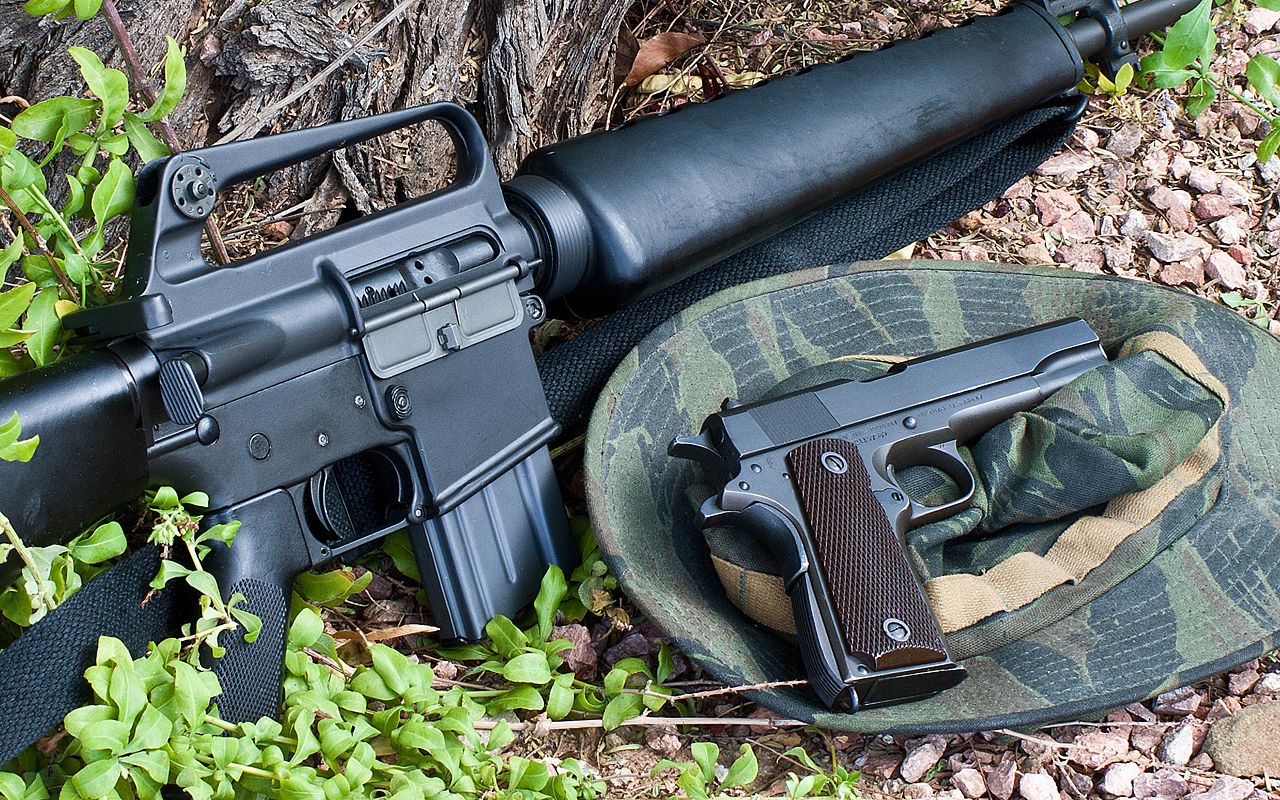
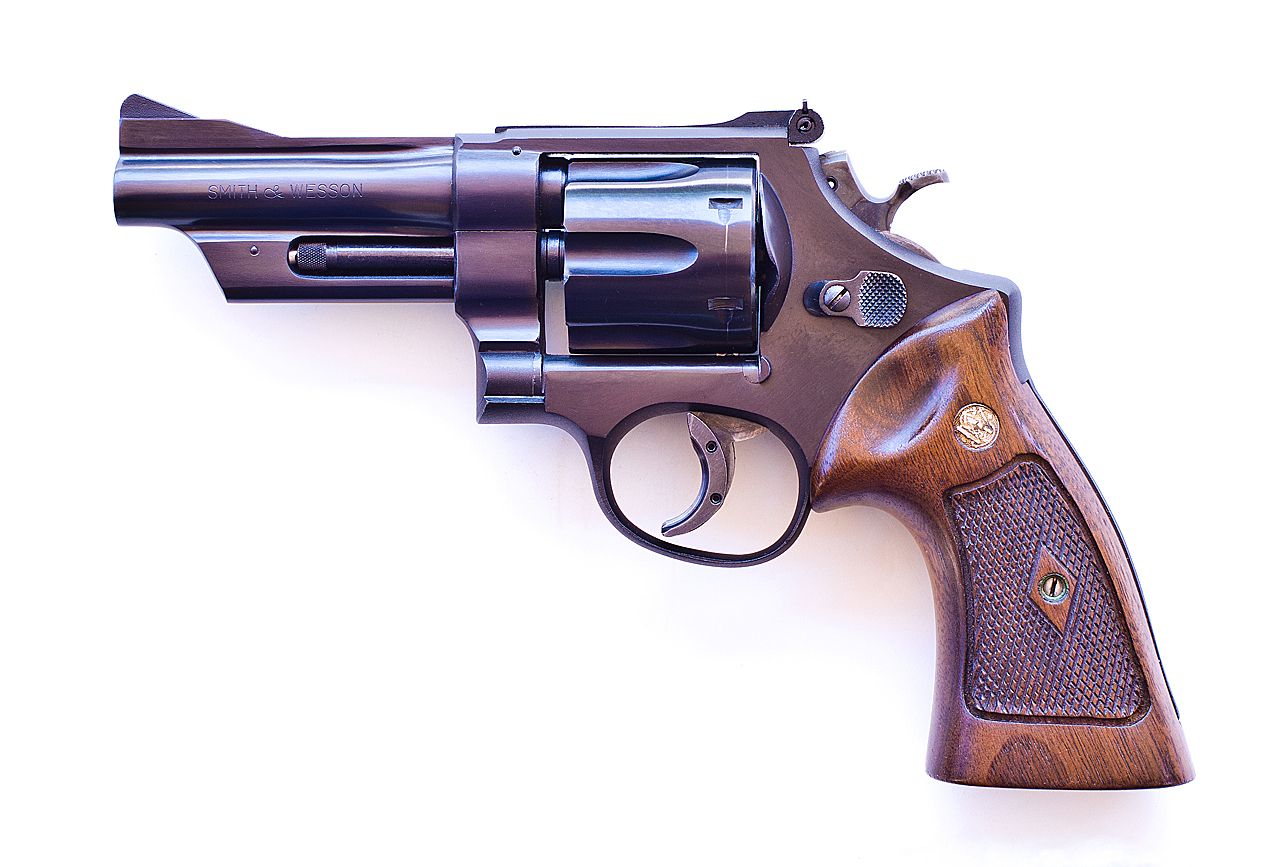
 For a long time as I began to use Pentax digital cameras, I made good use of the K100D's green tab on the mode selection wheel. It just seemed so much easier to let the camera decide on all the settings, and I was assured of getting a good picture most of the time. As I moved up to a better camera (the K200D) I found that using the AV spot on the dial gave me either lots of depth of field or tight focus with softer backgrounds. This became my "most used" setting. I was content to shoot JPGs, letting the camera "develop" the picture. I had no software that could even handle RAW files, so I totally ignored working with them. Things changed when I got my K-5. To me, this was a truly awesome camera, with capabilities way beyond what I was used to using. I also began to get some nicer glass than the kit lens, and wanted to take advantage of all of this. I was still pretty much using the semiautomatic modes - AV for depth of field, TV for action shots, and TAV where I could control both and let the camera determine ISO. I was using the camera commercially a bit - I'm a firearms writer, and began to carefully utilize the full manual mode and process RAW files using PhotoShop Elements. I found that being able to control all the elements of the "exposure triangle" gave me incredible options. Previously, giving the camera control of even one element often didn't give me what I wanted. Sometimes I wanted black, and camera would give me grey, so to speak. A dark object on a white background could only be handled with full manual control. My two secret weapons for absolute artistic control were a sturdy tripod and shooting in the RAW format. For those of you not yet using RAW files - stop being afraid. Do it. The "DNG" suffix on the version I use means "Digital Negative" and it's as close to a universal RAW file as you can get. Put very simply, the RAW file is truly ALL the digital information you will need to get a really satisfactory picture. Using computer software, you can control many elements of the picture AFTER you've taken it. Give the photo more exposure, or less. Increase clarity if you wish. Bring up the color saturation. Bring out details in the overexposed areas, or increase the contrast. The possibilities are endless. Then convert the photo to a .JPG, and you'll find the extra work has been well worth it. With the manual setting, you have complete control over the photo at your fingertips. Adjust the aperture - want it sharper or softer, it's your choice. Get that ISO setting where you want it. ISO 100 for "no noise" in the picture. Or in dim light, use a higher ISO to get shots you never could before, or use the increased noise for artistic effect. When you are using a tripod, unless your subject is moving, you can use whatever shutter speed you want to get the exposure exactly right. I now have the marvelous K-3 camera and some superb limited glass, so when I take product shots, I want things absolutely sharp and perfectly exposed. K-3 + great glass + RAW file + full manual control + tripod = pictures exactly the way you want them. I'm not willing, except for a quick "target of opportunity" shot, to let the camera make any decision for me. Call me a control freak, but that's what makes for great pictures. Here's one example. This is a photo of some Vietnam-era weaponry I took as computer wallpaper for some of my Vietnam veteran friends. I used the K-3, the great SMC-DA 35mm f/2.8 Macro Limited prime lens, a tripod, shot it in RAW, and controlled the aperture and shutter speed to my taste at ISO 100. By the way, when you shoot manual, the shake reduction feature should be off; you should be using a tripod. I generally take a "test" JPG shot, and if I like it, I save it in RAW format also. When you have the shot in memory and displayed on playback, you can press the AE-Lock button to also save it in RAW. At any rate, here's an example of full manual control. The exposure is right, it's sharp as a tack, the colors are realistic, and it has a nice balance of light and dark elements. I find when taking pictures of things with a very large range of light and dark elements, manual control is essential. In the photo below, I wanted plenty of detail in the dark areas of the firearm itself, and I didn't care if the white background was completely blanked out. Again, using a tripod and exposing only for the subject gave me exactly what I wanted. I adjusted the aperture to give me the sharpest possible result, again using that great 35mm limited lens. and shooting in RAW. This revolver once belonged to my father. You'll find that if you use either the K-5 series or the K-3 when you shoot full manual, the camera can still help you. When you look through the viewfinder, over in the lower right hand corner, the camera displays either "0" or + or - and a number. These are exposure values, and you can use these as a guide, moving up or down (I generally use the front control wheel to adjust exposure time) to get your exposure just the way you want it. I have my camera set for 1/3 exposure value steps, and I may bracket any particular shot with as many as five increments, selecting the best one in post-processing. While 1/2 exposure value steps will work, if you are a perfectionist, you will want to use 1/3 EV adjustments - often a slight variance in tonal value makes all the difference. Again, using RAW, you still have a lot of latitude through post-processing. I guess the bottom line is this. If you want pictures as perfect as possible, go full manual. Use RAW. Use a tripod. Process the RAW file into exactly what you want. Letting the camera make any decision on exposure time, aperture or ISO is a distant second choice. Don't be afraid of that manual setting. Use it. Experiment. You'll be glad you did, and proud of the results you can achieve. John PENTAX : PENTAX Photo Gallery artist page  Thanks. Thanks.
| |

| 12-12-2014, 07:33 PM | #3 |
|
I grew up shooting on a K1000, and waited until the K-5 became affordable just so I could have a fully manual DSLR. I agree with your statements and appreciate your tips. Great pictures of the weapons, and the tiger stripe boonie hat. I served in the US Army for 21 years, though in a later period, I love seeing pictures that show off the tools of the trade captured in their best light, pun intended.
| |


| 12-12-2014, 10:23 PM | #4 |
|
I started with a Pentax MX 35 mm SLR with a 50 mm Pentax M f1.4 lens and I really learned a lot about manual focus, exposure and manual frame advance with it (did I told you that I really miss it now - in other post?). Anyways, I have re-experienced from time to time with manual settings again with my K10D and it's a blast. Of course, there's no more advance lever action, but I'm not THAT traditionalist. Many of my subjects are transportation and architecture and I shoot RAW, but to keep myself well grounded in 'manual', I set a fixed ISO and adjust WB manually too. After each session, I reset all to full auto, but stay in RAW. I just don't want to lose the (very) occasional opportunity to photograph Air Force 1 passing by overhead (all the presidents are always in a hurry, you know). | |
| 03-23-2015, 09:22 PM | #5 |
|
Nice Camera Work btw ...who is going to post there personal settings(adjustments to picture control I:E sharpness saturation contrast color curves) i have not seen anyone post the secret magic stuff yet Aloha Timothy | |
| 03-23-2015, 09:57 PM | #6 |
|
When my k20D aperture lever inside the mount got chaffed, it would transmit aperture settings on my -A and AF lenses only half the time. For a long time I shot M, K and M42 lenses on a make-shift split screen I resized from an old Yashica SLR. I mostly shot on M mode, adjusting settings on the fly. In retrospect I really miss those times. Now I mainly shoot AF lenses with Av mode selected.
| |
| 04-03-2015, 04:04 PM | #7 |
|
Thanks so much for the encouragement! For the spur of the moment shots, I tend to use the AV mode most of the time. I'll really have to be more conscious of going more manual. | |
| 08-27-2015, 04:31 AM | #8 |
| When you have the shot in memory and displayed on playback, you can press the AE-Lock button to also save it in RAW I usualy only record in DNG format, the only reason why I would take JPEG would be to have faster photo recording on my SD card. Is it better to use PEF or DNG when using Lightroom ? I also take most of my shots in M mode using green button, with MF lens, getting used to have my left hand always on the focus ring while shooting. But the factory focusing screen is not that good for manual focusing and I'm looking for a replacement screen. I would like to find a screen with horizontal split in a circle and simple horizontal ruler(s), things I found on e-bay are not what I'm looking for. Any advice on good focusing screen at affordable price ? Also, when in playback mode, changing the zoom wheel functionality from normal to x8 or x16 is very usefull to ensure your photo is as sharp as you expect, you just need to turn it 1 click to get a full centerd zoom and click on the Menu button to unzoom to full-size photo. | |
| 08-27-2015, 10:30 AM | #9 |
| Veteran Member   Original Poster | Thanks for this tip, I didn't know that, can you do this only with the last shot you have taken or with older shots ? Is this possible with the K200D ? (I suppose it's only the last taken). I usualy only record in DNG format, the only reason why I would take JPEG would be to have faster photo recording on my SD card. Is it better to use PEF or DNG when using Lightroom ? I also take most of my shots in M mode using green button, with MF lens, getting used to have my left hand always on the focus ring while shooting. But the factory focusing screen is not that good for manual focusing and I'm looking for a replacement screen. I would like to find a screen with horizontal split in a circle and simple horizontal ruler(s), things I found on e-bay are not what I'm looking for. Any advice on good focusing screen at affordable price ? Also, when in playback mode, changing the zoom wheel functionality from normal to x8 or x16 is very usefull to ensure your photo is as sharp as you expect, you just need to turn it 1 click to get a full centerd zoom and click on the Menu button to unzoom to full-size photo. |
| 08-27-2015, 11:16 AM | #10 |
|
I'd probably on go full manual only in a controlled light studio environment. I'm pretty sure I'm faster, using the AV setting and doing fine adjustments with the EV dial set to 1/3 stop adjustments in variable light conditions.
| |
|
« Those Black Spots on your Photos
|
Manual Metering on Pentax DSLRs with Manual and Automatic Lenses »
| Bookmarks |


| Tags - Make this thread easier to find by adding keywords to it! |
| camera, control, elements, exposure, iso, k-3, photo, picture, pictures, tripod |
| Top Liked Posts |
2  Post #1 by PALADIN85020 Post #1 by PALADIN85020 |
 Similar Threads
 | ||||
| Thread | Thread Starter | Forum | Replies | Last Post |
| Want to get the G3 and Lightroom 3? Get them together! | jct us101 | Canon, Nikon, Sony, and Other Camera Brands | 4 | 06-11-2011 07:44 AM |
| Is there anything that gets you energized to go out and want to take lots of photos? | jct us101 | Photographic Technique | 30 | 04-11-2010 03:44 PM |
| So, if you're up @ 3 and want to go shooting in the forest? | Jewelltrail | Photographic Technique | 27 | 04-08-2010 03:07 PM |


