Forgot Password
Pentax Camera Forums Home
 

Reply
Show Printable Version Search this Thread
07-19-2011, 09:20 PM   #1
New Member


Join Date: Oct 2010
Location: United States
Photos: Gallery
Posts: 10
Camera dropped - Body mount ring damaged.

Hi Everyone,

I wish I were posting regarding a slightly happier subject...I recently dropped my K-7 from about 3-4 feet onto pavement. The camera seemed pretty messed up at first. The body mount ring was hanging cockeyed off the camera body so that the autofocus drive and most of the other contacts to/from the lens were disconnected (namely the aperture contact). But I found that after pushing the body mount ring back into position, the autofocus drive re-engaged as did the aperture contact.

The problem is that 3 of the 5 mount ring screws stripped the plastic piece the mount ring attaches to, so that the screws will not screw back in and clamp the mount down anymore (in the photo, they're the 3 bottom holes). Basically, I'm trying to find a way to remount the mount ring. I've considered using some sort of epoxy to adhere the mount ring back to this plastic piece, or even to fill the screw holes so that they can be re-tapped somehow.

I figure this kind of repair would take weeks and cost almost as much as a new camera if I sent it in. Mainly because I think most of the internals mount to that one plastic piece that would need replaced. That's why I'm trying to figure out a DIY fix. Otherwise, the camera still seems to work great, which is pretty impressive, really.

Does anyone have any ideas or suggestions at all on how to reattach the mount ring? I know it needs to be very level and accurately placed for the optics to still work accurately, not to mention the contacts. I'd be grateful for any help I can get. Thanks in advance.

Attached Images
 
07-19-2011, 10:46 PM   #2
New Member


Join Date: Oct 2009
Location: Stranda, Norway
Posts: 15
I do not think you should do it yourself. It is made to break if you drop the camera and hit the ground in a bad way to prevent damage at your lens and more seriously damage of the body. It is a rather simple operation and it should not cost a fortune.
If you do it yourself, you will probably not be able to adjust the alignment of the mount correctly. Even if things seems to work ok, you will probably get problems to achieve sharp images. The images could be sharp at one side, but gradually be out of focus at the opposite side.
07-19-2011, 11:30 PM   #3
Inactive Account


Join Date: Aug 2008
Location: Michigan, USA
Photos: Gallery | Albums
Posts: 7,484
This is what I would try....

Go to a local hobby shop or craft store (Michaels?) and get some styrene rod and some 2 part epoxy. While you are there get an Xacto knife with a #11 blade (the most common one there is). Gently stuff a clean cloth (paper towel) into the mirror box so you don't get any shavings in there. Your basic goal here is to fill the holes with something that you can drill and thread the screws back in. Super glue may also work if you use the Gel type (not liquid). Cut pieces of the rod long enough to leave some hanging out of the holes and glue them in. Let it dry and cure (give it a day or so). Then use the knife to trim the fillers flush to the body. From there you should be able to drill small holes, small enough that the screws can thread themselves back in. You should be able to get the lens mount fastened back on.


If you need to get the drill bits, try a place like Harbor Freight (or whatever the incarnation of junk tools is these days). You can wrap a piece of masking tape around the drill shaft to make a simple hand operated drill. All you want to do is create a starter hole.

It'll only cost you a few $$ to try it yourself and if it doesn't work, send it for repair. The body part probably needs to be replaced anyway. This won't correct any alignment problems caused by the fall so you may still be sending it in anyway. Barring that, sell it for parts and get another camera (which may be the most economical solution anyway).

07-20-2011, 12:12 AM   #4
Veteran Member
wlachan's Avatar

Join Date: Sep 2006
Location: Canada
Photos: Albums
Posts: 2,625
The damage part is the mirror box assembly which is the heart of the camera. Everything else has to come off to replace it. That means a total rebuild. I cannot even imagine how much the labour will cost but get a quote anyway. There should be some plastic filler for this purpose but I am no expert. The question is how much stress the mount would be able to withstand afterward. Dropping an expensive lens won't be pretty.

07-20-2011, 01:20 AM   #5
Pentaxian


Join Date: Nov 2008
Location: Waikikamukau
Photos: Albums
Posts: 1,248
As a Full time Jeweller and Part-time Model-maker I can recommend Milliput...
Milliput

two part epoxy putty that can be sanded, drilled, and tapped when hard.
Has a long working time and can be smoothed with water before dry.

I would fill the holes almost proud then cover with a small waxed paper circle having a hole the size of the screw.
Then put the body mount ring in place, dip each screw in a little water and screw into the putty then remove the screw carefully.
Once the putty is dry the screws can be test fit and a tap used to ease the thread if needed.
07-20-2011, 01:46 AM   #6
Veteran Member


Join Date: Jan 2010
Location: Vancouver, BC
Posts: 1,421
QuoteOriginally posted by bobD Quote
As a Full time Jeweller and Part-time Model-maker I can recommend Milliput...
Milliput

two part epoxy putty that can be sanded, drilled, and tapped when hard.
Has a long working time and can be smoothed with water before dry.

I would fill the holes almost proud then cover with a small waxed paper circle having a hole the size of the screw.
Then put the body mount ring in place, dip each screw in a little water and screw into the putty then remove the screw carefully.
Once the putty is dry the screws can be test fit and a tap used to ease the thread if needed.
That's a good idea but what about just filling in the holes, place the body mount on the body, put the screws back and clamp the mount until the epoxy putty sets? The two undamaged screws should ensure proper alignment of the body mount, clamping the mount should keep the register distance from shifting at any point on the mount. I think the concern is what happens to the the oozing epoxy (if any) - I guess as long as the epoxy doesn't touch any moving parts, it should be okay.

Thanks,
07-20-2011, 02:04 AM   #7
Pentaxian


Join Date: Nov 2008
Location: Waikikamukau
Photos: Albums
Posts: 1,248
QuoteQuote:
I think the concern is what happens to the the oozing epoxy (if any)
Hence the "almost proud (filled)" so that the action of inserting the screws will displace only enough to fill the hole and no more.
(some experiment by drilling a hole in scrap wood and trying it out would be advisable)
The waxed paper is to stop the epoxy adhering to anything else, including the mount ring.
Once dry the paper can be removed.

I would not screw into the fresh epoxy nor allow it to touch the mount ring as having the whole thing glued tight would be,IMHO, as bad as the current situation.
Clamping is a good idea though.

cheers, Bob.

07-20-2011, 02:33 AM   #8
Veteran Member


Join Date: Nov 2006
Location: md-usa
Photos: Gallery | Albums
Posts: 2,580
QuoteOriginally posted by excanonfd Quote
That's a good idea but what about just filling in the holes, place the body mount on the body, put the screws back and clamp the mount until the epoxy putty sets? The two undamaged screws should ensure proper alignment of the body mount, clamping the mount should keep the register distance from shifting at any point on the mount. I think the concern is what happens to the the oozing epoxy (if any) - I guess as long as the epoxy doesn't touch any moving parts, it should be okay.

Thanks,
That will work fine. It will be as strong as it was, which is not very. I really don't think it is designed to break there it just does because it is plastic. Use a piece of glass to be sure the mount is flat before you remount it.
07-20-2011, 10:15 AM   #9
Inactive Account


Join Date: Dec 2008
Location: Ames, Iowa, USA
Photos: Albums
Posts: 2,965
QuoteOriginally posted by borno Quote
That will work fine. It will be as strong as it was, which is not very. I really don't think it is designed to break there it just does because it is plastic. Use a piece of glass to be sure the mount is flat before you remount it.
I'd consider getting the next sized screw and tap; run the tap into the stripped holes and increase the countersink size on the mounting plate holes. Now everything will function and disassemble properly.

Or following BobD I'd use Devcon Plastic Welder - a nice to work with two part acrylic; wet the screws with the glue, run them into the holes, remove the screws, clean up the excess adhesive then replace the plate. The adhesive left in the holes should be sufficient to re-wet the screws when they re-enter the holes.
07-20-2011, 11:04 AM   #10
New Member


Join Date: Oct 2010
Location: United States
Photos: Gallery
Posts: 10
Original Poster
Thanks for all the input, guys. I really appreciate the ideas.

Well, it seems that I was thinking along the same lines as a lit of you. At first, I considered seeing if the plastic piece could be replaced, but after just a few seconds I realized, as wlachan mentioned, that it's part of the mirror box assembly, which virtually every vital part of the camera mounts to. So, to replace that would require the entire camera be disassembled then reassembled onto a new mirror box. Labor cost would be far higher that the retail price of a new body, I suspect.

So, I figure I've got to do this myself. Even though I know it has to be done extremely carefully so as not to ruin optical alignment, as was mentioned by SveinG. I've never used or heard of milliput. I've worked with JB Weld, but that's really best for non-plastics. I've used it before on plastic with a little success, but it typically doesn't like to bond well. I might try the milliput or Devcon plastic welder. Ideally, I'd like to be able to still disassemble it, but structural soundness and alignment are the two bigger priorities.

I'll probably test out some solutions in a piece of wood or plastic to try different epoxies and techniques. There are some good ideas here. If anyone else knows of anything, I'd love to hear it. The more ideas the better. I'll try some things out and let everyone know how it goes. Thanks again, everybody.
07-20-2011, 11:31 AM   #11
Veteran Member
JohnBee's Avatar

Join Date: Sep 2008
Location: Newrfoundland
Photos: Albums
Posts: 4,667
Personally, I think you can do it yourself.
However, I also think the trick to doing this right would be to run some tests prior to committing repairs to the unit itself.

Having said that, there are many good adhesives out there that should work with this type of repair. However, the key(I think) would be in identifying exactly what material you're working with. Which will really help in getting the appropriate bond needed to complete the job.

My two cents.
07-20-2011, 11:53 AM   #12
Inactive Account


Join Date: Aug 2008
Location: Michigan, USA
Photos: Gallery | Albums
Posts: 7,484
I've never tried it but have heard of it being used quite a lot in model building..

Standard Grain Milliput, 4 oz.

or if you prefer

http://www.micromark.com/Superfine-Grain-Milliput-4-oz,7626.html

07-20-2011, 12:24 PM   #13
Inactive Account


Join Date: Dec 2008
Location: Ames, Iowa, USA
Photos: Albums
Posts: 2,965
If you glue the screws in it'll be hard to get them out when necessary.

I'd prefer to fill the hole with an appropriate material like Plastic Welder then drill and tap for your existing screws as suggested earlier.

Or I think I'd explore replacing the screws. Take one to a machine shop supply store & get the next largest diameter, same length, and a tap for the new screw.

If no outlet is convenient, measure the screw diameter & length then order the next larger diameter & tap from http://mcmaster.com
07-20-2011, 04:17 PM   #14
Veteran Member


Join Date: Jul 2008
Location: Detroit MI, USA
Posts: 508
I agree with John (most times ) and think you can do this yourself.

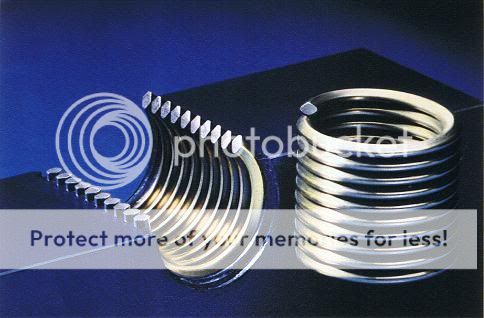
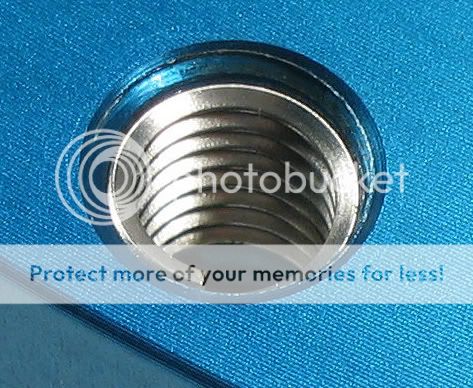
However the absolute best and strongest repair to a stripped thread is Helicoils and related products. This is well known to mechanics/technicians in auto and other industries. Hey I live and work in the Detroit area!

The repair may be stronger than the original!

But here is where I agree with John, you must make test runs somehow. I don't have the unit or the time (or I would be glad to) to think of how to do a test run, but I am sure you can figure it out.

Even a little extra glue on one side like a few drops extra can throw off alignment across the frame. So don't use glue and the coils (only if the coils require it). Just follow the directions for the coils. You can always shim with paper thin washers if need be. Also a tech can do a bit of AF tuning, if you get it real close, he/she can make adjustments to the AF module (it has screws for adjustments) and bring it real close if not back to 100% factory specs.

I suggest not going the glue route. In fact I suggest calling CRIS camera (Pentax only official repair center in the USA) to get a quote on fixing this. They may have such kits and can do the job. The kits might be at the link given by newarts. If you end up having to buy a kit just know you only need one tap, the coils and of course the screws. The size of the screws for a K20D is 2.0X4.5. Of course your K-7 may be different. Take them someplace and have them measured or ask CRIS if they can at least give you the screw size.

Honestly this is IMO the way to go. As they are strong! Read the links...

Helicoil - Emhart Technologies Helicoil Distributor, Manufacturer, Agent, Helicoil Free Running, Helicoil Screw Lock, Helicoil Metric, Helicoil Screw Thread Inserts, USA

Dodge Brass Inserts for Plastics - Emhart Technologies Ultrasert, Ultrasert Flange, Ultraseal, Ultramold, Expansion Inserts, Spread Lok, Self Tapping Inserts, Self Threading Inserts, Miniature Inserts, Compression Limiters


Last edited by jamesm007; 07-20-2011 at 04:27 PM.
07-20-2011, 04:53 PM   #15
Site Supporter
Site Supporter
Ex Finn.'s Avatar

Join Date: Nov 2007
Location: Southern Maryland. Espoo. Kouvola.
Photos: Gallery | Albums
Posts: 7,975
This is pretty good stuff for fixing things.
J-B Weld Company - J-B WELD Product Information
Reply

Bookmarks
  • Submit Thread to Facebook Facebook
  • Submit Thread to Twitter Twitter
  • Submit Thread to Digg Digg
Tags - Make this thread easier to find by adding keywords to it!
body, camera, figure, holes, mount, pentax help, piece, plastic, screw

Similar Threads
Thread Thread Starter Forum Replies Last Post
I dropped my lens! bent mount ring mikeSF Pentax SLR Lens Discussion 24 09-03-2011 08:00 PM
dropped camera lguckert79 Troubleshooting and Beginner Help 4 05-08-2011 06:50 PM
Dropped camera body Kambei77 Pentax DSLR Discussion 13 02-05-2011 06:27 PM
Dropped... Camera... NecroticSoldier Troubleshooting and Beginner Help 33 03-22-2010 12:38 PM
For Sale - Sold: K1000 bodies, ME Super Body, Damaged K1000 SE Body Rustyoldbug Sold Items 7 11-11-2009 08:48 AM


All times are GMT -7. The time now is 02:56 AM. | See also: NikonForums.com, CanonForums.com part of our network of photo forums!
  • Red (Default)
  • Green
  • Gray
  • Dark
  • Dark Yellow
  • Dark Blue
  • Old Red
  • Old Green
  • Old Gray
  • Dial-Up Style
Hello! It's great to see you back on the forum! Have you considered joining the community?
register
Creating a FREE ACCOUNT takes under a minute, removes ads, and lets you post! [Dismiss]
Top