Forgot Password
Pentax Camera Forums Home
 

Reply
Show Printable Version 4 Likes Search this Thread
09-10-2014, 01:35 PM   #1
Forum Member
Rayn's Avatar

Join Date: Feb 2014
Location: Zagreb
Posts: 73
Low light landscape photography - How do I make the light sources look good?

I took a few test shots on my vacation this year using my new tripod, but after getting home and checking the shots, I found the lights to be... a bit off.
The first one was shot for 8s at ISO100, 35mm/f8. The shot itself turned out ok, but the light sources are overwhelming:


This shot was of a beautiful full moon, but all I got was a star like light spot.


What am I missing? I'm guessing it's a settings problem (perhaps ISO too low?), but since I'm long back from vacation, I can no longer use the trial and error approach..

09-10-2014, 01:49 PM - 1 Like   #2
Pentaxian
Kozlok's Avatar

Join Date: Jun 2012
Location: Albuquerque
Photos: Gallery
Posts: 3,148
This is caused by the corners of the aperture blades. You can shoot wide open to prevent it, but at the cost of sharpness. A lens with rounded aperture blades is much less likely to do this. If the sky is a bit hazy, the stars won't form, either. To those of us for which the DA15mmLimited controls our mind, we seek out the star bursts and use them for creative effects.

Hazy sky:


Clear sky
09-10-2014, 02:03 PM   #3
Forum Member
Rayn's Avatar

Join Date: Feb 2014
Location: Zagreb
Posts: 73
Original Poster
QuoteOriginally posted by Kozlok Quote
This is caused by the corners of the aperture blades. You can shoot wide open to prevent it, but at the cost of sharpness. A lens with rounded aperture blades is much less likely to do this. If the sky is a bit hazy, the stars won't form, either. To those of us for which the DA15mmLimited controls our mind, we seek out the star bursts and use them for creative effects.
Thanks for the explanation.
So in other words, I need a fast wide angle lens which is sharp wide open?

I actually have the 35mm f2.4 prime, but for some reason the lens has trouble focusing infinity, so I get sharper shots with the kit lens. Still kind of upset about that, as I've bough the 35mm for just this kind of occasion...
09-10-2014, 02:05 PM   #4
dms
Site Supporter
Site Supporter


Join Date: Aug 2011
Location: New York, NY
Photos: Gallery
Posts: 2,192
1. Different lenses will handle the light differently--stars vs a circular light--but less star generally is open the lens up more/but other types of flare and comma then become more evident. I tend to have lenses that give me a look I like better (I don't like stars--some lens give less--see below)
2. The camera is setting an exposure based on the scene being a middle tone basically, so the light source(s) [lights or moon] are so much brighter that you get flare around them. [the star pattern is associated with the lens diaphragm partly closed--and not circular/light coming between the slightly overlapping leaves internally) You want the scene to look more like night, so experiment w/ exposure (around your home) to be prepared. In any event the lights will always be too bright--but you can get much less light reflections, etc.
3. I usually can guess/infer the setting based on my past history doing lots of night photography w/ film. You could start at iso 400 and about 1/8s and f/2 (or the equivalent exposure--e.g., 1/2s at f/4) and look at the result (the advantage of digital) to see how to revise it. If you want to meter the scene--try spot metering in manual (M), pick something you want to be visible but "night looking" and meter it and set the exposure about -2 to -3 e.v. below that setting. And learn from your trials.


Last edited by dms; 09-10-2014 at 02:26 PM.
09-10-2014, 02:09 PM   #5
Veteran Member
JinDesu's Avatar

Join Date: Jun 2011
Location: New York City
Photos: Gallery
Posts: 5,638
Shoot darker. Expose for those lights. Then in post process, bring up the shadows and blacks to match as much as possible. In the case of street lights, this may be near impossible to get rid of the starbursts (which occur when they are in focus, with a smaller aperture, and if they are extremely bright in comparison to the scene) - at which point you can reduce their size by lowering the highlights in post process. In the case of the moon, exposing for it will avoid giving the moon that starburst.
09-10-2014, 02:11 PM   #6
dms
Site Supporter
Site Supporter


Join Date: Aug 2011
Location: New York, NY
Photos: Gallery
Posts: 2,192
For this kind of photography--you really should use a lens that can be focused by looking at the distance scale (e.g., infinity or the hyperfocal distance)--or manually looking through the lens. AF is not appropriate for this application IMO (although I never use it for anything--so I may be suspect in this opinion).

I suppose you can use your lens and see where infinity focus is--in daylight--and put some tape on the lens and mark infinity. You could add markings for other distances as well--although the throw (rotation) on modern AF lenses may be rather small.

---------- Post added 09-10-14 at 02:18 PM ----------

No , following up on your comment, I don't think a fast prime is usually best if you are using a tripod. They tend to have more flare and comma. I suggest a good slower lens as wide open they may be better--although modern fast aspherical lenses can be good wide open--it requires testing to see. I believe people who use lenses for stars will have a better handle on which particular lenses do better.
09-10-2014, 02:18 PM - 1 Like   #7
Pentaxian
Kozlok's Avatar

Join Date: Jun 2012
Location: Albuquerque
Photos: Gallery
Posts: 3,148
For your 35/2.4...Did you perform focus calibration? It's the most likely cause of your infinity focus problem. My guess is it's focusing past infinity, unless you see the foreground as being quite sharp, then it's front focusing.

09-10-2014, 02:23 PM   #8
dms
Site Supporter
Site Supporter


Join Date: Aug 2011
Location: New York, NY
Photos: Gallery
Posts: 2,192
Also your 8s at iso 100 at f/8 is often (IMO) a good starting guess--but from the results it was clearly too much exposure. 1.5 e.v. less may be about right, but this requires some trial and error. Do look at the screen and adjust things. And try a corresponding exposure at f/2.8-f/4.
09-10-2014, 02:27 PM   #9
Loyal Site Supporter


Join Date: Mar 2009
Location: Gladys, Virginia
Photos: Gallery
Posts: 27,663
I think shooting a little more wide open -- f4 or f5.6 will tend to avoid diffraction stars. Some times exposure blending is helpful too.

This is the 16-50 at f5.6...


This is at f8, but a considerably darker exposure...

09-10-2014, 02:46 PM   #10
Site Supporter
Site Supporter


Join Date: Mar 2008
Location: Prince George, BC
Photos: Gallery | Albums
Posts: 3,546
Agree that relying on autofocus at night to latch onto infinity is likely to fail. All DA lenses rack past infinity. Best is to use manual focus and live view magnified and focus on something nearest to infinity such as the moon or stars.
09-10-2014, 02:47 PM   #11
Veteran Member


Join Date: Sep 2008
Location: Phoenix, AZ
Posts: 1,448
I like starbursts and use them as creative effects. back in my film days I even had a starburst filter.

I guess it's personal taste, but I intentionally shoot f16 at night to get as must burst as I can.

Also, exposing for the light tends to really subject you to shadow noise, which is not my favorite thing.

I personally think the first picture is very close to how our minds would perceive the image (starbursts and all) unless I need Lasix....lol

Now when trying to incorporate the Moon, if you want the moon craters and such to show up, you're definitely better off taking 2 images, one exposed for moon and one exposed for foreground, and then masking them together in post production. You're asking far too much of your sensor to handle dark foreground and bright full moon in same image.
09-10-2014, 03:21 PM   #12
Pentaxian


Join Date: Jan 2011
Location: New York
Posts: 4,834
@Rayn, what is "overwhelming" about the light sources: are they too bright, or do you dislike the starburst effect radiating out from each light?

Too bright: Shoot raw instead of jpg, then turn down highlights during processing. Or shoot darker and lift the shadows.

Dislike starburst: Shoot with a wider aperture (lower f number = wider).
09-10-2014, 05:00 PM   #13
Site Supporter
Site Supporter


Join Date: Sep 2011
Location: Richland, Washington, USA
Posts: 935
Personally I like the first image. The moon in the second is a problem, but blending 2 exposures is probably the only way to get that right.
Also, shooting wide open means loss of sharpness as all glass is sharper stopped down some, but also thinner depth of field.
09-10-2014, 05:56 PM - 2 Likes   #14
Site Supporter
Site Supporter
ramseybuckeye's Avatar

Join Date: Apr 2009
Location: Hampstead, NC
Photos: Gallery
Posts: 17,295
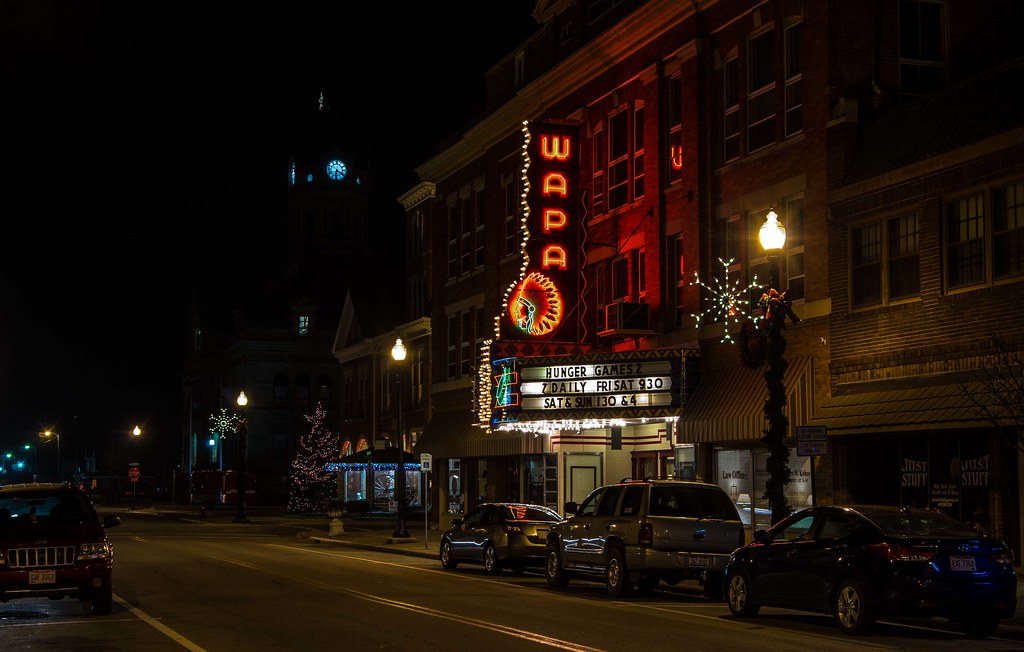
It's all exposure and there are no settings that work for everything. Your first picture has a lot of light sources, probably 5 or 6 seconds would have been better. Since having a K-30 I nearly always use manual focus and focus peaking for night shooting. I usually always shoot manual too, but if I'm in a hurry, like you probably did when you were on a trip I may shoot in aperture or shutter priority, look at the result and adjust from there. I find that when the camera helps select the exposure it will tend to overexpose. It can become more challenging when you put neon lights into the equation like in the picture below. Different colors of neon have different temperatures that vary a lot, all different types of lighting do, but they are sometimes close together, your eyes compensate better than a sensor can.


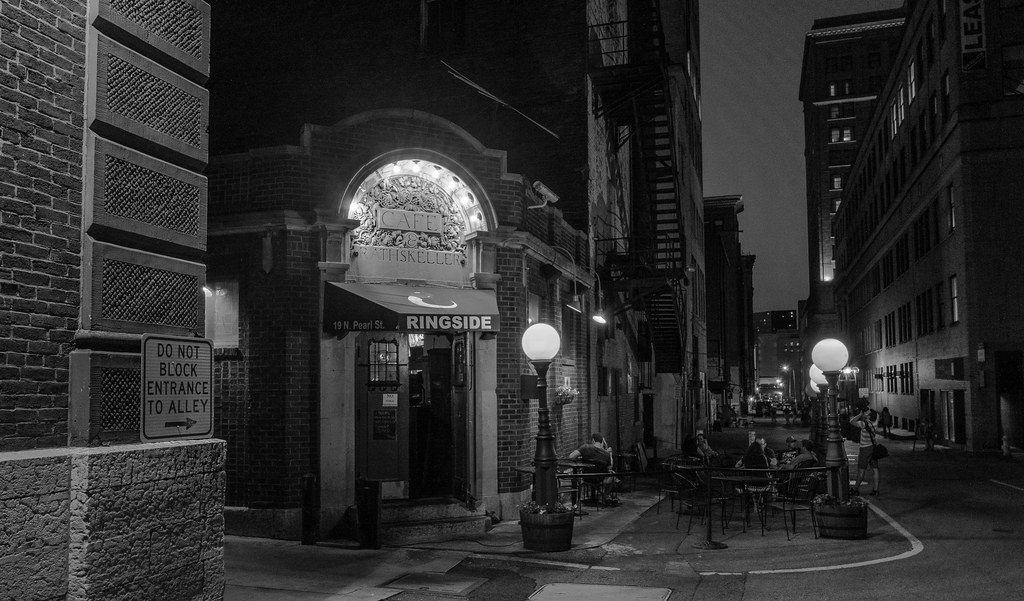
This one has some people in it, I wanted a faster shutter, it's shot a f13, but .4 second shutter. The faster speed kept the starburst effects away mostly, the incandescent lights on the arched door were pretty bright
r

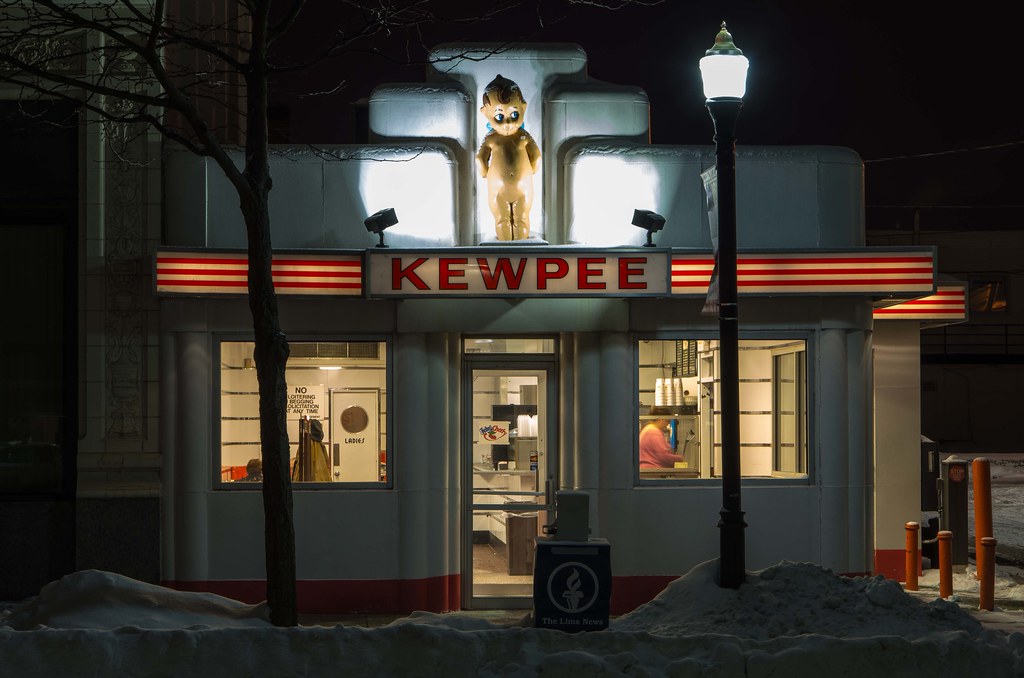
This next one has some lights that are much brighter than others, but it came out looking like it does. I don't think you would ever get that balance without manual exposure. You have unseen street lights, obnoxiously bright lights on the doll, interior lights, and reflections off of the snow. I'm sure this could be done much better, but you can get a decent life like picture with one image by taking your time.
09-10-2014, 08:20 PM   #15
Loyal Site Supporter


Join Date: Jun 2009
Location: Tumbleweed, Arizona
Photos: Gallery | Albums
Posts: 5,707
Good Evening,

I like to shoot low ambient light landscapes / cityscapes. That does not mean that I get everything right all the time. Shooting in the late afternoon, early evening and night can be frustrating. Also, always shoot in RAW, so that if something is not set right, you have the greatest potential of fixing it in post processing. Also, your K500 user's manual can be downloaded here. So, let's start with the Moon.
  • Moon - The Moon reflects sunlight. It is bright, especially bright when in a black or night sky. So, when you are shooting the moon, how you measure the light is important. If you just take your camera out into the back yard at night and shoot it, your camera measures the light in two different ways. There are two modes (page 97 in your manual, multi-segement or center weighted) that averages the light measured across the entire frame. So, if you do that - the moon will be way too bright a spot and it will be blown out. The other measurement is spot mode which uses the center of your frame through which to measure the light. By putting the center of the frame over the moon, it will just measure the light just from the moon and figure out the rest.


    In your second image, if you put the camera into spot mode, then aim the center of the camera at the moon and meter it, you will get the shutter speed for the aperture and ISO the camera is currently set to. Then you can recompose, and shoot in manual by dialing in the shutter speed. The vast majority of the image frame will be dark. The good aspect to this is that the sensor in your K500 is the same as the K5 and is very good at pulling detail out of darkness. Also, shoot in RAW and you will have all the information possible in terms of post processing the shot later. PS - remember to switch back out of spot mode to either multi-segement or center weighted (your preference). Also, you can do an experiment. Put the camera in spot mode and also Live View (page 26). Aim the camera at the moon. When the center is over the moon, you will see the bloom of light meter and then the image will be taken down in brightness so that you can start to see features on the moon's surface. As the moon moves off the center, and the camera starts to meter on the black sky, the moon's brightness will light up again to a bright blob.
  • Lights in general - You can think of the Moon as a specific case, and this - lights in general, your first image, as the more generalized case. Since "citylights" are usually pretty distributed, switching to spot mode really is not that practical. It would probably be better to just dial down the exposure. You can do that with the [+/-] (EV Compensation) button (page 23 in your manual). You are just going to have to wing this in terms of how much. So, take a image in the standard way, then take several more, each one dialed down some amount. Check the rear screen after each image to see what it looks like. If you like it - dial down another click or two and take an additional image - just in case.
  • Lenses - You have good lenses. I really do not think that you need any more glass. If you want to remove the starring effect, as others have posted, open up the aperture all the way. Then keep the ISO low so that you get the best image quality with the lowest possible noise. You will have LOTS of shutter speed through which to dial down the brightness of the bright spots (or by using EV Compensation or a combination of both).
  • Bracketing - This is mainly for Citylights and is another approach to lights in general. You have a mode on your camera called Bracketing (page 93). This will take several continuous images. computed exposure, over exposed and under exposed. You can also combine this with EV Compensation (I believe on your K500). There are programs that will take all 3 images and combine them together, bringing out the best of each (usually called HDR or tone mapping).
  • HDR Mode - This is an automagic built-in mode within the camera that does Bracketing in one step, called the HDR mode. It will take 3 images in quick succession and blend them into a single image for you in camera. Page 122 in your manual. Also take a look here at this video (the K500 is similar to the Kx).

There are always multiple ways to work around a perceived problem that you want to address in some manner. It is just a case of figuring out what you want to do, and then fundamentally how to manipulate shutter speed, aperture or sensitivity (ISO) either directly or indirectly in some way. You can solve 95% of your problems in this way - i.e., without going out and buying more or different equipment. That is the last option.


Last edited by interested_observer; 09-10-2014 at 08:54 PM.
Reply

Bookmarks
  • Submit Thread to Facebook Facebook
  • Submit Thread to Twitter Twitter
  • Submit Thread to Digg Digg
Tags - Make this thread easier to find by adding keywords to it!
af, camera, distance scale, infinity, landscape, lens, lenses, light, light sources, night & low light, pentax help, photography, shot, shots, sources, vacation

Similar Threads
Thread Thread Starter Forum Replies Last Post
DA 40 Ltd.-how useable in low light/interior photography? planedriver Pentax SLR Lens Discussion 27 11-25-2016 02:33 AM
How does one make the film roll not sensitive to light? LeDave Film SLRs and Compact Film Cameras 11 11-12-2012 04:39 AM
Low Light? How about Zodiacal Light? KansasHorizons.com Pentax K-5 & K-5 II 31 03-03-2011 03:23 PM
How do you shoot low light? audiobomber Photographic Technique 48 04-12-2010 03:35 PM
How do I make my posted photos look right? joelovotti Post Your Photos! 6 12-28-2008 07:29 PM


All times are GMT -7. The time now is 06:27 PM. | See also: NikonForums.com, CanonForums.com part of our network of photo forums!
  • Red (Default)
  • Green
  • Gray
  • Dark
  • Dark Yellow
  • Dark Blue
  • Old Red
  • Old Green
  • Old Gray
  • Dial-Up Style
Hello! It's great to see you back on the forum! Have you considered joining the community?
register
Creating a FREE ACCOUNT takes under a minute, removes ads, and lets you post! [Dismiss]
Top