Forgot Password
Pentax Camera Forums Home
 

Reply
Show Printable Version Search this Thread
12-22-2014, 02:36 PM   #16
Pentaxian


Join Date: Jan 2011
Location: New York
Posts: 4,834
QuoteOriginally posted by dakight Quote
... I'll use mode Av to fix the aperture ...
Please consider M instead of Av. You'll be able to determine exactly what part of the scene you want to expose for. Night lighting has an extreme dynamic range and the camera doesn't know whether you want perfect lights with dark shadows, or lighter shadows and blow-out lights. M is not that difficult for non-moving scenes: make a guess, take a photo, look at the preview. Your guesses will get better with practice.

The characteristics of your lens might also dictate how you set the shutter speed. Some lenses handle bright lights well and may allow you to expose for the darker areas, while other lenses show bad flare and ghost images from the lights.

12-22-2014, 04:07 PM   #17
Veteran Member
Saltwater Images's Avatar

Join Date: Nov 2014
Location: Newfoundland
Photos: Gallery
Posts: 501
Drop the ISO as low as you can go (such as ISO 80 or 100 or even 200). Try a smaller aperture. Use a sturdy tripod with vibration dampening. Use the 2 second timer on the camera to take the photo - because pushing the button causes vibration too (or use a remote). Try a longer shutter speed. Cheers.

Last edited by Saltwater Images; 12-26-2014 at 09:57 AM.
12-22-2014, 04:19 PM   #18
Veteran Member
Sagitta's Avatar

Join Date: Feb 2011
Location: Maine
Photos: Gallery
Posts: 3,081
QuoteOriginally posted by Just1MoreDave Quote
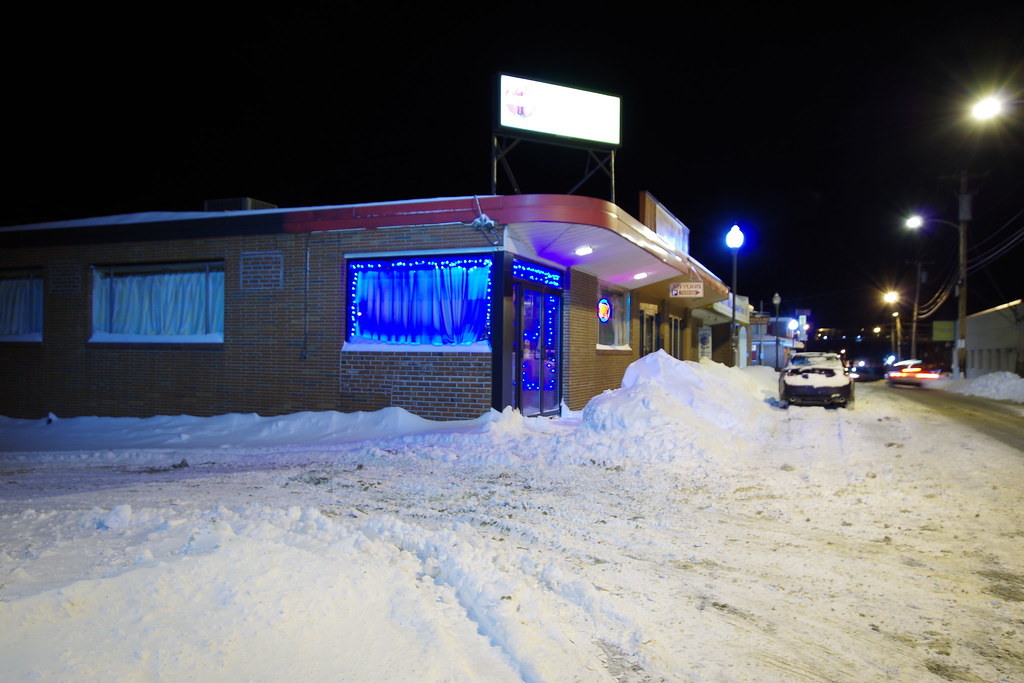
Two points to add to the above: blue and red lights can easily get overexposed. The first shot is a good example of prime conditions for this. The meter sees an overall dark scene and the blue points are too small to impact the meter. So it raises exposure and the blue gets overexposed. It's hard to see this in the dark. You can check the RGB histogram to see if the blue channel is too far to the right.
Actually, from what it appears, those blue lights are LEDs.

LEDs do not play well with modern sensors (camera make doesn't matter, its a universal thing) since they're essentially a 'pure' color and will almost always look awful compared to the rest of the image.

The blues (and the white street lamp, actually) in this shot are LEDs, as an example.


The gist of it is basically that a sensor works by mixing the colors hitting it to make whatever the end color is (almost like an old CRT TV set - its Red/Blue/Green, but gets mixed to produce other colors). When you throw a, say, blue LED at it, you'll get almost pure blue with no red or green, and you wind up with the blues dominating at the expense of everything else.

I don't do concert photography, but I've seen the issue crop up a few times from those shooting under modern stage lighting because it almost lends a blacklight effect to the shots being taken (which is not a good thing).
12-22-2014, 07:20 PM   #19
Veteran Member
dakight's Avatar

Join Date: Sep 2014
Location: Phoenix, AZ
Photos: Albums
Posts: 1,216
Original Poster
This is an improvement, still not exactly where I want to be. It turns out that points of colored light may be more challenging than I anticipated.

Attached Images
View Picture EXIF
PENTAX K-50  Photo 
12-23-2014, 06:56 AM   #20
Site Supporter
Site Supporter
TER-OR's Avatar

Join Date: Apr 2009
Location: Dundee, IL
Photos: Gallery | Albums
Posts: 6,699
Looks like you pretty much nailed this last image. The brightest lights are borderline overexposed, and the dimmer ones - the treetops - fade pleasingly into the void.
12-23-2014, 09:46 AM   #21
Site Supporter
Site Supporter
crewl1's Avatar

Join Date: Jul 2010
Location: Los Angeles, CA
Photos: Gallery | Albums
Posts: 9,807
This looks much better, good job.
12-23-2014, 01:44 PM   #22
Veteran Member
Saltwater Images's Avatar

Join Date: Nov 2014
Location: Newfoundland
Photos: Gallery
Posts: 501
Kudos. Well done indeed.

12-23-2014, 02:44 PM   #23
Pentaxian
micromacro's Avatar

Join Date: Jan 2014
Location: Florida
Photos: Gallery
Posts: 3,722
QuoteOriginally posted by dakight Quote
This is an improvement, still not exactly where I want to be. It turns out that points of colored light may be more challenging than I anticipated.
Try a few shoots of the same subject with different metering and compare. I personally try to avoid pattern metering at night.
12-23-2014, 03:33 PM   #24
Loyal Site Supporter


Join Date: Jun 2009
Location: Tumbleweed, Arizona
Photos: Gallery | Albums
Posts: 5,707
QuoteOriginally posted by dakight Quote
I did use a tripod. There was a very light breeze and I expected the ripples on the water. The lens was my SMC FA1:4-5.6 35-80mm with the aperture at max. The lens was zoomed out to its widest setting, 35 mm for most of the shots and the iso was 6400. The shutter speed varied from 1/30 to 1/80 depending on the light. My thinking about where to go from here is to stop the lens down to sharpen it up which of course will lengthen the shutter times. I also think maybe I should limit the iso a stop or 2. I'm not worried about the motion of the water as that just adds to the effect but I do want the points of light to be sharper or even star burst thought I'm not sure I have a lens that will effectively create that effect.[COLOR="Silver"]
It looks like your latest ones are much better. I was going to ask, that on the tripod - I am thinking that you had your center column up for some extra height. Don't do this, since that will introduce some additional wobble into the whole structure. Don't extend the center column and just use it a the top of the tripod legs. This provides a lot of additional support - especially lateral (sideways) support. I have blown a lot of images by using the tripod with the column extended.

12-23-2014, 03:46 PM   #25
Veteran Member
dakight's Avatar

Join Date: Sep 2014
Location: Phoenix, AZ
Photos: Albums
Posts: 1,216
Original Poster
QuoteOriginally posted by interested_observer Quote
It looks like your latest ones are much better. I was going to ask, that on the tripod - I am thinking that you had your center column up for some extra height. Don't do this, since that will introduce some additional wobble into the whole structure. Don't extend the center column and just use it a the top of the tripod legs. This provides a lot of additional support - especially lateral (sideways) support. I have blown a lot of images by using the tripod with the column extended.

Actually the center section was only up a half inch or so; just enough to let it turn freely. In addition, I only extended the lower section of the legs so that it would be a comfortable height when I was sitting in a chair behind it. I'm not sure where the motion came from unless I bumped it accidentally. The second round I was very careful to sit still and not touch it while the shutter was open. In addition to using the remote control, I also used the 2 second timer. The main difference I think is in exposure. I fixed the f-stop at 8.0 and let the meter select the shutter speed. I limited iso to 200 and after a few test shots I decided to dial in -2 EV correction. I probably could have gone to -2.5 or -3 but I'm pretty happy with the exposure. The lights are still not as sharp as I would like and I blame that on the lens. If I get a chance I'll try It again with a couple different lenses and see if I get better results.
12-23-2014, 06:29 PM   #26
Site Supporter
Site Supporter
jheu02's Avatar

Join Date: Aug 2009
Location: North Carolina
Photos: Gallery | Albums
Posts: 3,027
There's definite improvement, but it still looks a little blurry. Different lens but it could have a front focus or back focus issue. As a suggestion, switch to full manual mode and spot metering. Open the lens to wide open or at most one stop up and go to live view at least 4x if not 8x magnification. Manually focus in live view for best definition and then leave live view. Stop down to f8 and use the metering in the viewfinder on one of the lights. Look for about 2/3 stop underexposed and try a sample shot. Adjust shutter speed from there.
12-23-2014, 07:16 PM   #27
Veteran Member
dakight's Avatar

Join Date: Sep 2014
Location: Phoenix, AZ
Photos: Albums
Posts: 1,216
Original Poster
I used manual focusing and focus peaking in live view; the focus is as good as it can be. The focus is at infinity anyway and very near if not at the infinity stop. I'll try the other suggestions if I get a chance to get back out before the displays come down. If not, there's always next year.
12-23-2014, 07:37 PM   #28
Veteran Member
aleonx3's Avatar

Join Date: Jul 2007
Location: Brampton, Ontario
Photos: Gallery | Albums
Posts: 3,996
QuoteOriginally posted by dakight Quote
I used manual focusing and focus peaking in live view; the focus is as good as it can be. The focus is at infinity anyway and very near if not at the infinity stop. I'll try the other suggestions if I get a chance to get back out before the displays come down. If not, there's always next year.
I don't think it is a focus issue as it is not hard to achieve hyperfocal distance on that focal length. IMHO, you have done as much as you can given that situation; I am not sure if you have captured exactly what it looks like to you while you were there. I often don't pay too much attention to the lights itself, but the surroundings that was lit up by the lights would be the focal point instead (a good example would be the image by Saltwater images in this thread).
12-23-2014, 08:12 PM   #29
Veteran Member
dakight's Avatar

Join Date: Sep 2014
Location: Phoenix, AZ
Photos: Albums
Posts: 1,216
Original Poster
QuoteOriginally posted by aleonx3 Quote
I don't think it is a focus issue as it is not hard to achieve hyperfocal distance on that focal length. IMHO, you have done as much as you can given that situation; I am not sure if you have captured exactly what it looks like to you while you were there. I often don't pay too much attention to the lights itself, but the surroundings that was lit up by the lights would be the focal point instead (a good example would be the image by Saltwater images in this thread).
There are two things I was trying to accomplish. The first was to capture as much as possible, for lack of a better word, emotional aspect of the scenes. The lights, the color they cast on the surroundings, the serene beauty of the colors reflected on the water, etc. This I think I did. As I've said before, the camera doesn't see what the human eyes sees. In human vision, probably 90% of what we see or don't is in how our brain interprets the image. It's impossible for a camera to render the image as our brain sees it.


The second thing was to learn my camera better, to exercise the settings and explore the capabilities and limitations of the equipment. I made a start toward that but it's the first step in a journey of 1000 miles. I think a couple or three primes are definitely in my future but in the meantime I need to learn how to use what I have.
12-23-2014, 08:55 PM   #30
Veteran Member
aleonx3's Avatar

Join Date: Jul 2007
Location: Brampton, Ontario
Photos: Gallery | Albums
Posts: 3,996
QuoteOriginally posted by dakight Quote

This I think I did. As I've said before, the camera doesn't see what the human eyes sees. In human vision, probably 90% of what we see or don't is in how our brain interprets the image. It's impossible for a camera to render the image as our brain sees it.


The second thing was to learn my camera better, to exercise the settings and explore the capabilities and limitations of the equipment. I made a start toward that but it's the first step in a journey of 1000 miles. I think a couple or three primes are definitely in my future but in the meantime I need to learn how to use what I have.
Actually that is the point I am trying to make... even though the camera does not see the same as we see (we have far more dynamic range with our eyes), but as an artist (or photographer), the objective (at least one of them) is to get as close as possible to reality so you can capture the 'mood' as well as the image. Also, if it is that easy to capture that, then many people would have done it even with a point-and-shoot. Perhaps (I am guessing) a better lens may help, but I am not sure; before you go crazy on that, I would try to stop down a little more and use longer shutter time (again, just guessing).
Reply

Bookmarks
  • Submit Thread to Facebook Facebook
  • Submit Thread to Twitter Twitter
  • Submit Thread to Digg Digg
Tags - Make this thread easier to find by adding keywords to it!
camera, effect, focus, iso, lens, light, lights, motion, pentax help, photography, shutter, stop, troubleshooting, water

Similar Threads
Thread Thread Starter Forum Replies Last Post
Landscape Sunset on the Water GeoJerry Post Your Photos! 10 07-21-2018 09:06 AM
Cityscape Lights in the City of Lights rfaucher Post Your Photos! 4 07-21-2018 06:47 AM
Nature First Day on the Water Bob Harris Post Your Photos! 12 11-23-2013 12:41 AM
Macro On the wing over water......... eaglem Post Your Photos! 7 04-07-2013 04:45 AM
Two lights on the light meter?? Anthony Trinidad Visitors' Center 2 02-13-2013 01:08 PM


All times are GMT -7. The time now is 02:57 AM. | See also: NikonForums.com, CanonForums.com part of our network of photo forums!
  • Red (Default)
  • Green
  • Gray
  • Dark
  • Dark Yellow
  • Dark Blue
  • Old Red
  • Old Green
  • Old Gray
  • Dial-Up Style
Hello! It's great to see you back on the forum! Have you considered joining the community?
register
Creating a FREE ACCOUNT takes under a minute, removes ads, and lets you post! [Dismiss]
Top