Forgot Password
Pentax Camera Forums Home
 

Reply
Show Printable Version Search this Thread
4 Likes  #1
HDR the hard way - how to process night shots
Posted By: Prieni, 09-19-2011, 08:57 AM

Here is an article that I wrote a while back for another forum.
I like taking night shots. Due to the high dynamic range in the scenes (bright lights and very dark shadows) it's best to take a series of shots at different exposures. Then you need to put them all together into one.

The method I use is not that different from the image stacking that is described in the macro forum. But instead of focus stacking (discussed over there) it is exposure stacking. From a series of exposures you pick the right exposure for the different parts of the shot.

First prerequisite is of course an interesting scene to shoot. As I was in Singapore for a holiday there was no shortage of that. The example here is the Fullerton Hotel at Marina Bay. I did shoot this scene on the very first evening from the hotel balcony.

First you need a stable tripod. Then select the scenery and tighten all the knobs on the tripod. Focus carefully (sometimes not easy in the dark).

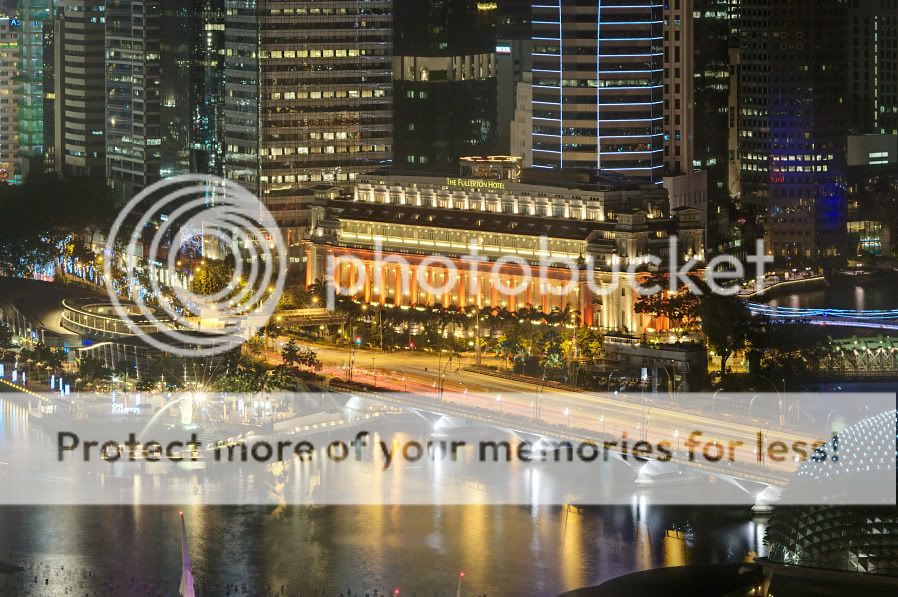
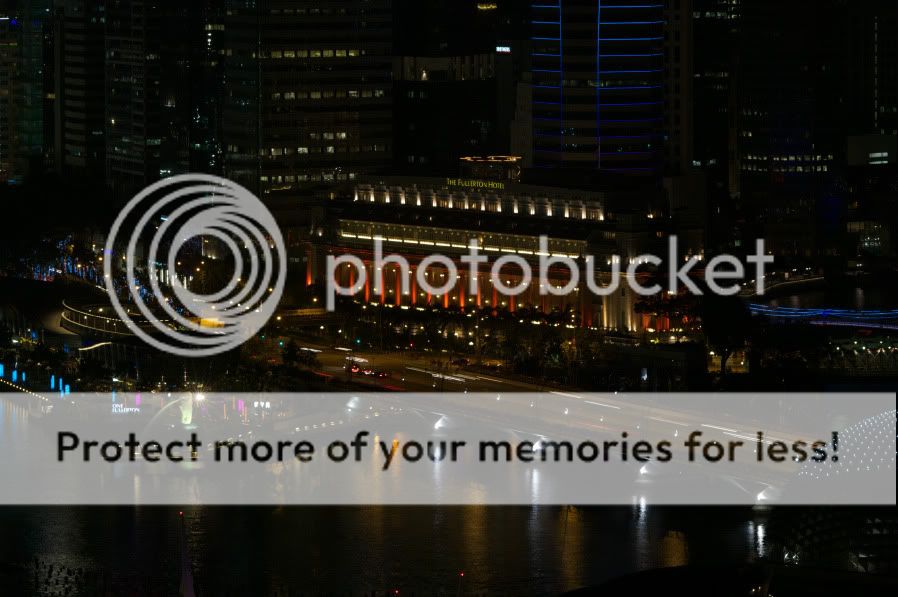
I did a series of exposures, using aperture priority at A8.0 and -2.5 to +2.0 EV in steps of 0.5 EV. So I ended up with ten exposures:


This is the darkest:

And this the brightest:
[img width=850 height=565]http://i156.photobucket.com/albums/t5/Prieni/howto%20night%20shot/_PRI7788brightest.jpg[/img]
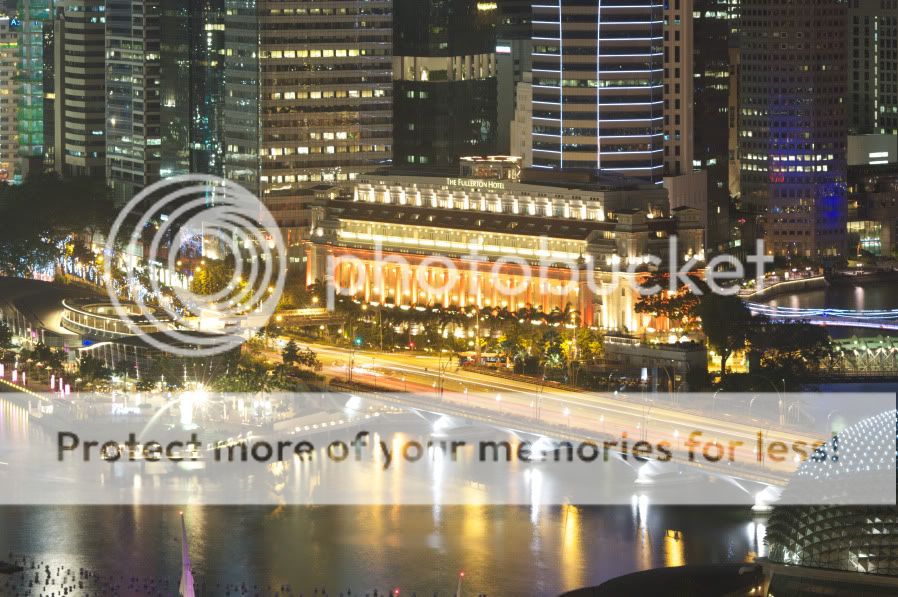

All were developed to TIFFs in SilkyPix from the RAW images. The technique should work equally well with JPGs, though.

Next I loaded them up in Photoshop, starting with the darkest (-2.5 EV). Then I opened the -2.0 EV exposure and put it on the first one as a new layer. On top of that the -1.5 EV one and so on. So I end up with seeing the brightest one on top. I selected that top layer.

Now I selected all the bright parts in the image (Select, Color range, highlights works but CTRL+SHIFT+ALT+~ does the trick as well).
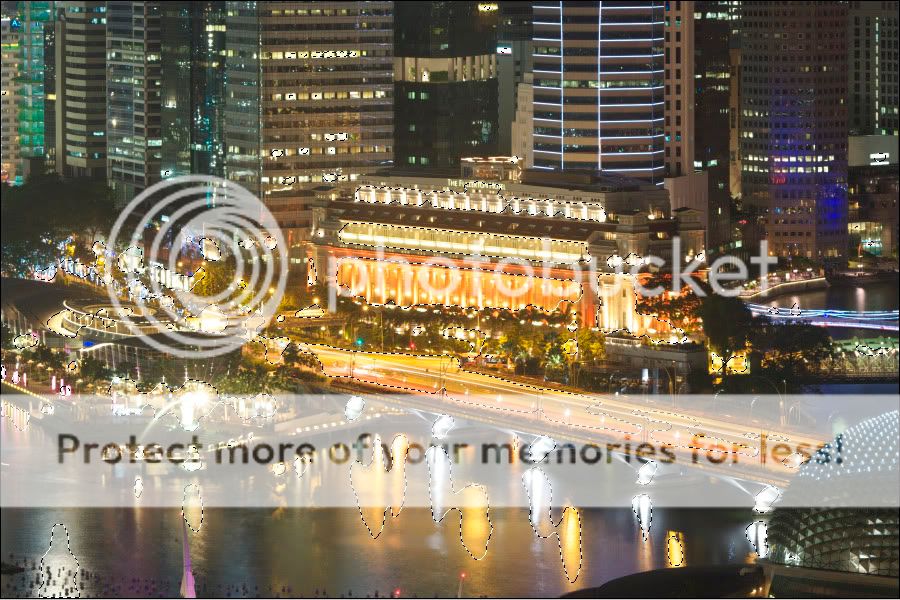
You see the selection "ant-street" around the bright parts. Now I used the Feather... command from the Select menu at 30 pixels and then I added a layer mask with "hide selection" option.
Here is what the result looks like when you use a pure black background layer. Remember, this was the brightest exposure and what you see here is the contribution to the finished product:

Do you see how all the overexposed parts have disappeared?

While leaving the top layer (that I just worked on) enabled, I now select one layer down (the +1.5 EV exposure) and start the same process again (CTRL+SHIFT+ALT+~, then feather 28, i.e. a bit less than before, add layer mask "hide selection").
And in this way I work my way down the layers. The result then is this image:
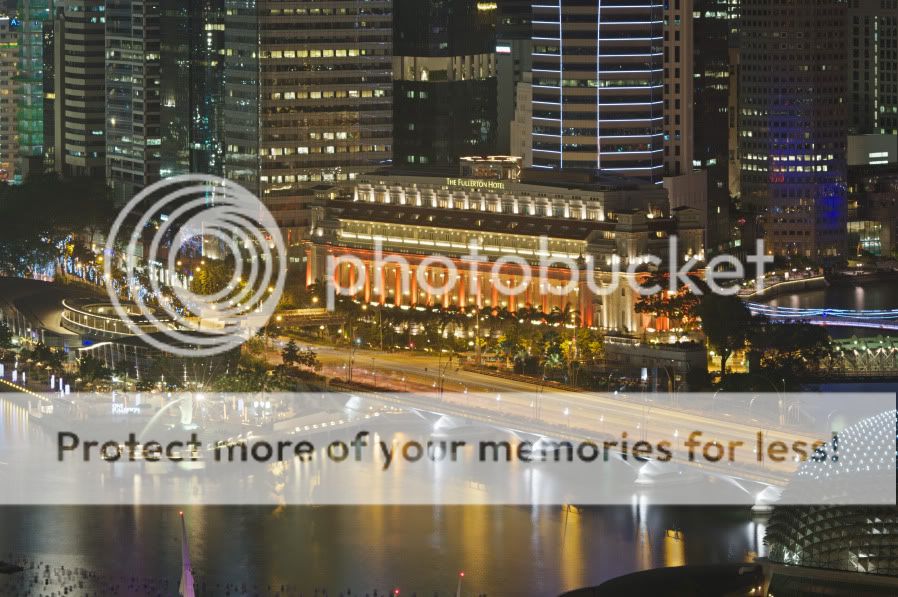


Now is the right time to save that result and flatten the image (10 layers plus masks at the image size of the K20D does take some memory).

Almost ready...

Now I took the brightest exposure and loaded it into Corel PhotoPaint. This has an image adjust function called local equalisation, which I use quite frequently. It brings out the local contrast of an image. The result is an image that looks like drawn with colour pencils:
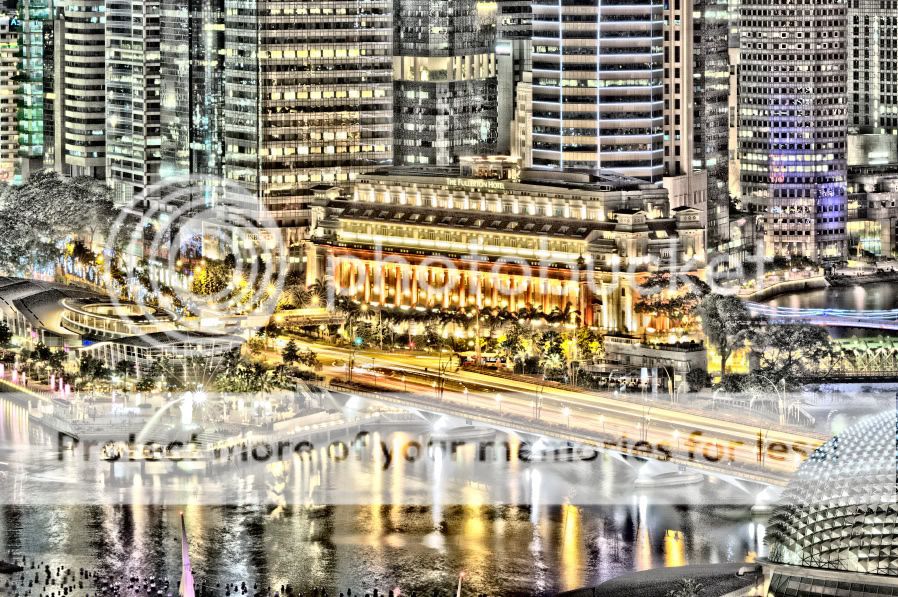

That is loaded into Photoshop again and put on top of the (now flattened) result. Layer mode switched to "soft light". Now I took back the opacity a bit (to around 40% for this image).
Saving, resizing and a bit of unsharp mask and the image is ready:
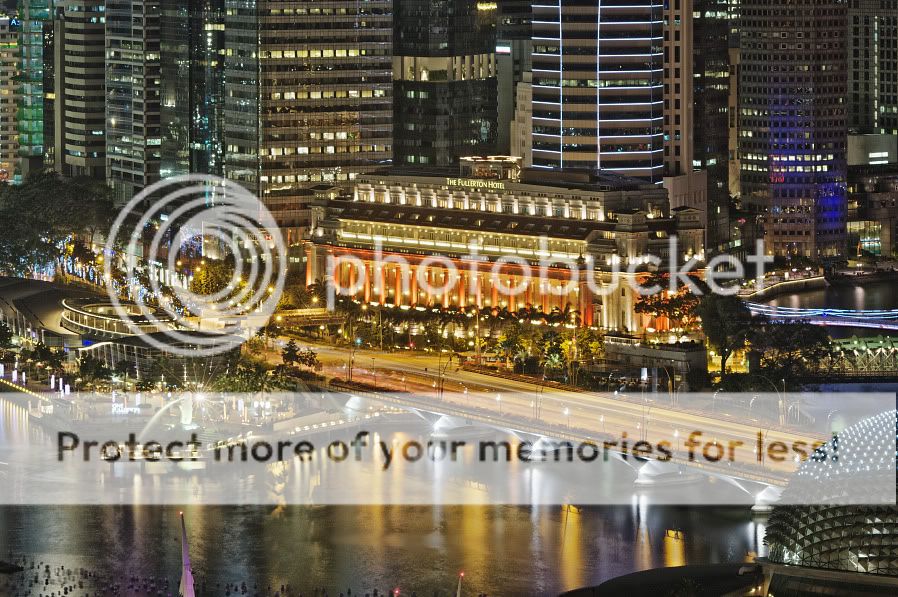

Of course you can apply a bit of curve correction, de-saturation (putting on the local equalisation layer sometimes over-saturates the result which might not be fitting for all images) or whatever you fancy.

It also is interesting to see what a bit of curve correction in one of the masks does for the image. That way you can fine-tune the lights a bit.

I had used this method before but only on three or four exposures. I probably didn't take bright enough ones also. This time round I am satisfied with the results. I will go out around home some time soon and test this method on my home turf.

There are alternatives to this method, of course. One is very similar, you stack the exposures the other way round, i.e. the darkest one on top. You select the lights again and do the feather on the selection, but this time round you add a mask with 'reveal selection'. Then you work your way down.

And last not least there are methods to save a lot of manual work (but also limiting your freedom to adjust things and fiddle around with them) using a HDR software. I downloaded a trial version of Photomatix (there are other similar packages out there) and after a very short time (and without knowing in depth the parameters) I already got a very decent result:
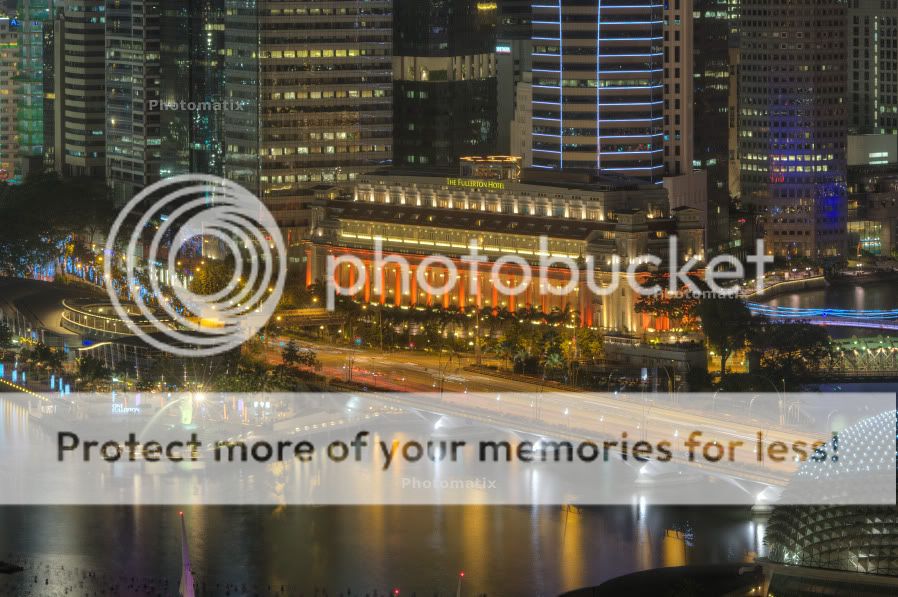


I only can imagine what would be possible if I really knew what I am doing in Photomatix, so the above result is more like a worst case!
I hope that I was able to inspire you to go out with the tripod (or bean bag or whatever) and take some exciting night shots.

Prieni

P.S.: The images are a bit sharper when you click on them.
Views: 7,755
09-21-2011, 02:54 AM   #2
Pentaxian
dosdan's Avatar

Join Date: Dec 2007
Location: Brisbane, Australia
Photos: Gallery | Albums
Posts: 1,741
Prieni, interesting. Try FDRTools - High Dynamic Range HDR Bildgebung Digitale Panorama Fotografie Software. (Since you're German you won't need the link to the English pages of this German program.) It has a good tutorial on the HDR process. FDRtools has an alignment step where it calculates the amount of misalignment in pixels and can correct it. It would be interesting to see if there's any horiz. and/or vert. misalignment between any of your 8 shots. It's hard to prevent any vibration at all, even with a good tripod.

Would it be possible to show a split composite image (split vert. down the middle) showing your 8 stacked shots with & without the local eq. layer applied so we can see the effect of its inclusion.

Dan.

Last edited by dosdan; 09-21-2011 at 03:00 AM.
09-21-2011, 03:57 AM   #3
Senior Member
Prieni's Avatar

Join Date: Sep 2011
Location: Rostock
Photos: Gallery
Posts: 104
Original Poster
Dan,

thanks for the link. There is also the set of PanoTools (you find their Wiki here) that I have used more recently, especially the command line tool enfuse.
The misalignment was not noticeable (you can easily check that when putting the layers one over the other and change layer transparency), a solid tripod goes a long way. (Being up on the 19th floor, though, and using a longish focal length it could easily occur, that's right.)

Using Photoshop in the way I describe here has the advantage that you can easily put things right, remove ghosts make adjustments in areas that you don't like. Also you can change the impact of the single layers by changing the masks of individual layers using curves or level adjustments. So I think that even with lots of HDR tools around there can be reasons to take this hard way.

Good idea about the split version, will have a look if I still have the Photoshop file flying around on my hard disk (always tight with disk space left these days...). Don't hold your breath but I will see to get to it in good time.

Prieni
09-21-2011, 01:40 PM   #4
Pentaxian
dosdan's Avatar

Join Date: Dec 2007
Location: Brisbane, Australia
Photos: Gallery | Albums
Posts: 1,741
Yes, I thought of Enfuse when I read your article.

The whole area of the processing of multi-shot stacks, for Super-Resolution, NR & increasing DOF, as well as for increasing DR, is very interesting. The fast shooting rates of modern cameras encourage it. Sony has incorporated it for NR in some of its cameras.

Here is a NR test where I stacked a continuous hand-held 14-shot sequence of K20D PEFs using PhotoAcute:

https://www.pentaxforums.com/forums/digital-processing-software-printing/7470...king-test.html

Dan


Last edited by dosdan; 09-21-2011 at 03:17 PM.
09-22-2011, 09:53 AM   #5
Senior Member
Prieni's Avatar

Join Date: Sep 2011
Location: Rostock
Photos: Gallery
Posts: 104
Original Poster
Ok, here is the shot with/without the local equalisation layer:

It's not easy to spot where it's in or not. I have made a mask with three stripes where that additional layer was masked out. First is from the left to the Merlion (that spouting figure), second is from the left of the top floor of the Fullerton to about half the building behind the Fullerton with the blue strip lights on the facade and the last thinner stripe starts with the roof of the Durian right bottom. It doesn't make a huge difference (and I had the opacity set to 25% on the layer) but it adds a bit of clarity to the shot.

For comparison here is the final result from the first post again (looking at it again it might have had a higher opacity than 25% on that additional layer):


Prieni
09-22-2011, 01:11 PM   #6
Pentaxian
dosdan's Avatar

Join Date: Dec 2007
Location: Brisbane, Australia
Photos: Gallery | Albums
Posts: 1,741
Prieni, thanks for that. I can see the lightning in the processed areas and the detail appears easier to see, undoubtly more so in a 100% crop.

Dan.
10-11-2011, 09:07 PM   #7
Pentaxian
Gerbermiester's Avatar

Join Date: Oct 2011
Location: British Columbia
Photos: Gallery | Albums
Posts: 377
Groovy tunes, thanks for the show-how.

Reply

Bookmarks
  • Submit Thread to Facebook Facebook
  • Submit Thread to Twitter Twitter
  • Submit Thread to Digg Digg
Tags - Make this thread easier to find by adding keywords to it!
bit, ev, exposure, exposures, image, layer, result, select, shots, time
Thread Tools Search this Thread
Search this Thread:

Advanced Search


Similar Threads
Thread Thread Starter Forum Replies Last Post
Macro It's Been a Hard Night! Take 2 eaglem Post Your Photos! 11 04-19-2010 10:43 PM
Abstract It's Been a Hard Night! eaglem Post Your Photos! 4 04-18-2010 03:49 PM
Night shot: how to post process? jamonation Post Your Photos! 6 09-25-2008 05:48 AM
HDR process JCSullivan Digital Processing, Software, and Printing 7 02-08-2008 04:21 AM
I like this process to recover some pictures HDR Peter Zack Photographic Technique 13 10-26-2007 06:18 PM


All times are GMT -7. The time now is 02:15 PM. | See also: NikonForums.com, CanonForums.com part of our network of photo forums!
  • Red (Default)
  • Green
  • Gray
  • Dark
  • Dark Yellow
  • Dark Blue
  • Old Red
  • Old Green
  • Old Gray
  • Dial-Up Style
Hello! It's great to see you back on the forum! Have you considered joining the community?
register
Creating a FREE ACCOUNT takes under a minute, removes ads, and lets you post! [Dismiss]
Top