Forgot Password
Pentax Camera Forums Home
 

Reply
Show Printable Version Search this Thread
3 Likes  
D-AC50 power adapter cheap replacement
Posted By: Predictor, 12-26-2011, 02:59 AM

Staff note: This post may contain affiliate links, which means Pentax Forums may earn a small commission if a visitor clicks through and makes a purchase. If you would like to support the forum directly, you may also make a donation here.


Original Pentax D-AC50 adapter (for k10d, ..., k-5 DSLRs) is hard to find and expensive, especially for purchase outside US.

So I aimed to find a cheap replacement.
I noticed that Canon CA-570 AC power adapter ($7.98 with free shipping at ebay) has the same characteristics as D-AC50:
Input Voltage: 100V-240V AC (50-60Hz)
Output Voltage: 8.4V
Amperage: 2A

The only difference is a tricky plug used by pentax.
A little googling and I found compatible plug MQ172-3SA-CV(50) Digi-Key Part Number H10485-ND (center pin is +V and shield is GND) (only $2.99).

I assume that the way using canon adaptor is more simple than described in the DIY AC Adapter for The Pentax K10D and K20D article.
The only problem for me is that I live in Russia and digi-key does not ship to Russia.
If you are intending to assemble adapter according to this advice, please make a noble deed, purchase 2 plugs and send me one, not pro bono (I will send the plug price and S&H fee to your paypal account).
Views: 21,952
07-15-2012, 07:48 AM   #31
Veteran Member
Scootatheschool1990's Avatar

Join Date: Jun 2012
Location: Boise Idaho
Photos: Gallery | Albums
Posts: 466
No worries mate, until then!thank you

07-31-2012, 05:26 AM   #32
Senior Member
LeFanch's Avatar

Join Date: Dec 2007
Location: Working in Norway, Bordeaux area when on time-off
Posts: 123
Hi,

Here is how I made my adapter...

What I wanted:
A 12V to 8.4V that I could connect...
- Directly on a car battery
- On a smaller battery (carried in backpack)
- In a car, on a cigarette lighter plug
- To a 220V (or 110V) to 12V transformer.

What I needed:
- Adjustable voltage regulator from Dimension Engineering, 25$
- A MQ172-3SA-CV(50) connector, 3$
- DC connectors 5.5x2.1mm (male, female). 6$ per pair
- Speaker cable (price depends on length used)

There are only 3 pins on the regulator, making easy to mount it. If you don't want to solder it, you can use a breakout board.

On the GND pin, 2 wires will connect. One from the power supply ( (-) on battery), one to the connector on the camera side.
Vin connects to the battery (+) or 12V transformer
Vout connects to the connector on camera side

On the battery side, I soldered some DC connectors, in order to be able to use it in all kinds of combinations. However it is not absolutely necessary to put DC connectors on the cables if you plan on using this in 1 unique configuration.

The tricky part is actually to solder the cable to the connector on the camera side. The contacts are not very large, and are close to each other. It is not technically difficult, but it is important to make sure that there is no solder bridge between the contacts. Fortunately, we use 2 contacts out of 3, the middle one remains unconnected, that makes it a bit easier.
I put some heat-shrink around the contacts after soldering them, but some electrical tape can be used.

Since the voltage converter is put in-line with the cables, I chose to tape the wires to it, in order to prevent too much stress on the connections. Any tension will be taken by the wires in that case.

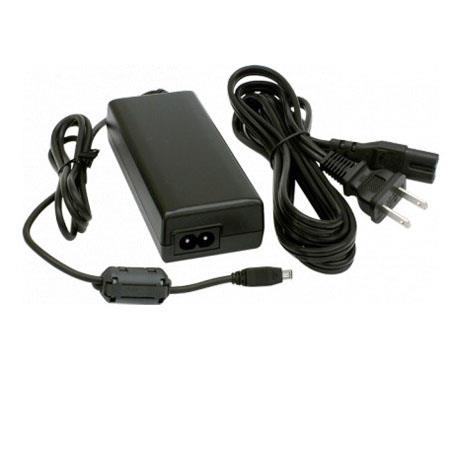
The finished "product" looks like the picture below.


Before connecting the adapter to the camera,the voltage needs to be adjusted to 8.4V. This can be done by turning a potentiometer with a small (flat) screwdriver and checking the voltage value with a multimeter.

I must emphasize that even though that might seem a bit technical to some, it really is simple. Really. I managed to do it, believe me, that's proof enough... ;-)

I have not found the spare connectors and converter yet (moving house) so I have not had the opportunity to take more detailed pictures, but I will try and do that ASAP.

I hope this helps...

Last edited by LeFanch; 12-03-2013 at 08:58 PM. Reason: Added more details
07-05-2013, 09:39 PM - 1 Like   #33
New Member
Cephas's Avatar

Join Date: Jul 2013
Posts: 1
Guys, you can probably get away with using any 8V DC adaptor (plugpack, wallwart, whatever) if it can continually supply at least 2A, and up to 6 or 8A for very short periods (such as writing to flash).

Now, unless you know what you're on about, it's almost impossible to find either of these two specifications for any given plugpack, and not even then!

So as a "rule of thumb", may I suggest the following :

1) Buy a good quality adaptor.

I prefer the old, transformer-style adaptors, because although they're heavy and huge (!!), there's almost nothing that can go wrong with them, especially in comparison with the smaller and lighter switchmode supplies. Plus, it's almost impossible for the mains voltage to appear on the output, whereas switchmodes have exactly that issue.

Put another way, the technology level of switchmode adaptors is in the same ballpark as transformer plugpacks were in the 1980s. Trust me on this one - I've designed plugpacks for commercial vendors.

2) Use the heaviest wire you can to attach the lead to the Digikey plug. I'm not talking jumper cables, but certainly use braided multistrand wiring in preference to solid copper (it's more flexible and has far more surface area). If the cable is rated at at least 2A (and preferably 4-8A at 120V or 240V), then you shouldn't have too many problems.

3) Keep the cable as short as possible.

Yeah, I know, when you really need to use an adapter for the camera, it's always too far away from a wall outlet or generator lead or whatever... But you're far better off finding an extension lead for the adapter than making a longer DC cable!

But let's say 2 metres (~6 feet) long as a kind of compromise, and then every extra metre you add to that length, expect the power handling to degrade by 50%.

So, let's say you use 3m of high-quality, braided 10A cable, with an 8V/4A power supply. You would to expect the camera to see a maximum current source (while keeping the voltage the same) of less than 5A due to the cable, which means roughly 2A to the camera. Now, that might work - but it will probably give you problems in very cold or hot weather, and you would expect to see file saving problems at maximum camera load. Which is kinda important to the picture taking process, I understand!!

I hope this makes sense to everyone interested. I've grossly oversimplified things to avoid writing a book here on connecting DC supplies to high-power cameras like ours (mine's a K7). If anything doesn't make sense, I'd be happy to explain further.

Again, I hope this really helps everyone.
Reply

Bookmarks
  • Submit Thread to Facebook Facebook
  • Submit Thread to Twitter Twitter
  • Submit Thread to Digg Digg
Tags - Make this thread easier to find by adding keywords to it!
ac, adapter, d-ac50, diy, do it yourself, pentax, plug, purchase, russia, voltage, yourself
Thread Tools Search this Thread
Search this Thread:

Advanced Search


Similar Threads
Thread Thread Starter Forum Replies Last Post
K-5 / K-7 power adapter? penties rider Pentax K-5 & K-5 II 6 12-28-2011 11:35 AM
K-AC50 AC Adapter Availability Mister Pita Ask B&H Photo! 3 11-17-2010 12:47 PM
How useful is the pentax power adapter..... mapguy Pentax DSLR Discussion 4 08-07-2010 06:04 PM
D-AC50 - Wow, that's one expensive (propritary) AC adapter! getmoresoon Pentax Camera and Field Accessories 18 09-26-2008 06:04 PM


All times are GMT -7. The time now is 08:10 AM. | See also: NikonForums.com, CanonForums.com part of our network of photo forums!
  • Red (Default)
  • Green
  • Gray
  • Dark
  • Dark Yellow
  • Dark Blue
  • Old Red
  • Old Green
  • Old Gray
  • Dial-Up Style
Hello! It's great to see you back on the forum! Have you considered joining the community?
register
Creating a FREE ACCOUNT takes under a minute, removes ads, and lets you post! [Dismiss]
Top