Hey PentaxForums!
Ive been working on this project for a while now, and I think it would be of interest to the community! Ive built a low-cost (~$150, including the lens) tilt-shift adapter that takes medium format lenses! I know this is something that several people have tried before, but I think this design has some advantages over the other ones on the internet and over commercial tilt adapters!
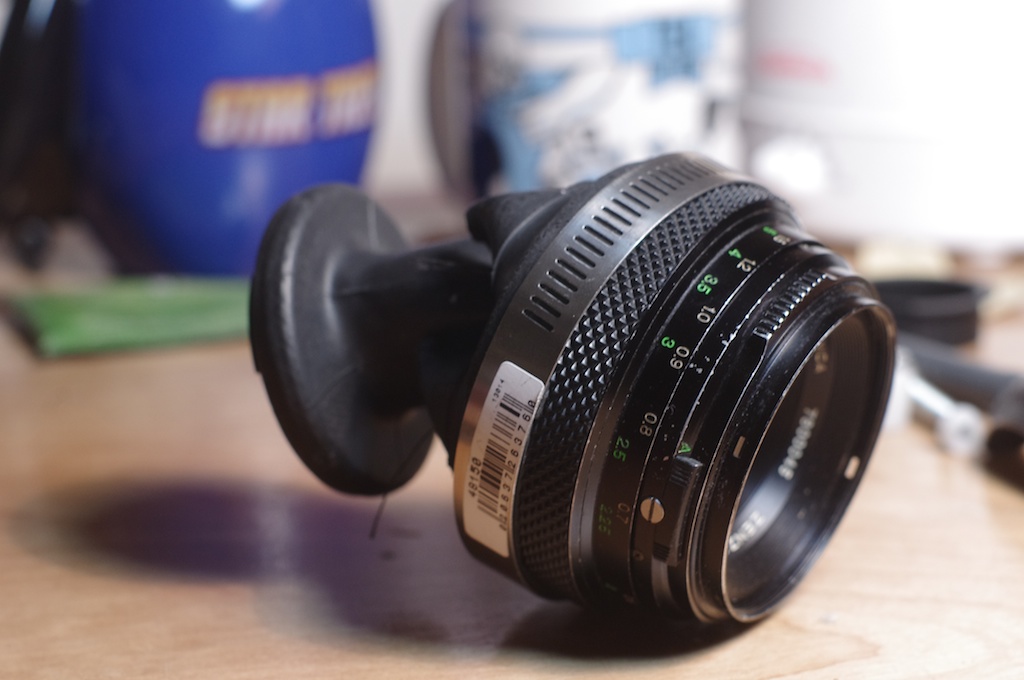
This is what it looks like:

Quick refresher on tilt-shift: tilt-shift refers to the kinds of movements that a lens can make relative to the sensor in a camera. By tilting the lens relative to the sensor, you change the interaction of the sensor plane and the lenses image plane. This gets you a sort of slice of focus through a scene. Aside from being a kind of fun effect, its useful for being more specific about what is in focus in your images.

Current options:
There are a couple of options for tilt-shift currently on the market. First, you have actual tilt-shift lenses. Theyre too expensive for a college student like me, especially since its hard to know pre-purchase if you will even like the effect. Even the Arax, the cheapest T/S lens for Pentax, is $670, and other brands are much more expensive (Schneiders are about $4000!). Its hard to justify the cost of a tilt-shift lens if youre not going to do use it all the time or do anything professional with it.
Lensbaby sells their own tilt lenses for ~$80, but for that you get plastic optics, a fixed aperture, and no ability to maintain the settings you picked. Its difficult/impossible to maintain consistency in your pictures, which rules out a lot of possibilities, like longer exposures on a tripod or time lapse. For $150, you can get glass optics and a variable aperture, but you still cant set tilt or shift settings and you need both hands to focus. Considering the capability that you get, I think the Lensbabies are too expensive.
Alternatively, you can also buy tilt adapters and shift adapters online. For ~$115, you can get a tilt adapter for Pentacon Six lenses on eBay, or a shift adapter for ~$150. You can pick up a cheap Pentacon Six lens for ~$130 or so. I think you can attach them together with a small extension tube to get both movements (though youll lose infinity focus). If you only want one movement or the other, this is a great setup, but if you want both its kind of pricey and you lose infinity focus. Still, some people on the forum do this, and have gotten really nice results!
Those are the only commercial options for DSLRs that I know of. There are several DIY options scattered throughout the internet.
The best ones I found are listed at
Tilt-shift: A DIY Guide (which also has a really cogent description of the tilt-shift phenomenon, if youre interested in the physics). They can get you Lensbaby capabilities with much nicer glass and minimal cost (almost free, if you have a lens or two youre willing to deconstruct). In general, these DIY hacks consist of a piece of flexible material, like a toilet plunger or bicycle inner tube, a body cap, and a lens. I tried this bendy method and got some interesting results, but I found it nearly impossible to get good resultsit requires your focusing hand to take care of tilt, shift, the distance of the lens to the camera

I thought about the problem for a while, and this is what I came up with:

Its composed of (from left to right): the bayonet from a practically-free for-parts-only lens, a custom 3D-printed part, laser cut plastic, some hardware bits from McMaster-Carr (mcmaster.com) and my local hardware store, and a Bronica medium format lens I picked up from KEH.com. If people are interested, I can post the Solidworks file for the 3D-printed part on GrabCAD.
It allows somewhere between 8 and 9 degrees of tilt, and 3/8 shift. Essentially, a plate can slide around the front of the adapter, and the tilt axis is attached to the sliding plate. Heres what it looks like on my K-01 (It also fits on my K-r, but its more comfortable to use on the K-01 because of the flatter grip. Notably the adapter doesnt fit the K-20D because of the protruding flash; I havent tested it with the K-5 or K-30).

Everything can be locked down and fixed, so you can shoot multiple pictures with the same tilt and shift setup. It doesnt require the disassembly of any lenses, you have full access to the aperture control via the preset mechanism on the lens. Theres no epoxy on the lens itself, though the bayonet mount of the medium format lens is trapped between two epoxied rings of acrylic. I couldnt find any Bronica adapters, so I had to improvise, but I think this system will generalize to any bayonet lens system.
Here are some results:


I had a booth at the Bay Area Maker Faire last weekend, and got to share the project with a few hundred people there, including some fellow Pentaxians. (As an aside, it was lots of fun, if theres ever a Maker Faire near where you live, I highly suggest checking it out!). I figured now is as good a time as any to share with you all (this is my first forum post, but Ive been lurking for a while now
hi!).
There are some things that I have to work through to get it ready for this, but my goal is to make the adapter (or an adapter kit) available to people via Kickstarter or something like that within the next year. What I think is nice about this adapter is that it allows you the sort of free-from experimentation that you can get from a Lensbaby or something like that, but when you need to, you can lock the lens down and take more controlled shots with most of the capability of a commercial lens! Looking through the forums, it seems like there is definitely a group of people looking for something like this to experiment with. I hope you guys like it!
Ideas going forwards:
--Obligatory versions for Canon, Nikon, and Micro 4/3rds crowd
--A version of the adapter that allows people to easily adapt their existing 35mm lenses
--Rework the CAD so that its more comfortable to use with a longer grip
--More freedom in rotation (maybe with a ring of ball-bearings instead of slots?)
--Easier way to swap out lenses
--Resin casting instead of 3D printing
Thoughts/comments/suggestions? Im open to everything!


")


 Post #1 by sgirvin
 Similar Threads


